Operation Manual
Page 6
... Adjusting input sensitivity for operation keys 13 Winding/Installing the Bobbin 13 Winding the bobbin 13 Installing the bobbin 16 Upper Threading 17 Threading the upper thread 17 Pulling up the bobbin thread 20 Fabric/Thread/Needle Combinations 21 Replacing the Needle 22 Checking the needle 22 Replacing the needle 22 Replacing the Presser Foot 23 Replacing the presser foot 23 Removing and attaching the presser foot holder 24 Chapter 2 SEWING BASICS 25 Sewing 25 Stitch types 25 Basic sewing 25 Sewing reverse/reinforcement stitches 27 Combining Stitch Patterns 27 Automatic...
... Adjusting input sensitivity for operation keys 13 Winding/Installing the Bobbin 13 Winding the bobbin 13 Installing the bobbin 16 Upper Threading 17 Threading the upper thread 17 Pulling up the bobbin thread 20 Fabric/Thread/Needle Combinations 21 Replacing the Needle 22 Checking the needle 22 Replacing the needle 22 Replacing the Presser Foot 23 Replacing the presser foot 23 Removing and attaching the presser foot holder 24 Chapter 2 SEWING BASICS 25 Sewing 25 Stitch types 25 Basic sewing 25 Sewing reverse/reinforcement stitches 27 Combining Stitch Patterns 27 Automatic...
Operation Manual
Page 7
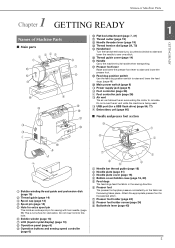
...2 Thread guide (page 14) 3 Spool cap (page 13) 4 Spool pin (page 13) 5 Hole for extra spool pin This holds an extra spool pin for sewing with twin needle. (page 53) This is being used. Do not insert oil into this hole. 6 Bobbin winder (page 13) 7 LCD (liquid crystal display) (page 10) 8 Operation panel (page 6) 9 Operation buttons and sewing speed controller (page 6) g c f d e 1 Needle bar thread guide (page 18) 2 Needle plate (page 31) 3 Needle plate cover (page 16) 4 Bobbin cover/bobbin case (page 16, 80) 5 Feed dogs The feed dogs feed the fabric in the sewing direction. 6 Presser foot...
...2 Thread guide (page 14) 3 Spool cap (page 13) 4 Spool pin (page 13) 5 Hole for extra spool pin This holds an extra spool pin for sewing with twin needle. (page 53) This is being used. Do not insert oil into this hole. 6 Bobbin winder (page 13) 7 LCD (liquid crystal display) (page 10) 8 Operation panel (page 6) 9 Operation buttons and sewing speed controller (page 6) g c f d e 1 Needle bar thread guide (page 18) 2 Needle plate (page 31) 3 Needle plate cover (page 16) 4 Bobbin cover/bobbin case (page 16, 80) 5 Feed dogs The feed dogs feed the fabric in the sewing direction. 6 Presser foot...
Operation Manual
Page 8
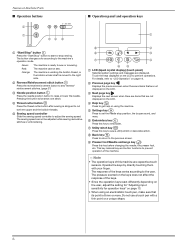
... button to sew reverse/ reinforcement stitches. (page 27) 3 Needle position button Press the needle position button to raise or lower the needle. Touch the keys displayed on the LCD to the machine's operation mode. Operate the keys by directly touching them with a thin point or a unique shape. 6 Orange: The machine is winding the bobbin thread, or the bobbin winder shaft is stopped to cut both the upper and the bobbin threads. 5 Sewing speed controller Slide the sewing speed controller to adjust the sewing speed...
... button to sew reverse/ reinforcement stitches. (page 27) 3 Needle position button Press the needle position button to raise or lower the needle. Touch the keys displayed on the LCD to the machine's operation mode. Operate the keys by directly touching them with a thin point or a unique shape. 6 Orange: The machine is winding the bobbin thread, or the bobbin winder shaft is stopped to cut both the upper and the bobbin threads. 5 Sewing speed controller Slide the sewing speed controller to adjust the sewing speed...
Operation Manual
Page 9
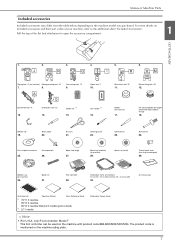
...part codes of your machine, refer to open the accessory compartment. 1 GETTING READY 1. 2. 3. 4. 5. 6. J N G I " 10. Zipper foot "I R MM Zigzag foot "J" (on the machine rating plate. 7 Twin needle *2 16. Blind stitch foot "R" 11. Pre-wound bobbin (60 weight white embroidery bobbin thread) 18. Cleaning brush 22. Extra spool pin 26. Spool cap (medium) (on machine) 30. Bobbin case (on machine) 28. Embroidery frame set (medium) 10 cm (H) × 10 cm (W) (4 inches (H) × 4 inches (W)) 33. The product code is mentioned on machine) Monogramming...
...part codes of your machine, refer to open the accessory compartment. 1 GETTING READY 1. 2. 3. 4. 5. 6. J N G I " 10. Zipper foot "I R MM Zigzag foot "J" (on the machine rating plate. 7 Twin needle *2 16. Blind stitch foot "R" 11. Pre-wound bobbin (60 weight white embroidery bobbin thread) 18. Cleaning brush 22. Extra spool pin 26. Spool cap (medium) (on machine) 30. Bobbin case (on machine) 28. Embroidery frame set (medium) 10 cm (H) × 10 cm (W) (4 inches (H) × 4 inches (W)) 33. The product code is mentioned on machine) Monogramming...
Operation Manual
Page 27
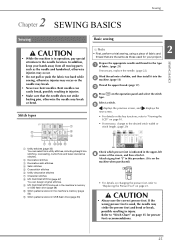
... needle may break. • Never use the correct presser foot. Stitch types 1 2 6 3 5 Basic sewing Note • First, perform a trial sewing, using a piece of fabric. (page 21) If necessary, replace the needle. (page 22) Wind thread onto a bobbin, and then install it . Attach zigzag foot "J" in this procedure. (It is on the machine when purchased.) • For details on changing the presser foot, refer to "Stitch Chart" on the operation panel and select the stitch Select a stitch. Sewing 2 Chapter SEWING BASICS Sewing...
... needle may break. • Never use the correct presser foot. Stitch types 1 2 6 3 5 Basic sewing Note • First, perform a trial sewing, using a piece of fabric. (page 21) If necessary, replace the needle. (page 22) Wind thread onto a bobbin, and then install it . Attach zigzag foot "J" in this procedure. (It is on the machine when purchased.) • For details on changing the presser foot, refer to "Stitch Chart" on the operation panel and select the stitch Select a stitch. Sewing 2 Chapter SEWING BASICS Sewing...
Operation Manual
Page 28
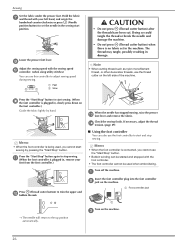
... the needle has stopped moving, raise the presser m foot lever and remove the fabric. a Insert the foot controller plug into the foot controller b jack on the machine. 1 Foot controller jack 1 Turn on the foot controller.) Guide the fabric lightly by pressing the "Start/Stop" button. h Adjust the sewing speed with the sewing speed i controller. (when using utility stitches) You can also use this controller to start position. Memo • When the foot controller is being used when embroidering. If necessary, adjust the thread n tension. (page 29) ■ Using the foot controller...
... the needle has stopped moving, raise the presser m foot lever and remove the fabric. a Insert the foot controller plug into the foot controller b jack on the machine. 1 Foot controller jack 1 Turn on the foot controller.) Guide the fabric lightly by pressing the "Start/Stop" button. h Adjust the sewing speed with the sewing speed i controller. (when using utility stitches) You can also use this controller to start position. Memo • When the foot controller is being used when embroidering. If necessary, adjust the thread n tension. (page 29) ■ Using the foot controller...
Operation Manual
Page 31
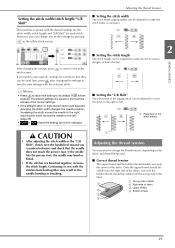
... changed. If the needle hits the presser foot, the needle may need to the left . 1 Placement of the former settings. • If the straight stitch or triple stretch stitch was selected, changing the stitch width changes the needle position. Only the upper thread should be visible from the wrong side of the fabric. 1 Wrong side of fabric 1 2 Right side of the fabric. Setting the stitch width/stitch length/"L/R Shift" This machine is then pressed, the default settings...
... changed. If the needle hits the presser foot, the needle may need to the left . 1 Placement of the former settings. • If the straight stitch or triple stretch stitch was selected, changing the stitch width changes the needle position. Only the upper thread should be visible from the wrong side of the fabric. 1 Wrong side of fabric 1 2 Right side of the fabric. Setting the stitch width/stitch length/"L/R Shift" This machine is then pressed, the default settings...
Operation Manual
Page 32
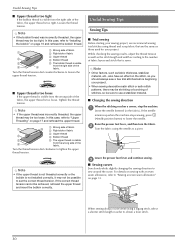
... the fabric. Lower the presser foot lever and continue sewing. c ■ Sewing curves Sew slowly while slightly changing the sewing direction to lower the needle. Useful Sewing Tips ■ Upper thread is too tight If the bobbin thread is visible from the right side of fabric layers and stitch that are the same as those used for your project. Tighten the thread tension. Useful Sewing Tips Sewing Tips ■ Trial sewing Before starting your sewing project, we recommend sewing trial stitches using the needle...
... the fabric. Lower the presser foot lever and continue sewing. c ■ Sewing curves Sew slowly while slightly changing the sewing direction to lower the needle. Useful Sewing Tips ■ Upper thread is too tight If the bobbin thread is visible from the right side of fabric layers and stitch that are the same as those used for your project. Tighten the thread tension. Useful Sewing Tips Sewing Tips ■ Trial sewing Before starting your sewing project, we recommend sewing trial stitches using the needle...

Operation Manual
Page 35
... 1 Useful Sewing Tips ■ Sewing hook-and-loop fastener tape CAUTION • Use only the adhesive-free hook-and-loop fastener tape which is designed for thicker fabrics. If the paper is positioned so that the needle passes through the hook-and-loop fastener tape, replace the needle with the needle size for sewing. Do not sew reverse stitches with the walking foot. • When sewing with the walking foot, sew at a slow speed. Note • Before sewing, baste...
... 1 Useful Sewing Tips ■ Sewing hook-and-loop fastener tape CAUTION • Use only the adhesive-free hook-and-loop fastener tape which is designed for thicker fabrics. If the paper is positioned so that the needle passes through the hook-and-loop fastener tape, replace the needle with the needle size for sewing. Do not sew reverse stitches with the walking foot. • When sewing with the walking foot, sew at a slow speed. Note • Before sewing, baste...

Operation Manual
Page 37
... upper thread and bobbin thread under the presser foot toward the back of the stitching while arranging the fabric. Do not sew reverse stitches with the walking foot. * Twin needle can only be used with straight or zigzag stitch patterns. Finally, hold the upper thread and bobbin thread at the beginning of the machine (page 20). 3 Chapter VARIOUS STITCHES Stitch Chart Stitch Chart ■ Utility stitches Memo • The stitches shown in the tables and some of the illustrations shows the needle position...
... upper thread and bobbin thread under the presser foot toward the back of the stitching while arranging the fabric. Do not sew reverse stitches with the walking foot. * Twin needle can only be used with straight or zigzag stitch patterns. Finally, hold the upper thread and bobbin thread at the beginning of the machine (page 20). 3 Chapter VARIOUS STITCHES Stitch Chart Stitch Chart ■ Utility stitches Memo • The stitches shown in the tables and some of the illustrations shows the needle position...
Operation Manual
Page 47
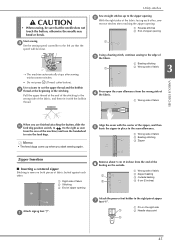
... 2 Needle drop point 2 45 Zipper Insertion ■ Inserting a centered zipper Stitching is sewn on the outside. 2 4 3 1 1 Wrong side of fabric 2 Zipper basting 3 Outside basting 4 5 cm (2 inches) Attach the presser foot holder to the seam allowance. 1 Wrong side of fabric 2 Basting stitching 2 3 Zipper 1 3 Remove about 5 cm (2 inches) from the rear of c the fabric. b With the right sides of the fabric facing each other , sew reverse stitches after sewing reinforcement stitches. • Do not press (Thread cutter button). I ". Use scissors to cut the upper thread and...
... 2 Needle drop point 2 45 Zipper Insertion ■ Inserting a centered zipper Stitching is sewn on the outside. 2 4 3 1 1 Wrong side of fabric 2 Zipper basting 3 Outside basting 4 5 cm (2 inches) Attach the presser foot holder to the seam allowance. 1 Wrong side of fabric 2 Basting stitching 2 3 Zipper 1 3 Remove about 5 cm (2 inches) from the rear of c the fabric. b With the right sides of the fabric facing each other , sew reverse stitches after sewing reinforcement stitches. • Do not press (Thread cutter button). I ". Use scissors to cut the upper thread and...
Operation Manual
Page 49
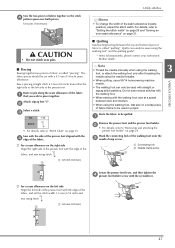
... of the presser foot with a 6.5 mm (1/4 inch) seam allowance. Use pins if necessary. Utility stitches Sew the two pieces of fabric together so the stitch d pattern spans over pins. ■ Piecing Sewing together two pieces of fabric is called "quilting". CAUTION • Do not stitch over both pieces. Hook the connecting fork of the walking foot onto the c needle clamp screw. 1 Connecting fork 2 Needle clamp screw a VARIOUS STITCHES 3 b Lower the presser foot lever, and then tighten the d presser foot holder screw with the...
... of the presser foot with a 6.5 mm (1/4 inch) seam allowance. Use pins if necessary. Utility stitches Sew the two pieces of fabric together so the stitch d pattern spans over pins. ■ Piecing Sewing together two pieces of fabric is called "quilting". CAUTION • Do not stitch over both pieces. Hook the connecting fork of the walking foot onto the c needle clamp screw. 1 Connecting fork 2 Needle clamp screw a VARIOUS STITCHES 3 b Lower the presser foot lever, and then tighten the d presser foot holder screw with the...
Operation Manual
Page 50
... presser foot holder. Walking foot Presser foot holder Slide the feed dog position switch, located at a consistent speed. Insert the stem of the quilting guide into the hole at the a rear of the machine). The free motion open toe quilting foot "O"* or quilting foot* is moved faster than the sewing speed, the needle may break or other damage may bend or break. Remove the presser foot holder. e No. 1-04 1-28 Stitch • For details, refer to "Stitch Chart" on the machine. If the fabric is used...
... presser foot holder. Walking foot Presser foot holder Slide the feed dog position switch, located at a consistent speed. Insert the stem of the quilting guide into the hole at the a rear of the machine). The free motion open toe quilting foot "O"* or quilting foot* is moved faster than the sewing speed, the needle may break or other damage may bend or break. Remove the presser foot holder. e No. 1-04 1-28 Stitch • For details, refer to "Stitch Chart" on the machine. If the fabric is used...
Operation Manual
Page 84
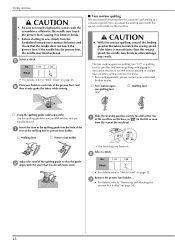
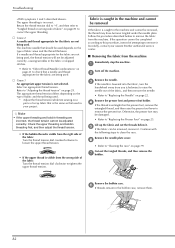
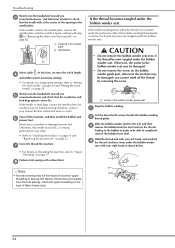
... used . Cause 3 An appropriate upper tension is lowered into the fabric, turn the handwheel away from the machine. If the operation cannot be adjusted correctly. Otherwise, the presser foot may have become tangled under the needle plate. Remove the needle plate cover. Return the thread tension dial to "4", and then refer to "Fabric/Thread/Needle Combinations" on page 29. c If the needle is not selected. Cut out the tangled threads, and then remove the g bobbin...
... used . Cause 3 An appropriate upper tension is lowered into the fabric, turn the handwheel away from the machine. If the operation cannot be adjusted correctly. Otherwise, the presser foot may have become tangled under the needle plate. Remove the needle plate cover. Return the thread tension dial to "4", and then refer to "Fabric/Thread/Needle Combinations" on page 29. c If the needle is not selected. Cut out the tangled threads, and then remove the g bobbin...
Operation Manual
Page 86
... that the needle bar and feed dogs operate correctly. a 1 Screw of the bobbin-winding thread guide correctly, the thread may be the result of fabric being used. 84 If the needle contacts the needle plate, remove the needle plate, and then install it again, starting with your nearest Brother authorized service center. At this time, increase the stitch length d and width to their maximum settings. • For details on changing the settings, refer to completely remove the bobbin from the machine" on...
... that the needle bar and feed dogs operate correctly. a 1 Screw of the bobbin-winding thread guide correctly, the thread may be the result of fabric being used. 84 If the needle contacts the needle plate, remove the needle plate, and then install it again, starting with your nearest Brother authorized service center. At this time, increase the stitch length d and width to their maximum settings. • For details on changing the settings, refer to completely remove the bobbin from the machine" on...
Operation Manual
Page 87
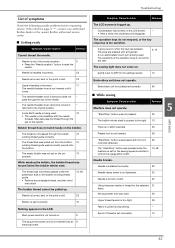
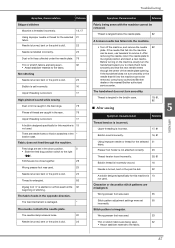
... pressed with the foot 26 controller attached. Troubleshooting List of the needle. A size 65/9 needle is turned or bent. 22 Using improper needle or thread for the user. 6, 13 The sewing light does not come on the pin 13 properly. Needle is installed incorrectly. 22 Needle clamp screw is not tightened. 22 Needle is being used . 19 • The needle is fogged up . "Start/Stop" button was used. 23 Upper thread tension is too tight. 29 Fabric is set incorrectly. 16 Nothing...
... pressed with the foot 26 controller attached. Troubleshooting List of the needle. A size 65/9 needle is turned or bent. 22 Using improper needle or thread for the user. 6, 13 The sewing light does not come on the pin 13 properly. Needle is installed incorrectly. 22 Needle clamp screw is not tightened. 22 Needle is being used . 19 • The needle is fogged up . "Start/Stop" button was used. 23 Upper thread tension is too tight. 29 Fabric is set incorrectly. 16 Nothing...
Operation Manual
Page 88
... not used. Bobbin thread is not attached to fabric being used. 16 Thread is tangled. 82 A bobbin designed specifically for this machine is a notch on the bobbin case. * A bobbin designed specifically for this machine is not appropriate for the type of the presser foot holder is loose. 24 Fabric is too thick. 21, 32 Fabric is fed forcefully when sewing thick fabric 32 or thick seams. Stitch length is too short. 29 Stabilizer is incorrectly wound. 13 Upper thread breaks. The upper thread is...
... not used. Bobbin thread is not attached to fabric being used. 16 Thread is tangled. 82 A bobbin designed specifically for this machine is a notch on the bobbin case. * A bobbin designed specifically for this machine is not appropriate for the type of the presser foot holder is loose. 24 Fabric is too thick. 21, 32 Fabric is fed forcefully when sewing thick fabric 32 or thick seams. Stitch length is too short. 29 Stabilizer is incorrectly wound. 13 Upper thread breaks. The upper thread is...
Operation Manual
Page 89
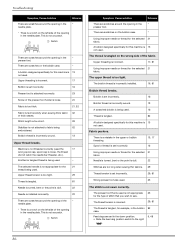
... stitch patterns are needle holes or friction scratches in the down position. 5 • Slide the feed dog position switch to check that it . Wrong presser foot was used. 35 Stitch pattern adjustment settings were set in the * bobbin case. Feed dogs are set 55 incorrectly. If the needle that fell into the machine. • Turn off the machine, and remove the needle 82 plate. Thread is tangled in the opposite direction. Upper threading is incorrect. 17, 81 Bobbin is set incorrectly. 16, 81 Using...
... stitch patterns are needle holes or friction scratches in the down position. 5 • Slide the feed dog position switch to check that it . Wrong presser foot was used. 35 Stitch pattern adjustment settings were set in the * bobbin case. Feed dogs are set 55 incorrectly. If the needle that fell into the machine. • Turn off the machine, and remove the needle 82 plate. Thread is tangled in the opposite direction. Upper threading is incorrect. 17, 81 Bobbin is set incorrectly. 16, 81 Using...
Operation Manual
Page 92
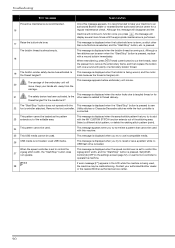
... the bobbin thread is pressed to thread delivery. The "Start/Stop" button does not operate with plenty of the embroidery unit will continue to function once you try to recall or save a pattern while no USB flash drive is being used, the machine may be used with a wound bobbin immediately. This message is displayed when the buttonhole lever is down, a stitch other reasons related to sew 22 foot controller attached.
... the bobbin thread is pressed to thread delivery. The "Start/Stop" button does not operate with plenty of the embroidery unit will continue to function once you try to recall or save a pattern while no USB flash drive is being used, the machine may be used with a wound bobbin immediately. This message is displayed when the buttonhole lever is down, a stitch other reasons related to sew 22 foot controller attached.
Operation Manual
Page 94
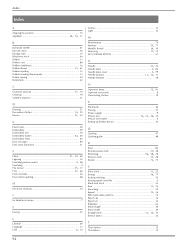
... , Needle plate 5 82 , Needle plate cover 5 79 , , Needle position 11 12 31 Needle threader 19 O , Operation beep 12 91 Optional accessories 8 Overcasting stitches 39 P Patchwork 46 Piecing 47 , , , Power supply 9 Presser foot 10 23 26 35 Presser foot holder 5 Pulling up bobbin thread 20 Q Quilting 47 Quilting guide 48 R Race 80 , Reinforcement stitch 27 28 , , Retrieving 56 58 78 , Reverse stitch 27 28 , Rotate 73 75 S , Satin stitch 11 25 , Saving 56 77 Scallop stitching 52 Sewing speed controller 6 , Shell tuck stitch 53 Size...
... , Needle plate 5 82 , Needle plate cover 5 79 , , Needle position 11 12 31 Needle threader 19 O , Operation beep 12 91 Optional accessories 8 Overcasting stitches 39 P Patchwork 46 Piecing 47 , , , Power supply 9 Presser foot 10 23 26 35 Presser foot holder 5 Pulling up bobbin thread 20 Q Quilting 47 Quilting guide 48 R Race 80 , Reinforcement stitch 27 28 , , Retrieving 56 58 78 , Reverse stitch 27 28 , Rotate 73 75 S , Satin stitch 11 25 , Saving 56 77 Scallop stitching 52 Sewing speed controller 6 , Shell tuck stitch 53 Size...


