Operation Manual
Page 3
... the fabric when sewing, and follow the troubleshooting table in should be kept out of the reach of children or disposed of experience and knowledge if they have been given supervision or instruction concerning use a damaged or incorrect needle plate, as described in this machine, avoid direct sunlight and high humidity locations. The contents of this manual and specifications of this machine was...
... the fabric when sewing, and follow the troubleshooting table in should be kept out of the reach of children or disposed of experience and knowledge if they have been given supervision or instruction concerning use a damaged or incorrect needle plate, as described in this machine, avoid direct sunlight and high humidity locations. The contents of this manual and specifications of this machine was...
Operation Manual
Page 4
... fabrics 27 Stitching cylindrical pieces 27 Sewing with a twin needle (Option 27 Thread tension 29 3. APPENDIX 47 MAINTENANCE 47 Restrictions on oiling 47 Precautions on plug. • Always replace the fuse cover. KNOWING YOUR SEWING MACHINE 4 ACCESSORIES 4 Optional accessories 4 THE MAIN PARTS 5 Flat bed attachment 5 USING YOUR SEWING MACHINE 6 Connecting plugs 6 Main power and sewing light switch 7 Foot controller 7 Checking the needle 7 Replacing the needle 7 Changing the presser foot 8 THE CONTROLS 9 Pattern selection dial 9 Stretch stitching 9 Patterns and stitch...
... fabrics 27 Stitching cylindrical pieces 27 Sewing with a twin needle (Option 27 Thread tension 29 3. APPENDIX 47 MAINTENANCE 47 Restrictions on oiling 47 Precautions on plug. • Always replace the fuse cover. KNOWING YOUR SEWING MACHINE 4 ACCESSORIES 4 Optional accessories 4 THE MAIN PARTS 5 Flat bed attachment 5 USING YOUR SEWING MACHINE 6 Connecting plugs 6 Main power and sewing light switch 7 Foot controller 7 Checking the needle 7 Replacing the needle 7 Changing the presser foot 8 THE CONTROLS 9 Pattern selection dial 9 Stretch stitching 9 Patterns and stitch...
Operation Manual
Page 5
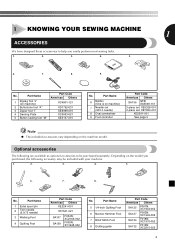
... on the model you purchased, the following are available as optional accessories to help you easily perform most sewing tasks. 1. 2. 3. 4. 5. 6. 7. 8. 9. Part Name 6 Bobbin (One is on machine) 7 Needle set (90/14 needle) 8 Oval screwdriver 9 Foot controller Part Code Americas Others SA156 SFB: XA5539-151 3-piece set: XE5328-001 2-piece set: XE7064-001 XE5241-001 See page 5 Note ● The included accessories vary depending on machine) 2 Buttonhole foot "A" 3 Zipper foot "I" 4 Darning Plate 5 Button sewing foot "M" Part Code Americas Others XC4901...
... on the model you purchased, the following are available as optional accessories to help you easily perform most sewing tasks. 1. 2. 3. 4. 5. 6. 7. 8. 9. Part Name 6 Bobbin (One is on machine) 7 Needle set (90/14 needle) 8 Oval screwdriver 9 Foot controller Part Code Americas Others SA156 SFB: XA5539-151 3-piece set: XE5328-001 2-piece set: XE7064-001 XE5241-001 See page 5 Note ● The included accessories vary depending on machine) 2 Buttonhole foot "A" 3 Zipper foot "I" 4 Darning Plate 5 Button sewing foot "M" Part Code Americas Others XC4901...
Operation Manual
Page 6
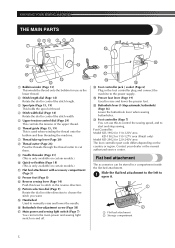
... attachment with accessory compartment (Page 5) B Presser foot (Page 8) C Reverse sewing lever (Page 14) Push this to control the sewing speed, and to start and stop sewing. Contact your dealer or the nearest authorized service center. F Buttonhole fine-adjustment screw (Page 38) G Main power and sewing light switch (Page 7) You can turn the main power and sewing light switch on the country or region. KNOWING YOUR SEWING MACHINE THE MAIN PARTS 654 3 2 1 7 E 8 9 D 0 A C B 1 Bobbin winder (Page 15) This winds the thread...
... attachment with accessory compartment (Page 5) B Presser foot (Page 8) C Reverse sewing lever (Page 14) Push this to control the sewing speed, and to start and stop sewing. Contact your dealer or the nearest authorized service center. F Buttonhole fine-adjustment screw (Page 38) G Main power and sewing light switch (Page 7) You can turn the main power and sewing light switch on the country or region. KNOWING YOUR SEWING MACHINE THE MAIN PARTS 654 3 2 1 7 E 8 9 D 0 A C B 1 Bobbin winder (Page 15) This winds the thread...
Operation Manual
Page 9
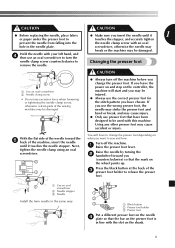
...; Only use presser feet that the bar on the presser foot is in line with an oval hole in the same way. 1 2 3 1 Black button 2 Presser foot holder 3 Presser foot Put a different presser foot on the needle 4 plate so that have chosen. CAUTION CAUTION ● Before replacing the needle, place fabric ● Make sure you insert the needle until it 1 or paper under the presser foot to release the presser foot. 1 1 Use an oval screwdriver 2 Needle stopper 3 Needle Install the twin needle in the needle plate.
...; Only use presser feet that the bar on the presser foot is in line with an oval hole in the same way. 1 2 3 1 Black button 2 Presser foot holder 3 Presser foot Put a different presser foot on the needle 4 plate so that have chosen. CAUTION CAUTION ● Before replacing the needle, place fabric ● Make sure you insert the needle until it 1 or paper under the presser foot to release the presser foot. 1 1 Use an oval screwdriver 2 Needle stopper 3 Needle Install the twin needle in the needle plate.
Operation Manual
Page 10
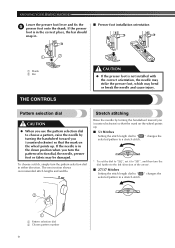
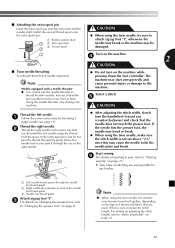
... SEWING MACHINE Lower the presser foot lever and fix the 5 presser foot onto the shank. If the presser foot is in the correct place, the bar should snap in. ■ Presser foot installation orientation 1 2 1 Shank 2 Bar THE CONTROLS CAUTION ● If the presser foot is in the down position when you (counterclockwise) so that the mark on the wheel points up . ■ 53 Stitches Setting the stitch length dial to " 1 " changes the selected pattern to a stretch stitch. * To set the dial to "SS2", set...
... SEWING MACHINE Lower the presser foot lever and fix the 5 presser foot onto the shank. If the presser foot is in the correct place, the bar should snap in. ■ Presser foot installation orientation 1 2 1 Shank 2 Bar THE CONTROLS CAUTION ● If the presser foot is in the down position when you (counterclockwise) so that the mark on the wheel points up . ■ 53 Stitches Setting the stitch length dial to " 1 " changes the selected pattern to a stretch stitch. * To set the dial to "SS2", set...
Operation Manual
Page 15
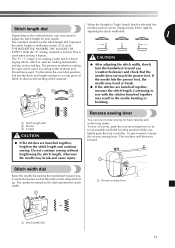
... presser foot, the needle may break and cause injury. If fabric to right by turning the handwheel toward you thread being used when sewing a button. The position needed for making the satin stitch varies according to adjusting the stitch width dial. 1 adjust the stitch length for back tacking and reinforcing seams. To sew in reverse, push the reverse sewing lever in as far as possible and hold it in that position while you lightly push the foot controller. Continuing to 1 sew...
... presser foot, the needle may break and cause injury. If fabric to right by turning the handwheel toward you thread being used when sewing a button. The position needed for making the satin stitch varies according to adjusting the stitch width dial. 1 adjust the stitch length for back tacking and reinforcing seams. To sew in reverse, push the reverse sewing lever in as far as possible and hold it in that position while you lightly push the foot controller. Continuing to 1 sew...
Operation Manual
Page 18
... foot controller and the machine starts to sew, you (counterclockwise) and raise the presser foot lever. If you . Raise the needle by sliding it and 3 lift toward you could be incorrect or break the needle. CAUTION ● Make sure you turn off the machine while threading. KNOWING YOUR SEWING MACHINE CAUTION ● Not winding the bobbin properly may cause the thread tension to be injured. Put the bobbin in so the thread comes...
... foot controller and the machine starts to sew, you (counterclockwise) and raise the presser foot lever. If you . Raise the needle by sliding it and 3 lift toward you could be incorrect or break the needle. CAUTION ● Make sure you turn off the machine while threading. KNOWING YOUR SEWING MACHINE CAUTION ● Not winding the bobbin properly may cause the thread tension to be injured. Put the bobbin in so the thread comes...
Operation Manual
Page 20
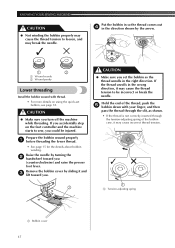
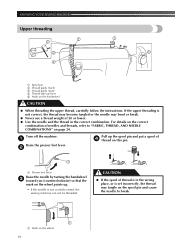
... lever 5 Mark on the handwheel CAUTION ● When threading the upper thread, carefully follow the instructions. KNOWING YOUR SEWING MACHINE Upper threading 2 2 3 4 1 5 1 Spool pin 2 Thread guide (back) 3 Thread guide (front) 4 Thread take-up . • If the needle is not correctly raised, the sewing machine can not be threaded. CAUTION ● If the spool of thread is in the correct combination. If the upper threading is set incorrectly, the thread may bend or break. ● Never use a thread weight of needles...
... lever 5 Mark on the handwheel CAUTION ● When threading the upper thread, carefully follow the instructions. KNOWING YOUR SEWING MACHINE Upper threading 2 2 3 4 1 5 1 Spool pin 2 Thread guide (back) 3 Thread guide (front) 4 Thread take-up . • If the needle is not correctly raised, the sewing machine can not be threaded. CAUTION ● If the spool of thread is in the correct combination. If the upper threading is set incorrectly, the thread may bend or break. ● Never use a thread weight of needles...
Operation Manual
Page 24
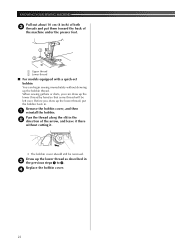
... . Replace the bobbin cover. 4 23 Draw up the lower thread, put them toward the back of the arrow, and leave it there without drawing up the bobbin thread. KNOWING YOUR SEWING MACHINE Pull out about 10 cm (4 inch) of both 3 threads and put the bobbin back in the 2 direction of the machine under the presser foot. 1 2 1 Upper thread 2 Lower thread ■ For models equipped with a quick-set bobbin You can draw up the lower thread...
... . Replace the bobbin cover. 4 23 Draw up the lower thread, put them toward the back of the arrow, and leave it there without drawing up the bobbin thread. KNOWING YOUR SEWING MACHINE Pull out about 10 cm (4 inch) of both 3 threads and put the bobbin back in the 2 direction of the machine under the presser foot. 1 2 1 Upper thread 2 Lower thread ■ For models equipped with a quick-set bobbin You can draw up the lower thread...
Operation Manual
Page 28
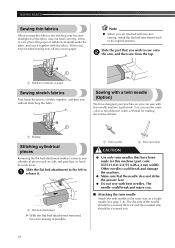
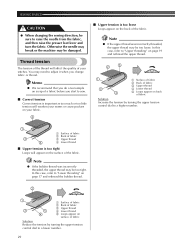
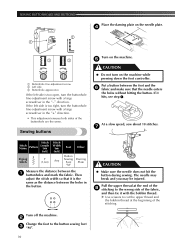
... for making decorative stitches. 1 1 Basting Stitching cylindrical pieces Removing the flat bed attachment makes it . 1 1 Flat bed attachment X With the flat bed attachment removed, free-arm sewing is possible. 1 Twin needle 2 Extra spool pin CAUTION ● Use only twin needles that have finished sewing, tear off any excess paper. Note ● When you . ■ Attaching the twin needle Attach the twin needle in its original position. Slide the part that the needle does not strike the presser foot. ● Do not sew with free-arm sewing, install...
... for making decorative stitches. 1 1 Basting Stitching cylindrical pieces Removing the flat bed attachment makes it . 1 1 Flat bed attachment X With the flat bed attachment removed, free-arm sewing is possible. 1 Twin needle 2 Extra spool pin CAUTION ● Use only twin needles that have finished sewing, tear off any excess paper. Note ● When you . ■ Attaching the twin needle Attach the twin needle in its original position. Slide the part that the needle does not strike the presser foot. ● Do not sew with free-arm sewing, install...
Operation Manual
Page 29
... may cause the needle to hit the needle plate and break. 3 2 1 Start sewing. 6 For details on starting to sew, refer to attach zigzag foot "J", otherwise the needle may break or the machine may start unexpectedly and cause personal injury or damage to "Stitch length dial" on the machine while pressing down the foot controller. Install the second thread spool onto the extra spool pin. 1 Bobbin winder shaft 3 2 Extra spool pin 2 3 Thread spool CAUTION ● When using the twin needle, the stitches may damage the machine. ● Do...
... may cause the needle to hit the needle plate and break. 3 2 1 Start sewing. 6 For details on starting to sew, refer to attach zigzag foot "J", otherwise the needle may break or the machine may start unexpectedly and cause personal injury or damage to "Stitch length dial" on the machine while pressing down the foot controller. Install the second thread spool onto the extra spool pin. 1 Bobbin winder shaft 3 2 Extra spool pin 2 3 Thread spool CAUTION ● When using the twin needle, the stitches may damage the machine. ● Do...
Operation Manual
Page 30
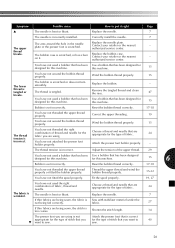
... too loose. In this case, refer to "Lower threading" on page 17 and rethread the bobbin thread. 2 1 3 5 4 1 Surface of fabric 2 Back of fabric 3 Upper thread 4 Lower thread 5 Loops appear on surface of your fabric. 2 ■ Upper tension is too tight Loops will affect the quality of fabric Solution Reduce the tension by turning the upper tension control dial to raise the needle from the fabric, and then raise the presser foot lever and turn the fabric. Memo...
... too loose. In this case, refer to "Lower threading" on page 17 and rethread the bobbin thread. 2 1 3 5 4 1 Surface of fabric 2 Back of fabric 3 Upper thread 4 Lower thread 5 Loops appear on surface of your fabric. 2 ■ Upper tension is too tight Loops will affect the quality of fabric Solution Reduce the tension by turning the upper tension control dial to raise the needle from the fabric, and then raise the presser foot lever and turn the fabric. Memo...
Operation Manual
Page 37
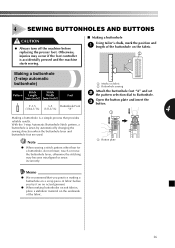
...or move the buttonhole lever, otherwise the stitching may occur if the foot controller is accidentally pressed and the machine starts sewing. ■ Making a buttonhole Using tailor's chalk, mark the position and 1 length of the buttonhole on the fabric. 2 1 Making a buttonhole (1-step automatic buttonhole) 1 Marks on fabric 2 Buttonhole sewing Stitch Stitch Pattern Length Width Foot Attach the buttonhole foot "A" and set 2 the pattern selection dial to Buttonhole. [mm (inch)] [mm (inch)] Open the button plate and insert the 1 F-1.5 3 button. 3-5 Buttonhole Foot (1/64-1/16...
...or move the buttonhole lever, otherwise the stitching may occur if the foot controller is accidentally pressed and the machine starts sewing. ■ Making a buttonhole Using tailor's chalk, mark the position and 1 length of the buttonhole on the fabric. 2 1 Making a buttonhole (1-step automatic buttonhole) 1 Marks on fabric 2 Buttonhole sewing Stitch Stitch Pattern Length Width Foot Attach the buttonhole foot "A" and set 2 the pattern selection dial to Buttonhole. [mm (inch)] [mm (inch)] Open the button plate and insert the 1 F-1.5 3 button. 3-5 Buttonhole Foot (1/64-1/16...
Operation Manual
Page 38
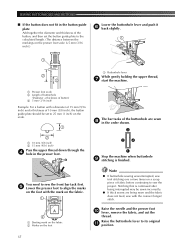
... button guide plate should be set the button guide plate to its original a position. 37 You need to sew the front bar tack first. 5 Lower the presser foot to sew the project. Raise the needle and the presser foot 0 lever, remove the fabric, and cut the thread. The bar tacks of the buttonhole are being sewn and the fabric does not feed, sew with the mark on the fabric. 1 2 1 Starting mark on the fabric 2 Marks on the foot Note ● If buttonhole sewing...
... button guide plate should be set the button guide plate to its original a position. 37 You need to sew the front bar tack first. 5 Lower the presser foot to sew the project. Raise the needle and the presser foot 0 lever, remove the fabric, and cut the thread. The bar tacks of the buttonhole are being sewn and the fabric does not feed, sew with the mark on the fabric. 1 2 1 Starting mark on the fabric 2 Marks on the foot Note ● If buttonhole sewing...
Operation Manual
Page 40
... "+" direction. • This adjustment ensures both sides of the buttonhole are the same. X Use scissors to cut the upper thread and the bobbin thread at the end of the 8 stitching to the button sewing foot 3 "M". 39 SEWING BUTTONHOLES AND BUTTONS Place the darning plate on the machine while pressing down the foot controller. Put a button between the 1 buttonholes and mark the fabric. CAUTION ● Make sure the needle does not hit the button during sewing. The needle may break...
... "+" direction. • This adjustment ensures both sides of the buttonhole are the same. X Use scissors to cut the upper thread and the bobbin thread at the end of the 8 stitching to the button sewing foot 3 "M". 39 SEWING BUTTONHOLES AND BUTTONS Place the darning plate on the machine while pressing down the foot controller. Put a button between the 1 buttonholes and mark the fabric. CAUTION ● Make sure the needle does not hit the button during sewing. The needle may break...
Operation Manual
Page 44
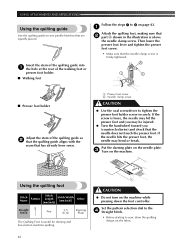
... foot controller. Then lower the presser foot lever and tighten the presser foot screw. • Make sure that the needle clamp screw is loose, the needle may hit the presser foot and you may bend or break. If the screw is firmly tightened. Using the quilting foot Stitch Name Pattern Stitch Length [mm (inch)] Stitch Width [mm (inch)] Other Straight 2 Stitch Any 2.5 (3/32) Darning Plate The Quilting Foot is above the needle clamp screw. Set the pattern selection dial to the 4 Straight Stitch. • Before starting to sew, draw the quilting design on page 42. 1 Attach...
... foot controller. Then lower the presser foot lever and tighten the presser foot screw. • Make sure that the needle clamp screw is loose, the needle may hit the presser foot and you may bend or break. If the screw is firmly tightened. Using the quilting foot Stitch Name Pattern Stitch Length [mm (inch)] Stitch Width [mm (inch)] Other Straight 2 Stitch Any 2.5 (3/32) Darning Plate The Quilting Foot is above the needle clamp screw. Set the pattern selection dial to the 4 Straight Stitch. • Before starting to sew, draw the quilting design on page 42. 1 Attach...
Operation Manual
Page 50
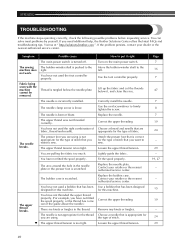
... the nearest authorized service center. Use a bobbin that you need additional help, the Brother Solutions Center offers the latest FAQs and troubleshooting tips. Correct the upper threading. Correctly install the needle. Loosen the upper thread tension. Fit the spool properly. Replace the needle plate. Visit us at " http://solutions.brother.com ". The bobbin-winder shaft is scratched. The needle breaks. You are knots or tangles in the needle plate or the presser foot is loose. Use the oval screwdriver...
... the nearest authorized service center. Use a bobbin that you need additional help, the Brother Solutions Center offers the latest FAQs and troubleshooting tips. Correct the upper threading. Correctly install the needle. Loosen the upper thread tension. Fit the spool properly. Replace the needle plate. Visit us at " http://solutions.brother.com ". The bobbin-winder shaft is scratched. The needle breaks. You are knots or tangles in the needle plate or the presser foot is loose. Use the oval screwdriver...
Operation Manual
Page 51
... machine. 15 You have not threaded the upper thread properly. Fit the spool properly. 19, 27 You have not used the right combination of fabric. 24 tension is set incorrectly. Symptom Possible cause How to sew. Replace the needle. 7 The needle is scratched. Correctly install the needle. 7 The upper The area around the hole in the needle plate or the presser foot is incorrectly installed. thread breaks. The bobbin case is tangled or breaks. You have not used a bobbin...
... machine. 15 You have not threaded the upper thread properly. Fit the spool properly. 19, 27 You have not used the right combination of fabric. 24 tension is set incorrectly. Symptom Possible cause How to sew. Replace the needle. 7 The needle is scratched. Correctly install the needle. 7 The upper The area around the hole in the needle plate or the presser foot is incorrectly installed. thread breaks. The bobbin case is tangled or breaks. You have not used a bobbin...
Operation Manual
Page 53
... L Light switch 7 , Lower threading 17 quick-set bobbin 18 23 M Main parts 5 Main power 7 Maintenance 47 N Narrow hemmer foot 44 Needle checking 7 combinations with fabric and thread .........24 replacing 7 Needle threader 21 O Overedge stitching 34 P Pattern selection dial 9 Patterns 10 Presser foot changing 8 , Q Quick-set bobbin 18 23 Quilting foot 43 R Race cleaning 47 Reverse sewing lever 14 S Satin stitch 30 , Shell tuck stitching 32 Spool pin 15 19 extra 28 Stitch length dial 14 Stitch width dial 14 Stitches built-in 30 names 10 Straight stitching 30 Stretch...
... L Light switch 7 , Lower threading 17 quick-set bobbin 18 23 M Main parts 5 Main power 7 Maintenance 47 N Narrow hemmer foot 44 Needle checking 7 combinations with fabric and thread .........24 replacing 7 Needle threader 21 O Overedge stitching 34 P Pattern selection dial 9 Patterns 10 Presser foot changing 8 , Q Quick-set bobbin 18 23 Quilting foot 43 R Race cleaning 47 Reverse sewing lever 14 S Satin stitch 30 , Shell tuck stitching 32 Spool pin 15 19 extra 28 Stitch length dial 14 Stitch width dial 14 Stitches built-in 30 names 10 Straight stitching 30 Stretch...


