Operation Manual
Page 4
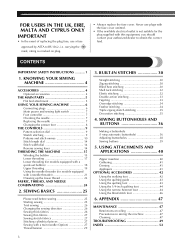
...10 Stitch length dial 14 Stitch width dial 14 Reverse sewing lever 14 THREADING THE MACHINE 15 Winding the bobbin 15 Lower threading 17 Lower threading (for models equipped with a quick-set bobbin 18 Upper threading 19 Using the needle threader (for the plug supplied with this equipment...Sewing thin fabrics 27 Sewing stretch fabrics 27 Stitching cylindrical pieces 27 Sewing with a needle threader 21 Drawing up the lower thread 22 FABRIC, THREAD, AND NEEDLE COMBINATIONS 24 2. BUILT-IN STITCHES 30 Straight stitching 30 Zigzag stitching 30 Blind hem stitching 30 Shell tuck ...
...10 Stitch length dial 14 Stitch width dial 14 Reverse sewing lever 14 THREADING THE MACHINE 15 Winding the bobbin 15 Lower threading 17 Lower threading (for models equipped with a quick-set bobbin 18 Upper threading 19 Using the needle threader (for the plug supplied with this equipment...Sewing thin fabrics 27 Sewing stretch fabrics 27 Stitching cylindrical pieces 27 Sewing with a needle threader 21 Drawing up the lower thread 22 FABRIC, THREAD, AND NEEDLE COMBINATIONS 24 2. BUILT-IN STITCHES 30 Straight stitching 30 Zigzag stitching 30 Blind hem stitching 30 Shell tuck ...
Operation Manual
Page 6
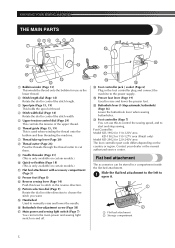
...service center. F Buttonhole fine-adjustment screw (Page 38) G Main power and sewing light switch (Page 7) You can use as the lower thread. 2 Stitch length dial (Page 14) Rotate the dial to control the stitch length. 3 Spool pin (Page 15, 19) This holds the spool of... (Page 29) This controls the tension of the upper thread. 6 Thread guide (Page 15, 19) This is used when winding the thread onto the bobbin and then threading the machine. 7 Thread take-up lever (Page 20) 8 Thread cutter (Page 26) Pass the threads through the thread cutter to cut them. 9 Needle threader (Page 21)...
...service center. F Buttonhole fine-adjustment screw (Page 38) G Main power and sewing light switch (Page 7) You can use as the lower thread. 2 Stitch length dial (Page 14) Rotate the dial to control the stitch length. 3 Spool pin (Page 15, 19) This holds the spool of... (Page 29) This controls the tension of the upper thread. 6 Thread guide (Page 15, 19) This is used when winding the thread onto the bobbin and then threading the machine. 7 Thread take-up lever (Page 20) 8 Thread cutter (Page 26) Pass the threads through the thread cutter to cut them. 9 Needle threader (Page 21)...
Operation Manual
Page 15
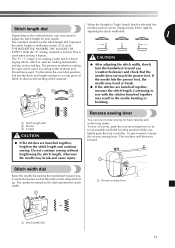
The numbers marked on the stitch length dial represent the stitch length in that position while you thread being used. the needle hits the presser foot, the needle may break and cause injury. Do not continue sewing without lengthening the stitch length, otherwise ...
The numbers marked on the stitch length dial represent the stitch length in that position while you thread being used. the needle hits the presser foot, the needle may break and cause injury. Do not continue sewing without lengthening the stitch length, otherwise ...
Operation Manual
Page 16
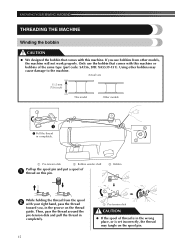
...shaft Pull up the spool pin and put a spool of 1 thread on this pin. 3 Bobbin While holding the thread from the spool 2 with your right hand, pass the thread toward you use the bobbin that comes with this machine or bobbins of thread is in the groove on the spool pin. KNOWING YOUR SEWING... bobbin that comes with this machine. If you , in the wrong place, or is set incorrectly, the thread may cause damage to the machine. Then, pass the thread around the pre-tension disk and pull the thread in completely. 15 1 1 Pre-tension disk CAUTION ● If the spool of the same type (part...
...shaft Pull up the spool pin and put a spool of 1 thread on this pin. 3 Bobbin While holding the thread from the spool 2 with your right hand, pass the thread toward you use the bobbin that comes with this machine or bobbins of thread is in the groove on the spool pin. KNOWING YOUR SEWING... bobbin that comes with this machine. If you , in the wrong place, or is set incorrectly, the thread may cause damage to the machine. Then, pass the thread around the pre-tension disk and pull the thread in completely. 15 1 1 Pre-tension disk CAUTION ● If the spool of the same type (part...
Operation Manual
Page 17
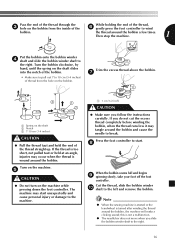
... not a malfunction. ● The needle bar does not move when you follow the instructions carefully. Press the foot controller to the right. 16 If the thread is too short, not pulled taut or held at an angle, injuries may tangle around the bobbin a few times. Pass the end of the... thread through the 3 hole on the bobbin from the hole on the bobbin. Note ● When the sewing machine is started or the handwheel is wound ...
... not a malfunction. ● The needle bar does not move when you follow the instructions carefully. Press the foot controller to the right. 16 If the thread is too short, not pulled taut or held at an angle, injuries may tangle around the bobbin a few times. Pass the end of the... thread through the 3 hole on the bobbin from the hole on the bobbin. Note ● When the sewing machine is started or the handwheel is wound ...
Operation Manual
Page 18
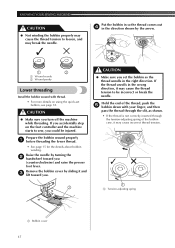
... you set bobbin, see page 18. KNOWING YOUR SEWING MACHINE CAUTION ● Not winding the bobbin properly may cause the thread tension to loosen, and may cause incorrect thread tension. 1 1 1 Tension-adjusting spring 1 Bobbin cover 17 CAUTION ● Make sure you . Put the bobbin in... controller and the machine starts to be injured. Prepare the bobbin wound properly 1 before threading the lower thread. • See page 15 for the details about bobbin winding. If the thread unrolls in the right direction. If you (counterclockwise) and raise the presser foot lever....
... you set bobbin, see page 18. KNOWING YOUR SEWING MACHINE CAUTION ● Not winding the bobbin properly may cause the thread tension to loosen, and may cause incorrect thread tension. 1 1 1 Tension-adjusting spring 1 Bobbin cover 17 CAUTION ● Make sure you . Put the bobbin in... controller and the machine starts to be injured. Prepare the bobbin wound properly 1 before threading the lower thread. • See page 15 for the details about bobbin winding. If the thread unrolls in the right direction. If you (counterclockwise) and raise the presser foot lever....
Operation Manual
Page 19
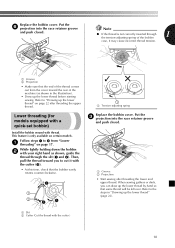
.... Replace the bobbin cover. While lightly holding down the bobbin 2 with the cutter.) 18 When sewing gathers or darts, you to "Drawing up the lower thread before starting sewing. This feature is not correctly inserted through the slit (1 and 2). Put the 6 projection into the race retainer groove and push closed . Refer...
.... Replace the bobbin cover. While lightly holding down the bobbin 2 with the cutter.) 18 When sewing gathers or darts, you to "Drawing up the lower thread before starting sewing. This feature is not correctly inserted through the slit (1 and 2). Put the 6 projection into the race retainer groove and push closed . Refer...
Operation Manual
Page 20
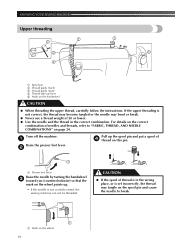
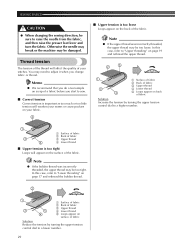
... follow the instructions. CAUTION ● If the spool of needles and threads, refer to break. 1 1 Mark on the correct combination of thread is in the correct combination. KNOWING YOUR SEWING MACHINE Upper threading 2 2 3 4 1 5 1 Spool pin 2 Thread guide (back) 3 Thread guide (front) 4 Thread take-up . • If the needle is not correctly raised, the sewing machine can...
... follow the instructions. CAUTION ● If the spool of needles and threads, refer to break. 1 1 Mark on the correct combination of thread is in the correct combination. KNOWING YOUR SEWING MACHINE Upper threading 2 2 3 4 1 5 1 Spool pin 2 Thread guide (back) 3 Thread guide (front) 4 Thread take-up . • If the needle is not correctly raised, the sewing machine can...
Operation Manual
Page 21
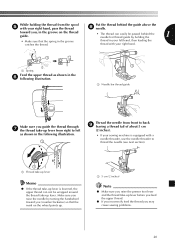
... lever from right to thread the needle (see next section). 1 1 Thread take-up lever Memo ● If the thread take-up lever is equipped with your right hand, pass the thread Put the thread behind the needle bar thread guide by holding the thread from front to back 9 leaving a thread tail of about 5 ...cm (2 inches). • If your sewing machine is lowered, the upper thread can not be wrapped around the thread take-up lever before...
... lever from right to thread the needle (see next section). 1 1 Thread take-up lever Memo ● If the thread take-up lever is equipped with your right hand, pass the thread Put the thread behind the needle bar thread guide by holding the thread from front to back 9 leaving a thread tail of about 5 ...cm (2 inches). • If your sewing machine is lowered, the upper thread can not be wrapped around the thread take-up lever before...
Operation Manual
Page 22
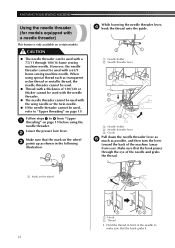
...) This feature is only available on the wheel 3 points up as shown in front of the machine (away from "Upper 1 threading" on page 19 before using special thread such as possible, and then turn the lever toward the back of the needle to 8 from you). Follow steps 1 to make... Needle threader lever 3 Guide Pull down the needle threader lever as 5 much as transparent nylon thread or metallic thread, the needle threader cannot be used. ● Thread with a thickness of the needle and grabs the thread. 1 Mark on page 19. Make sure that the hook passes through the eye of 130...
...) This feature is only available on the wheel 3 points up as shown in front of the machine (away from "Upper 1 threading" on page 19 before using special thread such as possible, and then turn the lever toward the back of the needle to 8 from you). Follow steps 1 to make... Needle threader lever 3 Guide Pull down the needle threader lever as 5 much as transparent nylon thread or metallic thread, the needle threader cannot be used. ● Thread with a thickness of the needle and grabs the thread. 1 Mark on page 19. Make sure that the hook passes through the eye of 130...
Operation Manual
Page 23
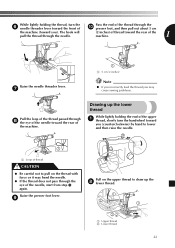
...machine. 1 Raise the needle threader lever. 7 1 1 5 cm (2 inches) Note ● If you incorrectly feed the thread you may cause sewing problems. Pull the loop of the thread passed through the 0 presser foot, and then pull out about 5 cm the machine (toward you (counterclockwise) by hand to lower... and then raise the needle. 1 1 Loop of thread CAUTION ● Be careful not to draw up the lower thread While lightly holding the thread, turn the handwheel toward you ). While lightly holding the end of the upper 1 thread, slowly turn the 6 needle threader lever toward the front ...
...machine. 1 Raise the needle threader lever. 7 1 1 5 cm (2 inches) Note ● If you incorrectly feed the thread you may cause sewing problems. Pull the loop of the thread passed through the 0 presser foot, and then pull out about 5 cm the machine (toward you (counterclockwise) by hand to lower... and then raise the needle. 1 1 Loop of thread CAUTION ● Be careful not to draw up the lower thread While lightly holding the thread, turn the handwheel toward you ). While lightly holding the end of the upper 1 thread, slowly turn the 6 needle threader lever toward the front ...
Operation Manual
Page 24
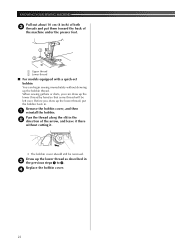
... the bobbin back in. Replace the bobbin cover. 4 23 Draw up the bobbin thread. When sewing gathers or darts, you draw up the lower thread by hand so that some thread will be removed. Before you can begin sewing immediately without cutting it. • The bobbin cover should still be left over. Remove... the bobbin cover, and then 1 reinstall the bobbin. KNOWING YOUR SEWING MACHINE Pull out about 10 cm (4 inch) of both 3 threads and put them toward the back of the arrow, and leave it there without drawing up the lower...
... the bobbin back in. Replace the bobbin cover. 4 23 Draw up the bobbin thread. When sewing gathers or darts, you draw up the lower thread by hand so that some thread will be removed. Before you can begin sewing immediately without cutting it. • The bobbin cover should still be left over. Remove... the bobbin cover, and then 1 reinstall the bobbin. KNOWING YOUR SEWING MACHINE Pull out about 10 cm (4 inch) of both 3 threads and put them toward the back of the arrow, and leave it there without drawing up the lower...
Operation Manual
Page 25
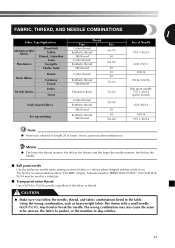
... needle is "HG-4BR" (Organ). It may bend or break the needle. CAUTION ● Make sure you follow the needle, thread, and fabric combinations listed in the table. Schmetz needles "JERSEY BALL POINT" 130/705H SUK 90/14 may be uneven, the fabric... fabrics Thin fabrics Broadcloth Taffeta Flannel, Gabardine Lawn Georgette Challis, Satin Thick fabrics Denim Corduroy Tweed Thread Type Cotton thread Synthetic thread Silk thread Cotton thread Synthetic thread Silk thread Cotton thread Synthetic thread Silk thread Size 60-90 50 60-90 50 30 50 50-60 Size of Needle 75/11-90/...
... needle is "HG-4BR" (Organ). It may bend or break the needle. CAUTION ● Make sure you follow the needle, thread, and fabric combinations listed in the table. Schmetz needles "JERSEY BALL POINT" 130/705H SUK 90/14 may be uneven, the fabric... fabrics Thin fabrics Broadcloth Taffeta Flannel, Gabardine Lawn Georgette Challis, Satin Thick fabrics Denim Corduroy Tweed Thread Type Cotton thread Synthetic thread Silk thread Cotton thread Synthetic thread Silk thread Cotton thread Synthetic thread Silk thread Size 60-90 50 60-90 50 30 50 50-60 Size of Needle 75/11-90/...
Operation Manual
Page 26
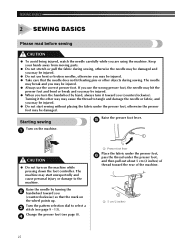
...damaged. Turn the pattern selection dial to the machine. Change the presser foot (see page 9 - 13). Turning it toward the rear of thread toward you may be injured. ● Take care that the mark on the machine while pressing down the foot controller. Starting sewing Raise the... personal injury or damage to select a 3 stitch (see page 8). 4 1 Presser foot lever Place the fabric under the presser foot, 6 pass the thread under the presser foot, otherwise the presser foot may be injured. ● Always use bent or broken needles, otherwise you may be injured. ● ...
...damaged. Turn the pattern selection dial to the machine. Change the presser foot (see page 9 - 13). Turning it toward the rear of thread toward you may be injured. ● Take care that the mark on the machine while pressing down the foot controller. Starting sewing Raise the... personal injury or damage to select a 3 stitch (see page 8). 4 1 Presser foot lever Place the fabric under the presser foot, 6 pass the thread under the presser foot, otherwise the presser foot may be injured. ● Always use bent or broken needles, otherwise you may be injured. ● ...
Operation Manual
Page 27
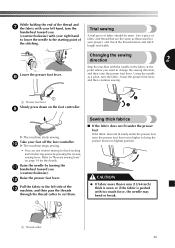
...higher to bring the presser foot to "Reverse sewing lever" on the foot controller. 9 1 2 X The machine starts sewing. Trial sewing A trial piece of fabric and thread that are the same as a pivot, turn the handwheel toward you (counterclockwise). Using the needle as those used for your project, and check the... more than 6 mm (15/64 inch) thick is sewn or if the fabric is pushed with too much force, the needle may bend or break. 1 Thread cutter 26 b Pull the fabric to the left hand, turn the fabric, lower the presser foot lever, and then continue sewing. 1 1 Presser foot lever ...
...higher to bring the presser foot to "Reverse sewing lever" on the foot controller. 9 1 2 X The machine starts sewing. Trial sewing A trial piece of fabric and thread that are the same as a pivot, turn the handwheel toward you (counterclockwise). Using the needle as those used for your project, and check the... more than 6 mm (15/64 inch) thick is sewn or if the fabric is pushed with too much force, the needle may bend or break. 1 Thread cutter 26 b Pull the fabric to the left hand, turn the fabric, lower the presser foot lever, and then continue sewing. 1 1 Presser foot lever ...
Operation Manual
Page 28
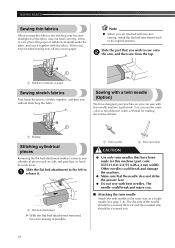
... as a single needle (see page 7-8). Other needles could break and injure you can use the same color or two different colors of thread for this needle and two top threads. The flat side of fabric together, and then sew without stretching the fabric. SEWING BASICS Sewing thin fabrics When sewing thin fabrics...
... as a single needle (see page 7-8). Other needles could break and injure you can use the same color or two different colors of thread for this needle and two top threads. The flat side of fabric together, and then sew without stretching the fabric. SEWING BASICS Sewing thin fabrics When sewing thin fabrics...
Operation Manual
Page 29
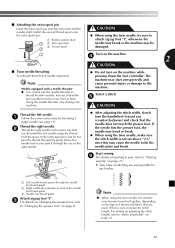
... sewing" on page 25. If the needle hits the presser foot, the needle may bend or break. ● When using the thread from front to thread the twin needle. Note Models equipped with a needle threader ● You cannot use the needle threader to back. Using the needle threader... front of stitching are used. If this may be damaged. 1 Turn on the machine. 4 2 CAUTION ■ Twin needle threading You should thread each other. 1 Left needle thread passes through the eye of the bobbin winder shaft. ■ Attaching the extra spool pin Insert the extra spool pin onto the...
... sewing" on page 25. If the needle hits the presser foot, the needle may bend or break. ● When using the thread from front to thread the twin needle. Note Models equipped with a needle threader ● You cannot use the needle threader to back. Using the needle threader... front of stitching are used. If this may be damaged. 1 Turn on the machine. 4 2 CAUTION ■ Twin needle threading You should thread each other. 1 Left needle thread passes through the eye of the bobbin winder shaft. ■ Attaching the extra spool pin Insert the extra spool pin onto the...
Operation Manual
Page 30
... Reduce the tension by turning the upper tension control dial to a higher number. 1 3 4 1 Surface of fabric 2 Back of fabric 3 Upper thread 4 Lower thread ■ Upper tension is too loose Loops appear on the surface of the fabric. Memo ● We recommend that you do a test sample on ...back of a fabric before you start to adjust it when you change fabric or thread. Note ● If the bobbin thread was incorrectly threaded, the upper thread may need to sew. ■ Correct tension Correct tension is important as too much or too little tension will...
... Reduce the tension by turning the upper tension control dial to a higher number. 1 3 4 1 Surface of fabric 2 Back of fabric 3 Upper thread 4 Lower thread ■ Upper tension is too loose Loops appear on the surface of the fabric. Memo ● We recommend that you do a test sample on ...back of a fabric before you start to adjust it when you change fabric or thread. Note ● If the bobbin thread was incorrectly threaded, the upper thread may need to sew. ■ Correct tension Correct tension is important as too much or too little tension will...
Operation Manual
Page 33
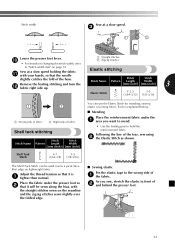
... normal. Following the line of the hem. The Shell Tuck Stitch can use the Elastic Stitch for mending, sewing elastic or joining fabric. Adjust the thread tension so that the needle slightly catches the fold of the tear, sew using 2 the Elastic Stitch as shown. Remove the basting stitching and turn...
... normal. Following the line of the hem. The Shell Tuck Stitch can use the Elastic Stitch for mending, sewing elastic or joining fabric. Adjust the thread tension so that the needle slightly catches the fold of the tear, sew using 2 the Elastic Stitch as shown. Remove the basting stitching and turn...
Operation Manual
Page 34
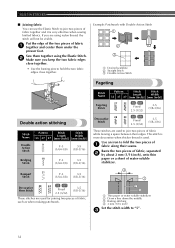
Put the edge of the two pieces of fabric 1 together and center them together using nylon thread, the stitch will not be visible. Use an iron to fold the two pieces of 1 fabric along their edges. BUILT-IN STITCHES ■ Joining fabric ... and it is used to hold the two fabric edges close together. Sew them under the presser foot. This stitch is more decorative when thicker thread is very effective when sewing knitted fabrics. Stitch Name Fagoting Stitch Pattern Stitch Stitch Length Width 53 37 27 [mm (inch)] [mm (inch)] 27 22...
Put the edge of the two pieces of fabric 1 together and center them together using nylon thread, the stitch will not be visible. Use an iron to fold the two pieces of 1 fabric along their edges. BUILT-IN STITCHES ■ Joining fabric ... and it is used to hold the two fabric edges close together. Sew them under the presser foot. This stitch is more decorative when thicker thread is very effective when sewing knitted fabrics. Stitch Name Fagoting Stitch Pattern Stitch Stitch Length Width 53 37 27 [mm (inch)] [mm (inch)] 27 22...


