Operation Manual
Page 4
... direction 26 Sewing thick fabrics 26 Sewing thin fabrics 27 Sewing stretch fabrics 27 Stitching cylindrical pieces 27 Sewing with a twin needle (Option 27 Thread tension 29 3. APPENDIX 47 MAINTENANCE 47 Restrictions on oiling 47 Precautions on plug. • Always replace the fuse cover. KNOWING YOUR SEWING MACHINE 4 ACCESSORIES 4 Optional accessories...
... direction 26 Sewing thick fabrics 26 Sewing thin fabrics 27 Sewing stretch fabrics 27 Stitching cylindrical pieces 27 Sewing with a twin needle (Option 27 Thread tension 29 3. APPENDIX 47 MAINTENANCE 47 Restrictions on oiling 47 Precautions on plug. • Always replace the fuse cover. KNOWING YOUR SEWING MACHINE 4 ACCESSORIES 4 Optional accessories...
Operation Manual
Page 6
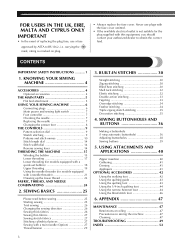
..., 19) This holds the spool of thread. 4 Stitch width dial (Page 14) Rotate the dial to control the stitch width. 5 Upper tension-control dial (Page 29) This controls the tension of the upper thread. 6 Thread guide (Page 15, 19) This is used when winding the thread onto the bobbin and then threading...
..., 19) This holds the spool of thread. 4 Stitch width dial (Page 14) Rotate the dial to control the stitch width. 5 Upper tension-control dial (Page 29) This controls the tension of the upper thread. 6 Thread guide (Page 15, 19) This is used when winding the thread onto the bobbin and then threading...
Operation Manual
Page 16
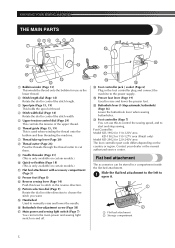
Actual size 11.5 mm (7/16 inch) This model Other models 1 1 Pull the thread in completely. 2 3 1 Pre-tension disk 2 Bobbin winder shaft Pull up the spool pin and put a spool of 1 thread on this pin. 3 Bobbin While holding the thread from other bobbins ... spool 2 with your right hand, pass the thread toward you use the bobbin that comes with this machine. Then, pass the thread around the pre-tension disk and pull the thread in completely. 15 1 1 Pre-tension disk CAUTION ● If the spool of the same type (part code: SA156, SFB: XA5539-151).
Actual size 11.5 mm (7/16 inch) This model Other models 1 1 Pull the thread in completely. 2 3 1 Pre-tension disk 2 Bobbin winder shaft Pull up the spool pin and put a spool of 1 thread on this pin. 3 Bobbin While holding the thread from other bobbins ... spool 2 with your right hand, pass the thread toward you use the bobbin that comes with this machine. Then, pass the thread around the pre-tension disk and pull the thread in completely. 15 1 1 Pre-tension disk CAUTION ● If the spool of the same type (part code: SA156, SFB: XA5539-151).
Operation Manual
Page 18
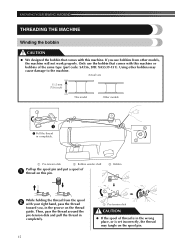
...unrolls in the right direction. KNOWING YOUR SEWING MACHINE CAUTION ● Not winding the bobbin properly may cause the thread tension to loosen, and may cause incorrect thread tension. 1 1 1 Tension-adjusting spring 1 Bobbin cover 17 CAUTION ● Make sure you . Put the bobbin in so the thread comes ... your finger, and then pass the thread through the slit, as shown. • If the thread is not correctly inserted through the tension-adjusting spring of the thread, push the 5 bobbin down with thread. • For more details on the foot controller and the machine...
...unrolls in the right direction. KNOWING YOUR SEWING MACHINE CAUTION ● Not winding the bobbin properly may cause the thread tension to loosen, and may cause incorrect thread tension. 1 1 1 Tension-adjusting spring 1 Bobbin cover 17 CAUTION ● Make sure you . Put the bobbin in so the thread comes ... your finger, and then pass the thread through the slit, as shown. • If the thread is not correctly inserted through the tension-adjusting spring of the thread, push the 5 bobbin down with thread. • For more details on the foot controller and the machine...
Operation Manual
Page 19
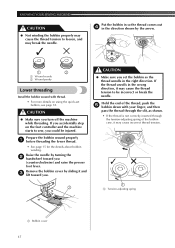
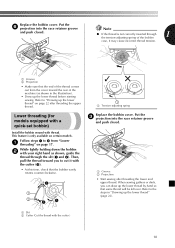
... When sewing gathers or darts, you to "Drawing up the lower thread by hand so that the bobbin easily rotates counterclockwise. 2 1 2 3 1 1 1 Tension-adjusting spring Replace the bobbin cover. Follow steps 1 to the steps in the illustration). • Draw up the lower thread" (page 22). 1 Slit 2 Cutter... will be left over. Refer to 4 from the cover toward the rear of the machine (as shown, guide the thread through 1 the tension-adjusting spring of the thread comes out from "Lower 1 threading" on certain models. Put the 6 projection into the race retainer groove and ...
... When sewing gathers or darts, you to "Drawing up the lower thread by hand so that the bobbin easily rotates counterclockwise. 2 1 2 3 1 1 1 Tension-adjusting spring Replace the bobbin cover. Follow steps 1 to the steps in the illustration). • Draw up the lower thread" (page 22). 1 Slit 2 Cutter... will be left over. Refer to 4 from the cover toward the rear of the machine (as shown, guide the thread through 1 the tension-adjusting spring of the thread comes out from "Lower 1 threading" on certain models. Put the 6 projection into the race retainer groove and ...
Operation Manual
Page 27
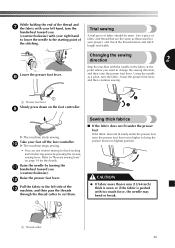
... the sewing direction 2 Stop the machine with the needle in the fabric at the point where you (counterclockwise). Take your project, and check the thread tension and stitch length and width.
... the sewing direction 2 Stop the machine with the needle in the fabric at the point where you (counterclockwise). Take your project, and check the thread tension and stitch length and width.
Operation Manual
Page 30
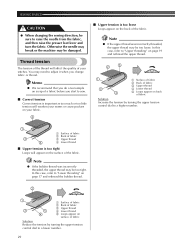
...when you start to a higher number. 1 3 4 1 Surface of fabric 2 Back of fabric 3 Upper thread 4 Lower thread ■ Upper tension is important as too much or too little tension will appear on the surface of the fabric. In this case, refer to "Upper threading" on page 19 and rethread the.... 25 1 3 4 1 Surface of fabric 2 Back of fabric 3 Upper thread 4 Lower thread 5 Loops appear on back of fabric Solution Increase the tension by turning the upper tension control dial to a lower number. 29 Otherwise the needle may break or the machine may be too loose. Memo ● We recommend that...
...when you start to a higher number. 1 3 4 1 Surface of fabric 2 Back of fabric 3 Upper thread 4 Lower thread ■ Upper tension is important as too much or too little tension will appear on the surface of the fabric. In this case, refer to "Upper threading" on page 19 and rethread the.... 25 1 3 4 1 Surface of fabric 2 Back of fabric 3 Upper thread 4 Lower thread 5 Loops appear on back of fabric Solution Increase the tension by turning the upper tension control dial to a lower number. 29 Otherwise the needle may break or the machine may be too loose. Memo ● We recommend that...
Operation Manual
Page 33
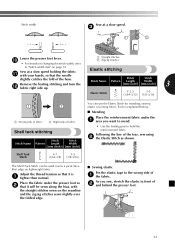
... page 14. Place the fabric under the 1 area you sew, stretch the elastic in front of 2 and behind the presser foot. 32 Adjust the thread tension so that it will be used to "Stitch width dial" on lightweight fabric. Following the line of the tear, sew using 2 the Elastic Stitch as...
... page 14. Place the fabric under the 1 area you sew, stretch the elastic in front of 2 and behind the presser foot. 32 Adjust the thread tension so that it will be used to "Stitch width dial" on lightweight fabric. Following the line of the tear, sew using 2 the Elastic Stitch as...

Operation Manual
Page 42
Begin sewing by cutting a different piece of 2 straight stitches. Loosen the tension of the upper thread so 1 that the lower thread lies on the machine. 4 41 Carefully sew around the edge of the 2 design with a zigzag stitch. ...
Begin sewing by cutting a different piece of 2 straight stitches. Loosen the tension of the upper thread so 1 that the lower thread lies on the machine. 4 41 Carefully sew around the edge of the 2 design with a zigzag stitch. ...
Operation Manual
Page 50
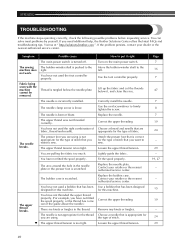
...fabric. Contact your retailer or the nearest authorized service center. You have not used the foot controller properly. Loosen the upper thread tension. Remove any knots or tangles. You can solve most problems by yourself. Symptom The sewing machine does not work. The presser.... Use a bobbin that you have not used a bobbin that you need additional help, the Brother Solutions Center offers the latest FAQs and troubleshooting tips. Loosen the upper thread tension. Use the foot controller properly. Attach the presser foot that is pushed to firmly tighten the ...
...fabric. Contact your retailer or the nearest authorized service center. You have not used the foot controller properly. Loosen the upper thread tension. Remove any knots or tangles. You can solve most problems by yourself. Symptom The sewing machine does not work. The presser.... Use a bobbin that you have not used a bobbin that you need additional help, the Brother Solutions Center offers the latest FAQs and troubleshooting tips. Loosen the upper thread tension. Use the foot controller properly. Attach the presser foot that is pushed to firmly tighten the ...
Operation Manual
Page 51
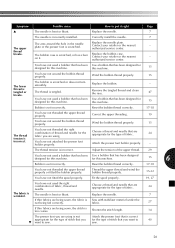
...properly. 15 The thread You have not used a bobbin that has been Use a bobbin that you are appropriate for the type of fabric. 24 tension is too coarse. Replace the needle. 7 If thin fabrics are being fed correctly. fabric. 27 If thin fabrics are being sewn, the fabric is... on it right Page ▲ The needle is wrinkled. Choose a thread and needle that has been designed designed for this machine. Adjust the tension of the upper thread. 29 You have not threaded the right combination of thread and needle for the fabric you for the type of fabric...
...properly. 15 The thread You have not used a bobbin that has been Use a bobbin that you are appropriate for the type of fabric. 24 tension is too coarse. Replace the needle. 7 If thin fabrics are being fed correctly. fabric. 27 If thin fabrics are being sewn, the fabric is... on it right Page ▲ The needle is wrinkled. Choose a thread and needle that has been designed designed for this machine. Adjust the tension of the upper thread. 29 You have not threaded the right combination of thread and needle for the fabric you for the type of fabric...
Operation Manual
Page 52
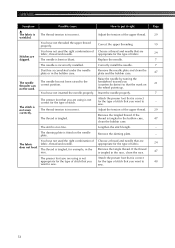
... right combination of stitch that you (counterclockwise) so that you want to the correct position. Correct the upper threading. Possible cause The thread tension is too fine. The thread is correct for example, in the bobbin case, clean the bobbin case. How to sew. Remove the tangled... race. You have not threaded the upper thread properly. Remove the needle plate and clean the plate and the bobbin case. The thread tension is tangled. Raise the needle by turning the handwheel toward you want to sew. Choose a thread and needle that are skipped. The ...
... right combination of stitch that you (counterclockwise) so that you want to the correct position. Correct the upper threading. Possible cause The thread tension is too fine. The thread is correct for example, in the bobbin case, clean the bobbin case. How to sew. Remove the tangled... race. You have not threaded the upper thread properly. Remove the needle plate and clean the plate and the bobbin case. The thread tension is tangled. Raise the needle by turning the handwheel toward you want to sew. Choose a thread and needle that are skipped. The ...
Operation Manual
Page 53
... extra 28 Stitch length dial 14 Stitch width dial 14 Stitches built-in 30 names 10 Straight stitching 30 Stretch stitching 9 T Thread cutter 26 Thread tension 29 , Threading lower 17 18 needle threader 21 twin needle 28 upper 19 Triple zigzag stretch stitching 35 Troubleshooting 49 , Twin needle attaching 8 27 sewing...
... extra 28 Stitch length dial 14 Stitch width dial 14 Stitches built-in 30 names 10 Straight stitching 30 Stretch stitching 9 T Thread cutter 26 Thread tension 29 , Threading lower 17 18 needle threader 21 twin needle 28 upper 19 Triple zigzag stretch stitching 35 Troubleshooting 49 , Twin needle attaching 8 27 sewing...


