Accessory Catalog
Page 4
...Piping Foot Brother General Sewing Accessories 06 Adjustable Zipper & Piping Foot Attaches zippers and pipings easily. Position the presser foot over the long feed dogs on the presser foot and select a straight stitch (left or right. 3. Requires Low Shank Adapter for ULT series, PC-6500, PC-8200 and PC-8500 ...sewing machines. Its position can be adjusted exactly on the edge of zipper/piping, avoiding the non-flat parts of the presser foot and slide the presser foot so that the needle...
...Piping Foot Brother General Sewing Accessories 06 Adjustable Zipper & Piping Foot Attaches zippers and pipings easily. Position the presser foot over the long feed dogs on the presser foot and select a straight stitch (left or right. 3. Requires Low Shank Adapter for ULT series, PC-6500, PC-8200 and PC-8500 ...sewing machines. Its position can be adjusted exactly on the edge of zipper/piping, avoiding the non-flat parts of the presser foot and slide the presser foot so that the needle...

Accessory Catalog
Page 6
...vertical bobbin machines only. Lower the presser foot so that the foot guide is Project Book (See page 53 for details.) www.brother.com SA135 GHILOP Picot Foot Creates shell-looking edges on lightweight fabrics. 1. Non Stick Foot Designed for consistent feeding with the wrong...7. Slowly sew 2-3 stitches, making sure the fabric is rolling around the curled part of the fabric. Brother General Sewing Accessories 09 Narrow Hemmer Foot Non Stick Foot Overlock Foot Picot Foot Brother General Sewing Accessories 10 SA126 ABCDEFJKMN SA127 GHILOP Skirt Innov-is Project Book (See...
...vertical bobbin machines only. Lower the presser foot so that the foot guide is Project Book (See page 53 for details.) www.brother.com SA135 GHILOP Picot Foot Creates shell-looking edges on lightweight fabrics. 1. Non Stick Foot Designed for consistent feeding with the wrong...7. Slowly sew 2-3 stitches, making sure the fabric is rolling around the curled part of the fabric. Brother General Sewing Accessories 09 Narrow Hemmer Foot Non Stick Foot Overlock Foot Picot Foot Brother General Sewing Accessories 10 SA126 ABCDEFJKMN SA127 GHILOP Skirt Innov-is Project Book (See...

Users Manual - English
Page 2
... when removing covers, lubricating, or making any of lint, dust, and loose cloth. 5. Return the machine to be taken, including the following: Read all moving parts. Keep fingers away from the electrical outlet immediately after use this machine to the nearest authorized dealer or service center for its air openings blocked...
... when removing covers, lubricating, or making any of lint, dust, and loose cloth. 5. Return the machine to be taken, including the following: Read all moving parts. Keep fingers away from the electrical outlet immediately after use this machine to the nearest authorized dealer or service center for its air openings blocked...
Users Manual - English
Page 4
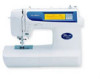
... cord when: • operation is completed • replacing or removing the needle or any assembly, the presser foot, the needle, or other parts • a power failure occurs during use • maintaining the machine • leaving the machine unattended 3. When storing this manual. Benzene, thinner... other moving parts. 2. Do not drop or hit the machine. 4. To fully enjoy all the features incorporated into the wall. For repair or adjustment: In the event that you study this machine, avoid direct sunlight and high humidity. THANK YOU FOR PURCHASING THE PC-6500 COMPUTERIZED SEWING...
... cord when: • operation is completed • replacing or removing the needle or any assembly, the presser foot, the needle, or other parts • a power failure occurs during use • maintaining the machine • leaving the machine unattended 3. When storing this manual. Benzene, thinner... other moving parts. 2. Do not drop or hit the machine. 4. To fully enjoy all the features incorporated into the wall. For repair or adjustment: In the event that you study this machine, avoid direct sunlight and high humidity. THANK YOU FOR PURCHASING THE PC-6500 COMPUTERIZED SEWING...
Users Manual - English
Page 5
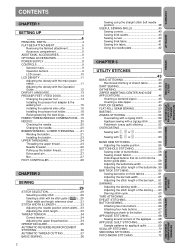
CONTENTS CHAPTER 1 SETTING UP 4 PRINCIPAL PARTS 4 FLAT-BED-ATTACHMENT 5 Removing the flat-bed attachment 5 Accessory compartment 5 ADDITIONAL ACCESSORIES 6 OPTIONAL ACCESSORIES 7 POWER SUPPLY 8 CONTROLS 9 Selection keys 9 Operation buttons 9 LCD screen 10 LCD ...
CONTENTS CHAPTER 1 SETTING UP 4 PRINCIPAL PARTS 4 FLAT-BED-ATTACHMENT 5 Removing the flat-bed attachment 5 Accessory compartment 5 ADDITIONAL ACCESSORIES 6 OPTIONAL ACCESSORIES 7 POWER SUPPLY 8 CONTROLS 9 Selection keys 9 Operation buttons 9 LCD screen 10 LCD ...

Users Manual - English
Page 6
... 4 MY CUSTOM STITCHTM (CREATE YOUR OWN STITCH DESIGNS) 77 DESIGNING THE STITCH 77 ENTERING STITCH DATA 79 EDITING STITCH DATA 81 Moving a point 81 Moving part or all of the design 82 Inserting new points 82 STORING A STITCH DESIGN THAT YOU HAVE CREATED 84 RETRIEVING A STITCH DESIGN THAT HAS BEEN SAVED...
... 4 MY CUSTOM STITCHTM (CREATE YOUR OWN STITCH DESIGNS) 77 DESIGNING THE STITCH 77 ENTERING STITCH DATA 79 EDITING STITCH DATA 81 Moving a point 81 Moving part or all of the design 82 Inserting new points 82 STORING A STITCH DESIGN THAT YOU HAVE CREATED 84 RETRIEVING A STITCH DESIGN THAT HAS BEEN SAVED...

Users Manual - English
Page 7
CONTENTS SETTING UP SEWING UTILITY STITCHES MY CUSTOM STITCHTM (CREATE YOUR OWN STITCH DESIGNS) SETTING UP PRINCIPAL PARTS CHAPTER 1 18 17 16 15 14 13 12 20 1 2 19 8 6 3 4 5 7 11 10 9 1 Handle 2 Bobbin winder 3 Selection keys (Refer to page 9 for more details.) 4 Balance wheel 5 ...
CONTENTS SETTING UP SEWING UTILITY STITCHES MY CUSTOM STITCHTM (CREATE YOUR OWN STITCH DESIGNS) SETTING UP PRINCIPAL PARTS CHAPTER 1 18 17 16 15 14 13 12 20 1 2 19 8 6 3 4 5 7 11 10 9 1 Handle 2 Bobbin winder 3 Selection keys (Refer to page 9 for more details.) 4 Balance wheel 5 ...

Users Manual - English
Page 8
... or as additional accessories. MY CUSTOM STITCHTM (CREATE YOUR OWN STITCH DESIGNS) EMBROIDERING MAINTENANCE ERROR MESSAGES SEWING CHART PATTERNS (PROGRAMMED IN MACHINE) 5 Part Name 1 Buttonhole foot A 2 Embroidery foot Q 3 Overcasting foot G 4 Monogramming foot N 5 Zipper foot I To open the accessory compartment...1 J III 2A 3 4 5 1 9 0 6 78 I 6 Zigzag foot J 7 Blind hem foot R 8 Seam ripper 9 Button sewing foot M 0 Bobbins* A Needle set Part Code X57789-101 XA5891-101 X51162-001 X53840-301 X59370-051 137748-101 X56409-001 X54243-001 130489-001 136492-101 X58358-001 *Only use...
... or as additional accessories. MY CUSTOM STITCHTM (CREATE YOUR OWN STITCH DESIGNS) EMBROIDERING MAINTENANCE ERROR MESSAGES SEWING CHART PATTERNS (PROGRAMMED IN MACHINE) 5 Part Name 1 Buttonhole foot A 2 Embroidery foot Q 3 Overcasting foot G 4 Monogramming foot N 5 Zipper foot I To open the accessory compartment...1 J III 2A 3 4 5 1 9 0 6 78 I 6 Zigzag foot J 7 Blind hem foot R 8 Seam ripper 9 Button sewing foot M 0 Bobbins* A Needle set Part Code X57789-101 XA5891-101 X51162-001 X53840-301 X59370-051 137748-101 X56409-001 X54243-001 130489-001 136492-101 X58358-001 *Only use...

Users Manual - English
Page 9
Part Name 1 Presser foot adapter 2 Seam ripper 3 Screwa (for securing presser foot) 4 Scissors 5 Chalk pen 6 Cleaning brush 7 Eyelet punch 8 Screwdriver (large) 9 Screwdriver (small) 0 Spool cap (small) A...SETTING UP SEWING UTILITY STITCHES MY CUSTOM STITCHTM (CREATE YOUR OWN STITCH DESIGNS) ADDITIONAL ACCESSORIES 1 2 3 4 5 6 7 8 9 : A B C D E F G H I Grid sheet J Hard case K Bobbin thread L Embroidery cards M Stabilizer material Part Code XA6027-001 X54243-001 XA5904-051 184783-001 184944-001 XA4527-001 135793-001 X55467-051 X55468-051 130013-003 130012-003 XA3336-051...
Part Name 1 Presser foot adapter 2 Seam ripper 3 Screwa (for securing presser foot) 4 Scissors 5 Chalk pen 6 Cleaning brush 7 Eyelet punch 8 Screwdriver (large) 9 Screwdriver (small) 0 Spool cap (small) A...SETTING UP SEWING UTILITY STITCHES MY CUSTOM STITCHTM (CREATE YOUR OWN STITCH DESIGNS) ADDITIONAL ACCESSORIES 1 2 3 4 5 6 7 8 9 : A B C D E F G H I Grid sheet J Hard case K Bobbin thread L Embroidery cards M Stabilizer material Part Code XA6027-001 X54243-001 XA5904-051 184783-001 184944-001 XA4527-001 135793-001 X55467-051 X55468-051 130013-003 130012-003 XA3336-051...

Users Manual - English
Page 10
...MAINTENANCE EMBROIDERING MY CUSTOM STITCHTM (CREATE YOUR OWN STITCH DESIGNS) UTILITY STITCHES SEWING SETTING UP CONTENTS c When using the extra-large embroidery frame. Part Name 2 No. 25 Equestrian No. 27 Birds No. 28 Christmas No. 29 Lace No. 30 Wildlife animals No. 31 Large flower ...SA342 SA343 SA344 SA345 SA346 SA347 SA348 SA349 SA350 SA425 X81064-001 a This unit cannot be compatible with memory card S1. OPTIONAL ACCESSORIES 1 2 3 4 No. Part Name 1 Side cutter Embroidery cardsa No. 3 Dinosaur No. 6 Moskowitz's World No. 7 Country Life No. 8 Holiday No. 9 Hobby Craft No. 10 ...
...MAINTENANCE EMBROIDERING MY CUSTOM STITCHTM (CREATE YOUR OWN STITCH DESIGNS) UTILITY STITCHES SEWING SETTING UP CONTENTS c When using the extra-large embroidery frame. Part Name 2 No. 25 Equestrian No. 27 Birds No. 28 Christmas No. 29 Lace No. 30 Wildlife animals No. 31 Large flower ...SA342 SA343 SA344 SA345 SA346 SA347 SA348 SA349 SA350 SA425 X81064-001 a This unit cannot be compatible with memory card S1. OPTIONAL ACCESSORIES 1 2 3 4 No. Part Name 1 Side cutter Embroidery cardsa No. 3 Dinosaur No. 6 Moskowitz's World No. 7 Country Life No. 8 Holiday No. 9 Hobby Craft No. 10 ...
Users Manual - English
Page 14
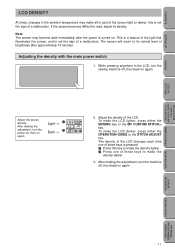
... CUSTOM STITCHTM (CREATE YOUR OWN STITCH DESIGNS) EMBROIDERING MAINTENANCE ERROR MESSAGES SEWING CHART PATTERNS (PROGRAMMED IN MACHINE) 11 Note The screen may make all or part of the LCD. Light → 1 Dark → 2 2. To make the LCD darker, press either the SEWING key or the MY CUSTOM STITCHTM key. this key...
... CUSTOM STITCHTM (CREATE YOUR OWN STITCH DESIGNS) EMBROIDERING MAINTENANCE ERROR MESSAGES SEWING CHART PATTERNS (PROGRAMMED IN MACHINE) 11 Note The screen may make all or part of the LCD. Light → 1 Dark → 2 2. To make the LCD darker, press either the SEWING key or the MY CUSTOM STITCHTM key. this key...
Users Manual - English
Page 23
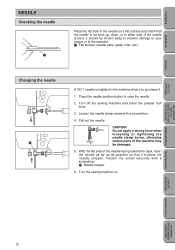
... damage to your project or to raise the needle. 2. CAUTION Do not apply a strong force when loosening or tightening the needle clamp screw, otherwise certain parts of the needle facing toward the back, insert the needle as possible so that it . 1.
... damage to your project or to raise the needle. 2. CAUTION Do not apply a strong force when loosening or tightening the needle clamp screw, otherwise certain parts of the needle facing toward the back, insert the needle as possible so that it . 1.
Users Manual - English
Page 41
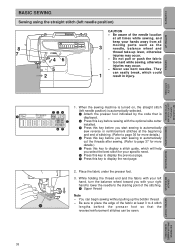
... stitch for your specific need. 6 Press this key to display the previous page. 7 Press this key before sewing with your hands away from all 3 moving parts such as the needle, balance wheel and thread take-up the bobbin thread. - Do not pull or push the fabric too hard while sewing, otherwise...
... stitch for your specific need. 6 Press this key to display the previous page. 7 Press this key before sewing with your hands away from all 3 moving parts such as the needle, balance wheel and thread take-up the bobbin thread. - Do not pull or push the fabric too hard while sewing, otherwise...
Users Manual - English
Page 59
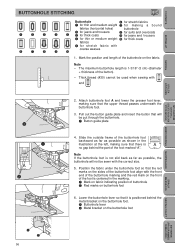
... align with and . 2. Note - Thick thread (#30) cannot be put through the buttonhole. 1 Button guide plate 4. Note If the buttonhole foot is positioned behind the part of buttonhole 3 2 Red marks on the buttonhole foot EMBROIDERING MAINTENANCE ERROR MESSAGES SEWING CHART PATTERNS (PROGRAMMED IN MACHINE) 1 2 56 CONTENTS SETTING UP SEWING UTILITY STITCHES...
... align with and . 2. Note - Thick thread (#30) cannot be put through the buttonhole. 1 Button guide plate 4. Note If the buttonhole foot is positioned behind the part of buttonhole 3 2 Red marks on the buttonhole foot EMBROIDERING MAINTENANCE ERROR MESSAGES SEWING CHART PATTERNS (PROGRAMMED IN MACHINE) 1 2 56 CONTENTS SETTING UP SEWING UTILITY STITCHES...
Users Manual - English
Page 63
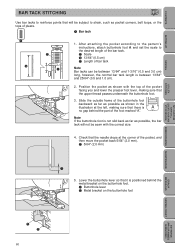
... the left, making sure that it is between 13/64" and 1-3/16" (0.5 and 3.0 cm) long, however, the normal bar tack length is positioned behind the part of pleats. 1 Bar tack 1 3 1 2 1. After attaching the pocket according to the pattern's instructions, attach buttonhole foot A and set the scale to the desired length of...
... the left, making sure that it is between 13/64" and 1-3/16" (0.5 and 3.0 cm) long, however, the normal bar tack length is positioned behind the part of pleats. 1 Bar tack 1 3 1 2 1. After attaching the pocket according to the pattern's instructions, attach buttonhole foot A and set the scale to the desired length of...

Users Manual - English
Page 65
... of the foot marked "A". Check that the needle drops at the left, making sure that there is 1-3/16" (3.0 cm). 3 5 3 5 2. Once sewing is positioned behind the part of the buttonhole foot backward as far as possible as possible, the darning will not be sewn with the correct size. 4. Lower the buttonhole lever...
... of the foot marked "A". Check that the needle drops at the left, making sure that there is 1-3/16" (3.0 cm). 3 5 3 5 2. Once sewing is positioned behind the part of the buttonhole foot backward as far as possible as possible, the darning will not be sewn with the correct size. 4. Lower the buttonhole lever...
Users Manual - English
Page 80
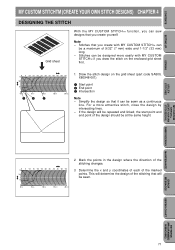
..., close the design by intersecting lines. - If the design will determine the design of the stitching that you draw the stitch on the grid sheet (part code SA500, X80948-001). 1 Start point 2 End point 3 Intersection Note - Determine the x and y coordinates of each of the design should be repeated and linked, the...
..., close the design by intersecting lines. - If the design will determine the design of the stitching that you draw the stitch on the grid sheet (part code SA500, X80948-001). 1 Start point 2 End point 3 Intersection Note - Determine the x and y coordinates of each of the design should be repeated and linked, the...
Users Manual - English
Page 84
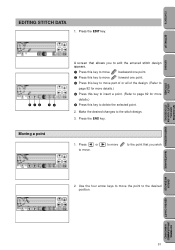
.... 3 Press this key to move to the point that allows you wish 2. Press or to move the point to delete the selected point. 2. to move part of or all of the design. (Refer to page 82 for more details.) 4 Press this key to insert a point. (Refer to page 82 for more...
.... 3 Press this key to move to the point that allows you wish 2. Press or to move the point to delete the selected point. 2. to move part of or all of the design. (Refer to page 82 for more details.) 4 Press this key to insert a point. (Refer to page 82 for more...

Users Manual - English
Page 85
... YOUR OWN STITCH DESIGNS) EMBROIDERING MAINTENANCE ERROR MESSAGES SEWING CHART PATTERNS (PROGRAMMED IN MACHINE) 82 Inserting new points 1. CONTENTS SETTING UP SEWING UTILITY STITCHES Moving part or all points that come after it are surrounded by a box. (This indicates the area that you wish to add a new point to the desired...
... YOUR OWN STITCH DESIGNS) EMBROIDERING MAINTENANCE ERROR MESSAGES SEWING CHART PATTERNS (PROGRAMMED IN MACHINE) 82 Inserting new points 1. CONTENTS SETTING UP SEWING UTILITY STITCHES Moving part or all points that come after it are surrounded by a box. (This indicates the area that you wish to add a new point to the desired...
Users Manual - English
Page 92
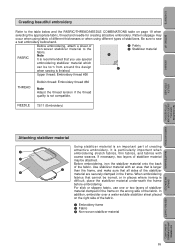
... is finished. For slick or slippery fabric, use special embroidering stabilizer material which can be torn from around the design 2 when sewing is an important part of stabilizer material clamped in the frame. FABRIC Note It is recommended that cannot be attached. It is difficult, place the stabilizer material underneath the...
... is finished. For slick or slippery fabric, use special embroidering stabilizer material which can be torn from around the design 2 when sewing is an important part of stabilizer material clamped in the frame. FABRIC Note It is recommended that cannot be attached. It is difficult, place the stabilizer material underneath the...

