Accessory Catalog
Page 2
... straw hats Contents 02 FZ2-B1 Brother Sewing Machine Lineup 03-04 Brother General Sewing Accessories 05-16 Brother Embellishment Feet 17-24 Brother Quilting Feet 25-28 Brother Embroidery Accessories 29-66 Brother Sewing Machine Attachments for PQ Series 0637-0740 Brother Serger/Overlock Feet 71-74 Brother Cover Stitch Feet 75-78 More From Brother 79 Index 80 You can always...
... straw hats Contents 02 FZ2-B1 Brother Sewing Machine Lineup 03-04 Brother General Sewing Accessories 05-16 Brother Embellishment Feet 17-24 Brother Quilting Feet 25-28 Brother Embroidery Accessories 29-66 Brother Sewing Machine Attachments for PQ Series 0637-0740 Brother Serger/Overlock Feet 71-74 Brother Cover Stitch Feet 75-78 More From Brother 79 Index 80 You can always...
Accessory Catalog
Page 3
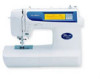
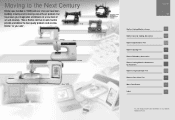
.... Please note the correct SA accessory number. Innov-is 900D/ SE-350/ HE-240/LB6770 Sewing & Embroidery Combination Machines Entry-level model that are easily created from the extensive Brother Embroidery Library. * Brother embroidery accessories are compatible with features that have Innov-is the perfect multifunction machine. Please refer to the following pages to 40, PS21...
.... Please note the correct SA accessory number. Innov-is 900D/ SE-350/ HE-240/LB6770 Sewing & Embroidery Combination Machines Entry-level model that are easily created from the extensive Brother Embroidery Library. * Brother embroidery accessories are compatible with features that have Innov-is the perfect multifunction machine. Please refer to the following pages to 40, PS21...

Accessory Catalog
Page 17
.... Basting Function to prevent shrinkage and misalignment of your top of making beautiful borders. Brother Embroidery Accessories 31 QuattroTM 6000D Embroidery Card Reader QuattroTM 6000D Border Frame Innov-is 4000D Premium Package SAECR1 Only compatible with USB...sewing stitches within the frame. - The simple and easy USB attachment takes seconds to the next location! 4000D Premium Package Exclusively for easier viewing of designs will work beautifully in USB port on your LCD screen background color for the Innov-is 4000D Premium Upgrade Package II Brother Embroidery...
.... Basting Function to prevent shrinkage and misalignment of your top of making beautiful borders. Brother Embroidery Accessories 31 QuattroTM 6000D Embroidery Card Reader QuattroTM 6000D Border Frame Innov-is 4000D Premium Package SAECR1 Only compatible with USB...sewing stitches within the frame. - The simple and easy USB attachment takes seconds to the next location! 4000D Premium Package Exclusively for easier viewing of designs will work beautifully in USB port on your LCD screen background color for the Innov-is 4000D Premium Upgrade Package II Brother Embroidery...
Accessory Catalog
Page 33
...to your next embroidery, quilting or sewing project. Some hoops can easily be used thread colors. Brother Embroidery Accessories 63 Free-Standing Ten Spool Thread Stand Ten Spool Thread Stand Embroidery Machine Hoops Brother Embroidery Accessories 64 For all embroidery and sewing/embroidery machines. Spend... Large: 260 x 160 mm (approx. 10-1/4 x 6-1/4 inches) SA428 • Medium Plus: 180 x 130 mm (approx. 7 x 5 inches) SA429 For PC-6500, 8200, 8500, 8500D series: • Extra-large: 300 x 130 mm (approx. 12 x 5 inches) • Small: 20 x 60 mm (approx. 1 x 2-1/2 ...
...to your next embroidery, quilting or sewing project. Some hoops can easily be used thread colors. Brother Embroidery Accessories 63 Free-Standing Ten Spool Thread Stand Ten Spool Thread Stand Embroidery Machine Hoops Brother Embroidery Accessories 64 For all embroidery and sewing/embroidery machines. Spend... Large: 260 x 160 mm (approx. 10-1/4 x 6-1/4 inches) SA428 • Medium Plus: 180 x 130 mm (approx. 7 x 5 inches) SA429 For PC-6500, 8200, 8500, 8500D series: • Extra-large: 300 x 130 mm (approx. 12 x 5 inches) • Small: 20 x 60 mm (approx. 1 x 2-1/2 ...
Accessory Catalog
Page 34
... embroidery only machines, PE750D and PE700II. It is ideal for placement on a wide range of thread per spool. This pack gives you just the right color for the Quattro™ 6000D, Duetta™ 4500D/Innov-is 4000D, 2500D, 1500D, 1200 series, PC ... colors specifically designed for greater utility and space saving. Stabilizers and Water Soluble Stabilizers When doing machine embroidery, the use the Brother Bobbin Thread designed specifically for Brother sewing and embroidering machines. 61 Color Thread Set with Wooden Rack ETKSP999 PacesetterTM Polyester Threads (61 Color Thread...
... embroidery only machines, PE750D and PE700II. It is ideal for placement on a wide range of thread per spool. This pack gives you just the right color for the Quattro™ 6000D, Duetta™ 4500D/Innov-is 4000D, 2500D, 1500D, 1200 series, PC ... colors specifically designed for greater utility and space saving. Stabilizers and Water Soluble Stabilizers When doing machine embroidery, the use the Brother Bobbin Thread designed specifically for Brother sewing and embroidering machines. 61 Color Thread Set with Wooden Rack ETKSP999 PacesetterTM Polyester Threads (61 Color Thread...

Users Manual - English
Page 6
...embroidering position 105 Changing the pattern direction 106 Mirror imaging patterns 106 Embroidering from a specific starting point..107 Checking the embroidery area 107 Changing the size of patterns 108 Changing the thread density 109 MEMORY 110 Saving character combinations in the ... 124 ERROR MESSAGES 125 Warning messages 125 Operation messages 128 Troubleshooting 129 Thread and stitch problems 130 Mechanical problems 131 SEWING CHART 132 PATTERNS (PROGRAMMED IN MACHINE) 135 Utility stitches 135 Character embroidering 135 Frame pattern embroidering 136 Floral alphabet...
...embroidering position 105 Changing the pattern direction 106 Mirror imaging patterns 106 Embroidering from a specific starting point..107 Checking the embroidery area 107 Changing the size of patterns 108 Changing the thread density 109 MEMORY 110 Saving character combinations in the ... 124 ERROR MESSAGES 125 Warning messages 125 Operation messages 128 Troubleshooting 129 Thread and stitch problems 130 Mechanical problems 131 SEWING CHART 132 PATTERNS (PROGRAMMED IN MACHINE) 135 Utility stitches 135 Character embroidering 135 Frame pattern embroidering 136 Floral alphabet...

Users Manual - English
Page 8
... supplied in figure III. MY CUSTOM STITCHTM (CREATE YOUR OWN STITCH DESIGNS) EMBROIDERING MAINTENANCE ERROR MESSAGES SEWING CHART PATTERNS (PROGRAMMED IN MACHINE) 5 Part Name 1 Buttonhole foot A 2 Embroidery foot Q 3 Overcasting foot G 4 Monogramming foot N 5 Zipper foot I To open the accessory...1 Presser foot code III Compartment accessories The location of the sewing machine. 1 Flat-bed attachment 1 Accessory compartment I II 1 J III 2A 3 4 5 1 9 0 6 78 I 6 Zigzag foot J 7 Blind hem foot R 8 Seam ripper 9 Button sewing foot M 0 Bobbins* A Needle set Part Code X57789-...
... supplied in figure III. MY CUSTOM STITCHTM (CREATE YOUR OWN STITCH DESIGNS) EMBROIDERING MAINTENANCE ERROR MESSAGES SEWING CHART PATTERNS (PROGRAMMED IN MACHINE) 5 Part Name 1 Buttonhole foot A 2 Embroidery foot Q 3 Overcasting foot G 4 Monogramming foot N 5 Zipper foot I To open the accessory...1 Presser foot code III Compartment accessories The location of the sewing machine. 1 Flat-bed attachment 1 Accessory compartment I II 1 J III 2A 3 4 5 1 9 0 6 78 I 6 Zigzag foot J 7 Blind hem foot R 8 Seam ripper 9 Button sewing foot M 0 Bobbins* A Needle set Part Code X57789-...

Users Manual - English
Page 9
... with this machine model PC6500. CONTENTS SETTING UP SEWING UTILITY STITCHES MY CUSTOM STITCHTM (CREATE YOUR OWN STITCH DESIGNS) ADDITIONAL ACCESSORIES 1 2 3 4 5 6 7 8 9 : A B C D E F G H I Grid sheet J Hard case K Bobbin thread L Embroidery cards M Stabilizer material Part Code XA6027-001 X54243...Spool cap (small) A Spool cap (large) B Extra spool pinb C Spool felt D Disc-shaped screwdriver E Spool netd F Embroidery set (large) G Screw (for securing adapter) H Foot controller I J K L M No. b The extra spool pin provided as an accessory should be used ....
... with this machine model PC6500. CONTENTS SETTING UP SEWING UTILITY STITCHES MY CUSTOM STITCHTM (CREATE YOUR OWN STITCH DESIGNS) ADDITIONAL ACCESSORIES 1 2 3 4 5 6 7 8 9 : A B C D E F G H I Grid sheet J Hard case K Bobbin thread L Embroidery cards M Stabilizer material Part Code XA6027-001 X54243...Spool cap (small) A Spool cap (large) B Extra spool pinb C Spool felt D Disc-shaped screwdriver E Spool netd F Embroidery set (large) G Screw (for securing adapter) H Foot controller I J K L M No. b The extra spool pin provided as an accessory should be used ....

Users Manual - English
Page 10
...SA313 SA314 SA315 SA316 SA319 SA320 SA321 SA323 No. WARNING Embroidery cards purchased in other countries may not be used together with your machine. b Refer to page 15. 7 PATTERNS (PROGRAMMED IN MACHINE) SEWING CHART ERROR MESSAGES MAINTENANCE EMBROIDERING MY CUSTOM STITCHTM (CREATE YOUR... OWN STITCH DESIGNS) UTILITY STITCHES SEWING SETTING UP CONTENTS Part Name 2 No. 25 Equestrian No. 27 Birds No. 28 ...
...SA313 SA314 SA315 SA316 SA319 SA320 SA321 SA323 No. WARNING Embroidery cards purchased in other countries may not be used together with your machine. b Refer to page 15. 7 PATTERNS (PROGRAMMED IN MACHINE) SEWING CHART ERROR MESSAGES MAINTENANCE EMBROIDERING MY CUSTOM STITCHTM (CREATE YOUR... OWN STITCH DESIGNS) UTILITY STITCHES SEWING SETTING UP CONTENTS Part Name 2 No. 25 Equestrian No. 27 Birds No. 28 ...

Users Manual - English
Page 12
...OWN STITCH DESIGNS) key You can use the "MY CUSTOM STITCHTM" (function for making own stitch) to sew patterns that you have drawn yourself. (Refer to page 77.) 3 EMBROIDERY key When the embroidery unit is installed, press this key to display a screen that allows you to select letters and other ... such as upper threading, bobbin winding and bobbin thread setting. (Refer to page 35 for details.) 6 STITCH ADJUST (stitch adjustment) key When the embroidery unit is not installed, press this key to display a screen that allows you to change the stitch width and length, and 1 Thread cutter button...
...OWN STITCH DESIGNS) key You can use the "MY CUSTOM STITCHTM" (function for making own stitch) to sew patterns that you have drawn yourself. (Refer to page 77.) 3 EMBROIDERY key When the embroidery unit is installed, press this key to display a screen that allows you to select letters and other ... such as upper threading, bobbin winding and bobbin thread setting. (Refer to page 35 for details.) 6 STITCH ADJUST (stitch adjustment) key When the embroidery unit is not installed, press this key to display a screen that allows you to change the stitch width and length, and 1 Thread cutter button...
Users Manual - English
Page 21
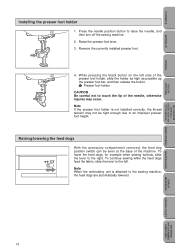
... then release the button. 1 Presser foot holder CAUTION Be careful not to raise the needle, and then turn off the sewing machine. 2. Note When the embroidery unit is not installed correctly, the thread tension may not be seen at the base of the needle, otherwise injuries may... occur. MY CUSTOM STITCHTM (CREATE YOUR OWN STITCH DESIGNS) EMBROIDERING MAINTENANCE ERROR MESSAGES SEWING CHART PATTERNS (PROGRAMMED IN MACHINE) 18 ...
... then release the button. 1 Presser foot holder CAUTION Be careful not to raise the needle, and then turn off the sewing machine. 2. Note When the embroidery unit is not installed correctly, the thread tension may not be seen at the base of the needle, otherwise injuries may... occur. MY CUSTOM STITCHTM (CREATE YOUR OWN STITCH DESIGNS) EMBROIDERING MAINTENANCE ERROR MESSAGES SEWING CHART PATTERNS (PROGRAMMED IN MACHINE) 18 ...

Users Manual - English
Page 77
...MAINTENANCE ERROR MESSAGES Shell tuck stitching 1. and select a strong thread 2. Unfold the fabric and iron the tucks down to one side. 74 SEWING CHART PATTERNS (PROGRAMMED IN MACHINE) Make sure that the needle drops slightly off the edge of crazy quilts or to decorate hems. For a... more ornamental stitch, use contrasting thread colors or decorative embroidery thread. CONTENTS SETTING UP DECORATIVE STITCHING 1 J N 1 Decorative 2 Satin stitch 2 These stitches can be used to embellish the seams of the ...
...MAINTENANCE ERROR MESSAGES Shell tuck stitching 1. and select a strong thread 2. Unfold the fabric and iron the tucks down to one side. 74 SEWING CHART PATTERNS (PROGRAMMED IN MACHINE) Make sure that the needle drops slightly off the edge of crazy quilts or to decorate hems. For a... more ornamental stitch, use contrasting thread colors or decorative embroidery thread. CONTENTS SETTING UP DECORATIVE STITCHING 1 J N 1 Decorative 2 Satin stitch 2 These stitches can be used to embellish the seams of the ...

Users Manual - English
Page 82
... 3. Press the SET key to erase the last point set . 7 Press this key to finish creating the stitch and display the screen that the embroidery unit is drawn on the grid sheet until the stitch design is not attached. 1 1. Press the MY CUSTOM STITCH key. 1 MY CUSTOM STITCH ...key SETTING UP SEWING UTILITY STITCHES MY CUSTOM STITCHTM (CREATE YOUR OWN STITCH DESIGNS) EMBROIDERING 23 1 9 45 6 7 8 1 This area displays the stitch that is being created. ...
... 3. Press the SET key to erase the last point set . 7 Press this key to finish creating the stitch and display the screen that the embroidery unit is drawn on the grid sheet until the stitch design is not attached. 1 1. Press the MY CUSTOM STITCH key. 1 MY CUSTOM STITCH ...key SETTING UP SEWING UTILITY STITCHES MY CUSTOM STITCHTM (CREATE YOUR OWN STITCH DESIGNS) EMBROIDERING 23 1 9 45 6 7 8 1 This area displays the stitch that is being created. ...

Users Manual - English
Page 89
...may occur. It is tightly attached to the presser foot bar. - CONTENTS SETTING UP SEWING EMBROIDERING SETUP CHAPTER 5 Installing embroidery foot Q CAUTION Be sure to turn off the power before attaching embroidery foot Q. Slide the bracket on and the start/stop button is accidentally pressed, the ...needle position button to raise the needle, and then turn off the sewing machine. 2. Note - A 75/11-size needle might bend or break, which could result in serious injury. 5 1. If the power is left on embroidery foot Q up onto the presser foot bar, and then fasten it ...
...may occur. It is tightly attached to the presser foot bar. - CONTENTS SETTING UP SEWING EMBROIDERING SETUP CHAPTER 5 Installing embroidery foot Q CAUTION Be sure to turn off the power before attaching embroidery foot Q. Slide the bracket on and the start/stop button is accidentally pressed, the ...needle position button to raise the needle, and then turn off the sewing machine. 2. Note - A 75/11-size needle might bend or break, which could result in serious injury. 5 1. If the power is left on embroidery foot Q up onto the presser foot bar, and then fasten it ...

Users Manual - English
Page 90
... level surface. 1. Always set your hands near the embroidery arm, otherwise injuries may occur. - Insert the connector on a flat, level surface, slide the embroidery unit towards the machine. Note With the sewing machine on the embroidery unit firmly into the connecting slot. Note If the... CAUTION - Do not carry the machine with the embroidery unit connected. - After the error condition is not attached and try initializing the embroidery unit again. 87 SEWING CHART PATTERNS (PROGRAMMED IN MACHINE) Please note that a embroidery frame is corrected, the message shown at the left...
... level surface. 1. Always set your hands near the embroidery arm, otherwise injuries may occur. - Insert the connector on a flat, level surface, slide the embroidery unit towards the machine. Note With the sewing machine on the embroidery unit firmly into the connecting slot. Note If the... CAUTION - Do not carry the machine with the embroidery unit connected. - After the error condition is not attached and try initializing the embroidery unit again. 87 SEWING CHART PATTERNS (PROGRAMMED IN MACHINE) Please note that a embroidery frame is corrected, the message shown at the left...
Users Manual - English
Page 91
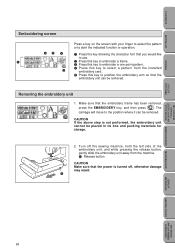
...MACHINE) 88 The carriage will move to the position where it can be removed. Make sure that the embroidery unit can be removed. Removing the embroidery unit 1. CONTENTS SETTING UP SEWING UTILITY STITCHES MY CUSTOM STITCHTM (CREATE YOUR OWN STITCH DESIGNS) Embroidering screen 23 4 1 5 Press a ... then press . CAUTION If the above step is turned off the sewing machine, hold the left side of the embroidery unit, and while pressing the release button, gently slide the embroidery unit away from the installed embroidery card. 5 Press this key to select a pattern from the machine...
...MACHINE) 88 The carriage will move to the position where it can be removed. Make sure that the embroidery unit can be removed. Removing the embroidery unit 1. CONTENTS SETTING UP SEWING UTILITY STITCHES MY CUSTOM STITCHTM (CREATE YOUR OWN STITCH DESIGNS) Embroidering screen 23 4 1 5 Press a ... then press . CAUTION If the above step is turned off the sewing machine, hold the left side of the embroidery unit, and while pressing the release button, gently slide the embroidery unit away from the installed embroidery card. 5 Press this key to select a pattern from the machine...
Users Manual - English
Page 92
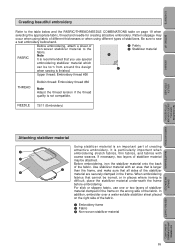
...embroidering stabilizer material which can be torn from around the design 2 when sewing is not compatible. Before embroidering, attach a sheet of 1 Fabric non-woven stabilizer material to sew a test embroidery beforehand. If necessary, two layers of stabilizer material may occur when using ...of the fabric. It is difficult, place the stabilizer material underneath the frame before embroidering. CONTENTS SETTING UP SEWING Creating beautiful embroidery Refer to the table below and the FABRIC/THREAD/NEEDLE COMBINATIONS table on page 19 when selecting the appropriate fabric...
...embroidering stabilizer material which can be torn from around the design 2 when sewing is not compatible. Before embroidering, attach a sheet of 1 Fabric non-woven stabilizer material to sew a test embroidery beforehand. If necessary, two layers of stabilizer material may occur when using ...of the fabric. It is difficult, place the stabilizer material underneath the frame before embroidering. CONTENTS SETTING UP SEWING Creating beautiful embroidery Refer to the table below and the FABRIC/THREAD/NEEDLE COMBINATIONS table on page 19 when selecting the appropriate fabric...
Users Manual - English
Page 93
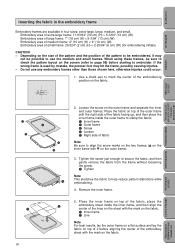
..., it before starting to help reduce pattern distortions while embroidering. 4. Use a chalk pen to use any embroidery frames other than those shown here, otherwise injuries could occur. 1. SEWING UTILITY STITCHES MY CUSTOM STITCHTM (CREATE YOUR OWN STITCH DESIGNS) EMBROIDERING MAINTENANCE 1 2 1 90 4 3 ... Remove the inner frame. 5. Do not use the medium and small frames. ERROR MESSAGES SEWING CHART PATTERNS (PROGRAMMED IN MACHINE) Depending on the outer frame and separate the inner and outer frames. Embroidery area of extra-large frame: 11-53/64" (30 cm) (H) × 5-3/64"...
..., it before starting to help reduce pattern distortions while embroidering. 4. Use a chalk pen to use any embroidery frames other than those shown here, otherwise injuries could occur. 1. SEWING UTILITY STITCHES MY CUSTOM STITCHTM (CREATE YOUR OWN STITCH DESIGNS) EMBROIDERING MAINTENANCE 1 2 1 90 4 3 ... Remove the inner frame. 5. Do not use the medium and small frames. ERROR MESSAGES SEWING CHART PATTERNS (PROGRAMMED IN MACHINE) Depending on the outer frame and separate the inner and outer frames. Embroidery area of extra-large frame: 11-53/64" (30 cm) (H) × 5-3/64"...
Users Manual - English
Page 94
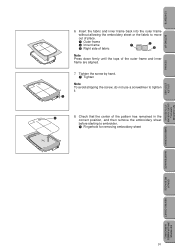
Check that the center of the pattern has remained in the correct position, and then remove the embroidery sheet before starting to move out of place. 1 Outer frame 2 Inner frame 3 Right side of fabric 1 2 3 Note Press down firmly... into the outer frame without allowing the embroidery sheet or the fabric to embroider. 1 Fingerhole for removing embroidery sheet UTILITY STITCHES MY CUSTOM STITCHTM (CREATE YOUR OWN STITCH DESIGNS) EMBROIDERING MAINTENANCE ERROR MESSAGES SEWING CHART PATTERNS (PROGRAMMED IN MACHINE) 91 CONTENTS SETTING UP SEWING 6. Tighten the screw by hand. 1...
Check that the center of the pattern has remained in the correct position, and then remove the embroidery sheet before starting to move out of place. 1 Outer frame 2 Inner frame 3 Right side of fabric 1 2 3 Note Press down firmly... into the outer frame without allowing the embroidery sheet or the fabric to embroider. 1 Fingerhole for removing embroidery sheet UTILITY STITCHES MY CUSTOM STITCHTM (CREATE YOUR OWN STITCH DESIGNS) EMBROIDERING MAINTENANCE ERROR MESSAGES SEWING CHART PATTERNS (PROGRAMMED IN MACHINE) 91 CONTENTS SETTING UP SEWING 6. Tighten the screw by hand. 1...

Users Manual - English
Page 95
... bracket of the fabric is facing up to page 87.) 1. CONTENTS SETTING UP SEWING UTILITY STITCHES Attaching the embroidery frame to the embroidery arm CAUTION Be sure to wait until the embroidery unit has finished initializing before trying to attach the embroidery frame. (Refer to remove it. 1 Release lever 1 MY CUSTOM STITCHTM (CREATE YOUR OWN...
... bracket of the fabric is facing up to page 87.) 1. CONTENTS SETTING UP SEWING UTILITY STITCHES Attaching the embroidery frame to the embroidery arm CAUTION Be sure to wait until the embroidery unit has finished initializing before trying to attach the embroidery frame. (Refer to remove it. 1 Release lever 1 MY CUSTOM STITCHTM (CREATE YOUR OWN...


