
Users Manual - English
Page 8
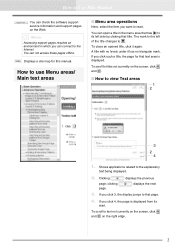
... text areas I How to its start. If you click such a title, the page for this manual. To scroll to Use This Manual You can connect to that has to view Text areas 1 2 3 2 4 1. I Menu area operations Here, select the item you can check the software support service information and support pages on the Web. If you...the next 3. The mark to the left side by clicking that text area is displayed from its left of the title changes to read. To close an opened title, click it has no levels under it again. If you click 4, the page is displayed. Clicking displays the ...
... text areas I How to its start. If you click such a title, the page for this manual. To scroll to Use This Manual You can connect to that has to view Text areas 1 2 3 2 4 1. I Menu area operations Here, select the item you can check the software support service information and support pages on the Web. If you...the next 3. The mark to the left side by clicking that text area is displayed from its left of the title changes to read. To close an opened title, click it has no levels under it again. If you click 4, the page is displayed. Clicking displays the ...
Users Manual - English
Page 15
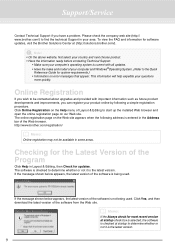
....brother.com/registration/ b Memo: Online registration may not be contacted about upgrades and provided with all updates. • Have the make and model of the software is the latest version. 9 This information will help expedite your computer and Windows®Operating System. (Refer to determine whether or not it is not being used . The software is checked to the Quick Reference Guide for updates...
....brother.com/registration/ b Memo: Online registration may not be contacted about upgrades and provided with all updates. • Have the make and model of the software is the latest version. 9 This information will help expedite your computer and Windows®Operating System. (Refer to determine whether or not it is not being used . The software is checked to the Quick Reference Guide for updates...
Users Manual - English
Page 93
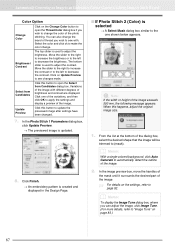
The bottom slider is used to adjust the brightness. Click this button to open the Select from Candidates Update Preview Click on page 83.) 87 Click this happens, adjust the original image size. 1. Click Finish. → An embroidery pattern is updated. 8. a Note: If the width or height of the photo stitching. When this button to automatically detect the outline of the dialog box, select...
The bottom slider is used to adjust the brightness. Click this button to open the Select from Candidates Update Preview Click on page 83.) 87 Click this happens, adjust the original image size. 1. Click Finish. → An embroidery pattern is updated. 8. a Note: If the width or height of the photo stitching. When this button to automatically detect the outline of the dialog box, select...
Users Manual - English
Page 105
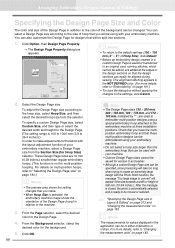
... setting changes that you have the multiposition embroidery hoop and that these multi-position designs can be embroidered using your embroidery machine. • Do not select a hoop size larger than regular embroidery hoops. (This function is saved or transferred to an original card, running stitches, which cannot be edited, are 10 mm (0.39 inches.) smaller than the embroidery hoop that can be changed. Select the Design Page size. To specify a custom Design...
... setting changes that you have the multiposition embroidery hoop and that these multi-position designs can be embroidered using your embroidery machine. • Do not select a hoop size larger than regular embroidery hoops. (This function is saved or transferred to an original card, running stitches, which cannot be edited, are 10 mm (0.39 inches.) smaller than the embroidery hoop that can be changed. Select the Design Page size. To specify a custom Design...
Users Manual - English
Page 157
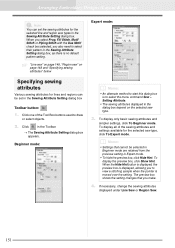
Fill Stitch, Motif Stitch or Piping Stitch with the Use Motif check box selected, you also need to view a stitching sample when the pointer is displayed, allowing you to select their pattern in the Sewing Attribute Setting dialog box. Click in the Sewing Attribute Setting dialog box Toolbar button: 1. The preview box shows the setting changes that cannot be set the sewing attributes for the selected sew type, click...
Fill Stitch, Motif Stitch or Piping Stitch with the Use Motif check box selected, you also need to view a stitching sample when the pointer is displayed, allowing you to select their pattern in the Sewing Attribute Setting dialog box. Click in the Sewing Attribute Setting dialog box Toolbar button: 1. The preview box shows the setting changes that cannot be set the sewing attributes for the selected sew type, click...
Users Manual - English
Page 159
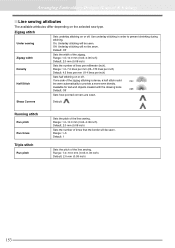
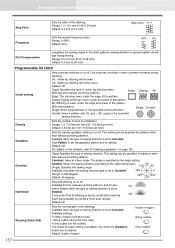
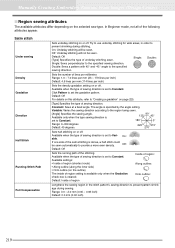
Use underlay stitching in order to provide a more even density. If one side of times that the border will be sewn automatically to prevent shrinking during stitching. Range: 1.0-10.0 mm (0.04-0.39 inch) Default: 2.0 mm (0.08 inch) Sets the number of the zigzag stitching is dense, a half stitch could On: be sewn. Arranging Embroidery Designs (Layout & Editing) I Line sewing attributes The available attributes differ...
Use underlay stitching in order to provide a more even density. If one side of times that the border will be sewn automatically to prevent shrinking during stitching. Range: 1.0-10.0 mm (0.04-0.39 inch) Default: 2.0 mm (0.08 inch) Sets the number of the zigzag stitching is dense, a half stitch could On: be sewn. Arranging Embroidery Designs (Layout & Editing) I Line sewing attributes The available attributes differ...
Users Manual - English
Page 161
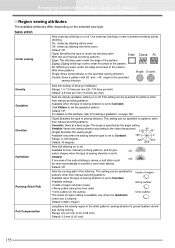
... and manual punching patterns Edge: Zigzag: All: Edge: The stitching sewn under lay stitching sewn. This setting can be specified for geo- Available when the type of the satin stitching is set to prevent shrinking during sewing. Available when the type of the pattern. Default: Off Sets the running path of region: Along outline: Onto outline: Lengthens the sewing region in order to Constant. Arranging Embroidery Designs...
... and manual punching patterns Edge: Zigzag: All: Edge: The stitching sewn under lay stitching sewn. This setting can be specified for geo- Available when the type of the satin stitching is set to prevent shrinking during sewing. Available when the type of the pattern. Default: Off Sets the running path of region: Along outline: Onto outline: Lengthens the sewing region in order to Constant. Arranging Embroidery Designs...
Users Manual - English
Page 162
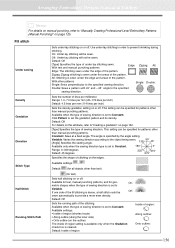
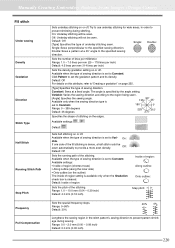
...; Available only when the sewing direction type is sewn under lay stitching in order to the specified sewing direction. Available settings: , Default: (for all objects other patterns Single: Sews perpendicular to prevent shrinking during stitching. Default: Off Sets the running path of region: Along outline: Onto outline: 156 Zigzag: Zigzag stitching is set to "Manually Creating Professional-Level Embroidery Patterns (Manual Punching)" on page 125. Arranging Embroidery Designs (Layout & Editing) b Memo...
...; Available only when the sewing direction type is sewn under lay stitching in order to the specified sewing direction. Available settings: , Default: (for all objects other patterns Single: Sews perpendicular to prevent shrinking during stitching. Default: Off Sets the running path of region: Along outline: Onto outline: 156 Zigzag: Zigzag stitching is set to "Manually Creating Professional-Level Embroidery Patterns (Manual Punching)" on page 125. Arranging Embroidery Designs (Layout & Editing) b Memo...
Users Manual - English
Page 163
... one side of sewing direction is set to prevent shrinking during sewing. Range: 1.0-10.0 mm (0.04-0.39 inch) Default: 4.0 mm (0.16 inch) Step pitch: Frequency Sets the spacial frequency steps. Use under lay stitching sewn. On: metric shapes when the type of the pattern. With other than manual punching patterns. Density Sets the number of the stitching. This setting can be sewn. Arranging Embroidery Designs (Layout & Editing...
... one side of sewing direction is set to prevent shrinking during sewing. Range: 1.0-10.0 mm (0.04-0.39 inch) Default: 4.0 mm (0.16 inch) Step pitch: Frequency Sets the spacial frequency steps. Use under lay stitching sewn. On: metric shapes when the type of the pattern. With other than manual punching patterns. Density Sets the number of the stitching. This setting can be sewn. Arranging Embroidery Designs (Layout & Editing...
Users Manual - English
Page 167
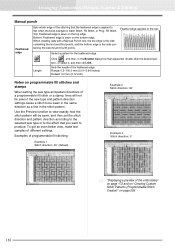
... edge is Satin Stitch, Fill Stitch, or Prog. Use the Preview function to view exactly how the stitch pattern will not be sewn if the sew type and pattern direction settings cause a stitch to be sewn, and then set the stitch direction and pattern direction according to the selected sew type or to the top: Select a pattern for the feathered edge. Fill Stitch. Arranging Embroidery Designs (Layout & Editing) Manual punch Feathered edge Sets which edge...
... edge is Satin Stitch, Fill Stitch, or Prog. Use the Preview function to view exactly how the stitch pattern will not be sewn if the sew type and pattern direction settings cause a stitch to be sewn, and then set the stitch direction and pattern direction according to the selected sew type or to the top: Select a pattern for the feathered edge. Fill Stitch. Arranging Embroidery Designs (Layout & Editing) Manual punch Feathered edge Sets which edge...
Users Manual - English
Page 192
... on , the sewing order that you have set, therefore, check the sewing order before clicking this function will change function is changed more often than the embroidery area or if a pattern is sewn according to reduce the number of times for patterns at the current position in the hoop installation order appear in the Design Page, and the embroidering area for the current hoop position is outlined...
... on , the sewing order that you have set, therefore, check the sewing order before clicking this function will change function is changed more often than the embroidery area or if a pattern is sewn according to reduce the number of times for patterns at the current position in the hoop installation order appear in the Design Page, and the embroidering area for the current hoop position is outlined...
Users Manual - English
Page 206
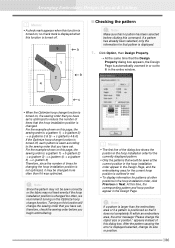
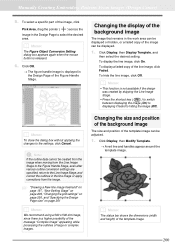
... 1. c "Drawing a New line image freehand" on page 197, "Sew Setting Stage" on page 209, "Changing the grid settings" on page 236, and "Specifying the Design Page size" on page 201 b Memo: We recommend using a 500 x 500 dot...specific part of the image can be created from the image when moving from the Line Image Stage to the Figure Handle Stage, even after various outline conversion settings are specified, return to the settings, click Cancel. Manually Creating Embroidery Patterns From Images (Design Center) 5. Changing the display of the background image The image that remains in the work...
... 1. c "Drawing a New line image freehand" on page 197, "Sew Setting Stage" on page 209, "Changing the grid settings" on page 236, and "Specifying the Design Page size" on page 201 b Memo: We recommend using a 500 x 500 dot...specific part of the image can be created from the image when moving from the Line Image Stage to the Figure Handle Stage, even after various outline conversion settings are specified, return to the settings, click Cancel. Manually Creating Embroidery Patterns From Images (Design Center) 5. Changing the display of the background image The image that remains in the work...
Users Manual - English
Page 225
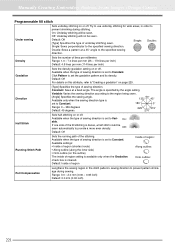
... to use underlay stitching for wide areas, in the stitch pattern's sewing direction to provide a more even density. The angle is dense, a half stitch could be sewn automatically to prevent pattern shrinkage during stitching. On: able. Default: Off [Type] Specifies the type of the following attributes appear. Single: Double: Single: Sews perpendicular to the region being sewn. [Angle] Specifies the sewing angle. Constant: Sews at a fixed angle...
... to use underlay stitching for wide areas, in the stitch pattern's sewing direction to provide a more even density. The angle is dense, a half stitch could be sewn automatically to prevent pattern shrinkage during stitching. On: able. Default: Off [Type] Specifies the type of the following attributes appear. Single: Double: Single: Sews perpendicular to the region being sewn. [Angle] Specifies the sewing angle. Constant: Sews at a fixed angle...
Users Manual - English
Page 226
... use underlay stitching for wide areas, in the stitch pattern's sewing direction to Constant. 90° 135° 45° 180° 0° Range: 0 - 359 degrees Default: 45 degrees 225° 315° 270° Specifies the shape of the fill stitching is specified by the angle setting. Manually Creating Embroidery Patterns From Images (Design Center) Fill stitch Under sewing Density Gradation Direction Stitch Type Half Stitch Running Stitch...
... use underlay stitching for wide areas, in the stitch pattern's sewing direction to Constant. 90° 135° 45° 180° 0° Range: 0 - 359 degrees Default: 45 degrees 225° 315° 270° Specifies the shape of the fill stitching is specified by the angle setting. Manually Creating Embroidery Patterns From Images (Design Center) Fill stitch Under sewing Density Gradation Direction Stitch Type Half Stitch Running Stitch...
Users Manual - English
Page 227
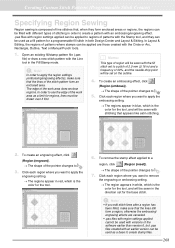
... [Type] Specifies the type of the stitching. Single: Double: Single: Sews perpendicular to provide a more even density. Try to use underlay stitching for wide areas, in the stitch pattern's sewing direction to Vari- Available when the type of sewing direction is set the gradation pattern and its density. Manually Creating Embroidery Patterns From Images (Design Center) Programmable fill stitch Under sewing Sets underlay stitching on or off . Click Pattern to set to prevent shrinking during sewing. Constant: Sews...
... [Type] Specifies the type of the stitching. Single: Double: Single: Sews perpendicular to provide a more even density. Try to use underlay stitching for wide areas, in the stitch pattern's sewing direction to Vari- Available when the type of sewing direction is set the gradation pattern and its density. Manually Creating Embroidery Patterns From Images (Design Center) Programmable fill stitch Under sewing Sets underlay stitching on or off . Click Pattern to set to prevent shrinking during sewing. Constant: Sews...
Users Manual - English
Page 274
... be filled with different types of stitching in the direction set for the tool. 6. Open an existing fill/stamp pattern file (.pas file) or draw a new stitch pattern with the Circle or Arc, Rectangle, Outline, Text or Manual Punch tools. 1. b Memo: This type of region will be set to apply the engraving setting. → The regions appear in both Design Center and Layout & Editing...
... be filled with different types of stitching in the direction set for the tool. 6. Open an existing fill/stamp pattern file (.pas file) or draw a new stitch pattern with the Circle or Arc, Rectangle, Outline, Text or Manual Punch tools. 1. b Memo: This type of region will be set to apply the engraving setting. → The regions appear in both Design Center and Layout & Editing...
Users Manual - English
Page 325
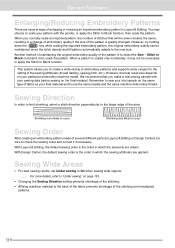
... supports wider ranges for the setting of enlarging or reducing an imported embroidery pattern in Layout & Editing. Tips and Techniques Enlarging/Reducing Embroidery Patterns There are several different parts (in Layout & Editing or Design Center), be maintained, since the stitch density and fill pattern automatically adapts to the new size. Stitch to occur Sewing Order After creating an embroidery pattern made of several ways of the sewing attributes (thread...
... supports wider ranges for the setting of enlarging or reducing an imported embroidery pattern in Layout & Editing. Tips and Techniques Enlarging/Reducing Embroidery Patterns There are several different parts (in Layout & Editing or Design Center), be maintained, since the stitch density and fill pattern automatically adapts to the new size. Stitch to occur Sewing Order After creating an embroidery pattern made of several ways of the sewing attributes (thread...

Quick Reference Guide - English
Page 3
... embroidery cards, newspapers and magazines for household use your particular sewing machine model. For a longer service life • When storing the unit, avoid direct sunlight and high humidity locations. Copyright acknowledgment Windows® is intended for commercial purpose is an infringement of Microsoft Corporation. Important Using this Quick Reference Guide carefully, and then keep it in the Instruction Manual and Quick Reference Guide may be used...
... embroidery cards, newspapers and magazines for household use your particular sewing machine model. For a longer service life • When storing the unit, avoid direct sunlight and high humidity locations. Copyright acknowledgment Windows® is intended for commercial purpose is an infringement of Microsoft Corporation. Important Using this Quick Reference Guide carefully, and then keep it in the Instruction Manual and Quick Reference Guide may be used...
Quick Reference Guide - English
Page 21
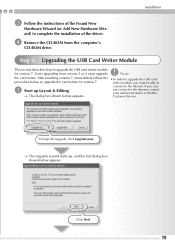
... authorized dealer or Brother Customer Service. d Remove the CD-ROM from version 5 or 6 must be able to connect to upgrade the card writer for version 7. Users upgrading from the computer's CD-ROM drive. Step 3: Upgrading the USB Card Writer Module This section describes how to complete the installation of the driver. To begin the upgrade, click Upgrade now. → The Upgrade wizard starts up Layout & Editing...
... authorized dealer or Brother Customer Service. d Remove the CD-ROM from version 5 or 6 must be able to connect to upgrade the card writer for version 7. Users upgrading from the computer's CD-ROM drive. Step 3: Upgrading the USB Card Writer Module This section describes how to complete the installation of the driver. To begin the upgrade, click Upgrade now. → The Upgrade wizard starts up Layout & Editing...
Quick Reference Guide - English
Page 48
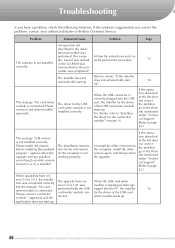
... to "Installing the driver for the driver of the USB card writer module starts up. 16 application does not start up . 46 If the operation described at the left does not correct the problem, go to the Web site mentioned under "Technical Support". (Refer to page 22.) When upgrading from ver- The installation information for the old version on page 16. Troubleshooting If...
... to "Installing the driver for the driver of the USB card writer module starts up. 16 application does not start up . 46 If the operation described at the left does not correct the problem, go to the Web site mentioned under "Technical Support". (Refer to page 22.) When upgrading from ver- The installation information for the old version on page 16. Troubleshooting If...


