
Operation Manual
Page 4
... the problem persists, please consult your authorized dealer to change without supervision. 7 This machine is not a toy: • Your close attention is necessary when the machine is required, first follow the troubleshooting table in the back of the operation manual to ensure that this equipment, you should never be used. • Always consult the operation manual when replacing or installing any assemblies, the presser feet, needle, or...
... the problem persists, please consult your authorized dealer to change without supervision. 7 This machine is not a toy: • Your close attention is necessary when the machine is required, first follow the troubleshooting table in the back of the operation manual to ensure that this equipment, you should never be used. • Always consult the operation manual when replacing or installing any assemblies, the presser feet, needle, or...
Operation Manual
Page 5
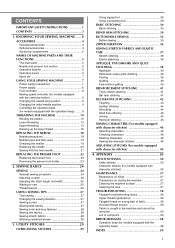
... thread tension 59 Fabric is caught in the machine and cannot be removed 60 List of symptoms 63 ERROR MESSAGES 68 Operation beep (for models equipped with the operation beep) ........ 9 THREADING THE MACHINE 10 Winding the bobbin 10 Lower threading 13 Upper threading 15 Drawing up the lower thread 18 REPLACING THE NEEDLE 18 Needle precautions 18 Needle types and their uses 19 Checking the needle 19 Replacing the needle 20 Sewing with the twin needle 21 REPLACING THE PRESSER FOOT 22 Replacing the presser foot 22 Removing the presser foot holder...
... thread tension 59 Fabric is caught in the machine and cannot be removed 60 List of symptoms 63 ERROR MESSAGES 68 Operation beep (for models equipped with the operation beep) ........ 9 THREADING THE MACHINE 10 Winding the bobbin 10 Lower threading 13 Upper threading 15 Drawing up the lower thread 18 REPLACING THE NEEDLE 18 Needle precautions 18 Needle types and their uses 19 Checking the needle 19 Replacing the needle 20 Sewing with the twin needle 21 REPLACING THE PRESSER FOOT 22 Replacing the presser foot 22 Removing the presser foot holder...

Operation Manual
Page 8
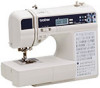
... with guides for sewing straight seams. l Needle bar thread guide (page 16) m Presser foot lever Raise and lower the presser foot. Attach the appropriate presser foot for models equipped with the quick-set bobbin) You can start or stop button to use. j Bobbin cover k Needle plate The needle plate is marked with the needle threader) (page 17) b Buttonhole lever (page 34 and 42) c Presser foot holder The presser foot is installed onto the presser foot holder. For details, refer to adjust the sewing speed. c Needle position button Press this controller to "Sewing reinforcement stitches...
... with guides for sewing straight seams. l Needle bar thread guide (page 16) m Presser foot lever Raise and lower the presser foot. Attach the appropriate presser foot for models equipped with the quick-set bobbin) You can start or stop button to use. j Bobbin cover k Needle plate The needle plate is marked with the needle threader) (page 17) b Buttonhole lever (page 34 and 42) c Presser foot holder The presser foot is installed onto the presser foot holder. For details, refer to adjust the sewing speed. c Needle position button Press this controller to "Sewing reinforcement stitches...

Operation Manual
Page 14
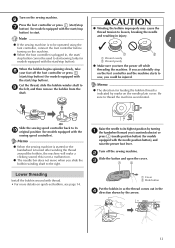
... winding the bobbin properly may cause the thread tension to loosen, and may bend or break when the bobbin thread starts to run out. If the bobbin is wound without cutting the thread using the cutter built into the notch in the bobbin or the needle may break the needle. Slide the sewing speed controller to the right (to g set the speed to fast) (for models equipped with the start /stop h button) (for models equipped...
... winding the bobbin properly may cause the thread tension to loosen, and may bend or break when the bobbin thread starts to run out. If the bobbin is wound without cutting the thread using the cutter built into the notch in the bobbin or the needle may break the needle. Slide the sewing speed controller to the right (to g set the speed to fast) (for models equipped with the start /stop h button) (for models equipped...
Operation Manual
Page 15
... direction for feeding the bobbin thread is not a malfunction. ● The needle bar does not move when you (counterclockwise) or press (needle position button) (for models equipped with thread. • For more details on the sewing machine. this is indicated by marks on the needle plate cover. c 1 2 Lower threading Install the bobbin wound with the start/stop button). Note ● If the sewing machine is to be operated using the foot controller, connect the foot controller before turning on the foot controller...
... direction for feeding the bobbin thread is not a malfunction. ● The needle bar does not move when you (counterclockwise) or press (needle position button) (for models equipped with thread. • For more details on the sewing machine. this is indicated by marks on the needle plate cover. c 1 2 Lower threading Install the bobbin wound with the start/stop button). Note ● If the sewing machine is to be operated using the foot controller, connect the foot controller before turning on the foot controller...

Operation Manual
Page 16
... thread tension (page 26). c 1 2 a Cover b Slide button Put the bobbin in so the thread comes out in the diagram). ■ For models equipped with the quick-set bobbin Memo ● The direction for feeding the bobbin thread is indicated by turning a the handwheel toward you (counterclockwise) or press (needle position button) (for models equipped with the needle position button), and raise the presser foot lever. 14 a Tension-adjusting spring Hold the end of the thread, push the bobbin e down the bobbin, guide e the thread...
... thread tension (page 26). c 1 2 a Cover b Slide button Put the bobbin in so the thread comes out in the diagram). ■ For models equipped with the quick-set bobbin Memo ● The direction for feeding the bobbin thread is indicated by turning a the handwheel toward you (counterclockwise) or press (needle position button) (for models equipped with the needle position button), and raise the presser foot lever. 14 a Tension-adjusting spring Hold the end of the thread, push the bobbin e down the bobbin, guide e the thread...

Operation Manual
Page 19
... a through the eye of the needle, start from front to sew, you turn the power off the sewing machine. j CAUTION ● Make sure you could be used with a 75/11 through the eye of the needle, and catch the thread. While lowering the needle threader lever, hook c the thread onto the guide. 1 a Needle holder b Needle threader lever c Guide Fully lower the needle threader lever. When using the needle threader (for models equipped with the needle threader) CAUTION ● The needle threader can be injured. Lower the presser foot lever.
... a through the eye of the needle, start from front to sew, you turn the power off the sewing machine. j CAUTION ● Make sure you could be used with a 75/11 through the eye of the needle, and catch the thread. While lowering the needle threader lever, hook c the thread onto the guide. 1 a Needle holder b Needle threader lever c Guide Fully lower the needle threader lever. When using the needle threader (for models equipped with the needle threader) CAUTION ● The needle threader can be injured. Lower the presser foot lever.

Operation Manual
Page 20
... When sewing gathers or darts, you may cause sewing problems. Drawing up the lower thread by pressing (needle position button) (for models equipped with the quick-set bobbin You can draw up the lower thread Lightly hold the end of both threads d and pull them toward you draw up the lower thread as illustrated bellow. KNOWING YOUR SEWING MACHINE Raise the presser foot lever. Before you (counterclockwise) so that some thread will be removed. a Presser foot lever Pass the...
... When sewing gathers or darts, you may cause sewing problems. Drawing up the lower thread by pressing (needle position button) (for models equipped with the quick-set bobbin You can draw up the lower thread Lightly hold the end of both threads d and pull them toward you draw up the lower thread as illustrated bellow. KNOWING YOUR SEWING MACHINE Raise the presser foot lever. Before you (counterclockwise) so that some thread will be removed. a Presser foot lever Pass the...

Operation Manual
Page 23
... thread through i of thread for the right needle in f the same way as the left needle. Thread the upper thread for making decorative stitches. a • For details on the sewing machine. Without passing the thread through the eye of the d bobbin winder shaft. Pass the thread through the needle g bar thread guide, manually thread the right needle. CAUTION ● When using the twin needle, be sure to select an appropriate stitch, otherwise the needle may break or the machine...
... thread through i of thread for the right needle in f the same way as the left needle. Thread the upper thread for making decorative stitches. a • For details on the sewing machine. Without passing the thread through the eye of the d bobbin winder shaft. Pass the thread through the needle g bar thread guide, manually thread the right needle. CAUTION ● When using the twin needle, be sure to select an appropriate stitch, otherwise the needle may break or the machine...

Operation Manual
Page 24
... the fabric with (needle position button), raise the needle by turning the handwheel a toward you use the correct presser foot for the stitch pattern you leave the power on and step on adjusting the stitch length, refer to sew" (page 25). Start sewing. REPLACING THE PRESSER FOOT CAUTION ● Always turn b it off the power before you (counterclockwise) so that the needle does not touch the presser foot. Otherwise the needle may break or the machine may...
... the fabric with (needle position button), raise the needle by turning the handwheel a toward you use the correct presser foot for the stitch pattern you leave the power on and step on adjusting the stitch length, refer to sew" (page 25). Start sewing. REPLACING THE PRESSER FOOT CAUTION ● Always turn b it off the power before you (counterclockwise) so that the needle does not touch the presser foot. Otherwise the needle may break or the machine may...

Operation Manual
Page 27
Refer to "Sewing speed controller (for models equipped with your right hand to lower the needle to the starting point of the thread and the fabric d with the start /stop button), if the foot controller is changed from the standard setting, around or disappears from the LCD. a Presser foot lever Place the fabric under the presser foot, pass the thread c under the presser foot, and then pull out about 5 cm (2 inches) of thread toward a you (counterclockwise...
Refer to "Sewing speed controller (for models equipped with your right hand to lower the needle to the starting point of the thread and the fabric d with the start /stop button), if the foot controller is changed from the standard setting, around or disappears from the LCD. a Presser foot lever Place the fabric under the presser foot, pass the thread c under the presser foot, and then pull out about 5 cm (2 inches) of thread toward a you (counterclockwise...

Operation Manual
Page 28
... to "STITCH SETTINGS" (page 50). For details, refer to page 13, 14. 26 Raise the needle by using the thread cutter. 1 a Thread cutter Memo ● When the foot controller is plugged in the fabric). Thread tension The thread tension will stay up when sewing is not inserted through the tension-adjusting spring of the machine, k and then cut the threads by turning the handwheel i toward you change fabric or thread. Raise the presser foot lever. Reinsert the thread correctly.
... to "STITCH SETTINGS" (page 50). For details, refer to page 13, 14. 26 Raise the needle by using the thread cutter. 1 a Thread cutter Memo ● When the foot controller is plugged in the fabric). Thread tension The thread tension will stay up when sewing is not inserted through the tension-adjusting spring of the machine, k and then cut the threads by turning the handwheel i toward you change fabric or thread. Raise the presser foot lever. Reinsert the thread correctly.

Operation Manual
Page 35
...) Attach buttonhole foot "A". Otherwise, injuries may occur if the foot controller or (start/ stop button) is 5 mm (3/16 inch).) a Reinforcement stitching ■ Part names of the buttonhole foot "A" a Button guide plate b Presser foot scale c Pin d Marks on buttonhole foot e 5 mm (3/16 inch) Use chalk to mark the position and length of the button, and then set the button guide plate to 25 mm (1 inch) on fabric b Buttonhole sewing 33 d Pass the upper thread down through the buttonhole. The size of buttonhole b foot "A", and then insert the button...
...) Attach buttonhole foot "A". Otherwise, injuries may occur if the foot controller or (start/ stop button) is 5 mm (3/16 inch).) a Reinforcement stitching ■ Part names of the buttonhole foot "A" a Button guide plate b Presser foot scale c Pin d Marks on buttonhole foot e 5 mm (3/16 inch) Use chalk to mark the position and length of the button, and then set the button guide plate to 25 mm (1 inch) on fabric b Buttonhole sewing 33 d Pass the upper thread down through the buttonhole. The size of buttonhole b foot "A", and then insert the button...

Operation Manual
Page 37
... the presser foot lever, and then slide the b feed dog position lever to remove any excess of the buttonhole. When sewing is finished, gently pull the gimp f thread to . 3 Attach buttonhole foot "A". Button sewing Buttons can be sewn on stretch fabrics, use a gimp thread. With a seam ripper, cut the middle part of the h gimp thread remaining at the top end of the gimp thread. Trim off any slack. ■ Sewing buttonholes on stretch fabrics When sewing buttonholes on with 4 holes can be attached. Buttons...
... the presser foot lever, and then slide the b feed dog position lever to remove any excess of the buttonhole. When sewing is finished, gently pull the gimp f thread to . 3 Attach buttonhole foot "A". Button sewing Buttons can be sewn on stretch fabrics, use a gimp thread. With a seam ripper, cut the middle part of the h gimp thread remaining at the top end of the gimp thread. Trim off any slack. ■ Sewing buttonholes on stretch fabrics When sewing buttonholes on with 4 holes can be attached. Buttons...

Operation Manual
Page 38
... the foot controller or (start/stop button) is positioned at low speed, press (reverse/reinforcement stitch button) to the wrong side of the needle. Turn the handwheel toward you are finished attaching the button, k slide the feed dog position lever to and turn off the main power before replacing the presser foot. a Basting stitching b Reverse stitches c Wrong side of fabric d End of zipper opening (where the zipper will be sure that the needle correctly goes into the two holes of fabric...
... the foot controller or (start/stop button) is positioned at low speed, press (reverse/reinforcement stitch button) to the wrong side of the needle. Turn the handwheel toward you are finished attaching the button, k slide the feed dog position lever to and turn off the main power before replacing the presser foot. a Basting stitching b Reverse stitches c Wrong side of fabric d End of zipper opening (where the zipper will be sure that the needle correctly goes into the two holes of fabric...

Operation Manual
Page 60
... needle plate cover is scratched, otherwise the upper thread may become tangled, the needle may break or sewing performance may cause the needle plate cover to this before contacting us at " http:// support.brother.com/ " . For a new bobbin case (part code: XE7560-001), contact your dealer or the nearest authorized service center. As shown, insert the tab on the machine. TROUBLESHOOTING If the machine stops operating correctly, check the following possible problems before installing the bobbin case. Frequent troubleshooting...
... needle plate cover is scratched, otherwise the upper thread may become tangled, the needle may break or sewing performance may cause the needle plate cover to this before contacting us at " http:// support.brother.com/ " . For a new bobbin case (part code: XE7560-001), contact your dealer or the nearest authorized service center. As shown, insert the tab on the machine. TROUBLESHOOTING If the machine stops operating correctly, check the following possible problems before installing the bobbin case. Frequent troubleshooting...

Operation Manual
Page 64
... upper threading or sewing thin fabrics. Attach the needle plate cover according to "Adjusting the stitch length and width" (page 24). Check the condition of fabric being used. 62 CAUTION ● Never use bent needles. Note ● After completing this time, increase the d stitch length and width to their maximum settings. • Refer to steps q h and i in injuries. a Select (middle needle position stitch). If the needle contacts the needle plate, remove the needle plate, and then install it again, starting...
... upper threading or sewing thin fabrics. Attach the needle plate cover according to "Adjusting the stitch length and width" (page 24). Check the condition of fabric being used. 62 CAUTION ● Never use bent needles. Note ● After completing this time, increase the d stitch length and width to their maximum settings. • Refer to steps q h and i in injuries. a Select (middle needle position stitch). If the needle contacts the needle plate, remove the needle plate, and then install it again, starting...

Operation Manual
Page 66
... type of stitch that has been designed for models equipped with the start / stop button, disconnect the foot controller. The area around the hole in . Replace the needle plate. Replace the bobbin case. Move the bobbin winder shaft to sew. Do not use a bobbin that are appropriate for this machine. Correctly install the spool or spool cap. The foot controller or the start /stop button was not pressed (for this machine. Lower the presser foot lever. The area around the hole in . The spool or spool...
... type of stitch that has been designed for models equipped with the start / stop button, disconnect the foot controller. The area around the hole in . Replace the needle plate. Replace the bobbin case. Move the bobbin winder shaft to sew. Do not use a bobbin that are appropriate for this machine. Correctly install the spool or spool cap. The foot controller or the start /stop button was not pressed (for this machine. Lower the presser foot lever. The area around the hole in . The spool or spool...

Operation Manual
Page 67
...machine. This is set incorrectly. Correctly install the needle. Replace the presser foot. Contact your retailer or the nearest authorised service center. Replace the bobbin case. Incorrect bobbins will not work properly. Replace the bobbin. Thread the upper thread and wind the bobbin thread properly. Replace the needle. the type of the spool being fed correctly. Only use a bobbin that has been designed for this machine. - You have not used the right combination of the opening in the thread. Only use a bobbin that are using...
...machine. This is set incorrectly. Correctly install the needle. Replace the presser foot. Contact your retailer or the nearest authorised service center. Replace the bobbin case. Incorrect bobbins will not work properly. Replace the bobbin. Thread the upper thread and wind the bobbin thread properly. Replace the needle. the type of the spool being fed correctly. Only use a bobbin that has been designed for this machine. - You have not used the right combination of the opening in the thread. Only use a bobbin that are using...
Operation Manual
Page 71
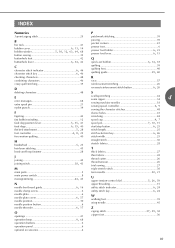
... E error messages 68 extra spool pin 21 eyelet punch 34 F fagoting 43 fast bobbin winding 12 feed dog position lever 5, 35, 41 feed , dogs 6 35, 40 , flat bed attachment 5 28 foot controller 4 8, 25 free-motion quilting 40 H , handwheel 5 25 heirloom stitching 45 hook-and-loop fastener 28 J joining 45 , joining stitch 38 43 M main parts 5 main power switch 8 , monogramming 44 45 N , needle bar thread guide 6 16 needle clamp screw 6 needle plate 6 , needle plate cover 6 57 needle position 30 needle position button 6 , needle threader 6 17 O openings 41 , operation beep...
... E error messages 68 extra spool pin 21 eyelet punch 34 F fagoting 43 fast bobbin winding 12 feed dog position lever 5, 35, 41 feed , dogs 6 35, 40 , flat bed attachment 5 28 foot controller 4 8, 25 free-motion quilting 40 H , handwheel 5 25 heirloom stitching 45 hook-and-loop fastener 28 J joining 45 , joining stitch 38 43 M main parts 5 main power switch 8 , monogramming 44 45 N , needle bar thread guide 6 16 needle clamp screw 6 needle plate 6 , needle plate cover 6 57 needle position 30 needle position button 6 , needle threader 6 17 O openings 41 , operation beep...


