Users Manual - English
Page 1
User's Guide 1 Appendix Creating Labels Introduction
User's Guide 1 Appendix Creating Labels Introduction

Users Manual - English
Page 2
... 18 Creating a New Contact 20 How to Use P-touch Library 21 Starting up the P-touch Library 21 Searching labels ...22 How to use the P-touch Editor for Mac 23 Starting the P-touch Editor 23 Start P-touch Editor Help 25 Appendix 26 Printing Directly from Other Applications 26 Setting the Printer Driver 26 Printing from Other Applications 28 Uninstalling...
... 18 Creating a New Contact 20 How to Use P-touch Library 21 Starting up the P-touch Library 21 Searching labels ...22 How to use the P-touch Editor for Mac 23 Starting the P-touch Editor 23 Start P-touch Editor Help 25 Appendix 26 Printing Directly from Other Applications 26 Setting the Printer Driver 26 Printing from Other Applications 28 Uninstalling...

Users Manual - English
Page 3
Introduction Creating Labels Introduction The Brother QL-570 label printer (hereafter referred to as "the machine") enables you use the machine correctly, and understand all features. User's Guide (this guide) This guide describes how to create labels using the P-touch Editor software that has been installed on a ...symbol shows information or directions that should read and understand them may result in this Guide The symbols used throughout this guide, when the mouse pointer changes to quickly and easily print custom labels created with the label software, P-touch Editor. For the...
Introduction Creating Labels Introduction The Brother QL-570 label printer (hereafter referred to as "the machine") enables you use the machine correctly, and understand all features. User's Guide (this guide) This guide describes how to create labels using the P-touch Editor software that has been installed on a ...symbol shows information or directions that should read and understand them may result in this Guide The symbols used throughout this guide, when the mouse pointer changes to quickly and easily print custom labels created with the label software, P-touch Editor. For the...
Users Manual - English
Page 4
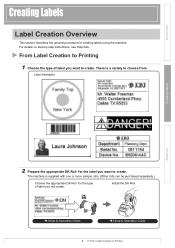
...instructions, see Help files. Label examples Creating Labels Appendix 2 Prepare the appropriate DK Roll for the type of label you want to Printing Install the DK Roll. ÎSetup & Operation Guide ÎSetup & Operation Guide 4 From Label Creation to create. There is... supplied with one or more sample rolls. (Other rolls can be purchased separately.) Choose the appropriate DK Roll for the label you want to choose from. Introduction Creating Labels Label Creation Overview This section describes...
...instructions, see Help files. Label examples Creating Labels Appendix 2 Prepare the appropriate DK Roll for the type of label you want to Printing Install the DK Roll. ÎSetup & Operation Guide ÎSetup & Operation Guide 4 From Label Creation to create. There is... supplied with one or more sample rolls. (Other rolls can be purchased separately.) Choose the appropriate DK Roll for the label you want to choose from. Introduction Creating Labels Label Creation Overview This section describes...
Users Manual - English
Page 5
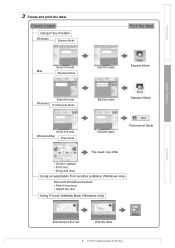
Introduction Creating Labels 3 Create and print the label. Create a label Using P-touch Editor Windows Express Mode Print the label Mac Enter the text Standard Mode Edit the label Express Mode Enter the text Windows Professional Mode Edit the label Standard Mode Enter the text Windows/Mac Snap Mode Edit the label Professional Mode The result may differ. • Screen...
Introduction Creating Labels 3 Create and print the label. Create a label Using P-touch Editor Windows Express Mode Print the label Mac Enter the text Standard Mode Edit the label Express Mode Enter the text Windows Professional Mode Edit the label Standard Mode Enter the text Windows/Mac Snap Mode Edit the label Professional Mode The result may differ. • Screen...

Users Manual - English
Page 6
... choose the label printer and media size. • When you choose [View History], the [History] dialog appears. See the P-touch Editor Help for samples of various kinds of labels. When P-touch Editor is the example for Windows Vista™. Use this Brother Solutions Center ... and click . • You can choose and open an existing label. Starting P-touch Editor 1 Click [Start]-[All Programs (Programs)]- [Brother P-touch]-[P-touch Editor 5.0]. With P-touch Editor, you can create various kinds of labels and details on the Quick Launch bar. The Help files allow you...
... choose the label printer and media size. • When you choose [View History], the [History] dialog appears. See the P-touch Editor Help for samples of various kinds of labels. When P-touch Editor is the example for Windows Vista™. Use this Brother Solutions Center ... and click . • You can choose and open an existing label. Starting P-touch Editor 1 Click [Start]-[All Programs (Programs)]- [Brother P-touch]-[P-touch Editor 5.0]. With P-touch Editor, you can create various kinds of labels and details on the Quick Launch bar. The Help files allow you...
Users Manual - English
Page 7
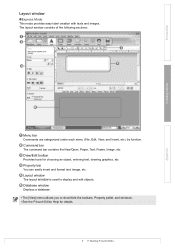
The layout window consists of the following sections: 1 2 3 5 4 Creating Labels Appendix 6 1 Menu bar Commands are categorized under each menu (File, Edit, View, and Insert, etc.) by function. 2 Command bar The command bar contains the New/... and edit objects. 6 Database window Displays a database. • The [View] menu allows you to show/hide the toolbars, Property pallet, and windows. • See the P-touch Editor Help for details. 7 Starting P-touch Editor Introduction Layout window „Express Mode This mode provides easy label creation with texts and images.
The layout window consists of the following sections: 1 2 3 5 4 Creating Labels Appendix 6 1 Menu bar Commands are categorized under each menu (File, Edit, View, and Insert, etc.) by function. 2 Command bar The command bar contains the New/... and edit objects. 6 Database window Displays a database. • The [View] menu allows you to show/hide the toolbars, Property pallet, and windows. • See the P-touch Editor Help for details. 7 Starting P-touch Editor Introduction Layout window „Express Mode This mode provides easy label creation with texts and images.

Users Manual - English
Page 8
... toolbar A group of the following sections: 1 2 3 4 5 7 Creating Labels Appendix 6 1 Menu bar Commands are categorized under each pallet to show /hide the box. 4 Draw/Edit toolbar Provides tools for details. 8 Starting P-touch Editor The layout window consists of frequently used to display and edit objects. 6 ... the objects, etc. • The [View] menu allows you to show /hide the toolbars, pallet, and windows. • See the P-touch Editor Help for choosing an object, entering text, drawing graphics, etc. 5 Layout window The layout window is used commands (New Layout, Open, ...
... toolbar A group of the following sections: 1 2 3 4 5 7 Creating Labels Appendix 6 1 Menu bar Commands are categorized under each pallet to show /hide the box. 4 Draw/Edit toolbar Provides tools for details. 8 Starting P-touch Editor The layout window consists of frequently used to display and edit objects. 6 ... the objects, etc. • The [View] menu allows you to show /hide the toolbars, pallet, and windows. • See the P-touch Editor Help for choosing an object, entering text, drawing graphics, etc. 5 Layout window The layout window is used commands (New Layout, Open, ...
Users Manual - English
Page 9
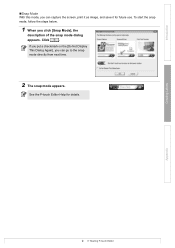
If you put a checkmark on the [Do Not Display This Dialog Again], you click [Snap Mode], the description of the snap mode dialog appears. See the P-touch Editor Help for future use. Creating Labels Appendix 9 Starting P-touch Editor Introduction „Snap Mode With this mode, you can go to the snap mode directly from next time. 2 The snap mode appears. To start the snap mode, follow the steps below. 1 When you can capture the screen, print it as image, and save it for details. Click .
If you put a checkmark on the [Do Not Display This Dialog Again], you click [Snap Mode], the description of the snap mode dialog appears. See the P-touch Editor Help for future use. Creating Labels Appendix 9 Starting P-touch Editor Introduction „Snap Mode With this mode, you can go to the snap mode directly from next time. 2 The snap mode appears. To start the snap mode, follow the steps below. 1 When you can capture the screen, print it as image, and save it for details. Click .
Users Manual - English
Page 10
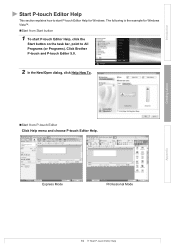
Express Mode Professional Mode Appendix 10 Start P-touch Editor Help The following is the example for Windows. Click Brother P-touch and P-touch Editor 5.0. 2 In the New/Open dialog, click Help-How To. „Start from Start button 1 To start P-touch Editor Help for Windows Vista™. „Start from P-touch Editor Click Help menu and choose P-touch Editor Help. Introduction Creating Labels Start P-touch Editor Help This section explains how to start P-touch Editor Help, click the Start button on the task bar, point to All Programs (or Programs).
Express Mode Professional Mode Appendix 10 Start P-touch Editor Help The following is the example for Windows. Click Brother P-touch and P-touch Editor 5.0. 2 In the New/Open dialog, click Help-How To. „Start from Start button 1 To start P-touch Editor Help for Windows Vista™. „Start from P-touch Editor Click Help menu and choose P-touch Editor Help. Introduction Creating Labels Start P-touch Editor Help This section explains how to start P-touch Editor Help, click the Start button on the task bar, point to All Programs (or Programs).

Users Manual - English
Page 11
Creating Labels Appendix 11 Start P-touch Editor Help Choose a normal printer that supports general paper sizes, such as Letter. Use your normal printer to print the P-touch Editor Help information. 1 In the [Contents] tab, choose any topic you want to print. 2 Click on the Toolbar. 3 Choose the range of topics to be printed. Introduction Printing the Help description The information given in P-touch Editor Help can be printed, and click . 4 Specify the [Printer] item and click .
Creating Labels Appendix 11 Start P-touch Editor Help Choose a normal printer that supports general paper sizes, such as Letter. Use your normal printer to print the P-touch Editor Help information. 1 In the [Contents] tab, choose any topic you want to print. 2 Click on the Toolbar. 3 Choose the range of topics to be printed. Introduction Printing the Help description The information given in P-touch Editor Help can be printed, and click . 4 Specify the [Printer] item and click .

Users Manual - English
Page 12
...Mode. • Professional Mode : Starts Professional mode. • Print Immediately : Prints the label. 12 Creating Labels with Other Applications When installing the software, if you can create and print labels quickly and easily. • The Add-In function supports the following applications: Microsoft® ... trust macros from this program, close the Word, Excel and Outlook® programs. 1 Click [Start]-[All Programs(Programs)]-[Brother Ptouch]-[P-touch Tools][P-touch Editor 5.0 Add-Ins Utility]. For details on the checkboxes for the applications in which the Add-In function is to...
...Mode. • Professional Mode : Starts Professional mode. • Print Immediately : Prints the label. 12 Creating Labels with Other Applications When installing the software, if you can create and print labels quickly and easily. • The Add-In function supports the following applications: Microsoft® ... trust macros from this program, close the Word, Excel and Outlook® programs. 1 Click [Start]-[All Programs(Programs)]-[Brother Ptouch]-[P-touch Tools][P-touch Editor 5.0 Add-Ins Utility]. For details on the checkboxes for the applications in which the Add-In function is to...
Users Manual - English
Page 13
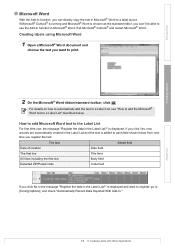
... Microsoft® Outlook® and restart Microsoft® Word. For details on how to automatically add the text to a Label List, see "How to add the Microsoft® Word text to a Label List" described below from next time you register the text: The text Added field Date of creation Date field The... to use , the message "Register the data in Microsoft® Word to [Tools]-[Options], and check "Automatically Record Data Imported With Add-In." 13 Creating Labels with Other Applications If you can directly copy the text in the...
... Microsoft® Outlook® and restart Microsoft® Word. For details on how to automatically add the text to a Label List, see "How to add the Microsoft® Word text to a Label List" described below from next time you register the text: The text Added field Date of creation Date field The... to use , the message "Register the data in Microsoft® Word to [Tools]-[Options], and check "Automatically Record Data Imported With Add-In." 13 Creating Labels with Other Applications If you can directly copy the text in the...
Users Manual - English
Page 14
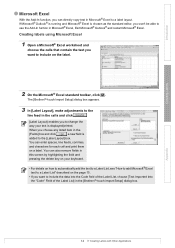
... Into the "Code" Field of the Label List] in Microsoft® Excel, Exit Microsoft® Outlook® and restart Microsoft® Excel. When you can directly copy text in Microsoft® Excel to use the Add-In funtion in the [Brother P-touch Import Setup] dialog box. You can ...enter spaces, line feeds, commas, and characters for each cell and print them on a label. The [Brother P-touch Import Setup] dialog box appears. 3 In [Label Layout], make...
... Into the "Code" Field of the Label List] in Microsoft® Excel, Exit Microsoft® Outlook® and restart Microsoft® Excel. When you can directly copy text in Microsoft® Excel to use the Add-In funtion in the [Brother P-touch Import Setup] dialog box. You can ...enter spaces, line feeds, commas, and characters for each cell and print them on a label. The [Brother P-touch Import Setup] dialog box appears. 3 In [Label Layout], make...
Users Manual - English
Page 15
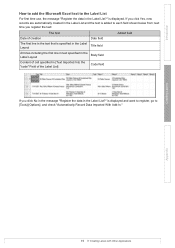
...Added field Date of creation Date field The first line in the text that is specified in the Label Title field Layout All lines including the first line in text specified in the Body field Label Layout Content of cell specified in [Text Imported Into the "code" Field of the... Label List] Code field If you click No in the message "Register the data in the Label List?" is displayed. Creating Labels Appendix 15 Creating Labels with Other Applications is displayed and want to register, go to [Tools]-[Options],...
...Added field Date of creation Date field The first line in the text that is specified in the Label Title field Layout All lines including the first line in text specified in the Body field Label Layout Content of cell specified in [Text Imported Into the "code" Field of the... Label List] Code field If you click No in the message "Register the data in the Label List?" is displayed. Creating Labels Appendix 15 Creating Labels with Other Applications is displayed and want to register, go to [Tools]-[Options],...
Users Manual - English
Page 16
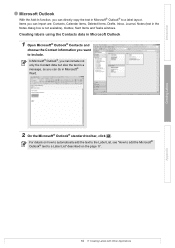
...Calendar items, Deleted Items, Drafts, Inbox, Journal, Notes (text in Microsoft® Outlook® to a label layout. Introduction Creating Labels Microsoft Outlook With the Add-In function, you can directly copy the text in the Notes dialog box is not available), Outbox, Sent Items and Tasks windows. In ... Outlook® Contacts and choose the Contact information you want to a Label List" described on the page 17. 16 Creating Labels with Other Applications Appendix For details on how to automatically add the text to the Label List, see "How to add the Microsoft® Outlook® text...
...Calendar items, Deleted Items, Drafts, Inbox, Journal, Notes (text in Microsoft® Outlook® to a label layout. Introduction Creating Labels Microsoft Outlook With the Add-In function, you can directly copy the text in the Notes dialog box is not available), Outbox, Sent Items and Tasks windows. In ... Outlook® Contacts and choose the Contact information you want to a Label List" described on the page 17. 16 Creating Labels with Other Applications Appendix For details on how to automatically add the text to the Label List, see "How to add the Microsoft® Outlook® text...
Users Manual - English
Page 17
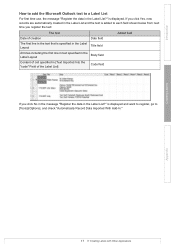
... each field shown below from next time you register the text: The text Added field Date of the Label List] Code field If you click No in the message "Register the data in the Label List and the text is added to [Tools]-[Options], and check "Automatically Record Data Imported With Add... time use, the message "Register the data in the text that is displayed. is specified in the Label Title field Layout All lines including the first line in text specified in the Body field Label Layout Content of cell specified in [Text Imported Into the "code" Field of creation Date field The...
... each field shown below from next time you register the text: The text Added field Date of the Label List] Code field If you click No in the message "Register the data in the Label List and the text is added to [Tools]-[Options], and check "Automatically Record Data Imported With Add... time use, the message "Register the data in the text that is displayed. is specified in the Label Title field Layout All lines including the first line in text specified in the Body field Label Layout Content of cell specified in [Text Imported Into the "code" Field of creation Date field The...
Users Manual - English
Page 18
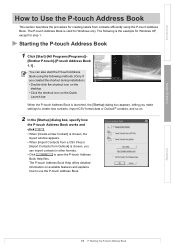
... procedure for creating labels from Outlook] is chosen, you make settings to create new contacts, import CSV format data or Outlook® contacts, and so on available features and explains how to use the P-touch Address Book. Starting the P-touch Address Book 1 Click [Start]-[All Programs(Programs)]- [Brother P-touch]-[P-touch Address Book 1.1] . The P-touch Address Book Help...
... procedure for creating labels from Outlook] is chosen, you make settings to create new contacts, import CSV format data or Outlook® contacts, and so on available features and explains how to use the P-touch Address Book. Starting the P-touch Address Book 1 Click [Start]-[All Programs(Programs)]- [Brother P-touch]-[P-touch Address Book 1.1] . The P-touch Address Book Help...

Users Manual - English
Page 19
... can also be searched using [Key1]. 8 Record View The Contact data is currently specified. Appendix 19 Starting the P-touch Address Book The data can search within the field in each field. Introduction Creating Labels Layout window The layout window consists of the following eight sections: 1 2 3 4 5 6 7 8 1 Menu bar Commands are categorized under each...
... can also be searched using [Key1]. 8 Record View The Contact data is currently specified. Appendix 19 Starting the P-touch Address Book The data can search within the field in each field. Introduction Creating Labels Layout window The layout window consists of the following eight sections: 1 2 3 4 5 6 7 8 1 Menu bar Commands are categorized under each...

Users Manual - English
Page 20
... create a new contact. 1 Click [File]-[New Contact]. Next Displays the next contact. Introduction Creating a New Contact This section explains how to enter each item. 1 2 Creating Labels Appendix 1 New Contact form toolbar The following file types are categorized in the menu: Icon Button name Function Previous Displays the previous contact. The following...
... create a new contact. 1 Click [File]-[New Contact]. Next Displays the next contact. Introduction Creating a New Contact This section explains how to enter each item. 1 2 Creating Labels Appendix 1 New Contact form toolbar The following file types are categorized in the menu: Icon Button name Function Previous Displays the previous contact. The following...


