
Users Manual - English
Page 2
... the P-touch Editor for Windows 6 Starting P-touch Editor 6 Start P-touch Editor Help 10 Creating Labels with Other Applications 12 How to Use the P-touch Address Book 18 Starting the P-touch Address Book 18 Creating a New Contact 20 How to Use P-touch Library 21 Starting up the P-touch Library 21...22 How to use the P-touch Editor for Mac 23 Starting the P-touch Editor 23 Start P-touch Editor Help 25 Appendix 26 Printing Directly from Other Applications 26 Setting the Printer Driver 26 Printing from Other Applications 28 Uninstalling Software ...29 For Windows ...29 For Mac ...30...
... the P-touch Editor for Windows 6 Starting P-touch Editor 6 Start P-touch Editor Help 10 Creating Labels with Other Applications 12 How to Use the P-touch Address Book 18 Starting the P-touch Address Book 18 Creating a New Contact 20 How to Use P-touch Library 21 Starting up the P-touch Library 21...22 How to use the P-touch Editor for Mac 23 Starting the P-touch Editor 23 Start P-touch Editor Help 25 Appendix 26 Printing Directly from Other Applications 26 Setting the Printer Driver 26 Printing from Other Applications 28 Uninstalling Software ...29 For Windows ...29 For Mac ...30...
Users Manual - English
Page 10
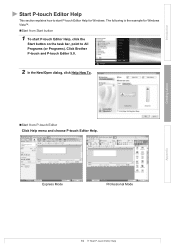
Click Brother P-touch and P-touch Editor 5.0. 2 In the New/Open dialog, click Help-How To. „Start from Start button 1 To start P-touch Editor Help, click the Start button on the task bar, point to start P-touch Editor Help for Windows Vista™. „Start from P-touch Editor Click Help menu and choose P-touch Editor Help. Introduction Creating Labels Start P-touch Editor Help This section explains how to All Programs (or Programs). The following is the example for Windows. Express Mode Professional Mode Appendix 10 Start P-touch Editor Help
Click Brother P-touch and P-touch Editor 5.0. 2 In the New/Open dialog, click Help-How To. „Start from Start button 1 To start P-touch Editor Help, click the Start button on the task bar, point to start P-touch Editor Help for Windows Vista™. „Start from P-touch Editor Click Help menu and choose P-touch Editor Help. Introduction Creating Labels Start P-touch Editor Help This section explains how to All Programs (or Programs). The following is the example for Windows. Express Mode Professional Mode Appendix 10 Start P-touch Editor Help

Users Manual - English
Page 36
...Printing Width Minimum printing length Buttons Interface Power source Dimensions Weight Cutter Specifications LED lamp (green, red, orange) Direct thermal printing via thermal head Max. 4.3 inch (110 mm)/sec, Max. 68 labels/min. (Standard Address Labels) 300 dpi/720...(Without DK Rolls) Durable automatic cutter Operating Environment Items Windows® OS Mac® Specifications Windows® 2000 Professional/XP *1 / Windows VistaTM Mac OS® X 10.3.9 ~ 10.4.10 Interface Hard Drive Memory Windows® Mac® Windows® Mac® Windows® Mac® USB port (USB Spec. 1.1...
...Printing Width Minimum printing length Buttons Interface Power source Dimensions Weight Cutter Specifications LED lamp (green, red, orange) Direct thermal printing via thermal head Max. 4.3 inch (110 mm)/sec, Max. 68 labels/min. (Standard Address Labels) 300 dpi/720...(Without DK Rolls) Durable automatic cutter Operating Environment Items Windows® OS Mac® Specifications Windows® 2000 Professional/XP *1 / Windows VistaTM Mac OS® X 10.3.9 ~ 10.4.10 Interface Hard Drive Memory Windows® Mac® Windows® Mac® Windows® Mac® USB port (USB Spec. 1.1...

Software Users Manual - English
Page 2
...Manual Structure ...4 Symbols Used in this Manual 4 Creating Labels (For Windows 5 Label Creation Overview 5 From Label Creation to Printing 5 How to Use P-touch Editor 7 Starting P-touch Editor 7 Creating an Address Label 9 Printing a Label ...10 Saving a Label ...11 Opening a Label File 11 Creating Different ...How to Use P-touch Transfer Manager & P-touch Library 39 Starting up P-touch Transfer Manager 39 Transferring label templates from the PC to the printer 41 Backing up label templates 44 Changing printer settings from the PC 45 Starting up the P-touch Library 46 Searching...
...Manual Structure ...4 Symbols Used in this Manual 4 Creating Labels (For Windows 5 Label Creation Overview 5 From Label Creation to Printing 5 How to Use P-touch Editor 7 Starting P-touch Editor 7 Creating an Address Label 9 Printing a Label ...10 Saving a Label ...11 Opening a Label File 11 Creating Different ...How to Use P-touch Transfer Manager & P-touch Library 39 Starting up P-touch Transfer Manager 39 Transferring label templates from the PC to the printer 41 Backing up label templates 44 Changing printer settings from the PC 45 Starting up the P-touch Library 46 Searching...

Software Users Manual - English
Page 10
...the Print dialog box displayed when you click the Properties button. (QL-1050/1050N only) Creating Labels (For Windows) Creating Labels (For Macintosh) Options Copies Setting Description Auto Cut...directly For normal use, this check box should be printed. 10 Printing a Label Appendix Cut at end (QL-650TD/ 1050/1050N) When multiple labels are printed, only cuts after 1050/1050N) printing. to Printer...off the printed label using the Cut button or the Cut lever (Brother QL-500) of the printer. The label is checked in the printer to cut . (Not available for printing a label you have ...
...the Print dialog box displayed when you click the Properties button. (QL-1050/1050N only) Creating Labels (For Windows) Creating Labels (For Macintosh) Options Copies Setting Description Auto Cut...directly For normal use, this check box should be printed. 10 Printing a Label Appendix Cut at end (QL-650TD/ 1050/1050N) When multiple labels are printed, only cuts after 1050/1050N) printing. to Printer...off the printed label using the Cut button or the Cut lever (Brother QL-500) of the printer. The label is checked in the printer to cut . (Not available for printing a label you have ...

Software Users Manual - English
Page 12
... length tape 8: Making sequential labels using the Numbering function 9: Using P-touch Editor to increment (numbering field) • Printing • Selecting a protocol 10: Making address labels with P-touch Editor • Printing • Saving a layout 2: Changing the text...direction 11: Making a label by using the Auto Format feature 12: Making a label by using the P-touch Library • Using the Auto Format function • Using the P-touch Library Creating Labels (For Macintosh) Appendix 12 Creating Different Types of Labels Introduction Creating Labels (For Windows...
... length tape 8: Making sequential labels using the Numbering function 9: Using P-touch Editor to increment (numbering field) • Printing • Selecting a protocol 10: Making address labels with P-touch Editor • Printing • Saving a layout 2: Changing the text...direction 11: Making a label by using the Auto Format feature 12: Making a label by using the P-touch Library • Using the Auto Format function • Using the P-touch Library Creating Labels (For Macintosh) Appendix 12 Creating Different Types of Labels Introduction Creating Labels (For Windows...
Software Users Manual - English
Page 21
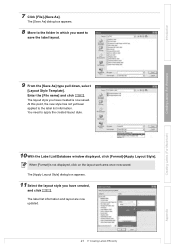
At this point, the new style has not yet been applied to apply the created layout style. 10 With the Label List/Database window displayed, click [Format]-[Apply Layout Style]. Creating Labels (For Windows) Creating Labels (For Macintosh) 9 From the [Save As] type pull down, select [Layout Style Template]. The layout style you have...
At this point, the new style has not yet been applied to apply the created layout style. 10 With the Label List/Database window displayed, click [Format]-[Apply Layout Style]. Creating Labels (For Windows) Creating Labels (For Macintosh) 9 From the [Save As] type pull down, select [Layout Style Template]. The layout style you have...
Software Users Manual - English
Page 22
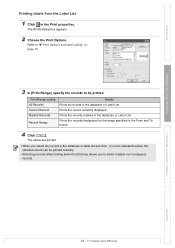
... select multiple non-contiguous records. The labels are printed. • When you select any record in the database or label list and click on page 10. 3 In [Print Range], specify the records to be printed instantly. • Selecting records while holding down the [Ctrl] key allows you to ...Î"Print Options and label cutting" on the standard toolbar, the selected record can be printed. Introduction Creating Labels (For Windows) Printing labels from the Label List 1 Click in the database or Label List. The [Print] dialog box appears. 2 Choose the Print Options.
... select multiple non-contiguous records. The labels are printed. • When you select any record in the database or label list and click on page 10. 3 In [Print Range], specify the records to be printed instantly. • Selecting records while holding down the [Ctrl] key allows you to ...Î"Print Options and label cutting" on the standard toolbar, the selected record can be printed. Introduction Creating Labels (For Windows) Printing labels from the Label List 1 Click in the database or Label List. The [Print] dialog box appears. 2 Choose the Print Options.

Software Users Manual - English
Page 25
Change the format and settings of the bar code as bar code data. Introduction Creating Labels (For Windows) 10 Select [Bar Code]. The database content is merged into the layout work area, click in the Print properties. The [Print] dialog box appears. If you want to print just the label shown in the layout work area as needed. 11 Click in the Print properties. 12 In [Print Range], select [All Records] and click . 13 All the labels are printed, using the database information. Creating Labels (For Macintosh) Appendix 25 Creating Labels Efficiently
Change the format and settings of the bar code as bar code data. Introduction Creating Labels (For Windows) 10 Select [Bar Code]. The database content is merged into the layout work area, click in the Print properties. The [Print] dialog box appears. If you want to print just the label shown in the layout work area as needed. 11 Click in the Print properties. 12 In [Print Range], select [All Records] and click . 13 All the labels are printed, using the database information. Creating Labels (For Macintosh) Appendix 25 Creating Labels Efficiently
Software Users Manual - English
Page 43
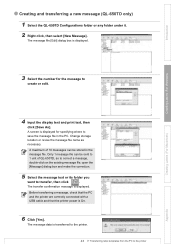
Creating Labels (For Windows) 3 Select the number for specifying where to transfer, then click . The message data is transferred to the printer. 43 Transferring label templates from the PC to create or edit. The transfer confirmation message is On. 6 Click [Yes... cable and that the printer power is displayed. The message file [Edit] dialog box is displayed for the message to the printer Appendix A maximum of 10 messages can be stored in the PC. Introduction Creating and transferring a new message (QL-650TD only) 1 Select the QL-650TD Configurations folder or ...
Creating Labels (For Windows) 3 Select the number for specifying where to transfer, then click . The message data is transferred to the printer. 43 Transferring label templates from the PC to create or edit. The transfer confirmation message is On. 6 Click [Yes... cable and that the printer power is displayed. The message file [Edit] dialog box is displayed for the message to the printer Appendix A maximum of 10 messages can be stored in the PC. Introduction Creating and transferring a new message (QL-650TD only) 1 Select the QL-650TD Configurations folder or ...

Software Users Manual - English
Page 53
... in the Draw toolbar and enter the name and address. 4 Click on in the layout window changes to Standard Address Label. • The length and width of creating an address label on Mac OS® X 10.3.9 as an example. 1 Click on next page for printing. Refer to Î"Printing the... box is displayed. 5 Adjust the font size. The label should now be ready for how to the selected text. Introduction Creating Labels (For Windows) Creating an Address Label This section describes the process of the tape are applied only to print the labels. Creating Labels (For Macintosh) Appendix ...
... in the Draw toolbar and enter the name and address. 4 Click on in the layout window changes to Standard Address Label. • The length and width of creating an address label on Mac OS® X 10.3.9 as an example. 1 Click on next page for printing. Refer to Î"Printing the... box is displayed. 5 Adjust the font size. The label should now be ready for how to the selected text. Introduction Creating Labels (For Windows) Creating an Address Label This section describes the process of the tape are applied only to print the labels. Creating Labels (For Macintosh) Appendix ...

Software Users Manual - English
Page 67
...) Over 70 MB of available space *4 Over 100 MB of the options. Introduction Operating Environment Items Brother QL-500/550 Specifications Brother QL-650TD Brother QL-1050 Windows® Windows® 2000 Professional/XP *1 OS Macintosh® Mac OS 10.1-10.4.7(PowerPC); So QL-1050N is not used in Mac environment. *3 The RS-232C interface is required when printing with ESC...
...) Over 70 MB of available space *4 Over 100 MB of the options. Introduction Operating Environment Items Brother QL-500/550 Specifications Brother QL-650TD Brother QL-1050 Windows® Windows® 2000 Professional/XP *1 OS Macintosh® Mac OS 10.1-10.4.7(PowerPC); So QL-1050N is not used in Mac environment. *3 The RS-232C interface is required when printing with ESC...

Brochure - English
Page 1
...printer to change without notice. Outlook-2000/2002/2003/2007; Interface SYSTEM REQUIREMENTS Compatibility Operating System Hard Disk Free Space for signs, window signage, binders and other brand and product names are registered trademarks or trademarks of their respective companies. Mirror Printing, Vertical Printing, Rotated Printing Yes Label design versatility. Distributed by: BROTHER INTERNATIONAL...into your labels. PC & Mac OS® Windows®: 2000 Professional/XP/Windows Vista® / Mac OS®: 10.3.9 -10.4.10 Windows®: Over 70MB / Mac OS®: ...
...printer to change without notice. Outlook-2000/2002/2003/2007; Interface SYSTEM REQUIREMENTS Compatibility Operating System Hard Disk Free Space for signs, window signage, binders and other brand and product names are registered trademarks or trademarks of their respective companies. Mirror Printing, Vertical Printing, Rotated Printing Yes Label design versatility. Distributed by: BROTHER INTERNATIONAL...into your labels. PC & Mac OS® Windows®: 2000 Professional/XP/Windows Vista® / Mac OS®: 10.3.9 -10.4.10 Windows®: Over 70MB / Mac OS®: ...

Setup & Operation Guide - English and Spanish
Page 21
...Windows® Label Overview 4 Double click [Brother QL-XXX Driver.pkg] in the following steps, you will see QLXXX. The installation of software is restarted. After installing the Printer Driver, it also explains how to set it , log in as your purchased printer name. STEP 2 2 Click [Mac OS X] folder and double click [P-touch...machine. • Until the installation of Mac OS® X 10.4.9. The printer names in [Mac OS X] folder. Follow the on -screen instructions. Here explains the example of printer driver is completed, do not connect the machine to finish installing ...
...Windows® Label Overview 4 Double click [Brother QL-XXX Driver.pkg] in the following steps, you will see QLXXX. The installation of software is restarted. After installing the Printer Driver, it also explains how to set it , log in as your purchased printer name. STEP 2 2 Click [Mac OS X] folder and double click [P-touch...machine. • Until the installation of Mac OS® X 10.4.9. The printer names in [Mac OS X] folder. Follow the on -screen instructions. Here explains the example of printer driver is completed, do not connect the machine to finish installing ...

Setup & Operation Guide - English and Spanish
Page 29
...8226; Until the installation of printer driver is displayed, click [Restart]. In the following screens may differ from Macintosh®. STEP 3 Installing the software For Macintosh® For Windows® Label Overview 4 Open [Brother QL-XXX Driver] in as ...Brother QL-XXX Driver.pkg] in the following steps, you will see QLXXX. Here explains the example of software is completed, do not connect the machine to Macintosh®. STEP 2 2 Click [Mac OS X] folder and double click [P-touch Editor 5.0 Installer]. The installation of Mac OS® X 10.4.9. The installation of printer...
...8226; Until the installation of printer driver is displayed, click [Restart]. In the following screens may differ from Macintosh®. STEP 3 Installing the software For Macintosh® For Windows® Label Overview 4 Open [Brother QL-XXX Driver] in as ...Brother QL-XXX Driver.pkg] in the following steps, you will see QLXXX. Here explains the example of software is completed, do not connect the machine to Macintosh®. STEP 2 2 Click [Mac OS X] folder and double click [P-touch Editor 5.0 Installer]. The installation of Mac OS® X 10.4.9. The installation of printer...
Setup & Operation Guide - English and Spanish
Page 31
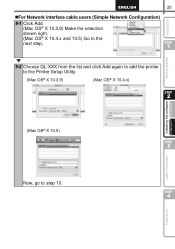
STEP 4 Reference STEP 1 Getting started 9-2 Choose QL-XXX from the list and click Add again to add the printer to the Printer Setup Utility. (Mac OS® X 10.3.9) (Mac OS® X 10.4.x) STEP 2 (Mac OS® X 10.5) STEP 3 Installing the software For Macintosh® For Windows® Label Overview Now, go to the next step. 25 „For Network interface cable users (Simple Network Configuration) Introduction 9-1 Click Add. (Mac OS® X 10.3.9) Make the selection shown right. (Mac OS® X 10.4.x and 10.5) Go to step 10.
STEP 4 Reference STEP 1 Getting started 9-2 Choose QL-XXX from the list and click Add again to add the printer to the Printer Setup Utility. (Mac OS® X 10.3.9) (Mac OS® X 10.4.x) STEP 2 (Mac OS® X 10.5) STEP 3 Installing the software For Macintosh® For Windows® Label Overview Now, go to the next step. 25 „For Network interface cable users (Simple Network Configuration) Introduction 9-1 Click Add. (Mac OS® X 10.3.9) Make the selection shown right. (Mac OS® X 10.4.x and 10.5) Go to step 10.
Setup & Operation Guide - English and Spanish
Page 45
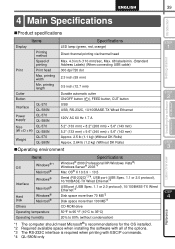
...Button ON/OFF button ( ), FEED button, CUT button Interface QL-570 QL-580N USB USB, RS-232C, 10/100BASE-TX Wired Ethernet Power supply QL-570 QL-580N 120V AC 60 Hz 1.7 A Size QL-570 (W × D × H) QL-580N 5.2" (133 mm) × 8.2" (208 mm) &#...QL-580N only Reference Label Overview Getting started STEP 1 STEP 2 STEP 3 STEP 4 39 Reference 4 Main Specifications Introduction Installing the software For Macintosh® For Windows® !Product specifications Items Specifications Display LED lamp (green, red, orange) Printing method Direct thermal printing via thermal...
...Button ON/OFF button ( ), FEED button, CUT button Interface QL-570 QL-580N USB USB, RS-232C, 10/100BASE-TX Wired Ethernet Power supply QL-570 QL-580N 120V AC 60 Hz 1.7 A Size QL-570 (W × D × H) QL-580N 5.2" (133 mm) × 8.2" (208 mm) &#...QL-580N only Reference Label Overview Getting started STEP 1 STEP 2 STEP 3 STEP 4 39 Reference 4 Main Specifications Introduction Installing the software For Macintosh® For Windows® !Product specifications Items Specifications Display LED lamp (green, red, orange) Printing method Direct thermal printing via thermal...


