Quick Setup Guide - English and Spanish
Page 29
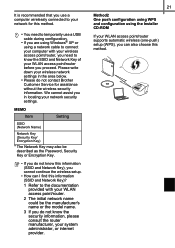
... your wireless network settings in locating your network security settings. We cannot assist you in the area below. • Please do not contact Brother Customer Service for this method. • You need to temporarily use a computer wirelessly connected to know the security information, please consult the ... using a network cable to connect your computer with your WLAN access point/router. 2 The initial network name could be described as the Password, Security Key or Encryption Key. • If you do not know the SSID and Network Key of your WLAN access point/router before...
... your wireless network settings in locating your network security settings. We cannot assist you in the area below. • Please do not contact Brother Customer Service for this method. • You need to temporarily use a computer wirelessly connected to know the security information, please consult the ... using a network cable to connect your computer with your WLAN access point/router. 2 The initial network name could be described as the Password, Security Key or Encryption Key. • If you do not know the SSID and Network Key of your WLAN access point/router before...
Quick Setup Guide - English and Spanish
Page 40
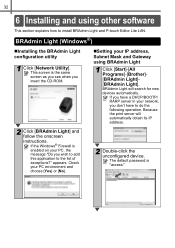
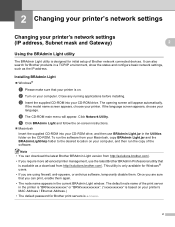
... your IP address, Subnet Mask and Gateway using other software This section explains how to install BRAdmin Light and P-touch Editor Lite LAN. The default password is enabled on your network, you don't have a DHCP/BOOTP/ RARP server in your PC, the message "Do you have to the list of exceptions...] and follow the onscreen instructions. Because the print server will search for new devices automatically. 32 6 Installing and using BRAdmin Light 1 Click [Start]-[All Programs]-[Brother][BRAdmin Light][BRAdmin Light].
... your IP address, Subnet Mask and Gateway using other software This section explains how to install BRAdmin Light and P-touch Editor Lite LAN. The default password is enabled on your network, you don't have a DHCP/BOOTP/ RARP server in your PC, the message "Do you have to the list of exceptions...] and follow the onscreen instructions. Because the print server will search for new devices automatically. 32 6 Installing and using BRAdmin Light 1 Click [Start]-[All Programs]-[Brother][BRAdmin Light][BRAdmin Light].

Quick Setup Guide - English and Spanish
Page 41
If you require more advanced printer management, use the latest Brother BRAdmin Professional utility version that is "access." 3 Choose STATIC for the Boot Method. The default password is available as the print server will automatically obtain its IP address. 4 The address information will ...to a location of your choice. „Setting your IP Address, Subnet Mask and Gateway using BRAdmin Light 1 Click [Library]-[Printers][Brother]-[P-touch Utilities]-[BRAdmin Light.jar]. BRAdmin Light (Macintosh) „Starting the BRAdmin Light configuration utility BRAdmin Light is in your network, ...
If you require more advanced printer management, use the latest Brother BRAdmin Professional utility version that is "access." 3 Choose STATIC for the Boot Method. The default password is available as the print server will automatically obtain its IP address. 4 The address information will ...to a location of your choice. „Setting your IP Address, Subnet Mask and Gateway using BRAdmin Light 1 Click [Library]-[Printers][Brother]-[P-touch Utilities]-[BRAdmin Light.jar]. BRAdmin Light (Macintosh) „Starting the BRAdmin Light configuration utility BRAdmin Light is in your network, ...
Software Users Manual - English
Page 26
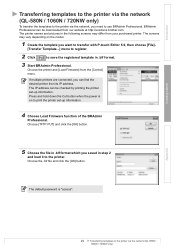
The IP address can be downloaded from its IP address. The default password is on the model. 1 Create the template you want to transfer with P-touch Editor 5.0, then choose [File]- [Transfer Template...] menu to register. 2 Click to save ... to the printer via the network (QL-580N / 1060N / 720NW only) Choose the printer and [Load Firmware] from your purchased printer. Press and hold down the Cut button when the power is "access". BRAdmin Professional can find the desired printer from our website at http://solutions.brother.com. Choose the .blf file...
The IP address can be downloaded from its IP address. The default password is on the model. 1 Create the template you want to transfer with P-touch Editor 5.0, then choose [File]- [Transfer Template...] menu to register. 2 Click to save ... to the printer via the network (QL-580N / 1060N / 720NW only) Choose the printer and [Load Firmware] from your purchased printer. Press and hold down the Cut button when the power is "access". BRAdmin Professional can find the desired printer from our website at http://solutions.brother.com. Choose the .blf file...
Network Users Manual - English
Page 7
...". ("xxxxxxxxxxxx" is access. 2 The default node name of the print server in the current BRAdmin Light window. To run the copy of Brother network connected devices. If the model name screen appears, choose your CD-ROM drive. b Turn on your printer's MAC Address / Ethernet Address....) • The default password for Brother print servers is based on . Click Network Utility. c Insert the supplied CD-ROM into your language. Note • You can download the latest Brother BRAdmin Light version from http://solutions.brother.com/. • If you can also search...
...". ("xxxxxxxxxxxx" is access. 2 The default node name of the print server in the current BRAdmin Light window. To run the copy of Brother network connected devices. If the model name screen appears, choose your CD-ROM drive. b Turn on your printer's MAC Address / Ethernet Address....) • The default password for Brother print servers is based on . Click Network Utility. c Insert the supplied CD-ROM into your language. Note • You can download the latest Brother BRAdmin Light version from http://solutions.brother.com/. • If you can also search...

Network Users Manual - English
Page 19
The User Name is admin and the default Password is 192.168.1.2.). e You can now change your print server settings using the HTTP (Hyper Text Transfer Protocol). As the print server supports TCP/IP ... seen on your computer or are using a Domain Name System, you can also enter the NetBIOS name of the print server. c Enter a user name and a password. Note 5 If you have edited the hosts file on the printer settings page. The NetBIOS name assigned is the first 15 characters of the node...
The User Name is admin and the default Password is 192.168.1.2.). e You can now change your print server settings using the HTTP (Hyper Text Transfer Protocol). As the print server supports TCP/IP ... seen on your computer or are using a Domain Name System, you can also enter the NetBIOS name of the print server. c Enter a user name and a password. Note 5 If you have edited the hosts file on the printer settings page. The NetBIOS name assigned is the first 15 characters of the node...
Network Users Manual - English
Page 41
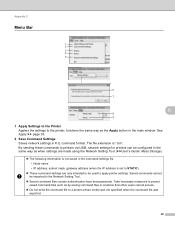
... ".bin". Appendix C Menu Bar C 1 2 3 4 5 6 7 C 8 9 1 Apply Settings to the Printer Applies the settings to the Network Setting Tool. Saved command files contain authentication keys and passwords. The file extension is set to STATIC). These command settings are made using the Network Setting Tool (uuUser's Guide: Mass Storage). The following...
... ".bin". Appendix C Menu Bar C 1 2 3 4 5 6 7 C 8 9 1 Apply Settings to the Printer Applies the settings to the Network Setting Tool. Saved command files contain authentication keys and passwords. The file extension is set to STATIC). These command settings are made using the Network Setting Tool (uuUser's Guide: Mass Storage). The following...
Network Users Manual - English
Page 42
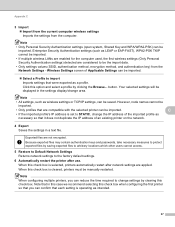
... When configuring multiple printers, you can be imported. Select a Profile to be displayed in a text file. Because exported files may contain authentication keys and passwords, take necessary measures to protect exported files by clearing this check box. Note • Only Personal Security Authentication settings (open system, Shared Key and WPA...
... When configuring multiple printers, you can be imported. Select a Profile to be displayed in a text file. Because exported files may contain authentication keys and passwords, take necessary measures to protect exported files by clearing this check box. Note • Only Personal Security Authentication settings (open system, Shared Key and WPA...
Network Users Manual - English
Page 46
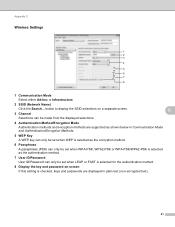
... Name) Click the Search... button to display the SSID selections on -screen If this setting is selected for the authentication method. 8 Display the key and password on a separate screen. C 3 Channel Selections can be made from the displayed selections. 4 Authentication Method/Encryption Mode Authentication methods and encryption methods are supported as ... 6 Passphrase A passphrase (PSK) can only be set when WPA-PSK, WPA2-PSK or WPA-PSK/WPA2-PSK is selected as the authentication method. 7 User ID/Password User ID/Password can only be set when LEAP or FAST is checked, keys and...
... Name) Click the Search... button to display the SSID selections on -screen If this setting is selected for the authentication method. 8 Display the key and password on a separate screen. C 3 Channel Selections can be made from the displayed selections. 4 Authentication Method/Encryption Mode Authentication methods and encryption methods are supported as ... 6 Passphrase A passphrase (PSK) can only be set when WPA-PSK, WPA2-PSK or WPA-PSK/WPA2-PSK is selected as the authentication method. 7 User ID/Password User ID/Password can only be set when LEAP or FAST is checked, keys and...
Users Manual - English
Page 6
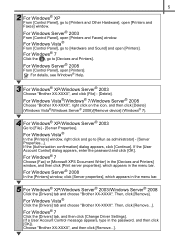
...and go to [File] - [Server Properties]. If the [User Account Control] dialog appears, enter the password and click [OK]. For Windows Vista® Click the [Drivers] tab and choose "Brother XX-XXXX". For Windows Server® 2008 In the [Printers] window, click [Server properties], which appears... Choose [Fax] or [Microsoft XPS Document Writer] in the [Devices and Printers] window, and then click [Print server properties], which appears in the password, and then click [OK]). For Windows® 7 Click the [Drivers] tab, and then click [Change Driver Settings]. (If a User Account Control ...
...and go to [File] - [Server Properties]. If the [User Account Control] dialog appears, enter the password and click [OK]. For Windows Vista® Click the [Drivers] tab and choose "Brother XX-XXXX". For Windows Server® 2008 In the [Printers] window, click [Server properties], which appears... Choose [Fax] or [Microsoft XPS Document Writer] in the [Devices and Printers] window, and then click [Print server properties], which appears in the password, and then click [OK]). For Windows® 7 Click the [Drivers] tab, and then click [Change Driver Settings]. (If a User Account Control ...