

Accessory Catalog
Page 13
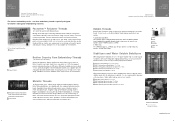
...grooves: SA179 ABCDEJ For five grooves: SA162 IP This presser foot does not include the bobbin cover. The ruffling blade on lightweight fabric. Brother Embellishment Feet 23 Bed Runner & Pillowcase Innov-is moved forward, its teeth catch a fabric and force it forward into the slot, and... combinations of tuck or gather by placing the completed row in the center position. 3. Install and manually thread a twin needle. 2. The intervals of tucks can be adjusted. 1. www.brother.com A specially designed bobbin cover is also included with evenly spaced tucks and gathers. Sew slowly...
...grooves: SA179 ABCDEJ For five grooves: SA162 IP This presser foot does not include the bobbin cover. The ruffling blade on lightweight fabric. Brother Embellishment Feet 23 Bed Runner & Pillowcase Innov-is moved forward, its teeth catch a fabric and force it forward into the slot, and... combinations of tuck or gather by placing the completed row in the center position. 3. Install and manually thread a twin needle. 2. The intervals of tucks can be adjusted. 1. www.brother.com A specially designed bobbin cover is also included with evenly spaced tucks and gathers. Sew slowly...
Accessory Catalog
Page 34
...the proper stabilizer helps to create machine embroidery as well as fur or terrycloth. Made to the Brother Embroidery Cards giving you just the right color for the Quattro™ 6000D, Duetta™ 4500D/Innov-is 4000D, 2500D, 1500D, 1200 series, PC and ULT series machines...Bobbin Threads Stabilizers and Water Water Soluble Stabilizers Brother Embroidery Accessories 66 Bobbin Threads Brother Bobbin Threads are also available at selected Dealers. Make sure you just the right color for placement on how to hoop your instruction manual for brightness and durability to the needle ...
...the proper stabilizer helps to create machine embroidery as well as fur or terrycloth. Made to the Brother Embroidery Cards giving you just the right color for the Quattro™ 6000D, Duetta™ 4500D/Innov-is 4000D, 2500D, 1500D, 1200 series, PC and ULT series machines...Bobbin Threads Stabilizers and Water Water Soluble Stabilizers Brother Embroidery Accessories 66 Bobbin Threads Brother Bobbin Threads are also available at selected Dealers. Make sure you just the right color for placement on how to hoop your instruction manual for brightness and durability to the needle ...

Users Manual - Multi
Page 4
If anything is missing or damaged, contact your authorized dealer or Brother Customer Service. • Border embroidery frame Since the sewing area can easily be changed when the border embroidery frame is used, repeated patterns can be ... Border Embroidery Frame We recommend using the border embroidery frame when embroidery repeated patterns at the edges of children, otherwise injuries may result. • Operation manual (this guide) Note • When the border embroidery frame is determined. CAUTION • Do not leave the border embroidery frame within the reach of items...
If anything is missing or damaged, contact your authorized dealer or Brother Customer Service. • Border embroidery frame Since the sewing area can easily be changed when the border embroidery frame is used, repeated patterns can be ... Border Embroidery Frame We recommend using the border embroidery frame when embroidery repeated patterns at the edges of children, otherwise injuries may result. • Operation manual (this guide) Note • When the border embroidery frame is determined. CAUTION • Do not leave the border embroidery frame within the reach of items...

Users Manual - Multi
Page 5
... line 3 Memo • For details on the border function, refer to repeat the pattern. d From the embroidery frame display settings, select one of the Operation Manual for border embroidery frames. b Combine the patterns and use the border function to "Designing Repeated Patterns" in chapter 6 of the embroidery frame displays for the...
... line 3 Memo • For details on the border function, refer to repeat the pattern. d From the embroidery frame display settings, select one of the Operation Manual for border embroidery frames. b Combine the patterns and use the border function to "Designing Repeated Patterns" in chapter 6 of the embroidery frame displays for the...

Users Manual - Multi
Page 10
... the thread has become tangled and the embroidery unit carriage does not move the embroidery unit carriage when the machine is turned off the machine, manually move the carriage, and then remove the border embroidery frame. • Only move to its initial position. ■ Removing the Border Embroidery Frame Note •...
... the thread has become tangled and the embroidery unit carriage does not move the embroidery unit carriage when the machine is turned off the machine, manually move the carriage, and then remove the border embroidery frame. • Only move to its initial position. ■ Removing the Border Embroidery Frame Note •...

Users Manual - English
Page 1
Computerized Embroidery and Sewing Machine Operation Manual Product Code: 882-W01/W02
Computerized Embroidery and Sewing Machine Operation Manual Product Code: 882-W01/W02
Users Manual - English
Page 3
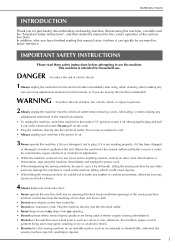
...machine directly into any sudden or careless movements, otherwise you may ignite, resulting in fire or an electric shock. • Do not place this manual, store it where it by any other part may fall, resulting in use the machine. Do not use an extension cord. • Always unplug... using this machine if it has a damaged cord or plug, if it is stored or in injuries. INTRODUCTION INTRODUCTION Thank you for purchasing this manual for the correct operation of burns, fire, electric shock, or injury to persons. 2 Always unplug the machine from the build up of the electrical...
...machine directly into any sudden or careless movements, otherwise you may ignite, resulting in fire or an electric shock. • Do not place this manual, store it where it by any other part may fall, resulting in use the machine. Do not use an extension cord. • Always unplug... using this machine if it has a damaged cord or plug, if it is stored or in injuries. INTRODUCTION INTRODUCTION Thank you for purchasing this manual for the correct operation of burns, fire, electric shock, or injury to persons. 2 Always unplug the machine from the build up of the electrical...

Users Manual - English
Page 4
..., it to break. 6 This machine is not a toy: • Your close attention to clean the case. If the problem persists, please consult your local authorized Brother dealer. Use this manual. Use only the interface cable (USB cable) included with this machine. For additional product information and updates, visit our website at www...
..., it to break. 6 This machine is not a toy: • Your close attention to clean the case. If the problem persists, please consult your local authorized Brother dealer. Use this manual. Use only the interface cable (USB cable) included with this machine. For additional product information and updates, visit our website at www...
Users Manual - English
Page 11
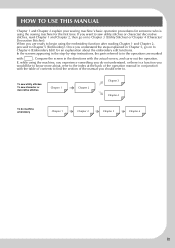
...6 (Embroidery Edit) for the first time. When you understand the steps explained in conjunction with the table of contents to find the section of the manual you want to sew utility stitches or character/ decorative stitches, read Chapter 1 and Chapter 2, then go on to Chapter 3 (Utility Stitches) or Chapter...step-by-step instructions, the parts referred to in the directions with the actual screen, and carry out the operation. HOW TO USE THIS MANUAL Chapter 1 and Chapter 2 explain your sewing machine's basic operation procedures for someone who is a function you would like to know more ...
...6 (Embroidery Edit) for the first time. When you understand the steps explained in conjunction with the table of contents to find the section of the manual you want to sew utility stitches or character/ decorative stitches, read Chapter 1 and Chapter 2, then go on to Chapter 3 (Utility Stitches) or Chapter...step-by-step instructions, the parts referred to in the directions with the actual screen, and carry out the operation. HOW TO USE THIS MANUAL Chapter 1 and Chapter 2 explain your sewing machine's basic operation procedures for someone who is a function you would like to know more ...
Users Manual - English
Page 12
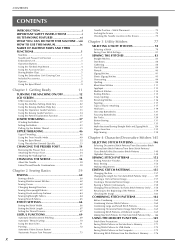
CONTENTS CONTENTS INTRODUCTION i IMPORTANT SAFETY INSTRUCTIONS i OUTSTANDING FEATURES vi WHAT YOU CAN DO WITH THIS MACHINE ...viii HOW TO USE THIS MANUAL ix NAMES OF MACHINE PARTS AND THEIR FUNCTIONS 1 Machine 1 Needle and Presser Foot Section 2 Embroidery Unit 3 Operation Buttons 3 Using the Flat Bed Attachment 4 Using the ...
CONTENTS CONTENTS INTRODUCTION i IMPORTANT SAFETY INSTRUCTIONS i OUTSTANDING FEATURES vi WHAT YOU CAN DO WITH THIS MACHINE ...viii HOW TO USE THIS MANUAL ix NAMES OF MACHINE PARTS AND THEIR FUNCTIONS 1 Machine 1 Needle and Presser Foot Section 2 Embroidery Unit 3 Operation Buttons 3 Using the Flat Bed Attachment 4 Using the ...

Users Manual - English
Page 21
... 54 LCD cleaning cloth XE4913-001 55 Soft cover XE3966-001 56 Embroidery unit carrying case XE3791-001 57 Accessory case XE4909-001 58 Operation manual This manual 59 Quick reference guide XE4917-001 Memo • Foot controller: Model S This foot controller can be used on the machine rating plate. 7 Part Code...
... 54 LCD cleaning cloth XE4913-001 55 Soft cover XE3966-001 56 Embroidery unit carrying case XE3791-001 57 Accessory case XE4909-001 58 Operation manual This manual 59 Quick reference guide XE4917-001 Memo • Foot controller: Model S This foot controller can be used on the machine rating plate. 7 Part Code...
Users Manual - English
Page 30
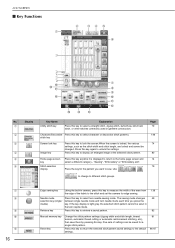
..., buttonhole, blind hem 79 stitch, or other stitches commonly used in the twin needle mode. Retrieve key Press this key to retrieve a saved pattern. 82 Manual memory key Reset key Change the stitch pattern settings (zigzag width and stitch length, thread tension, automatic thread cutting or automatic reinforcement stitching, etc.), then...
..., buttonhole, blind hem 79 stitch, or other stitches commonly used in the twin needle mode. Retrieve key Press this key to retrieve a saved pattern. 82 Manual memory key Reset key Change the stitch pattern settings (zigzag width and stitch length, thread tension, automatic thread cutting or automatic reinforcement stitching, etc.), then...

Users Manual - English
Page 33
... it with your computer. You can be used to perform a variety of the USB port on the computer (or USB hub), refer to the instruction manual for computer b USB cable connector Note • The connectors on the USB cable can be connected to your finger or the included touch pen. •...
... it with your computer. You can be used to perform a variety of the USB port on the computer (or USB hub), refer to the instruction manual for computer b USB cable connector Note • The connectors on the USB cable can be connected to your finger or the included touch pen. •...
Users Manual - English
Page 63
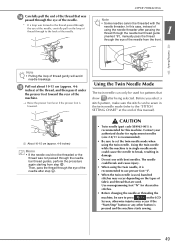
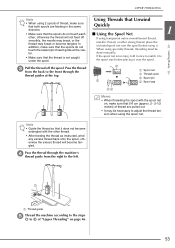
Then, pass the thread through the eye of the needle after passing the thread through the needle bar thread guide 1 (marked "6"), manually pass the thread through the needle bar thread guides, perform the procedure again starting from the front. a About 10-15 cm (approx. 4-6 inches)...be threaded with bent needles. was * If a loop was not passed through the eye of the needle from step c. Use monogramming foot "N" for this manual). n Carefully pull the end of the thread that show after being selected. o Pull out about 10-15 cm (approx. 4-6 inches) of the thread,...
Then, pass the thread through the eye of the needle after passing the thread through the needle bar thread guide 1 (marked "6"), manually pass the thread through the needle bar thread guides, perform the procedure again starting from the front. a About 10-15 cm (approx. 4-6 inches)...be threaded with bent needles. was * If a loop was not passed through the eye of the needle from step c. Use monogramming foot "N" for this manual). n Carefully pull the end of the thread that show after being selected. o Pull out about 10-15 cm (approx. 4-6 inches) of the thread,...
Users Manual - English
Page 64
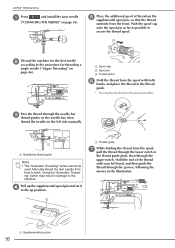
... the supplemental spool pin, so that the thread unwinds from the spool with your left side manually. a Supplemental spool pin 50 a Thread guide g While holding the thread from front to secure the thread spool. Manually thread the twin needle from the spool, pull the thread through the needle bar thread guides on...
... the supplemental spool pin, so that the thread unwinds from the spool with your left side manually. a Supplemental spool pin 50 a Thread guide g While holding the thread from front to secure the thread spool. Manually thread the twin needle from the spool, pull the thread through the needle bar thread guides on...
Users Manual - English
Page 65
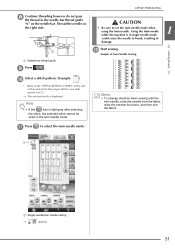
CAUTION • Be sure to select the twin needle mode. Sample of this manual for the proper stitch to break, resulting in the twin needle mode. Getting Ready a Needle bar thread guide l Start sewing. o The selected stitch is light ...
CAUTION • Be sure to select the twin needle mode. Sample of this manual for the proper stitch to break, resulting in the twin needle mode. Getting Ready a Needle bar thread guide l Start sewing. o The selected stitch is light ...
Users Manual - English
Page 67
c Pull the thread off smoothly, the needle may break, or the thread may be done manually. When using specialty threads, threading must be necessary to the spool size before using it does not become entangled with the spool net on page ...
c Pull the thread off smoothly, the needle may break, or the thread may be done manually. When using specialty threads, threading must be necessary to the spool size before using it does not become entangled with the spool net on page ...
Users Manual - English
Page 69
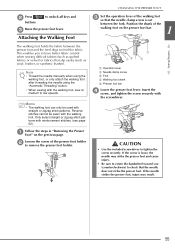
... to feed the fabric. Attaching the Walking Foot c Set the so that the needle does not strike the presser foot. Note • Thread the needle manually when using the walking foot, or only attach the walking foot after threading the needle using the "Automatic Threading" button. • When sewing with the...
... to feed the fabric. Attaching the Walking Foot c Set the so that the needle does not strike the presser foot. Note • Thread the needle manually when using the walking foot, or only attach the walking foot after threading the needle using the "Automatic Threading" button. • When sewing with the...

Users Manual - English
Page 76
... the end of the key display, you can sew reverse stitches by holding the "Reverse/ Reinforcement Stitch" button. foot controller to sew reverse/reinforcement stitches manually (see page 69). the foot controller to the desired length, and then insert the foot controller plug into its jack on the cord. Memo •...
... the end of the key display, you can sew reverse stitches by holding the "Reverse/ Reinforcement Stitch" button. foot controller to sew reverse/reinforcement stitches manually (see page 69). the foot controller to the desired length, and then insert the foot controller plug into its jack on the cord. Memo •...

Users Manual - English
Page 80
... want to their default settings. Note • Settings for some stitches cannot be changed (refer to the "STITCH SETTING CHART" at the end of this manual). • If you can change the zigzag stitch pattern width. Memo • For an alternate method of the individual settings. o The value in the display...
... want to their default settings. Note • Settings for some stitches cannot be changed (refer to the "STITCH SETTING CHART" at the end of this manual). • If you can change the zigzag stitch pattern width. Memo • For an alternate method of the individual settings. o The value in the display...


