
Users Manual - English
Page 12
... Stitch/Utility Decorative Stitch Patterns 148 Alphabet Characters 148 SEWING STITCH PATTERNS 152 Sewing Attractive Finishes 152 Basic Sewing 152 Making Adjustments 153 EDITING STITCH PATTERNS 155 Changing the Size 157 Changing the Length (for 7mm Satin Stitch Patterns Only 157 Creating ...a Vertical Mirror Image 157 Creating a Horizontal Mirror Image 158 Sewing a Pattern Continuously 158 Changing Thread Density (for Satin Stitch Patterns Only) .... 158 Returning to the Beginning of the Pattern 159 Checking the Image 160 COMBINING STITCH PATTERNS ...
... Stitch/Utility Decorative Stitch Patterns 148 Alphabet Characters 148 SEWING STITCH PATTERNS 152 Sewing Attractive Finishes 152 Basic Sewing 152 Making Adjustments 153 EDITING STITCH PATTERNS 155 Changing the Size 157 Changing the Length (for 7mm Satin Stitch Patterns Only 157 Creating ...a Vertical Mirror Image 157 Creating a Horizontal Mirror Image 158 Sewing a Pattern Continuously 158 Changing Thread Density (for Satin Stitch Patterns Only) .... 158 Returning to the Beginning of the Pattern 159 Checking the Image 160 COMBINING STITCH PATTERNS ...

Users Manual - English
Page 13
... "W 183 Attaching the Embroidery Unit 184 SELECTING PATTERNS 186 Selecting Embroidery Patterns/Brother "Exclusives"/Greek Alphabet Patterns/Floral Alphabet Patterns/Utility Embroidery Patterns 189 Selecting Alphabet...225 Resuming Embroidery After Turning Off the Power 225 MAKING EMBROIDERY ADJUSTMENTS ..........227 Adjusting Thread Tension 227 Adjusting the Alternate Bobbin Case (with No Color on the Screw...Size 236 Rotating the Pattern 237 Creating a Horizontal Mirror Image 238 Changing the Density (Alphabet Character and Frame Patterns Only 239 Changing the Colors of Alphabet Character...
... "W 183 Attaching the Embroidery Unit 184 SELECTING PATTERNS 186 Selecting Embroidery Patterns/Brother "Exclusives"/Greek Alphabet Patterns/Floral Alphabet Patterns/Utility Embroidery Patterns 189 Selecting Alphabet...225 Resuming Embroidery After Turning Off the Power 225 MAKING EMBROIDERY ADJUSTMENTS ..........227 Adjusting Thread Tension 227 Adjusting the Alternate Bobbin Case (with No Color on the Screw...Size 236 Rotating the Pattern 237 Creating a Horizontal Mirror Image 238 Changing the Density (Alphabet Character and Frame Patterns Only 239 Changing the Colors of Alphabet Character...

Users Manual - English
Page 159
... ...148 Alphabet Characters ...148 ■ Deleting Characters...150 ■ Adjusting the Character Spacing...150 SEWING STITCH PATTERNS 152 Sewing Attractive Finishes ...152 Basic Sewing ...152 Making Adjustments ...153 EDITING STITCH PATTERNS 155 ■ Key Functions ...155 Changing the... Size ...157 Changing the Length (for 7mm Satin Stitch Patterns Only 157 Creating a Vertical Mirror Image ...157 Creating a Horizontal Mirror Image ...158 Sewing a Pattern Continuously ...158 Changing Thread Density...
... ...148 Alphabet Characters ...148 ■ Deleting Characters...150 ■ Adjusting the Character Spacing...150 SEWING STITCH PATTERNS 152 Sewing Attractive Finishes ...152 Basic Sewing ...152 Making Adjustments ...153 EDITING STITCH PATTERNS 155 ■ Key Functions ...155 Changing the... Size ...157 Changing the Length (for 7mm Satin Stitch Patterns Only 157 Creating a Vertical Mirror Image ...157 Creating a Horizontal Mirror Image ...158 Sewing a Pattern Continuously ...158 Changing Thread Density...
Users Manual - English
Page 195
...9632; Copyright Information 186 ■ Pattern Selection Screens 187 Selecting Embroidery Patterns/Brother "Exclusives"/Greek Alphabet Patterns/Floral Alphabet Patterns/Utility Embroidery Patterns 189 Selecting Alphabet ... 220 Printing the Background and Embroidery Position Sheet ........221 Sewing Embroidery Patterns 222 ADJUSTMENTS DURING THE EMBROIDERY PROCESS 223 If the Bobbin Runs Out of Thread 223 If... 236 Rotating the Pattern 237 Creating a Horizontal Mirror Image 238 Changing the Density (Alphabet Character and Frame Patterns Only 239 Changing the Colors of Alphabet Character...
...9632; Copyright Information 186 ■ Pattern Selection Screens 187 Selecting Embroidery Patterns/Brother "Exclusives"/Greek Alphabet Patterns/Floral Alphabet Patterns/Utility Embroidery Patterns 189 Selecting Alphabet ... 220 Printing the Background and Embroidery Position Sheet ........221 Sewing Embroidery Patterns 222 ADJUSTMENTS DURING THE EMBROIDERY PROCESS 223 If the Bobbin Runs Out of Thread 223 If... 236 Rotating the Pattern 237 Creating a Horizontal Mirror Image 238 Changing the Density (Alphabet Character and Frame Patterns Only 239 Changing the Colors of Alphabet Character...
Users Manual - English
Page 370
... Cord guide bobbin cover 92 Crazy quilt 92 , Custom Thread Table 279 283 Cut/Tension key 227 D Darning 127 Dart seam 88 Density key 239 E Echo quilting 108 Edge sewing , edge sewing using the built-in camera vi 138 Editing character/decorative stitches 155 embroidery ...234 embroidery edit 267 MY CUSTOM STITCH 316 Elastic zigzag stitches 93 Elongation key 157 Embroidery adjusting the speed 231 automatic thread cutting function (END COLOR TRIM) ..........229 edges or corners 203 key functions 197 restarting from the ...
... Cord guide bobbin cover 92 Crazy quilt 92 , Custom Thread Table 279 283 Cut/Tension key 227 D Darning 127 Dart seam 88 Density key 239 E Echo quilting 108 Edge sewing , edge sewing using the built-in camera vi 138 Editing character/decorative stitches 155 embroidery ...234 embroidery edit 267 MY CUSTOM STITCH 316 Elastic zigzag stitches 93 Elongation key 157 Embroidery adjusting the speed 231 automatic thread cutting function (END COLOR TRIM) ..........229 edges or corners 203 key functions 197 restarting from the ...

Operation Manual Kit 1 - English
Page 2
... Fabric and Sewing 10 Bobbin Work Free Motion Sewing 12 CREATING BOBBIN WORK (EMBROIDERY 13 Selecting the Pattern...13 Start Embroidering...14 ADJUSTING THE THREAD TENSION 17 TROUBLESHOOTING...18 Chapter 2 New Features and New Patterns 19 HOW TO USE NEW FEATURES 20 Displaying the Fabric... While Aligning the Embroidery Position 20 CHANGING THE PATTERN SIZE WHILE MAINTAINING THE DESIRED THREAD DENSITY (STITCH RECALCULATOR)...23 NEW PATTERNS...25 Thumbnail List ...25 Embroidery Patterns Color Change Table 26 Before using this upgrade kit, be sure...
... Fabric and Sewing 10 Bobbin Work Free Motion Sewing 12 CREATING BOBBIN WORK (EMBROIDERY 13 Selecting the Pattern...13 Start Embroidering...14 ADJUSTING THE THREAD TENSION 17 TROUBLESHOOTING...18 Chapter 2 New Features and New Patterns 19 HOW TO USE NEW FEATURES 20 Displaying the Fabric... While Aligning the Embroidery Position 20 CHANGING THE PATTERN SIZE WHILE MAINTAINING THE DESIRED THREAD DENSITY (STITCH RECALCULATOR)...23 NEW PATTERNS...25 Thumbnail List ...25 Embroidery Patterns Color Change Table 26 Before using this upgrade kit, be sure...
Operation Manual Kit 1 - English
Page 15
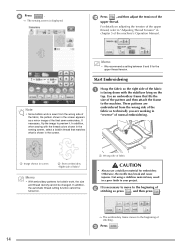
For details on . Start Embroidering Note • Since bobbin work , the size and thread density cannot be turned on adjusting the tension of the upper thread, refer to "Adjusting Thread Tension" in chapter 5 of the machine's Operation Manual. Use an embroidery frame that matches what... a Wrong side of the upper thread. Otherwise, the needle may result in a poor finish to your project. j Press , and then adjust the tension of fabric CAUTION • Always use a stabilizer material for embroidery. In addition, the automatic thread cutting function cannot be changed. ...
For details on . Start Embroidering Note • Since bobbin work , the size and thread density cannot be turned on adjusting the tension of the upper thread, refer to "Adjusting Thread Tension" in chapter 5 of the machine's Operation Manual. Use an embroidery frame that matches what... a Wrong side of the upper thread. Otherwise, the needle may result in a poor finish to your project. j Press , and then adjust the tension of fabric CAUTION • Always use a stabilizer material for embroidery. In addition, the automatic thread cutting function cannot be changed. ...
MY CUSTOM DESIGN - English
Page 11
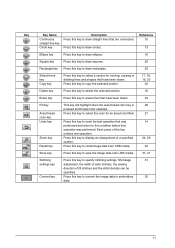
.../move key Copy key Press this key to display an enlargement of a specified section. Each press of fill stitches and the stitch density can be filled. Shrinkage 31 settings key adjustment, the width of satin stitches, the sewing direction of this key to select the color for moving, copying or deleting lines...
.../move key Copy key Press this key to display an enlargement of a specified section. Each press of fill stitches and the stitch density can be filled. Shrinkage 31 settings key adjustment, the width of satin stitches, the sewing direction of this key to select the color for moving, copying or deleting lines...
MY CUSTOM DESIGN - English
Page 33
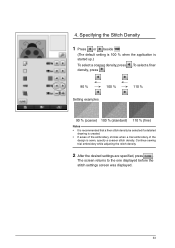
... embroidery while adjusting the stitch density. 2 After the desired settings are specified, press . The screen returns to the one displayed before the stitch settings screen was displayed. 33 4. Specifying the Stitch Density 1 Press or beside . (The default setting is 100 % when the application is sewn, specify a coarser stitch density. To select a finer density, press . ←...
... embroidery while adjusting the stitch density. 2 After the desired settings are specified, press . The screen returns to the one displayed before the stitch settings screen was displayed. 33 4. Specifying the Stitch Density 1 Press or beside . (The default setting is 100 % when the application is sewn, specify a coarser stitch density. To select a finer density, press . ←...

MY CUSTOM DESIGN - English
Page 47
In order to the sewing direction and stitch density of the fill stitches. Notes • Normally, the default setting of 0.3 mm is used. • Continue sewing trial embroidery while making adjustments. • The larger the pattern size, the easier shrinkage will occur. • Shrinkage...than the original data. ← Sewing direction → Original data ←← Sewing direction →→ Adjusted data Each arrow represents a shrinkage adjustment value (0.1 mm increments) 1 Display in 0.1 mm increments can be specified. To shorten the stitching, press . Also try...
In order to the sewing direction and stitch density of the fill stitches. Notes • Normally, the default setting of 0.3 mm is used. • Continue sewing trial embroidery while making adjustments. • The larger the pattern size, the easier shrinkage will occur. • Shrinkage...than the original data. ← Sewing direction → Original data ←← Sewing direction →→ Adjusted data Each arrow represents a shrinkage adjustment value (0.1 mm increments) 1 Display in 0.1 mm increments can be specified. To shorten the stitching, press . Also try...


