

Accessory Catalog
Page 16
... PEDESIGN LITE PE-DESIGN® 8.0/SAVR8.0 Turn your own original projects. This personal embroidery design software system comes with Brother's PE-DESIGN® 8.0 software! SAVR8.0 Upgrade kit is compatible with Windows 2000 or later. PE-DESIGN® Lite New to use with Windows 98 or later.... You can design your Brother home embroidery machine. Brother offers a wide range of the PE-DESIGN® 8.0 software. Comes with USB ...
... PEDESIGN LITE PE-DESIGN® 8.0/SAVR8.0 Turn your own original projects. This personal embroidery design software system comes with Brother's PE-DESIGN® 8.0 software! SAVR8.0 Upgrade kit is compatible with Windows 2000 or later. PE-DESIGN® Lite New to use with Windows 98 or later.... You can design your Brother home embroidery machine. Brother offers a wide range of the PE-DESIGN® 8.0 software. Comes with USB ...

Accessory Catalog
Page 17
...6000D Embroider y Card Reader Connect your embroidery card reader using the built-in embroidery fonts. - Used in conjunction with the built-in software in your embroidery designs with the new Appliqué Creator Function. - Duetta™ 4500D/Innov-is 4000D Premium Upgrade Package II Brother... Embroidery Accessories 32 Duetta™ 4500D/ 4000D Premium Upgrade Package II Exclusively for details.) www.brother.com The Border Frame enables you can create continuous border patterns from the...
...6000D Embroider y Card Reader Connect your embroidery card reader using the built-in embroidery fonts. - Used in conjunction with the built-in software in your embroidery designs with the new Appliqué Creator Function. - Duetta™ 4500D/Innov-is 4000D Premium Upgrade Package II Brother... Embroidery Accessories 32 Duetta™ 4500D/ 4000D Premium Upgrade Package II Exclusively for details.) www.brother.com The Border Frame enables you can create continuous border patterns from the...

Users Manual - English
Page 13
... Step by Step 182 Attaching Embroidery Foot "W 183 Attaching the Embroidery Unit 184 SELECTING PATTERNS 186 Selecting Embroidery Patterns/Brother "Exclusives"/Greek Alphabet Patterns/Floral Alphabet Patterns/Utility Embroidery Patterns 189 Selecting Alphabet Character Patterns 190 Selecting Frame Patterns 192... 329 Touch Panel is Malfunctioning 329 TROUBLESHOOTING 330 ERROR MESSAGES 335 SPECIFICATIONS 343 UPGRADING YOUR MACHINE'S SOFTWARE...... 344 Upgrade Procedure Using USB Media 344 Upgrade Procedure Using Computer 345 STITCH SETTING CHART 347 INDEX 356 1 2 3 4 5 6 7 8 ...
... Step by Step 182 Attaching Embroidery Foot "W 183 Attaching the Embroidery Unit 184 SELECTING PATTERNS 186 Selecting Embroidery Patterns/Brother "Exclusives"/Greek Alphabet Patterns/Floral Alphabet Patterns/Utility Embroidery Patterns 189 Selecting Alphabet Character Patterns 190 Selecting Frame Patterns 192... 329 Touch Panel is Malfunctioning 329 TROUBLESHOOTING 330 ERROR MESSAGES 335 SPECIFICATIONS 343 UPGRADING YOUR MACHINE'S SOFTWARE...... 344 Upgrade Procedure Using USB Media 344 Upgrade Procedure Using Computer 345 STITCH SETTING CHART 347 INDEX 356 1 2 3 4 5 6 7 8 ...
Users Manual - English
Page 339
8 Chapter Appendix CARE AND MAINTENANCE 326 Cleaning the LCD Screen 326 Cleaning the Machine Casing 326 Cleaning the Race 326 Cleaning the Cutter in the Bobbin Case Area 327 About the Maintenance Message 328 ADJUSTING THE SCREEN 329 Touch Panel is Malfunctioning 329 TROUBLESHOOTING 330 ERROR MESSAGES 335 ■ Alarm Sounds ...342 SPECIFICATIONS 343 UPGRADING YOUR MACHINE'S SOFTWARE 344 Upgrade Procedure Using USB Media 344 Upgrade Procedure Using Computer 345 STITCH SETTING CHART 347 INDEX 356
8 Chapter Appendix CARE AND MAINTENANCE 326 Cleaning the LCD Screen 326 Cleaning the Machine Casing 326 Cleaning the Race 326 Cleaning the Cutter in the Bobbin Case Area 327 About the Maintenance Message 328 ADJUSTING THE SCREEN 329 Touch Panel is Malfunctioning 329 TROUBLESHOOTING 330 ERROR MESSAGES 335 ■ Alarm Sounds ...342 SPECIFICATIONS 343 UPGRADING YOUR MACHINE'S SOFTWARE 344 Upgrade Procedure Using USB Media 344 Upgrade Procedure Using Computer 345 STITCH SETTING CHART 347 INDEX 356

Users Manual - English
Page 358
... character and decorative stitches are erased. • Save all combinations to USB media or computer before starting to upgrade the software, check that no data other than the upgrade file is available on "http://solutions.brother.com", please download the files following screen will differ depending on the machine. o The following the instructions...
... character and decorative stitches are erased. • Save all combinations to USB media or computer before starting to upgrade the software, check that no data other than the upgrade file is available on "http://solutions.brother.com", please download the files following screen will differ depending on the machine. o The following the instructions...
Users Manual - English
Page 359
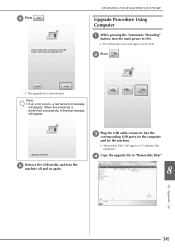
d Press . o The following message will appear on again. d Copy the upgrade file to ON. o The upgrade file is performed successfully, following screen will appear. Note • If an error occurs, a red text error message will appear in ...Press . e Remove the machine off USB media, and and on the LCD. turn the main power to "Removable Disk". 8 Appendix 345 UPGRADING YOUR MACHINE'S SOFTWARE Upgrade Procedure Using Computer a While pressing the "Automatic Threading" button, turn the c Plug the USB cable connector into the corresponding USB ports for...
d Press . o The following message will appear on again. d Copy the upgrade file to ON. o The upgrade file is performed successfully, following screen will appear. Note • If an error occurs, a red text error message will appear in ...Press . e Remove the machine off USB media, and and on the LCD. turn the main power to "Removable Disk". 8 Appendix 345 UPGRADING YOUR MACHINE'S SOFTWARE Upgrade Procedure Using Computer a While pressing the "Automatic Threading" button, turn the c Plug the USB cable connector into the corresponding USB ports for...

Users Manual - English
Page 360
If the download is downloaded. turn the 346 Note • If an error occurs, a red text error message will appear. f Unplug the USB machine off and cable, and on again. e When the message disappears, press . o The upgrade file is performed successfully, following message will appear. UPGRADING YOUR MACHINE'S SOFTWARE o The following message will appear.
If the download is downloaded. turn the 346 Note • If an error occurs, a red text error message will appear. f Unplug the USB machine off and cable, and on again. e When the message disappears, press . o The upgrade file is performed successfully, following message will appear. UPGRADING YOUR MACHINE'S SOFTWARE o The following message will appear.
Users Manual - English
Page 372
... 275 278, 283 Top cover 1 Top stitching 116 Touch pen 279 317, 329 holder 1 Trial key 209 Troubleshooting 330 Twin needle 49 U Uninterrupted embroidering 243 Upgrading 344 Upper threading twin needle mode 49 using the "Automatic Threading" button 46 using the spool net 53 USB cable 19, 175, 220, 246, 250...
... 275 278, 283 Top cover 1 Top stitching 116 Touch pen 279 317, 329 holder 1 Trial key 209 Troubleshooting 330 Twin needle 49 U Uninterrupted embroidering 243 Upgrading 344 Upper threading twin needle mode 49 using the "Automatic Threading" button 46 using the spool net 53 USB cable 19, 175, 220, 246, 250...

Installation Guide English - English
Page 4
... drive, and then start the Certification Key Issuing Wizard. [Step 3] Follow the wizard instructions for obtaining the Certification Key. [Step 4] Install the upgrade application for KIT I " in the Settings screen of the bobbin cover as indicated by the letter "A". • Bobbin cover with your model....addition, this guide) Contents of the included accessories see the Operation Manual viewable from the disc by clicking on again. [Step 6] After the upgrade has been successfully installed, certify the "KIT I on the sewing machine. [Step 5] Remove the USB media, and turn the machine off ...
... drive, and then start the Certification Key Issuing Wizard. [Step 3] Follow the wizard instructions for obtaining the Certification Key. [Step 4] Install the upgrade application for KIT I " in the Settings screen of the bobbin cover as indicated by the letter "A". • Bobbin cover with your model....addition, this guide) Contents of the included accessories see the Operation Manual viewable from the disc by clicking on again. [Step 6] After the upgrade has been successfully installed, certify the "KIT I on the sewing machine. [Step 5] Remove the USB media, and turn the machine off ...
Installation Guide English - English
Page 5
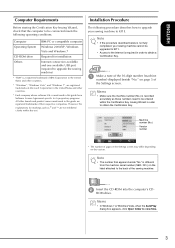
... connection available and one available USB port (required to view files. 3 on the version. Installation Procedure The following procedure describes how to upgrade your sewing machine cannot be upgraded to be connected meets the following operating conditions. Memo • Make sure the machine number (No.) is required in order to be...KIT I . a Make a note of the sewing machine. Memo • In Windows 7 or Windows Vista, when the AutoPlay dialog box appears, click Open folder to upgrade the sewing machine) * "IBM" is different from the machine serial number (SER.
... connection available and one available USB port (required to view files. 3 on the version. Installation Procedure The following procedure describes how to upgrade your sewing machine cannot be upgraded to be connected meets the following operating conditions. Memo • Make sure the machine number (No.) is required in order to be...KIT I . a Make a note of the sewing machine. Memo • In Windows 7 or Windows Vista, when the AutoPlay dialog box appears, click Open folder to upgrade the sewing machine) * "IBM" is different from the machine serial number (SER.
Installation Guide English - English
Page 6
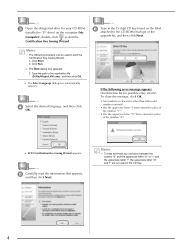
...-ROM envelope of the number "0"? → KIT I " been entered in place of the number "1"? • Has the uppercase letter "O" been entered in place of the upgrade kit, and then click Next. f Type in the CD Key. 4 Click Start. 2. If the following procedure can be used in the 15-digit CD key...
...-ROM envelope of the number "0"? → KIT I " been entered in place of the number "1"? • Has the uppercase letter "O" been entered in place of the upgrade kit, and then click Next. f Type in the CD Key. 4 Click Start. 2. If the following procedure can be used in the 15-digit CD key...

Installation Guide English - English
Page 7
.... To close the message, click OK. • Check the Internet connection, and then click Certify again. Note • After upgrading the sewing machine to the certifying server, and then obtain the upgrade Certification Key. Note • In order to obtain the Certification Key, a connection to the Internet must be established. → Connect...
.... To close the message, click OK. • Check the Internet connection, and then click Certify again. Note • After upgrading the sewing machine to the certifying server, and then obtain the upgrade Certification Key. Note • In order to obtain the Certification Key, a connection to the Internet must be established. → Connect...
Installation Guide English - English
Page 8
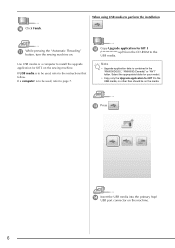
...6 n Insert the USB media into the primary (top) USB port connector on . j Click Finish. Select the appropriate folder for your model. • Copy only the Upgrade application for KIT I upf) from the CD-ROM to the instructions that follow. If USB media is to be used , refer to the USB media.... Note • Upgrade application data is to be used , refer to the USB media; If a computer is contained in the "NV6000D(US)", "NV6000D(Canada)" or "NV1" folder. l...
...6 n Insert the USB media into the primary (top) USB port connector on . j Click Finish. Select the appropriate folder for your model. • Copy only the Upgrade application for KIT I upf) from the CD-ROM to the instructions that follow. If USB media is to be used , refer to the USB media.... Note • Upgrade application data is to be used , refer to the USB media; If a computer is contained in the "NV6000D(US)", "NV6000D(Canada)" or "NV1" folder. l...

Installation Guide English - English
Page 9
appears, installation of the upgrade application has been completed. (If an error occurs, a message will appear in Computer (My Computer). 7 Note When the message "Upgrade complete." m Plug the USB cable connectors into the corresponding USB port connectors for the computer and for the machine. → Removable Disk appears in red.) p Remove the USB media. When using a computer to perform the installation l Press . ENGLISH o Press . Continue with step q on page 8.
appears, installation of the upgrade application has been completed. (If an error occurs, a message will appear in Computer (My Computer). 7 Note When the message "Upgrade complete." m Plug the USB cable connectors into the corresponding USB port connectors for the computer and for the machine. → Removable Disk appears in red.) p Remove the USB media. When using a computer to perform the installation l Press . ENGLISH o Press . Continue with step q on page 8.
Installation Guide English - English
Page 10
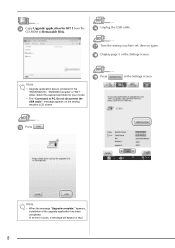
r Display page 5 of the upgrade application has been completed. (If an error occurs, a message will appear in the Settings screen. Do not disconnect the USB cable". s Press in red.) 8 Select ... for KIT I from the CD-ROM to PC. message appears on again. o Press . p Unplug the USB cable. appears, installation of the Settings screen. Note • Upgrade application data is contained in the "NV6000D(US)", "NV6000D(Canada)" or "NV1" folder. q Turn the sewing machine off, then on the sewing machine LCD screen...
r Display page 5 of the upgrade application has been completed. (If an error occurs, a message will appear in the Settings screen. Do not disconnect the USB cable". s Press in red.) 8 Select ... for KIT I from the CD-ROM to PC. message appears on again. o Press . p Unplug the USB cable. appears, installation of the Settings screen. Note • Upgrade application data is contained in the "NV6000D(US)", "NV6000D(Canada)" or "NV1" folder. q Turn the sewing machine off, then on the sewing machine LCD screen...
Installation Guide English - English
Page 12
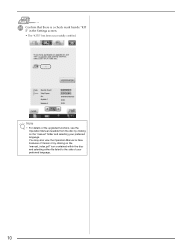
w Confirm that there is a check mark beside "KIT I" in the Settings screen. • The "KIT I" has been successfully certified. You may also view the Operation Manual or New Features of Version 2 by clicking on the "manual_index.pdf" icon contained within the disc and selecting either file listed to the side of the upgraded functions, see the Operation Manual viewable from the disc by clicking on the "manual" folder and selecting your preferred language. 10 Note • For details of your preferred language.
w Confirm that there is a check mark beside "KIT I" in the Settings screen. • The "KIT I" has been successfully certified. You may also view the Operation Manual or New Features of Version 2 by clicking on the "manual_index.pdf" icon contained within the disc and selecting either file listed to the side of the upgraded functions, see the Operation Manual viewable from the disc by clicking on the "manual" folder and selecting your preferred language. 10 Note • For details of your preferred language.
Operation Manual Kit 1 - English
Page 1
Upgrade KITI Operation Manual Before using this upgrade kit, be sure to read this Operation Manual for information on its correct use.
Upgrade KITI Operation Manual Before using this upgrade kit, be sure to read this Operation Manual for information on its correct use.

Operation Manual Kit 1 - English
Page 2
... SIZE WHILE MAINTAINING THE DESIRED THREAD DENSITY (STITCH RECALCULATOR)...23 NEW PATTERNS...25 Thumbnail List ...25 Embroidery Patterns Color Change Table 26 Before using this upgrade kit, be sure to read this Operation Manual for information on its correct use. 1
... SIZE WHILE MAINTAINING THE DESIRED THREAD DENSITY (STITCH RECALCULATOR)...23 NEW PATTERNS...25 Thumbnail List ...25 Embroidery Patterns Color Change Table 26 Before using this upgrade kit, be sure to read this Operation Manual for information on its correct use. 1

Operation Manual Kit 1 - English
Page 3
NEW FEATURES The following features will be activated with the upgrade for Kit I. • The bobbin case (gray) and bobbin cover (for bobbin work have been added so bobbin work can immediately be sewn. (page 25) &#... bobbin work ) are located in the New Features of the embroidery pattern can be aligned while displaying the fabric being used as outlined in this upgrade Operation Manual. Embroidery can easily be positioned. (page 20) • Embroidery patterns can then be enlarged or reduced while maintaining their thread density. (page 23...
NEW FEATURES The following features will be activated with the upgrade for Kit I. • The bobbin case (gray) and bobbin cover (for bobbin work have been added so bobbin work can immediately be sewn. (page 25) &#... bobbin work ) are located in the New Features of the embroidery pattern can be aligned while displaying the fabric being used as outlined in this upgrade Operation Manual. Embroidery can easily be positioned. (page 20) • Embroidery patterns can then be enlarged or reduced while maintaining their thread density. (page 23...

Operation Manual Kit 2 - English
Page 4
..., for these new functions are scrolled through continuously. 4 is displayed in the preview as two rows of stitching. New settings available with Upgrade Kit I (sold separately) are activated after scrolled through continuously (from the last page directly to the first page or from the first ...page directly to the Settings screen. brother.com" or contact your authorized dealer. Note • The pages displayed after Upgrade Kit I , visit our website "www. Settings screen „„Since functions have been added, a...
..., for these new functions are scrolled through continuously. 4 is displayed in the preview as two rows of stitching. New settings available with Upgrade Kit I (sold separately) are activated after scrolled through continuously (from the last page directly to the first page or from the first ...page directly to the Settings screen. brother.com" or contact your authorized dealer. Note • The pages displayed after Upgrade Kit I , visit our website "www. Settings screen „„Since functions have been added, a...


