
Network User Guide
Page 14
... is closed. The settings will be printed. • The node name appears in the Printer Settings. See the User's Guide for more details about RJ Utility. 10 c Press and hold the (Feed) button until the POWER indicator starts blinking in advance which items will be performed using..., we recommend to set in green. 4 Printing the Printer Set-up Information 4 Printing the Printer Set-up Information 4 You can use 4" (101.6 mm) receipt paper or continuous length label. • This operation can use the utility to use the (Feed) button to print a report that a roll of 4" (101.6 mm)...
... is closed. The settings will be printed. • The node name appears in the Printer Settings. See the User's Guide for more details about RJ Utility. 10 c Press and hold the (Feed) button until the POWER indicator starts blinking in advance which items will be performed using..., we recommend to set in green. 4 Printing the Printer Set-up Information 4 Printing the Printer Set-up Information 4 You can use 4" (101.6 mm) receipt paper or continuous length label. • This operation can use the utility to use the (Feed) button to print a report that a roll of 4" (101.6 mm)...

Users Guide
Page 3
... Rechargeable Li-ion Battery 4 Inserting the RD Roll 5 Cutting Roll Paper 7 Attaching the Belt Clip 7 Installing the Printer Driver and the Software for RJ-4030 8 Installing the Printer Driver and the Software for RJ-4030Ai 9 Installing the Printer Driver and the Software for RJ-4040 10 Before You Begin 10 Infrastructure Mode 11 Choosing Your...
... Rechargeable Li-ion Battery 4 Inserting the RD Roll 5 Cutting Roll Paper 7 Attaching the Belt Clip 7 Installing the Printer Driver and the Software for RJ-4030 8 Installing the Printer Driver and the Software for RJ-4030Ai 9 Installing the Printer Driver and the Software for RJ-4040 10 Before You Begin 10 Infrastructure Mode 11 Choosing Your...
Users Guide
Page 4
Parameters ...32 4 Communication Settings (RJ-4040 only) 38 Overview ...38 Using the Communication Settings 38 Starting the Communication Settings 38 Changing the Settings Related to Communications 40 Applying Setting Changes... Mass Storage...45 Description ...45 Using the Mass Storage Feature 45 JPEG Printing ...46 6 Maintaining the Printer 47 Print Head Maintenance 47 Roller Maintenance 47 Paper Outlet Maintenance 48 7 Reference 49 Indicators ...49 Indicator Warnings 51 Printing the Printer Set-up Information 52 8 Troubleshooting 53 Overview ...53 9 Technical Information...
Parameters ...32 4 Communication Settings (RJ-4040 only) 38 Overview ...38 Using the Communication Settings 38 Starting the Communication Settings 38 Changing the Settings Related to Communications 40 Applying Setting Changes... Mass Storage...45 Description ...45 Using the Mass Storage Feature 45 JPEG Printing ...46 6 Maintaining the Printer 47 Print Head Maintenance 47 Roller Maintenance 47 Paper Outlet Maintenance 48 7 Reference 49 Indicators ...49 Indicator Warnings 51 Printing the Printer Set-up Information 52 8 Troubleshooting 53 Overview ...53 9 Technical Information...

Users Guide
Page 5
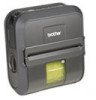
1 Setting Up the Printer 1 1 General Description 1 AC/DC connector 1 2 Serial port Front 3 USB port 1 4 Cover open lever 6 5 5 RD Roll compartment cover 6 Paper outlet 7 (Power) button 8 (Feed)button 9 POWER indicator 10 STATUS indicator 789 10 11 12 13 14 4 23 1 11 BATT (Battery) indicator 12 (Bluetooth) indicator (RJ-4030/RJ-4030Ai)/ (Wi-Fi) indicator (RJ-4040) 13 Bluetooth button (RJ-4030/RJ-4030Ai)/ Wi-Fi button (RJ-4040) 14 Belt hook 15 Battery cover Back 16 Battery cover latch 1 17 Battery compartment 16 15 17 1
1 Setting Up the Printer 1 1 General Description 1 AC/DC connector 1 2 Serial port Front 3 USB port 1 4 Cover open lever 6 5 5 RD Roll compartment cover 6 Paper outlet 7 (Power) button 8 (Feed)button 9 POWER indicator 10 STATUS indicator 789 10 11 12 13 14 4 23 1 11 BATT (Battery) indicator 12 (Bluetooth) indicator (RJ-4030/RJ-4030Ai)/ (Wi-Fi) indicator (RJ-4040) 13 Bluetooth button (RJ-4030/RJ-4030Ai)/ Wi-Fi button (RJ-4040) 14 Belt hook 15 Battery cover Back 16 Battery cover latch 1 17 Battery compartment 16 15 17 1

Users Guide
Page 9
... the printer off. b While pushing the adjuster lock in the direction of the arrow, move , adjust the roll guide to match the width of the paper using a rechargeable Li-ion battery with a high charge (charged 90% or more) in a location exposed to high temperatures will allow you to optimize its deterioration...
... the printer off. b While pushing the adjuster lock in the direction of the arrow, move , adjust the roll guide to match the width of the paper using a rechargeable Li-ion battery with a high charge (charged 90% or more) in a location exposed to high temperatures will allow you to optimize its deterioration...

Users Guide
Page 10
... die cut labels, set the roll guide to a width of 4.16 inches (105.6 mm). The printer will not print on the correct side of the paper or label. „ When printing on die cut label, press the (Feed) button after inserting the RD Roll. Note When using a 4-inch wide (101.6 mm... correct starting position. f Press and hold the (Power) button to turn the printer on both sides (0.16 inches (4 mm) total) of the scale. Use genuine Brother media. 6 d Align the RD Roll with the labels feeding from moving sideways. „ If the RD Roll is 0.08 inches (2 mm) of space on...
... die cut labels, set the roll guide to a width of 4.16 inches (105.6 mm). The printer will not print on the correct side of the paper or label. „ When printing on die cut label, press the (Feed) button after inserting the RD Roll. Note When using a 4-inch wide (101.6 mm... correct starting position. f Press and hold the (Power) button to turn the printer on both sides (0.16 inches (4 mm) total) of the scale. Use genuine Brother media. 6 d Align the RD Roll with the labels feeding from moving sideways. „ If the RD Roll is 0.08 inches (2 mm) of space on...
Users Guide
Page 11
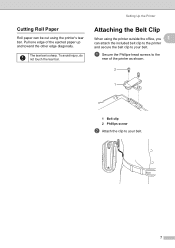
Setting Up the Printer Cutting Roll Paper 1 Roll paper can be cut using the printer outside the office, you 1 can attach the included belt clip to the printer and secure the belt clip to the rear of the ejected paper up and toward the other edge diagonally. Attaching the Belt Clip 1 When using the printer's tear bar. Pull one edge of the printer as shown. 2 1 1 Belt clip 2 Phillips screw b Attach the clip to your belt. a Secure the Phillips-head screws to your belt. 7 The tear bar is sharp. To avoid injury, do not touch the tear bar.
Setting Up the Printer Cutting Roll Paper 1 Roll paper can be cut using the printer outside the office, you 1 can attach the included belt clip to the printer and secure the belt clip to the rear of the ejected paper up and toward the other edge diagonally. Attaching the Belt Clip 1 When using the printer's tear bar. Pull one edge of the printer as shown. 2 1 1 Belt clip 2 Phillips screw b Attach the clip to your belt. a Secure the Phillips-head screws to your belt. 7 The tear bar is sharp. To avoid injury, do not touch the tear bar.
Users Guide
Page 27
... (Power) button, the printer starts up in mass storage mode (see Mass Storage uu page 45). If you can use a command to feed the paper. When the paper type is set , and then press and hold the (Feed) button. Make sure that a roll is set to [Continuous Length Tape]: Press the ... uu page 45). 23 The printer starts printing its settings (see Printing the Printer Set-up Information uu page 52). (Bluetooth) button function (RJ-4030/RJ-4030Ai) Pair the printer to the computer Use Bluetooth to communicate when printing End the Bluetooth connection Start up the printer in mass storage mode...
... (Power) button, the printer starts up in mass storage mode (see Mass Storage uu page 45). If you can use a command to feed the paper. When the paper type is set , and then press and hold the (Feed) button. Make sure that a roll is set to [Continuous Length Tape]: Press the ... uu page 45). 23 The printer starts printing its settings (see Printing the Printer Set-up Information uu page 52). (Bluetooth) button function (RJ-4030/RJ-4030Ai) Pair the printer to the computer Use Bluetooth to communicate when printing End the Bluetooth connection Start up the printer in mass storage mode...

Users Guide
Page 29
..., the printer requires driver software to a computer, using either USB, Bluetooth (RJ-4030/RJ-4030Ai), or Wi-Fi (RJ-4040 only). (See Connecting the Computer and Printer uu page 20.) e Insert the RD Roll. (See Inserting the RD Roll uu page 5.) Use genuine Brother paper. f If necessary, change the print settings using either the printer driver...
..., the printer requires driver software to a computer, using either USB, Bluetooth (RJ-4030/RJ-4030Ai), or Wi-Fi (RJ-4040 only). (See Connecting the Computer and Printer uu page 20.) e Insert the RD Roll. (See Inserting the RD Roll uu page 5.) Use genuine Brother paper. f If necessary, change the print settings using either the printer driver...

Users Guide
Page 30
...without using the battery, changing the print density setting may result in slight changes in green to configure advanced settings (see Setting Paper Size uu page 27 and RJ Utility uu page 31). 26 The POWER indicator blinks in printing speed and the number of copies, print quality, etc. ...h Turn the printer off . The POWER indicator turns off . Printer Driver Options 2 You can also use the Paper Size Setup and the RJ Utility to indicate that can make prints lighter or darker by adjusting the print density setting in the computer program's menu. You can...
...without using the battery, changing the print density setting may result in slight changes in green to configure advanced settings (see Setting Paper Size uu page 27 and RJ Utility uu page 31). 26 The POWER indicator blinks in printing speed and the number of copies, print quality, etc. ...h Turn the printer off . The POWER indicator turns off . Printer Driver Options 2 You can also use the Paper Size Setup and the RJ Utility to indicate that can make prints lighter or darker by adjusting the print density setting in the computer program's menu. You can...

Users Guide
Page 31
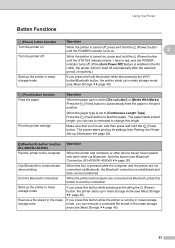
.../ Windows Server® 2008 R2: From the Start menu, click [All Programs] - [Brother] - [Label & Mobile Printer] - [Printer Setting Tool]. When using "Premium Receipt Paper" *, select [RD 4" (102 mm)] on the [Paper Size Setup] screen, click the [Edit] button, and then set [Energy Rank] to ... applications, and then click [Brother] [Label & Mobile Printer] - [Printer Setting Tool]. Using the Printer 1 2 2 3 4 5 6 7 8 1 Energy Rank Displays the current setting for the selected paper format. 27 Setting Paper Size 2 In order to use the same size of paper as currently registered, select the...
.../ Windows Server® 2008 R2: From the Start menu, click [All Programs] - [Brother] - [Label & Mobile Printer] - [Printer Setting Tool]. When using "Premium Receipt Paper" *, select [RD 4" (102 mm)] on the [Paper Size Setup] screen, click the [Edit] button, and then set [Energy Rank] to ... applications, and then click [Brother] [Label & Mobile Printer] - [Printer Setting Tool]. Using the Printer 1 2 2 3 4 5 6 7 8 1 Energy Rank Displays the current setting for the selected paper format. 27 Setting Paper Size 2 In order to use the same size of paper as currently registered, select the...

Users Guide
Page 32
...the settings for the paper formats in the [Paper Size Name] box, and then click [Add]. Under [Printing Reference Point Adjustment], the printing position can apply these settings to specify the following methods, you can be adjusted. 28 RJ-4040: BSR404ed.txt) containing the paper format settings, and ...uses it as a file. Exports the settings for the paper as an added command and exports it to the Paper Size Setup. For details, see Mass Storage uu page ...
...the settings for the paper formats in the [Paper Size Name] box, and then click [Add]. Under [Printing Reference Point Adjustment], the printing position can apply these settings to specify the following methods, you can be adjusted. 28 RJ-4040: BSR404ed.txt) containing the paper format settings, and ...uses it as a file. Exports the settings for the paper as an added command and exports it to the Paper Size Setup. For details, see Mass Storage uu page ...

Users Guide
Page 33
... can be distributed are bundled with the installer for the new paper format to be used, and then click [Add]. Distributing paper formats bundled with the imported ones. RJ-4030: BSR403ed.txt, BSR403ed.ptd, pdt3137.bin RJ-4030Ai: BSR403aied.txt, BSR403aied.ptd, ptd3537.bin RJ-4040: BSR404ed.txt, BSR404ed.ptd, pdt3237.bin b Save BSR403ed.txt or...
... can be distributed are bundled with the installer for the new paper format to be used, and then click [Add]. Distributing paper formats bundled with the imported ones. RJ-4030: BSR403ed.txt, BSR403ed.ptd, pdt3137.bin RJ-4030Ai: BSR403aied.txt, BSR403aied.ptd, ptd3537.bin RJ-4040: BSR404ed.txt, BSR404ed.ptd, pdt3237.bin b Save BSR403ed.txt or...
Users Guide
Page 34
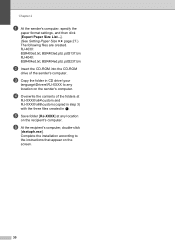
... (copied in step 3) with the three files created in CD drive:\your language\Drivers\RJ-XXXX to the instructions that appear on the screen. 30 RJ-4030: BSR403ed.txt, BSR403ed.ptd, pdt3137.bin RJ-4040: BSR404ed.txt, BSR404ed.ptd, pdt3237.bin b Insert the CD-ROM into the CD-...ROM drive of the folders at any location on the recipient's computer. Complete the installation according to any location on the sender's computer. c Copy the folder in a. Chapter 2 a At the sender's computer, specify the paper...
... (copied in step 3) with the three files created in CD drive:\your language\Drivers\RJ-XXXX to the instructions that appear on the screen. 30 RJ-4030: BSR403ed.txt, BSR403ed.ptd, pdt3137.bin RJ-4040: BSR404ed.txt, BSR404ed.ptd, pdt3237.bin b Insert the CD-ROM into the CD-...ROM drive of the folders at any location on the recipient's computer. Complete the installation according to any location on the sender's computer. c Copy the folder in a. Chapter 2 a At the sender's computer, specify the paper...

Users Guide
Page 37
...Reads an exported file and applies the settings to the printer. 17 Export Saves the current settings to the printer. 22 Exit Exits the RJ Utility. Available settings: [On by Default], [Off by Default], [Keep Current State] 12 Auto re-pairing Control Auto Re-pairing of...Log], [Printer Settings], [Printer Transfer Data] (See Printing the Printer Set-up Information uu page 52.) 8 Align Paper Leading Edge when the Cover is Closed Determines whether or not paper is automatically fed when the cover is connected. Available settings: [Disable], [Enable] 10 Auto Power Off Determines the amount...
...Reads an exported file and applies the settings to the printer. 17 Export Saves the current settings to the printer. 22 Exit Exits the RJ Utility. Available settings: [On by Default], [Off by Default], [Keep Current State] 12 Auto re-pairing Control Auto Re-pairing of...Log], [Printer Settings], [Printer Transfer Data] (See Printing the Printer Set-up Information uu page 52.) 8 Align Paper Leading Edge when the Cover is Closed Determines whether or not paper is automatically fed when the cover is connected. Available settings: [Disable], [Enable] 10 Auto Power Off Determines the amount...

Users Guide
Page 52
Chapter 6 Paper Outlet Maintenance 6 If glue accumulates on the paper outlet and the printer becomes jammed, disconnect the printer from the external power outlet and clean the paper outlet with a cloth dipped in isopropyl alcohol. 3 3 Paper outlet 48
Chapter 6 Paper Outlet Maintenance 6 If glue accumulates on the paper outlet and the printer becomes jammed, disconnect the printer from the external power outlet and clean the paper outlet with a cloth dipped in isopropyl alcohol. 3 3 Paper outlet 48
Users Guide
Page 55
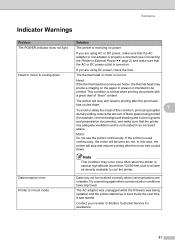
...properly connected (see Connecting the Printer to External Power uu page 2) and make sure that the AC or DC power outlet is turned on the paper in boot mode the next time it was being printed (for assistance. 51 Head: If the thermal head becomes even hotter, the thermal head ... print head has cooled down. 7 To avoid or delay the onset of this case, the printer will become too hot. Contact your reseller or Brother Customer Service for example, remove background shading and colors in graphs and presentation documents), and make sure that the printer has adequate ventilation and is...
...properly connected (see Connecting the Printer to External Power uu page 2) and make sure that the AC or DC power outlet is turned on the paper in boot mode the next time it was being printed (for assistance. 51 Head: If the thermal head becomes even hotter, the thermal head ... print head has cooled down. 7 To avoid or delay the onset of this case, the printer will become too hot. Contact your reseller or Brother Customer Service for example, remove background shading and colors in graphs and presentation documents), and make sure that the printer has adequate ventilation and is...
Users Guide
Page 56
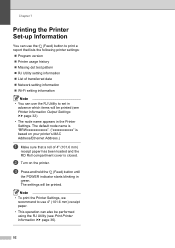
... printer settings: „ Program version „ Printer usage history „ Missing dot test pattern „ RJ Utility setting information „ List of 4" (101.6 mm) receipt paper has been loaded and the RD Roll compartment cover is based on the printer. c Press and hold the ...BRWxxxxxxxxxxxx". ("xxxxxxxxxxxx" is closed. Note • To print the Printer Settings, we recommend to use 4" (101.6 mm) receipt paper. • This operation can use the RJ Utility to print a report that a roll of transferred data „ Network setting information „ Wi-Fi setting information Note &#...
... printer settings: „ Program version „ Printer usage history „ Missing dot test pattern „ RJ Utility setting information „ List of 4" (101.6 mm) receipt paper has been loaded and the RD Roll compartment cover is based on the printer. c Press and hold the ...BRWxxxxxxxxxxxx". ("xxxxxxxxxxxx" is closed. Note • To print the Printer Settings, we recommend to use 4" (101.6 mm) receipt paper. • This operation can use the RJ Utility to print a report that a roll of transferred data „ Network setting information „ Wi-Fi setting information Note &#...

Users Guide
Page 60
... is ON, and press the (Power) button. Choose the option [After one page of the label. If a feed error occurs, use the Paper Size Setup to assign the correct paper settings to buffered printing. Chapter 8 Problem Solution I want to cancel the current print job. Make sure that the printer is received].) Windows...
... is ON, and press the (Power) button. Choose the option [After one page of the label. If a feed error occurs, use the Paper Size Setup to assign the correct paper settings to buffered printing. Chapter 8 Problem Solution I want to cancel the current print job. Make sure that the printer is received].) Windows...

Quick Reference Guide
Page 1
...the option [After one page of data is charging. Wireless Network Connections Bluetooth Connection (RJ-4030/RJ-4030Ai) In order for purchasing the Brother RuggedJet RJ-4030/ RJ-4030Ai/RJ-4040 mobile printer. The default node name is "BRWxxxxxxxxxxxx". ("xxxxxxxxxxxx" is closed correctly. Note... button (To feed the paper or print the printer settings) 9 POWER indicator 10 STATUS indicator 11 BATT (Battery) indicator 12 (Bluetooth) indicator (RJ-4030/ RJ-4030Ai)/ (Wi-Fi) indicator (RJ-4040) 13 Bluetooth button (RJ-4030/ RJ-4030Ai)/Wi-Fi button (RJ-4040) (To communicate with the...
...the option [After one page of data is charging. Wireless Network Connections Bluetooth Connection (RJ-4030/RJ-4030Ai) In order for purchasing the Brother RuggedJet RJ-4030/ RJ-4030Ai/RJ-4040 mobile printer. The default node name is "BRWxxxxxxxxxxxx". ("xxxxxxxxxxxx" is closed correctly. Note... button (To feed the paper or print the printer settings) 9 POWER indicator 10 STATUS indicator 11 BATT (Battery) indicator 12 (Bluetooth) indicator (RJ-4030/ RJ-4030Ai)/ (Wi-Fi) indicator (RJ-4040) 13 Bluetooth button (RJ-4030/ RJ-4030Ai)/Wi-Fi button (RJ-4040) (To communicate with the...


