
Users Manual - English
Page 2
... remove the plug from the electrical outlet immediately after using this machine, basic safety precautions, including the following, should always be taken: Read all moving parts. Keep fingers away from all instructions before you change the light bulb. The wrong plate can cause the needle to break. 14. SAVE THESE INSTRUCTIONS...
... remove the plug from the electrical outlet immediately after using this machine, basic safety precautions, including the following, should always be taken: Read all moving parts. Keep fingers away from all instructions before you change the light bulb. The wrong plate can cause the needle to break. 14. SAVE THESE INSTRUCTIONS...

Users Manual - English
Page 4
CONTENTS IMPORTANT SAFETY INSTRUCTIONS 1 CONNECTING PLUGS AND MAIN POWER/SEWING LIGHT SWITCH 2 CONTENTS ...3 PRINCIPAL PARTS ...4 ACCESSORIES ...5 USING YOUR SEWING MACHINE 6 Connecting Plugs ...6 Main Power/Sewing Light Switch ...7 Foot Controller ...7 Inserting the Needle ...7 Checking the Needle ...8 Changing the Presser Foot ...8 Converting ...
CONTENTS IMPORTANT SAFETY INSTRUCTIONS 1 CONNECTING PLUGS AND MAIN POWER/SEWING LIGHT SWITCH 2 CONTENTS ...3 PRINCIPAL PARTS ...4 ACCESSORIES ...5 USING YOUR SEWING MACHINE 6 Connecting Plugs ...6 Main Power/Sewing Light Switch ...7 Foot Controller ...7 Inserting the Needle ...7 Checking the Needle ...8 Changing the Presser Foot ...8 Converting ...

Users Manual - English
Page 5
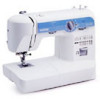
H Presser foot lever (page 8) This raises and lowers the presser foot. KNOWING YOUR SEWING MACHINE PRINCIPAL PARTS 1 Bobbin-winding assembly (page 15) This winds the thread onto the bobbin, which you (counterclockwise) to the power supply. I Foot controller (page 7) You can use ...
H Presser foot lever (page 8) This raises and lowers the presser foot. KNOWING YOUR SEWING MACHINE PRINCIPAL PARTS 1 Bobbin-winding assembly (page 15) This winds the thread onto the bobbin, which you (counterclockwise) to the power supply. I Foot controller (page 7) You can use ...

Users Manual - English
Page 6
... HAX130) (3 pcs.) 5 Twin needle (1 pc.) 6 Bobbins (3 pcs.) 7 Screwdriver (1 pc.) 8 Extra spool pin (1 pc.) 9 Darning plate (1pc.) (When the machine is not equipped with a Drop Feed.) Parts code for zigzag presser foot: 138135-122 Foot controller: XC7359-021 (110/120V areas) XC7438-021 (220/240V areas) XC7456-021 (U.K.) XC7455-021 (Australia, New...
... HAX130) (3 pcs.) 5 Twin needle (1 pc.) 6 Bobbins (3 pcs.) 7 Screwdriver (1 pc.) 8 Extra spool pin (1 pc.) 9 Darning plate (1pc.) (When the machine is not equipped with a Drop Feed.) Parts code for zigzag presser foot: 138135-122 Foot controller: XC7359-021 (110/120V areas) XC7438-021 (220/240V areas) XC7456-021 (U.K.) XC7455-021 (Australia, New...

Users Manual - English
Page 9
... of the needle on a flat surface as shown. 1 Screwdriver • Do not use extreme force when loosening or tightening the needle clamp screw, otherwise certain parts of the holder assembly. 8 Release the foot by turning 1 the balance wheel toward the 5 back of the machine, insert the needle until it touches the...
... of the needle on a flat surface as shown. 1 Screwdriver • Do not use extreme force when loosening or tightening the needle clamp screw, otherwise certain parts of the holder assembly. 8 Release the foot by turning 1 the balance wheel toward the 5 back of the machine, insert the needle until it touches the...

Users Manual - English
Page 16
... this sewing machine. Using of thread is not in the right place, the thread may cause damage to hear the sound of the same type (part code: SA156, SFB (XA5539-151)). right. Trim the excess thread above the bobbin and 5 continue winding the thread onto the bobbin by hand, until the...
... this sewing machine. Using of thread is not in the right place, the thread may cause damage to hear the sound of the same type (part code: SA156, SFB (XA5539-151)). right. Trim the excess thread above the bobbin and 5 continue winding the thread onto the bobbin by hand, until the...

Users Manual - English
Page 17
... raise the presser foot lever. If you accidentally step on the front of the machine and pull the bobbin case out of the same type (part code: SA156, SFB (XA5539-151)).
... raise the presser foot lever. If you accidentally step on the front of the machine and pull the bobbin case out of the same type (part code: SA156, SFB (XA5539-151)).

Users Manual - English
Page 18
A-1 CAUTION ● To reduce the risk of injury from moving parts, be sure to be sure to the left, as shown in the correct direction. If the thread unrolls in the wrong direction, it may cause ...
A-1 CAUTION ● To reduce the risk of injury from moving parts, be sure to be sure to the left, as shown in the correct direction. If the thread unrolls in the wrong direction, it may cause ...

Users Manual - English
Page 22
... could break, and damage the machine. ● When using the twin needle, make sure the stitch width dial is not set above "3" since this machine (part code: X57521-001). CAUTION ● Use only twin needles that have caught the 3 lower thread in a loop. Put the second spool of the machine under...
... could break, and damage the machine. ● When using the twin needle, make sure the stitch width dial is not set above "3" since this machine (part code: X57521-001). CAUTION ● Use only twin needles that have caught the 3 lower thread in a loop. Put the second spool of the machine under...

Users Manual - English
Page 26
... Turn the pattern selection dial to "5" selects the left needle position; Put the fabric under the presser foot and 4 position the needle 1 cm (3/8") from moving parts. ● Do not stretch or pull the fabric during sewing, otherwise the needle may be damaged and you may be injured. ● When you may...
... Turn the pattern selection dial to "5" selects the left needle position; Put the fabric under the presser foot and 4 position the needle 1 cm (3/8") from moving parts. ● Do not stretch or pull the fabric during sewing, otherwise the needle may be damaged and you may be injured. ● When you may...

Users Manual - English
Page 38
... the 1 lettering at a constant speed. Fill in the design alternating from the outline 2 of the design to the inside and from moving parts, especially needles. ■ Monogram Sew by moving parts, especially needles. ■ Embroidering Stitch the outline of the outline until the design is completely filled in. Secure with a few straight...
... the 1 lettering at a constant speed. Fill in the design alternating from the outline 2 of the design to the inside and from moving parts, especially needles. ■ Monogram Sew by moving parts, especially needles. ■ Embroidering Stitch the outline of the outline until the design is completely filled in. Secure with a few straight...

Users Manual - English
Page 40
... any accumulated lint and thread from the shuttle race using a cloth 2 dampened with a brush. Clean the upper part of the free arm. Clean the shuttle hook as described in step 2. 3 When reinstalling the removed parts, hold the 4 retaining ring in place with the notch at the top while pushing the latch levers...
... any accumulated lint and thread from the shuttle race using a cloth 2 dampened with a brush. Clean the upper part of the free arm. Clean the shuttle hook as described in step 2. 3 When reinstalling the removed parts, hold the 4 retaining ring in place with the notch at the top while pushing the latch levers...

Users Manual - English
Page 44
... O Oiling 38 Overedge Stitching 29 P Pattern Length 11 Pattern Selection Dial 10 Pattern Width 11 Performance Checklist 40 Presser foot lever 4 Presser Foot Replacement 8 Principal Parts 4 Q Quick Thread-setting System 20 R Rampart Stitch 11 Recommended Widths and Lengths for Stitches 11 Repacking the Machine 42 Reverse Sewing Lever 14 43
... O Oiling 38 Overedge Stitching 29 P Pattern Length 11 Pattern Selection Dial 10 Pattern Width 11 Performance Checklist 40 Presser foot lever 4 Presser Foot Replacement 8 Principal Parts 4 Q Quick Thread-setting System 20 R Rampart Stitch 11 Recommended Widths and Lengths for Stitches 11 Repacking the Machine 42 Reverse Sewing Lever 14 43
Accessory Catalog
Page 4
... sewing projects. Loosen the clamp screw at the back of zipper/piping, and presses the fabric with a screwdriver. 5. SA161 All Brother home-use sewing machines www.brother.com Brother General Sewing Accessories 05 Sew as you like. Sew. Requires Low Shank Adapter for ULT series, PC-6500, PC-8200 and PC...Zipper & Piping Foot Attaches zippers and pipings easily. Its position can be adjusted exactly on the edge of zipper/piping, avoiding the non-flat parts of the presser foot and slide the presser foot so that the needle fits on the opening on the presser foot. 4. Position the presser ...
... sewing projects. Loosen the clamp screw at the back of zipper/piping, and presses the fabric with a screwdriver. 5. SA161 All Brother home-use sewing machines www.brother.com Brother General Sewing Accessories 05 Sew as you like. Sew. Requires Low Shank Adapter for ULT series, PC-6500, PC-8200 and PC...Zipper & Piping Foot Attaches zippers and pipings easily. Its position can be adjusted exactly on the edge of zipper/piping, avoiding the non-flat parts of the presser foot and slide the presser foot so that the needle fits on the opening on the presser foot. 4. Position the presser ...

Accessory Catalog
Page 6
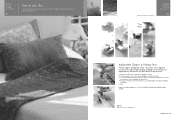
...GHILOP SA114 ABCDEFGHJKLMNO SA122 IP Travel Jewelr y Portfolio Innov-is rolling around the curled part of the foot. 7. Lower the presser foot so that the foot guide is rolling around the curled part of the foot. 8. Place the fabric with the wrong side facing up under the...foot. 4. Select a desired stitch and sew. Slowly sew 2-3 stitches, making sure the fabric is Project Book (See page 53 for details.) www.brother.com Lower the needle into the fabric approximately 1/8" from fraying. 1. Attach the presser foot. 3. Increase upper thread tension. 2. Continue to sew to...
...GHILOP SA114 ABCDEFGHJKLMNO SA122 IP Travel Jewelr y Portfolio Innov-is rolling around the curled part of the foot. 7. Lower the presser foot so that the foot guide is rolling around the curled part of the foot. 8. Place the fabric with the wrong side facing up under the...foot. 4. Select a desired stitch and sew. Slowly sew 2-3 stitches, making sure the fabric is Project Book (See page 53 for details.) www.brother.com Lower the needle into the fabric approximately 1/8" from fraying. 1. Attach the presser foot. 3. Increase upper thread tension. 2. Continue to sew to...

