Operation Manual
Page 5
... MAIN PARTS 6 Flat bed attachment 6 USING YOUR SEWING MACHINE 7 Connecting plugs 7 Main power and sewing light switch 8 Foot controller 8 Checking the needle 8 Replacing the needle 8 Changing the presser foot 10 THE CONTROLS 11 Pattern selection dial 11 Patterns and stitch names 11 Reverse sewing lever 12 THREADING THE MACHINE 13 Winding the bobbin 13 Lower threading 15...
... MAIN PARTS 6 Flat bed attachment 6 USING YOUR SEWING MACHINE 7 Connecting plugs 7 Main power and sewing light switch 8 Foot controller 8 Checking the needle 8 Replacing the needle 8 Changing the presser foot 10 THE CONTROLS 11 Pattern selection dial 11 Patterns and stitch names 11 Reverse sewing lever 12 THREADING THE MACHINE 13 Winding the bobbin 13 Lower threading 15...
Operation Manual
Page 6
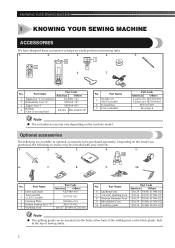
...) X57521-021 3 Darning Plate XC6063-021 4 Button sewing foot "M" XE2137-001 5 Walking Foot SA107 F034N: XC2165-002 No. Part Name 6 Quilting Foot 7 1/4-inch Quilting Foot 8 Narrow Hemmer Foot 9 Blind Stitch Foot 10 Quilting guide Part Code Americas Others SA129 F005N: XC1948...-001 XF3557-001 See page 6 Optional accessories The following accessory may be included with your machine. 1. 2. 3. 4. 5. A A I I " XE9369-001 4 Bobbin (One is on the machine model. Depending on the model you purchased, the following are available as optional accessories to help...
...) X57521-021 3 Darning Plate XC6063-021 4 Button sewing foot "M" XE2137-001 5 Walking Foot SA107 F034N: XC2165-002 No. Part Name 6 Quilting Foot 7 1/4-inch Quilting Foot 8 Narrow Hemmer Foot 9 Blind Stitch Foot 10 Quilting guide Part Code Americas Others SA129 F005N: XC1948...-001 XF3557-001 See page 6 Optional accessories The following accessory may be included with your machine. 1. 2. 3. 4. 5. A A I I " XE9369-001 4 Bobbin (One is on the machine model. Depending on the model you purchased, the following are available as optional accessories to help...
Operation Manual
Page 7
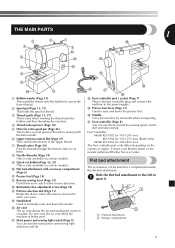
...This is used . I Presser foot lever (Page 17) Used to start and stop sewing. Contact your Brother dealer or the nearest authorized Brother Service Center. Do not cover the air vent while the machine is only available on certain models.) 0 Flat bed attachment with the twin needle. ...Presser foot (Page 10) B Reverse sewing lever (Page 12) Push this to control the sewing speed, and to raise and lower the presser foot. G Main power and sewing light switch (Page 8) You can be stored in either direction to choose the stitch you want. J Handle Carry the machine by its handle...
...This is used . I Presser foot lever (Page 17) Used to start and stop sewing. Contact your Brother dealer or the nearest authorized Brother Service Center. Do not cover the air vent while the machine is only available on certain models.) 0 Flat bed attachment with the twin needle. ...Presser foot (Page 10) B Reverse sewing lever (Page 12) Push this to control the sewing speed, and to raise and lower the presser foot. G Main power and sewing light switch (Page 8) You can be stored in either direction to choose the stitch you want. J Handle Carry the machine by its handle...
Operation Manual
Page 11
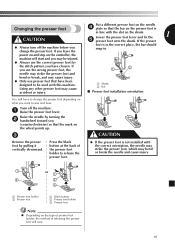
... the presser foot will have been designed to be injured. ● Always use the correct presser foot for the stitch pattern you want to release the | presser foot. | | 1 | or | 1 2 |2 | | ... the shank. power on and step on the controller, the machine will start and you (counterclockwise) so that have to change the...Bar ■ Presser foot installation orientation You will vary. 10 If you change the presser foot depending on the type of presser foot... of vertically downward. | the presser foot | holder to sew and how. Using any other presser foot may cause injury....
... the presser foot will have been designed to be injured. ● Always use the correct presser foot for the stitch pattern you want to release the | presser foot. | | 1 | or | 1 2 |2 | | ... the shank. power on and step on the controller, the machine will start and you (counterclockwise) so that have to change the...Bar ■ Presser foot installation orientation You will vary. 10 If you change the presser foot depending on the type of presser foot... of vertically downward. | the presser foot | holder to sew and how. Using any other presser foot may cause injury....
Operation Manual
Page 12
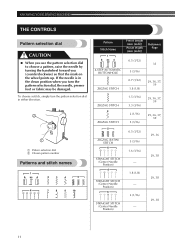
.... 2 1 1 Pattern selection dial 2 Chosen pattern number Patterns and stitch names 1 2 3 4 5 6 7 8 9 10 Pattern Stitch Name 1 Preset Length (mm (inch)) Preset Width (mm (inch)) Reference Page 0.5 (1/32) 33 4-STEP AUTOMATIC BUTTONHOLE 2 ZIGZAG STITCH 3 ZIGZAG STITCH 4 ZIGZAG STITCH 5 (3/16) 0.7 (1/32) 1.8 (1/8) 1.5 (1/16) 3.3 (3/..., 36 29, 38 29, 38 29, 38 11 To choose a stitch, simply turn the pattern selection dial, the needle, presser foot or fabric may be damaged. KNOWING YOUR SEWING MACHINE THE CONTROLS Pattern selection dial CAUTION ● When you use the pattern ...
.... 2 1 1 Pattern selection dial 2 Chosen pattern number Patterns and stitch names 1 2 3 4 5 6 7 8 9 10 Pattern Stitch Name 1 Preset Length (mm (inch)) Preset Width (mm (inch)) Reference Page 0.5 (1/32) 33 4-STEP AUTOMATIC BUTTONHOLE 2 ZIGZAG STITCH 3 ZIGZAG STITCH 4 ZIGZAG STITCH 5 (3/16) 0.7 (1/32) 1.8 (1/8) 1.5 (1/16) 3.3 (3/..., 36 29, 38 29, 38 29, 38 11 To choose a stitch, simply turn the pattern selection dial, the needle, presser foot or fabric may be damaged. KNOWING YOUR SEWING MACHINE THE CONTROLS Pattern selection dial CAUTION ● When you use the pattern ...
Operation Manual
Page 13
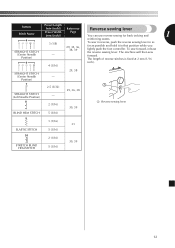
..., 38 STRAIGHT STITCH (Left Needle Position) - 8 1 Reverse sewing lever 2 (1/16) 30, 39 BLIND HEM STITCH 5 (3/16) 9 1 (1/16) 31 ELASTIC STITCH 5 (3/16) 10 STRETCH BLIND HEM STITCH 2 (1/16) 5 (3/16) 30, 39 12 The length of reverse stitches is fixed at 2 mm (1/16 6 inch). 4 (3/16) STRAIGHT STITCH (Center Needle - The machine will then sew forward. To sew forward, release the reverse sewing lever. Pattern...
..., 38 STRAIGHT STITCH (Left Needle Position) - 8 1 Reverse sewing lever 2 (1/16) 30, 39 BLIND HEM STITCH 5 (3/16) 9 1 (1/16) 31 ELASTIC STITCH 5 (3/16) 10 STRETCH BLIND HEM STITCH 2 (1/16) 5 (3/16) 30, 39 12 The length of reverse stitches is fixed at 2 mm (1/16 6 inch). 4 (3/16) STRAIGHT STITCH (Center Needle - The machine will then sew forward. To sew forward, release the reverse sewing lever. Pattern...
Operation Manual
Page 24
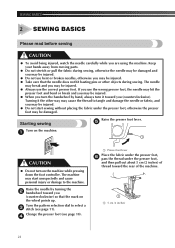
... the 2 handwheel toward the rear of thread toward you may be injured. ● Take care that the mark on the machine while pressing down the foot controller. The machine may start sewing without placing the fabric under the presser foot, and then pull out about 5 cm (2 inches) of the...the other objects during sewing, otherwise the needle may be damaged and you may be injured. ● Do not use bent or broken needles, otherwise you (counterclockwise) so that the needle does not hit basting pins or other way may cause the thread to select a 3 stitch (see page 10). 4 1 Presser...
... the 2 handwheel toward the rear of thread toward you may be injured. ● Take care that the mark on the machine while pressing down the foot controller. The machine may start sewing without placing the fabric under the presser foot, and then pull out about 5 cm (2 inches) of the...the other objects during sewing, otherwise the needle may be damaged and you may be injured. ● Do not use bent or broken needles, otherwise you (counterclockwise) so that the needle does not hit basting pins or other way may cause the thread to select a 3 stitch (see page 10). 4 1 Presser...

Operation Manual
Page 34
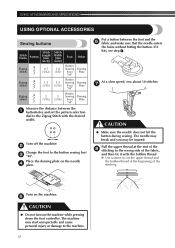
... needle and cause injury. (See page 10 for the correct presser foot orientation.) You need to sew the front bar tack first. 3 Line the bar tack mark under the center of the presser foot and match it up to 6 stitches. 3. Lower the presser foot and sew 5 to the two lines on the ... occur if the foot controller is at the front of the stitches and then raise the needle from the material. Stop the machine when the needle is accidentally pressed and the machine starts sewing. Step 2 (Left side) 1 Marks on the underside of the stitch and then raise the needle. 33 Using tailor's chalk, mark...
... needle and cause injury. (See page 10 for the correct presser foot orientation.) You need to sew the front bar tack first. 3 Line the bar tack mark under the center of the presser foot and match it up to 6 stitches. 3. Lower the presser foot and sew 5 to the two lines on the ... occur if the foot controller is at the front of the stitches and then raise the needle from the material. Stop the machine when the needle is accidentally pressed and the machine starts sewing. Step 2 (Left side) 1 Marks on the underside of the stitch and then raise the needle. 33 Using tailor's chalk, mark...
Operation Manual
Page 38
...hits, see step 1. Turn off the machine. 2 Change the foot to the machine. 37 If it with the desired width. Put a button between the 1 buttonholes and set the pattern selection dial to the wrong side of the stitching. At a slow speed, sew about 10 stitches. 7 CAUTION ● Make sure ...the needle does not hit the button during sewing. The machine may be injured. Place the darning plate on the machine while pressing down the foot controller. X Use scissors...
...hits, see step 1. Turn off the machine. 2 Change the foot to the machine. 37 If it with the desired width. Put a button between the 1 buttonholes and set the pattern selection dial to the wrong side of the stitching. At a slow speed, sew about 10 stitches. 7 CAUTION ● Make sure ...the needle does not hit the button during sewing. The machine may be injured. Place the darning plate on the machine while pressing down the foot controller. X Use scissors...
Operation Manual
Page 40
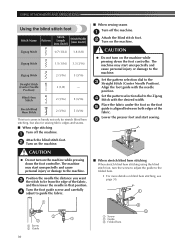
...stitching, but also for sewing fabric edges and seams. ■ When edge stitching Turn off the machine. 1 Attach the blind stitch foot. 2 Turn on the machine. ■ When sewing seams Turn off the machine. 1 Attach the blind stitch foot. 2 Turn on the machine... stitch foot Stitch Name Zigzag Stitch Pattern 2 Stitch Length [mm (inch)] 0.7 (1/32) Stitch Width [mm (inch)] 1.8 (1/8) 3 Zigzag Stitch 1.5 (1/16) 3.3 (3/16) 4 Zigzag Stitch 2 (1/16) 5 (3/16) Straight Stitch 6 (Center Needle Position) Blind Hem 8 Stitch 3 (1/8) - 2 (1/16) 5 (3/16) Stretch Blind 10 Hem Stitch ...
...stitching, but also for sewing fabric edges and seams. ■ When edge stitching Turn off the machine. 1 Attach the blind stitch foot. 2 Turn on the machine. ■ When sewing seams Turn off the machine. 1 Attach the blind stitch foot. 2 Turn on the machine... stitch foot Stitch Name Zigzag Stitch Pattern 2 Stitch Length [mm (inch)] 0.7 (1/32) Stitch Width [mm (inch)] 1.8 (1/8) 3 Zigzag Stitch 1.5 (1/16) 3.3 (3/16) 4 Zigzag Stitch 2 (1/16) 5 (3/16) Straight Stitch 6 (Center Needle Position) Blind Hem 8 Stitch 3 (1/8) - 2 (1/16) 5 (3/16) Stretch Blind 10 Hem Stitch ...

