
Instruction Manual - Multi
Page 2
... thread take-up lever, and consequently there is normal to carry out work while positioned directly in order to yourself or other people. The meanings of these parts. The picture inside the circle indicates the nature of injury".) This symbol ( ) indicates something that you must do . With industrial sewing machines, it correctly. Thank you must make the ground connection".) i ZM-850A, 851A (English...
... thread take-up lever, and consequently there is normal to carry out work while positioned directly in order to yourself or other people. The meanings of these parts. The picture inside the circle indicates the nature of injury".) This symbol ( ) indicates something that you must do . With industrial sewing machines, it correctly. Thank you must make the ground connection".) i ZM-850A, 851A (English...
Instruction Manual - Multi
Page 3
... moving parts. If using a work that they cannot move. The ambient temperature should be carried out by two or more than the requirements for the machine. Excessively dry or humid environments and dew formation may cause problems with correct operation may cause problems with correct operation. ZM-850A, 851A (English) ii The power supply capacity should be secured in injury. Install the belt covers...
... moving parts. If using a work that they cannot move. The ambient temperature should be carried out by two or more than the requirements for the machine. Excessively dry or humid environments and dew formation may cause problems with correct operation may cause problems with correct operation. ZM-850A, 851A (English) ii The power supply capacity should be secured in injury. Install the belt covers...
Instruction Manual - Multi
Page 4
... by Brother. tenance • When replacing consumable parts such as a result of oil supplied to their original positions and check that they operate correctly before starting work . Cleaning Turn off as the rotary hook * When using a work . Turn off the power switch. The sewing machine should not be covered by operators who have been removed, be absolutely sure to re-install them to the rotary hook, otherwise injury may operate if...
... by Brother. tenance • When replacing consumable parts such as a result of oil supplied to their original positions and check that they operate correctly before starting work . Cleaning Turn off as the rotary hook * When using a work . Turn off the power switch. The sewing machine should not be covered by operators who have been removed, be absolutely sure to re-install them to the rotary hook, otherwise injury may operate if...

Instruction Manual - Multi
Page 16
... thread tension 39 8-2. Adjusting the needle bar height 55 10-8. Adjusting the stitch length 33 6-9. Adjusting the presser foot pressure 41 9. TROUBLESHOOTING 69 12-1. Threading the upper thread 27 6-6. THREAD TENSION 39 8-1. Adjusting the feed dog height 50 10-4. Machine head 69 LZ2-B850A, B851A (English) CONTENTS 1. Installing the belt cover 15 5-8. Needle and rotary hook timing 57 10-9. INSTALLING OPTIONAL PARTS 63 11-1. TABLE AND MOTOR 7 5. Winding the lower thread 23 6-4. CLEANING 43 10. Adjusting the forward/back position of the feed dog...
... thread tension 39 8-2. Adjusting the needle bar height 55 10-8. Adjusting the stitch length 33 6-9. Adjusting the presser foot pressure 41 9. TROUBLESHOOTING 69 12-1. Threading the upper thread 27 6-6. THREAD TENSION 39 8-1. Adjusting the feed dog height 50 10-4. Machine head 69 LZ2-B850A, B851A (English) CONTENTS 1. Installing the belt cover 15 5-8. Needle and rotary hook timing 57 10-9. INSTALLING OPTIONAL PARTS 63 11-1. TABLE AND MOTOR 7 5. Winding the lower thread 23 6-4. CLEANING 43 10. Adjusting the forward/back position of the feed dog...
Instruction Manual - Multi
Page 26
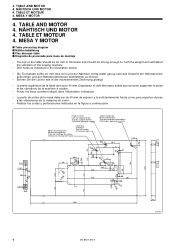
... 4. TABLE AND MOTOR 4. NÄHTISCH UND MOTOR 4. TABLE ET MOTEUR 4. MESA Y MOTOR 4. MESA Y MOTOR s Table processing diagram s Nähtischabbildung s Plan découpé table s Diagrama de procesado para mesa de montaje • The top of the table should be 40 mm in thickness and should be strong enough to hold the weight and withstand the vibration of the sewing machine. • Drill holes as...
... 4. TABLE AND MOTOR 4. NÄHTISCH UND MOTOR 4. TABLE ET MOTEUR 4. MESA Y MOTOR 4. MESA Y MOTOR s Table processing diagram s Nähtischabbildung s Plan découpé table s Diagrama de procesado para mesa de montaje • The top of the table should be 40 mm in thickness and should be strong enough to hold the weight and withstand the vibration of the sewing machine. • Drill holes as...
Instruction Manual - Multi
Page 63
... 9. Installer la plaque à aiguille w à l'aide des deux vis q . 1. Limpiar el polvo del garfio giratorio t con un paño suave, y verificar que el garfio giratorio t no damage to clean any dust from the feed dog e . 4. REINIGUNG 9. q 2. Use a soft wire brush to the rotary hook t . 7. Insert the bobbin into the bobbin case r , and then place the bobbin case r back into the machine. 5. Entfernen...
... 9. Installer la plaque à aiguille w à l'aide des deux vis q . 1. Limpiar el polvo del garfio giratorio t con un paño suave, y verificar que el garfio giratorio t no damage to clean any dust from the feed dog e . 4. REINIGUNG 9. q 2. Use a soft wire brush to the rotary hook t . 7. Insert the bobbin into the bobbin case r , and then place the bobbin case r back into the machine. 5. Entfernen...
Instruction Manual - Multi
Page 65
...• When carrying out inspection, adjustment and maintenance • When replacing consumable parts such as the rotary hook * When using the machine. Wenn die Maschine nicht ausgeschaltet wird, kann sie sich durch unbeabsichtigtes Drücken des Pedals in den folgenden Fällen zuerst ...weiter. Ask your Brother dealer or a qualified electrician to carry out any safety devices have been removed, be extremely careful to their original positions and check that they operate correctly before starting work. If any maintenance and inspection of the sewing machine should only be...
...• When carrying out inspection, adjustment and maintenance • When replacing consumable parts such as the rotary hook * When using the machine. Wenn die Maschine nicht ausgeschaltet wird, kann sie sich durch unbeabsichtigtes Drücken des Pedals in den folgenden Fällen zuerst ...weiter. Ask your Brother dealer or a qualified electrician to carry out any safety devices have been removed, be extremely careful to their original positions and check that they operate correctly before starting work. If any maintenance and inspection of the sewing machine should only be...
Instruction Manual - Multi
Page 74
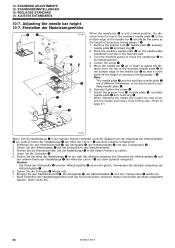
... w. 6. REGLAGES STANDARD 10. Remove the presser foot r, needle plate t, auxiliary needle plate w and feed dog y . 2. Place the auxiliary needle plate w on the needle plate installation surface of the auxiliary needle plate w to use the aux- Note: The needle plate t and the auxiliary needle plate w are of different thicknesses, so be sure to the bottom edge of the needle bar q should be sure to its lowest position, the distance from the top of accessory timing gauge 1 e. 1. Drehen...
... w. 6. REGLAGES STANDARD 10. Remove the presser foot r, needle plate t, auxiliary needle plate w and feed dog y . 2. Place the auxiliary needle plate w on the needle plate installation surface of the auxiliary needle plate w to use the aux- Note: The needle plate t and the auxiliary needle plate w are of different thicknesses, so be sure to the bottom edge of the needle bar q should be sure to its lowest position, the distance from the top of accessory timing gauge 1 e. 1. Drehen...
Instruction Manual - Multi
Page 76
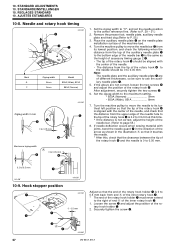
... correct, adjust the height of the rotary hook r should be 0 to use the auxiliary needle plate q. 5. Securely tighten the screw e. Place the auxiliary needle plate q on the needle plate installation surface of the rotary hook y. Set the zigzag width to P. 55.) 3. AJUSTES ESTANDARES 10-8. Remove the presser foot, needle plate, auxiliary needle plate and feed dog.(Refer to the maximum setting. • 850A (Narrow 5mm • 850A (Wide), 851A 8mm 7. If needle deflection occurs when sewing material...
... correct, adjust the height of the rotary hook r should be 0 to use the auxiliary needle plate q. 5. Securely tighten the screw e. Place the auxiliary needle plate q on the needle plate installation surface of the rotary hook y. Set the zigzag width to P. 55.) 3. AJUSTES ESTANDARES 10-8. Remove the presser foot, needle plate, auxiliary needle plate and feed dog.(Refer to the maximum setting. • 850A (Narrow 5mm • 850A (Wide), 851A 8mm 7. If needle deflection occurs when sewing material...
Instruction Manual - Multi
Page 82
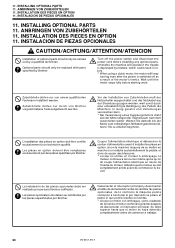
.../ATTENTION/ATENCION Installation of the motor's inertia. Turn off the power switch and disconnect the power cord before starting work. Vor der Installation von Zubehórteilen muß der Netzschalter ausgeschaltet und das Netzkabel aus der Steckdose gezogen werden, weil sonst durch eine unbeabsichtigte Betätigung des Pedals die Maschine in injury. * When using a clutch motor, the motor will operate if...
.../ATTENTION/ATENCION Installation of the motor's inertia. Turn off the power switch and disconnect the power cord before starting work. Vor der Installation von Zubehórteilen muß der Netzschalter ausgeschaltet und das Netzkabel aus der Steckdose gezogen werden, weil sonst durch eine unbeabsichtigte Betätigung des Pedals die Maschine in injury. * When using a clutch motor, the motor will operate if...
Instruction Manual - Multi
Page 88
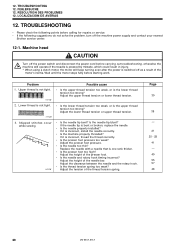
... the machine power supply and contact your nearest Brother service center. 12-1. Adjust the tension of the motor's inertia. Lower thread is bent or broken, replace the needle. • Is the needle properly installed? If the needle tip is not tight. 0574M 3. If it is the upper thread tension too strong? Problem 1. Adjust the height of the presser foot. • Is the needle and rotary hook timing incorrect? Adjust the height of the needle bar. Adjust the presser foot pressure. •...
... the machine power supply and contact your nearest Brother service center. 12-1. Adjust the tension of the motor's inertia. Lower thread is bent or broken, replace the needle. • Is the needle properly installed? If the needle tip is not tight. 0574M 3. If it is the upper thread tension too strong? Problem 1. Adjust the height of the presser foot. • Is the needle and rotary hook timing incorrect? Adjust the height of the needle bar. Adjust the presser foot pressure. •...
Instruction Manual - Multi
Page 89
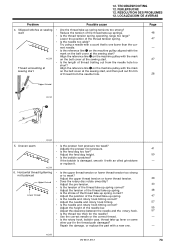
... sewing start. • Is the length of thread from the needle hole too short? Adjust the clearance between the needle and the rotary hook. • Is the thread too thick for the needle? Adjuste the presser foot pressure. • Is the feed dog too low? Adjust the feed dog height. • Is the bobbin scratched? Adjust the tension of the thread take-up spring. • Is the stroke of the thread take -up springs. • Is the thread tension spring operating...
... sewing start. • Is the length of thread from the needle hole too short? Adjust the clearance between the needle and the rotary hook. • Is the thread too thick for the needle? Adjuste the presser foot pressure. • Is the feed dog too low? Adjust the feed dog height. • Is the bobbin scratched? Adjust the tension of the thread take-up spring. • Is the stroke of the thread take -up springs. • Is the thread tension spring operating...

Instruction Manual - Multi
Page 90
... DES PROBLEMES 12. Make the lower thread tension as weak as possible. • Are the thread take -up spring tensions too strong? Make the thread take -up spring tension as weak as possible. • Is the lower thread tension too strong? The bobbin winding amount should not be loose because the thread tension spring operating range is being used? Upper and lower threads are specified by Brother being used . Adjust the position of the feed dog incorrect? Repair the damage, or replace the part with...
... DES PROBLEMES 12. Make the lower thread tension as weak as possible. • Are the thread take -up spring tensions too strong? Make the thread take -up spring tension as weak as possible. • Is the lower thread tension too strong? The bobbin winding amount should not be loose because the thread tension spring operating range is being used? Upper and lower threads are specified by Brother being used . Adjust the position of the feed dog incorrect? Repair the damage, or replace the part with...
Instruction Manual - Multi
Page 91
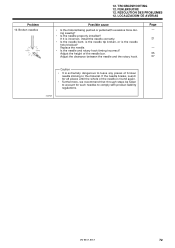
... during sewing? • Is the needle properly installed? LOCALIZACION DE AVERIAS Possible cause • Is the material being pushed or pulled with product liability regulations. 0469M ZM-850A, 851A 72 Adjust the clearance between the needle and the rotary hook. Problem 10. Broken needles 12. FEHLERSUCHE 12. Replace the needle. • Is the needle and rotary hook timing incorrect? If the needle breaks, search for such needles to...
... during sewing? • Is the needle properly installed? LOCALIZACION DE AVERIAS Possible cause • Is the material being pushed or pulled with product liability regulations. 0469M ZM-850A, 851A 72 Adjust the clearance between the needle and the rotary hook. Problem 10. Broken needles 12. FEHLERSUCHE 12. Replace the needle. • Is the needle and rotary hook timing incorrect? If the needle breaks, search for such needles to...
Instruction Manual - Multi
Page 104
INSTRUCTION MANUAL BEDIENUNGSANLEITUNG MANUEL D'INSTRUCTIONS MANUAL DE INSTRUCCIONES BROTHER INDUSTRIES, LTD. 15-1, Naeshiro-cho, Mizuho-ku, Nagoya 467-8561, Japan. Phone: 81-52-824-2177 Printed in Japan / Gedruckt in Japan / Imprimé au Japon / Impreso en Japón 118-M50 SA0742-001 2002.05. B (1)
INSTRUCTION MANUAL BEDIENUNGSANLEITUNG MANUEL D'INSTRUCTIONS MANUAL DE INSTRUCCIONES BROTHER INDUSTRIES, LTD. 15-1, Naeshiro-cho, Mizuho-ku, Nagoya 467-8561, Japan. Phone: 81-52-824-2177 Printed in Japan / Gedruckt in Japan / Imprimé au Japon / Impreso en Japón 118-M50 SA0742-001 2002.05. B (1)
Hand Book - English
Page 1
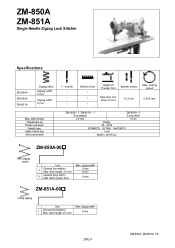
... mm ZM-850A-00□ Plain zigzag (wide) Use 1 General (foundation) Max. zigzag width 5 mm 8 mm 8 mm ZM-851A-00□ 3-step zigzag Use 1 General (foundation) Max. zigzag width 8 mm 2002.4 ZM-850A, ZM-851A 1/5 stitch lenght Thread take up Presser pressure Needle type Hight of Presser foot Needle stroke Manual 6 mm Knee 10 mm 33.3 mm Max. ZM-850A ZM-851A Single Needle Zigzag Lock Stitcher Specifications ZM-850A ZM-850A ZM-851A Zigzag stitch Zigzag width 5 mm Zigzag width 8 mm Max. needle * * * Bottom feed * * * Height of feed dog Arm pocket...
... mm ZM-850A-00□ Plain zigzag (wide) Use 1 General (foundation) Max. zigzag width 5 mm 8 mm 8 mm ZM-851A-00□ 3-step zigzag Use 1 General (foundation) Max. zigzag width 8 mm 2002.4 ZM-850A, ZM-851A 1/5 stitch lenght Thread take up Presser pressure Needle type Hight of Presser foot Needle stroke Manual 6 mm Knee 10 mm 33.3 mm Max. ZM-850A ZM-851A Single Needle Zigzag Lock Stitcher Specifications ZM-850A ZM-850A ZM-851A Zigzag stitch Zigzag width 5 mm Zigzag width 8 mm Max. needle * * * Bottom feed * * * Height of feed dog Arm pocket...
Hand Book - English
Page 2
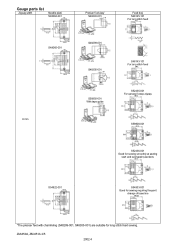
Gauge parts list Zigzag width Needle plate S48064-001 S48065-001 8 mm Presser foot assy S48293-001 Feed dog S48145-101 For long stitch feed S48299-001 S48305-001 S58950-001 With tape guide S48143-101 For long stitch feed S52435-001 For general 3-step zigzag S58908-001 S52436-001 Good for sewing smoothly at sewing start and overlapping sections S54922-001 S54933-001 Good for sewing requiring frequent change of base line *The presser feet with chamfering (S48299-001, S48305-001) are suitable for long stitch feed sewing. ZM-850A, ZM-851A 2/5 2002.4
Gauge parts list Zigzag width Needle plate S48064-001 S48065-001 8 mm Presser foot assy S48293-001 Feed dog S48145-101 For long stitch feed S48299-001 S48305-001 S58950-001 With tape guide S48143-101 For long stitch feed S52435-001 For general 3-step zigzag S58908-001 S52436-001 Good for sewing smoothly at sewing start and overlapping sections S54922-001 S54933-001 Good for sewing requiring frequent change of base line *The presser feet with chamfering (S48299-001, S48305-001) are suitable for long stitch feed sewing. ZM-850A, ZM-851A 2/5 2002.4
Hand Book - English
Page 3
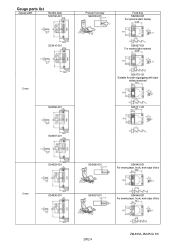
Gauge parts list Zigzag width Needle plate S06166-001 Presser foot assy S48308-001 Feed dog S52068-001 For general plain zigzag S53410-001 5 mm S48066-001 S54937-001 For sewing light material S06170-101 Suitable for plain zigzagging with tape widely stretched S06171-101 S48067-001 S54929-001 3 mm S54930-001 S54956-001 S54945-001 For sewing tape, hook, and edge of bra S54957-001 S54946-001 For sewing tape, hook, and edge of bra 2002.4 ZM-850A, ZM-851A 3/5
Gauge parts list Zigzag width Needle plate S06166-001 Presser foot assy S48308-001 Feed dog S52068-001 For general plain zigzag S53410-001 5 mm S48066-001 S54937-001 For sewing light material S06170-101 Suitable for plain zigzagging with tape widely stretched S06171-101 S48067-001 S54929-001 3 mm S54930-001 S54956-001 S54945-001 For sewing tape, hook, and edge of bra S54957-001 S54946-001 For sewing tape, hook, and edge of bra 2002.4 ZM-850A, ZM-851A 3/5
Hand Book - English
Page 4
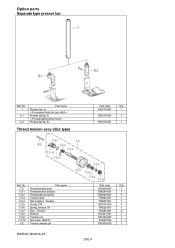
No. 1 2-1 2-2 Part name Presser bar, U < For presser foots for lock stitch > Presser bar tip, A < For standard presser foots > Presser bar tip, B Thread tension assy (disc type) Part code Q'ty S50114-001 1 S50115-001 1 S50116-001 1 Ref. No. 7-2 7-2-1 7-2-2 7-2-3 7-2-4 7-2-5 7-2-6 7-2-7 7-2-8 7-2-9 7-2-10 9-2 Part name Thread tension assy Thread tension bracket Thread take-up spring Tension stud Disc presser, ;Tension O ring, S14 Spring, tension ;M Disc, ;Tension Washer Tension nut Set screw, SM3.57 Tension release pin ZM-850A, ZM-851A 4/5 Part code Q'ty S51808-001 1 S48084-...
No. 1 2-1 2-2 Part name Presser bar, U < For presser foots for lock stitch > Presser bar tip, A < For standard presser foots > Presser bar tip, B Thread tension assy (disc type) Part code Q'ty S50114-001 1 S50115-001 1 S50116-001 1 Ref. No. 7-2 7-2-1 7-2-2 7-2-3 7-2-4 7-2-5 7-2-6 7-2-7 7-2-8 7-2-9 7-2-10 9-2 Part name Thread tension assy Thread tension bracket Thread take-up spring Tension stud Disc presser, ;Tension O ring, S14 Spring, tension ;M Disc, ;Tension Washer Tension nut Set screw, SM3.57 Tension release pin ZM-850A, ZM-851A 4/5 Part code Q'ty S51808-001 1 S48084-...
Hand Book - English
Page 5
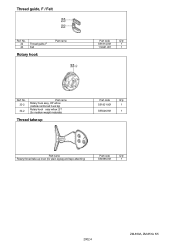
No. 32-2 32-2 Part name Rotary hook assy, HP w/box (carbide reinforced hook tip) Rotary hook assy w/box ;ST (for medium-weight materials) Thread take-up Part code Q'ty S51821-901 1 S55026-901 1 Part name Rotary thread take-up lever (for plain zigzag and tape attaching) Part code Q'ty S54996-001 1 2002.4 ZM-850A, ZM-851A 5/5 No. 22 23 Thread guide, F Felt Rotary hook Part name Part code Q'ty S51814-001 1 114941-001 1 Ref. Thread guide, F / Felt Ref.
No. 32-2 32-2 Part name Rotary hook assy, HP w/box (carbide reinforced hook tip) Rotary hook assy w/box ;ST (for medium-weight materials) Thread take-up Part code Q'ty S51821-901 1 S55026-901 1 Part name Rotary thread take-up lever (for plain zigzag and tape attaching) Part code Q'ty S54996-001 1 2002.4 ZM-850A, ZM-851A 5/5 No. 22 23 Thread guide, F Felt Rotary hook Part name Part code Q'ty S51814-001 1 114941-001 1 Ref. Thread guide, F / Felt Ref.


