

User Manual
Page 2
... connect the camera to a printer (sold separately) and print. • Software Starter Guide Read when you purchased the camera. If anything is required to view the PDF manuals. 2 Camera Battery Pack NB-5L (with Terminal Cover) Battery Charger CB-2LX/CB-2LXE Interface Cable IFC-400PCU AV Cable AVC-DC400 Wrist Strap WS-DC9 Camera User Guide DIGITAL CAMERA Warranty "Canon Customer (This Guide) Solution Disk Card Support" Leaflet Also refer to a computer. Detailed user guides (PDF format) for the included ZoomBrowser...
... connect the camera to a printer (sold separately) and print. • Software Starter Guide Read when you purchased the camera. If anything is required to view the PDF manuals. 2 Camera Battery Pack NB-5L (with Terminal Cover) Battery Charger CB-2LX/CB-2LXE Interface Cable IFC-400PCU AV Cable AVC-DC400 Wrist Strap WS-DC9 Camera User Guide DIGITAL CAMERA Warranty "Canon Customer (This Guide) Solution Disk Card Support" Leaflet Also refer to a computer. Detailed user guides (PDF format) for the included ZoomBrowser...
User Manual
Page 4
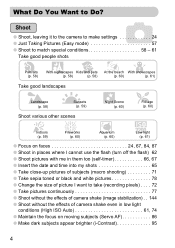
... where I cannot use the flash (turn off the flash) 62 ● Shoot pictures with me in them too (self-timer 66, 67 ● Insert the date and time into my shots 65 ● Take close-up pictures of subjects (macro shooting 71 ● Take sepia toned or black and white pictures 78 ● Change the size of picture I want to take (recording pixels) . . . . 72 ● Take pictures continuously 77 ● Shoot without the effects of camera shake (image stabilization) . . 144...
... where I cannot use the flash (turn off the flash) 62 ● Shoot pictures with me in them too (self-timer 66, 67 ● Insert the date and time into my shots 65 ● Take close-up pictures of subjects (macro shooting 71 ● Take sepia toned or black and white pictures 78 ● Change the size of picture I want to take (recording pixels) . . . . 72 ● Take pictures continuously 77 ● Shoot without the effects of camera shake (image stabilization) . . 144...
User Manual
Page 6
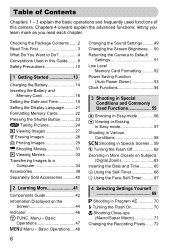
... operations and frequently used functions of this Guide ........9 Safety Precautions 10 1 Getting Started 13 Charging the Battery 14 Inserting the Battery and Memory Card 16 Setting the Date and Time 19 Setting the Display Language..........21 Formatting Memory Cards 22 Pressing the Shutter Button 23 A Taking Pictures 24 1 Viewing Images 27 / Erasing Images 28 2 Printing Images 29 E Shooting Movies 31 1 Viewing Movies 33 Transferring Images to a Computer 34 Accessories 38 Separately Sold Accessories ...........40 Changing the Sound Settings ......... 49 Changing the Screen...
... operations and frequently used functions of this Guide ........9 Safety Precautions 10 1 Getting Started 13 Charging the Battery 14 Inserting the Battery and Memory Card 16 Setting the Date and Time 19 Setting the Display Language..........21 Formatting Memory Cards 22 Pressing the Shutter Button 23 A Taking Pictures 24 1 Viewing Images 27 / Erasing Images 28 2 Printing Images 29 E Shooting Movies 31 1 Viewing Movies 33 Transferring Images to a Computer 34 Accessories 38 Separately Sold Accessories ...........40 Changing the Sound Settings ......... 49 Changing the Screen...

User Manual
Page 7
... 7 Changing the ISO Speed......... 74 Adjusting the White Balance 75 Adjusting the Brightness (Exposure Compensation) ........ 76 W Continuous Shooting 77 Changing the Tone of an Image (My Colors 78 Î Shooting Using the Two Second Self-Timer 79 $ Customizing the Self-Timer ........ 80 Shooting Using a TV Monitor .......... 81 Changing the Composition with the Focus Lock 81 5 Getting More Out of Contents @ Making Dark Subjects Appear Brighter (i-Contrast 95 Œ Red-Eye Correction 96 Checking for Shut Eyes 97 Setting the Flash...
... 7 Changing the ISO Speed......... 74 Adjusting the White Balance 75 Adjusting the Brightness (Exposure Compensation) ........ 76 W Continuous Shooting 77 Changing the Tone of an Image (My Colors 78 Î Shooting Using the Two Second Self-Timer 79 $ Customizing the Self-Timer ........ 80 Shooting Using a TV Monitor .......... 81 Changing the Composition with the Focus Lock 81 5 Getting More Out of Contents @ Making Dark Subjects Appear Brighter (i-Contrast 95 Œ Red-Eye Correction 96 Checking for Shut Eyes 97 Setting the Flash...
User Manual
Page 19
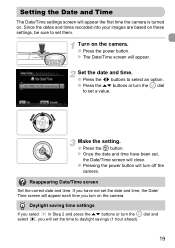
... Date/Time screen Set the correct date and time. X Once the date and time have not set them. Turn on the camera. X The Date/Time screen will appear the first time the camera is turned on these settings, be sure to set the time to daylight savings (1 hour ahead). 19 Setting the Date and Time The Date/Time settings screen will appear. If you will turn on the camera. ● Press the power button. Since the dates and times recorded into your images are based on . Make...
... Date/Time screen Set the correct date and time. X Once the date and time have not set them. Turn on the camera. X The Date/Time screen will appear the first time the camera is turned on these settings, be sure to set the time to daylight savings (1 hour ahead). 19 Setting the Date and Time The Date/Time settings screen will appear. If you will turn on the camera. ● Press the power button. Since the dates and times recorded into your images are based on . Make...
User Manual
Page 21
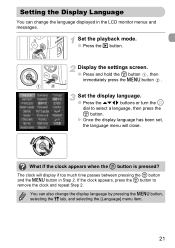
Display the settings screen. ● Press and hold the m button , then immediately press the n button . You can change the display language by pressing the n button, selecting the 3 tab, and selecting the [Language] menu item. 21 X Once the display language has been set, the language menu will display if too much time passes between pressing the m button and the n button in the LCD monitor menus and messages. Setting the Display Language You can also change the language displayed in Step...
Display the settings screen. ● Press and hold the m button , then immediately press the n button . You can change the display language by pressing the n button, selecting the 3 tab, and selecting the [Language] menu item. 21 X Once the display language has been set, the language menu will display if too much time passes between pressing the m button and the n button in the LCD monitor menus and messages. Setting the Display Language You can also change the language displayed in Step...
User Manual
Page 42
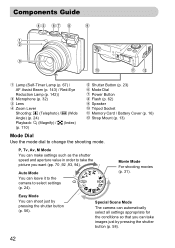
... (Self-Timer Lamp (p. 67) / AF Assist Beam (p. 143) / Red-Eye Reduction Lamp (p. 142)) Microphone (p. 32) Lens Zoom Lever Shooting: i (Telephoto) / j (Wide Angle) (p. 24) Playback: k (Magnify) / g (Index) (p. 110) Shutter Button (p. 23) Mode Dial Power Button Flash (p. 62) Speaker Tripod Socket Memory Card / Battery Cover (p. 16) Strap Mount (p. 13) Mode Dial Use the mode dial to select settings (p. 24). Auto Mode You can take images just by pressing the shutter button (p. 56). P, Tv, Av, M Mode You can make settings such as the shutter speed and aperture...
... (Self-Timer Lamp (p. 67) / AF Assist Beam (p. 143) / Red-Eye Reduction Lamp (p. 142)) Microphone (p. 32) Lens Zoom Lever Shooting: i (Telephoto) / j (Wide Angle) (p. 24) Playback: k (Magnify) / g (Index) (p. 110) Shutter Button (p. 23) Mode Dial Power Button Flash (p. 62) Speaker Tripod Socket Memory Card / Battery Cover (p. 16) Strap Mount (p. 13) Mode Dial Use the mode dial to select settings (p. 24). Auto Mode You can take images just by pressing the shutter button (p. 56). P, Tv, Av, M Mode You can make settings such as the shutter speed and aperture...

User Manual
Page 45
... Displayed on the Screen Playback (Detailed Information Display) Print List (p. 131) My Category (p. 123) Shooting Mode Shutter Speed Exposure Compensation (p. 76) White Balance (p. 75) Histogram (p. 46) Image Editing (pp. 125 - 130) Compression (Image Quality) (p. 72), (Movies) (p. 104) Recording Pixels (p. 72) Battery Charge Indicator (p. 15) Metering Modes (p. 88) Folder Number - Press the MENU button to select the 4 tab. No Information Display Simple Information Display Detailed Information Focus Check Display Display (p. 114) You can change the display using the l button...
... Displayed on the Screen Playback (Detailed Information Display) Print List (p. 131) My Category (p. 123) Shooting Mode Shutter Speed Exposure Compensation (p. 76) White Balance (p. 75) Histogram (p. 46) Image Editing (pp. 125 - 130) Compression (Image Quality) (p. 72), (Movies) (p. 104) Recording Pixels (p. 72) Battery Charge Indicator (p. 15) Metering Modes (p. 88) Folder Number - Press the MENU button to select the 4 tab. No Information Display Simple Information Display Detailed Information Focus Check Display Display (p. 114) You can change the display using the l button...

User Manual
Page 46
... the image data or cause the camera or memory card to check the composition (Night Display function). Colors Green Orange Status Lights Blinks Lights Blinks Operation Status Shooting preparation complete (p. 25)/Display Off (p. 138) Recording/reading/transmitting image data (p. 25) Shooting preparation complete (flash on) (p. 25) Camera shake warning (p. 62) When the indicator blinks green, data is being recorded to/read from the memory card or various information is called the histogram. Do not turn off the power, open the memory card slot/battery cover...
... the image data or cause the camera or memory card to check the composition (Night Display function). Colors Green Orange Status Lights Blinks Lights Blinks Operation Status Shooting preparation complete (p. 25)/Display Off (p. 138) Recording/reading/transmitting image data (p. 25) Shooting preparation complete (flash on) (p. 25) Camera shake warning (p. 62) When the indicator blinks green, data is being recorded to/read from the memory card or various information is called the histogram. Do not turn off the power, open the memory card slot/battery cover...

User Manual
Page 64
... zoom factor. X The view will be enlarged, the zoom factor will display on the screen. ● To return to select [1.5x] or [2.0x]. ● Pressing the n button will restore the shooting screen. This enables a faster shutter speed and less chance of camera shake than the zoom (including digital zoom) used by an equivalent of 1.5x or 2.0x. Combinations that Cause Image Deterioration • Using [1.5x] at a recording pixel setting...
... zoom factor. X The view will be enlarged, the zoom factor will display on the screen. ● To return to select [1.5x] or [2.0x]. ● Pressing the n button will restore the shooting screen. This enables a faster shutter speed and less chance of camera shake than the zoom (including digital zoom) used by an equivalent of 1.5x or 2.0x. Combinations that Cause Image Deterioration • Using [1.5x] at a recording pixel setting...
User Manual
Page 70
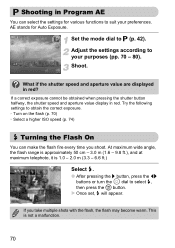
... exposure cannot be obtained when pressing the shutter button halfway, the shutter speed and aperture value display in red? At maximum wide angle, the flash range is approximately 50 cm - 3.0 m (1.6 - 9.8 ft.), and at maximum telephoto, it is not a malfunction. 70 X Once set, h will appear. G Shooting in Program AE You can make the flash fire every time you take multiple shots with the flash, the flash may become warm. Set the mode...
... exposure cannot be obtained when pressing the shutter button halfway, the shutter speed and aperture value display in red? At maximum wide angle, the flash range is approximately 50 cm - 3.0 m (1.6 - 9.8 ft.), and at maximum telephoto, it is not a malfunction. 70 X Once set, h will appear. G Shooting in Program AE You can make the flash fire every time you take multiple shots with the flash, the flash may become warm. Set the mode...
User Manual
Page 106
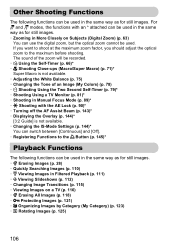
...; Viewing Images on Subjects (Digital Zoom) (p. 63) You can be used in the same way as for still images. • / Erasing Images (p. 28) • Quickly Searching Images (p. 110) • , Viewing Images in Filtered Playback (p. 111) • . The sound of the zoom will be recorded. • Ò Using the Self-Timer (p. 66)* • e Shooting Close-ups (Macro/Super Macro) (p. 71)* Super Macro is not available. • Adjusting the White Balance (p. 75) • Changing the Tone of an Image (My Colors...
...; Viewing Images on Subjects (Digital Zoom) (p. 63) You can be used in the same way as for still images. • / Erasing Images (p. 28) • Quickly Searching Images (p. 110) • , Viewing Images in Filtered Playback (p. 111) • . The sound of the zoom will be recorded. • Ò Using the Self-Timer (p. 66)* • e Shooting Close-ups (Macro/Super Macro) (p. 71)* Super Macro is not available. • Adjusting the White Balance (p. 75) • Changing the Tone of an Image (My Colors...
User Manual
Page 130
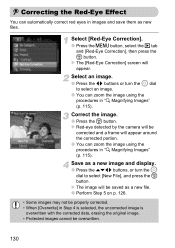
...; Protected images cannot be overwritten. 130 Select an image. ● Press the qr buttons or turn the  dial to select an image. ● You can zoom the image using the procedures in "k Magnifying Images" (p. 115). Correct the image. ● Press the m button. Save as a new image and display. ● Press the opqr buttons, or turn the  dial to select [New File], and press the m button. X The [Red-Eye Correction] screen...
...; Protected images cannot be overwritten. 130 Select an image. ● Press the qr buttons or turn the  dial to select an image. ● You can zoom the image using the procedures in "k Magnifying Images" (p. 115). Correct the image. ● Press the m button. Save as a new image and display. ● Press the opqr buttons, or turn the  dial to select [New File], and press the m button. X The [Red-Eye Correction] screen...
User Manual
Page 140
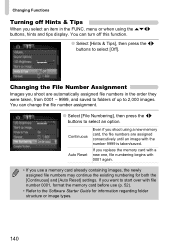
... order they were taken, from 0001 - 9999, and saved to folders of up to select an option. Continuous Auto Reset Even if you use (p. 52). • Refer to the Software Starter Guide for both the [Continuous] and [Auto Reset] settings. You can change the file number assignment. ● Select [File Numbering], then press the qr buttons to 2,000 images. menu or when using a new memory card, the file numbers are automatically assigned file numbers in the FUNC.
... order they were taken, from 0001 - 9999, and saved to folders of up to select an option. Continuous Auto Reset Even if you use (p. 52). • Refer to the Software Starter Guide for both the [Continuous] and [Auto Reset] settings. You can change the file number assignment. ● Select [File Numbering], then press the qr buttons to 2,000 images. menu or when using a new memory card, the file numbers are automatically assigned file numbers in the FUNC.
User Manual
Page 145
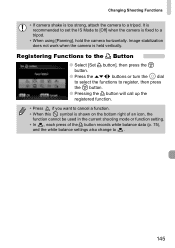
... to cancel a function. • When this symbol is fixed to . 145 It is recommended to set the IS Mode to [Off] when the camera is shown on the bottom right of an icon, the function cannot be used in the current shooting mode or function setting. • In , each press of the c button records white balance data (p. 75), and the white balance settings also change to a tripod. • When using [Panning], hold...
... to cancel a function. • When this symbol is fixed to . 145 It is recommended to set the IS Mode to [Off] when the camera is shown on the bottom right of an icon, the function cannot be used in the current shooting mode or function setting. • In , each press of the c button records white balance data (p. 75), and the white balance settings also change to a tripod. • When using [Panning], hold...

User Manual
Page 151
... output Image is black at low temperatures. Screen does not display properly in your problem, contact a Canon Customer Support Help Desk as a start-up . • Images that have been edited on a computer, have been shot on another camera may appear on the screen. • The h icon blinks when you think there is consumed quickly. • Battery performance decreases at start-up screen. Troubleshooting If you try to the desired shooting mode (p. 42...
... output Image is black at low temperatures. Screen does not display properly in your problem, contact a Canon Customer Support Help Desk as a start-up . • Images that have been edited on a computer, have been shot on another camera may appear on the screen. • The h icon blinks when you think there is consumed quickly. • Battery performance decreases at start-up screen. Troubleshooting If you try to the desired shooting mode (p. 42...
User Manual
Page 153
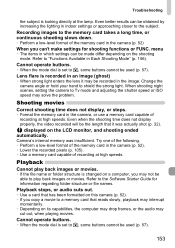
... you copy a movie to a memory card that it may be recorded in Each Shooting Mode" (p. 156). Cannot operate buttons. • When the mode dial is set to 9, some buttons cannot be used (p. 57). 153 Change the camera angle or hold your hand to the Software Starter Guide for shooting functions or FUNC. Recording images to the memory card takes a long time, or continuous shooting slows down. • Perform a low-level format of the memory card in the camera, or use a memory card capable of recording...
... you copy a movie to a memory card that it may be recorded in Each Shooting Mode" (p. 156). Cannot operate buttons. • When the mode dial is set to 9, some buttons cannot be used (p. 57). 153 Change the camera angle or hold your hand to the Software Starter Guide for shooting functions or FUNC. Recording images to the memory card takes a long time, or continuous shooting slows down. • Perform a low-level format of the memory card in the camera, or use a memory card capable of recording...

User Manual
Page 155
... air. Lens error, restart camera • A lens error was detected. Press the power button to turn the camera off and back on the Screen Cannot select! • When selecting the selection range (pp. 119, 121, 124), you hold the lens while it is attempting to display, contact your Canon Customer Support Help Desk as the folder that was after taking a picture, the shot may not have been recorded. If this error code reappears...
... air. Lens error, restart camera • A lens error was detected. Press the power button to turn the camera off and back on the Screen Cannot select! • When selecting the selection range (pp. 119, 121, 124), you hold the lens while it is attempting to display, contact your Canon Customer Support Help Desk as the folder that was after taking a picture, the shot may not have been recorded. If this error code reappears...
User Manual
Page 168
... (Scene Mode 58 Screen Display Language 21 Information Displayed 44 Menu Operations 47, 48 Switching the Display 44, 45 SD/SDHC Memory Card 18 Self-Timer 10 second Self-Timer 66 Changing Delay and Number of Shots 80 Face Self-Timer 67 Two Second Self-Timer 79 Sepia Tones 78 Servo AF 86 Shooting Date and Time J Date/Time Shooting Using a TV 81 Shutter Button 23 Slideshow 112 Snow (Scene Mode 61 Software DIGITAL CAMERA Solution Disk ...... 2, 35 Software Starter Guide 2 Transferring Images to a Computer ...... 34 Sound Settings Mute 49 Stitch Assist (Scene Mode 102...
... (Scene Mode 58 Screen Display Language 21 Information Displayed 44 Menu Operations 47, 48 Switching the Display 44, 45 SD/SDHC Memory Card 18 Self-Timer 10 second Self-Timer 66 Changing Delay and Number of Shots 80 Face Self-Timer 67 Two Second Self-Timer 79 Sepia Tones 78 Servo AF 86 Shooting Date and Time J Date/Time Shooting Using a TV 81 Shutter Button 23 Slideshow 112 Snow (Scene Mode 61 Software DIGITAL CAMERA Solution Disk ...... 2, 35 Software Starter Guide 2 Transferring Images to a Computer ...... 34 Sound Settings Mute 49 Stitch Assist (Scene Mode 102...

Brochure
Page 2
... Other Shooting Features Continuous Shooting (Large/Fine) Auto Focus, Auto Exposure, White Balance, Flash Exposure, Auto Red-Eye correction, FaceSelfTimer3, Blink Detection Servo AF, AF-Point Zoom, Size Select, AF Lock, AF Assist Beam, Intelligent Contrast Correction, Date Stamp, Digital tele-converter, real time histogram, Image Inspection Tool Approx 0.8 shots/sec; Fine, Normal Movies MOV (Image Data: H.264; Multiple coatings to incorporate facial brightness in 1/3-stop increments Sensitivity (Equivalent Film Speed) Auto6, ISO 80/100/200/400/800/1600 White Balance Modes Auto...
... Other Shooting Features Continuous Shooting (Large/Fine) Auto Focus, Auto Exposure, White Balance, Flash Exposure, Auto Red-Eye correction, FaceSelfTimer3, Blink Detection Servo AF, AF-Point Zoom, Size Select, AF Lock, AF Assist Beam, Intelligent Contrast Correction, Date Stamp, Digital tele-converter, real time histogram, Image Inspection Tool Approx 0.8 shots/sec; Fine, Normal Movies MOV (Image Data: H.264; Multiple coatings to incorporate facial brightness in 1/3-stop increments Sensitivity (Equivalent Film Speed) Auto6, ISO 80/100/200/400/800/1600 White Balance Modes Auto...


