
User Manual
Page 2
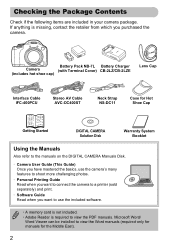
... be installed to view the Word manuals (required only for manuals for Hot Shoe Cap Getting Started DIGITAL CAMERA Solution Disk Warranty System Booklet Using the Manuals Also refer to the manuals on the DIGITAL CAMERA Manuals Disk. • Camera User Guide (This Guide) Once you have mastered the basics, use the camera's many features to shoot more challenging photos. • Personal Printing Guide Read when you want to connect the camera to a printer (sold separately) and print. • Software Guide Read...
... be installed to view the Word manuals (required only for manuals for Hot Shoe Cap Getting Started DIGITAL CAMERA Solution Disk Warranty System Booklet Using the Manuals Also refer to the manuals on the DIGITAL CAMERA Manuals Disk. • Camera User Guide (This Guide) Once you have mastered the basics, use the camera's many features to shoot more challenging photos. • Personal Printing Guide Read when you want to connect the camera to a printer (sold separately) and print. • Software Guide Read...

User Manual
Page 6
... 72 Turning the Flash On 72 Adjusting the Brightness (Exposure Compensation 73 Shooting Close-ups (Macro 73 Basic Operations ....48 6 MENU - Basic Operations 49 Changing the Sound Settings ......... 50 Changing the Screen Brightness .... 51 Adjusting the Viewfinder 52 Power Saving Function (Auto Power Down 52 Returning the Camera to Default Settings 53 Low Level Memory Card Formatting . 54 Clock Functions 55 3 Shooting with Commonly Used Functions 57 Zooming in More Closely on Subjects (Digital Zoom 58 Inserting the Date and Time 60 Using the Self-Timer 61 Shooting in...
... 72 Turning the Flash On 72 Adjusting the Brightness (Exposure Compensation 73 Shooting Close-ups (Macro 73 Basic Operations ....48 6 MENU - Basic Operations 49 Changing the Sound Settings ......... 50 Changing the Screen Brightness .... 51 Adjusting the Viewfinder 52 Power Saving Function (Auto Power Down 52 Returning the Camera to Default Settings 53 Low Level Memory Card Formatting . 54 Clock Functions 55 3 Shooting with Commonly Used Functions 57 Zooming in More Closely on Subjects (Digital Zoom 58 Inserting the Date and Time 60 Using the Self-Timer 61 Shooting in...
User Manual
Page 7
Table of Contents Changing the Recording Pixel Setting (Image Size 74 Changing the Compression Ratio (Image Quality 74 Changing the ISO Speed 76 Adjusting the White Balance 77 Continuous Shooting 78 Changing the Tone of an Image (My Colors 79 Using the Self-Timer to Prevent Camera Shake 80 Customizing the Self-Timer 81 Shooting Using a TV Monitor .......... 82 Changing the Composition with the Focus Lock 82 5 Getting More Out of Your Camera 83 Changing the AF Frame Mode........ 84 Changing the AF Frame...
Table of Contents Changing the Recording Pixel Setting (Image Size 74 Changing the Compression Ratio (Image Quality 74 Changing the ISO Speed 76 Adjusting the White Balance 77 Continuous Shooting 78 Changing the Tone of an Image (My Colors 79 Using the Self-Timer to Prevent Camera Shake 80 Customizing the Self-Timer 81 Shooting Using a TV Monitor .......... 82 Changing the Composition with the Focus Lock 82 5 Getting More Out of Your Camera 83 Changing the AF Frame Mode........ 84 Changing the AF Frame...
User Manual
Page 8
... Images for Printing (DPOF 147 Print Added Images 150 9 Customizing Camera Settings 151 Changing Camera Settings 152 Changing Shooting Function Settings 158 Registering Commonly Used Shooting Menus (My Menu 163 Changing Playback Function Settings 164 10 Useful Information ..........165 Using Household Power 166 Using the Lens Hood (Sold Separately 167 Using an Externally Mounted Flash (Sold Separately 168 Using an Eye-Fi Card 172 Troubleshooting 174 List of Messages That Appear on the Screen 177 Information Displayed on the Screen 179 Functions Available in Each Shooting Mode...
... Images for Printing (DPOF 147 Print Added Images 150 9 Customizing Camera Settings 151 Changing Camera Settings 152 Changing Shooting Function Settings 158 Registering Commonly Used Shooting Menus (My Menu 163 Changing Playback Function Settings 164 10 Useful Information ..........165 Using Household Power 166 Using the Lens Hood (Sold Separately 167 Using an Externally Mounted Flash (Sold Separately 168 Using an Eye-Fi Card 172 Troubleshooting 174 List of Messages That Appear on the Screen 177 Information Displayed on the Screen 179 Functions Available in Each Shooting Mode...
User Manual
Page 33
... USB ports. System Requirements Windows OS Computer model CPU RAM Interface Free Hard Disk Space Display Windows 7 Windows Vista Service Pack 1 and 2 Windows XP Service Pack 3 The above OS should be installed. If you can play smoothly, and the audio may take some time depending on computers with another Canon-brand compact digital camera, install the software from the included CD-ROM, overwriting your computer's capabilities. 33 Transferring Images to a Computer for viewing...
... USB ports. System Requirements Windows OS Computer model CPU RAM Interface Free Hard Disk Space Display Windows 7 Windows Vista Service Pack 1 and 2 Windows XP Service Pack 3 The above OS should be installed. If you can play smoothly, and the audio may take some time depending on computers with another Canon-brand compact digital camera, install the software from the included CD-ROM, overwriting your computer's capabilities. 33 Transferring Images to a Computer for viewing...

User Manual
Page 34
... with the installation. ● If the [User Account Control] window appears, follow the on -screen instructions to a Computer for these explanations. Begin installation. ● Click [Easy Installation] and follow the on -screen instructions to proceed with built-in the computer's CD-ROM drive. ● Place the supplied CD-ROM (DIGITAL CAMERA Solution Disk) (p. 2) into the computer's CD-ROM drive. Windows Place the CD in USB ports. Transferring Images to...
... with the installation. ● If the [User Account Control] window appears, follow the on -screen instructions to a Computer for these explanations. Begin installation. ● Click [Easy Installation] and follow the on -screen instructions to proceed with built-in the computer's CD-ROM drive. ● Place the supplied CD-ROM (DIGITAL CAMERA Solution Disk) (p. 2) into the computer's CD-ROM drive. Windows Place the CD in USB ports. Transferring Images to...
User Manual
Page 37
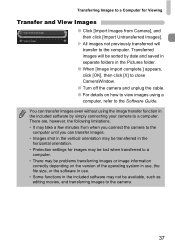
... problems transferring images or image information correctly depending on the version of the operating system in use, the file size, or the software in use. • Some functions in the included software may take a few minutes from when you connect the camera to the computer until you can transfer images even without using the image transfer function in the included software by date and saved in separate folders in the horizontal orientation. • Protection settings for Viewing Transfer and View Images...
... problems transferring images or image information correctly depending on the version of the operating system in use, the file size, or the software in use. • Some functions in the included software may take a few minutes from when you connect the camera to the computer until you can transfer images even without using the image transfer function in the included software by date and saved in separate folders in the horizontal orientation. • Protection settings for Viewing Transfer and View Images...

User Manual
Page 95
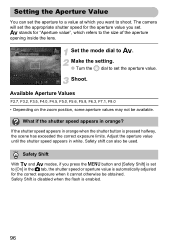
... indicates 1/160 second. • The fastest shutter speed when using the flash is chosen. • Depending on the zoom position, some shutter speeds may not be available. • When shutter speeds of processing time may be used , images are used (p. 96). 95 What if the aperture value appears in orange when the shutter button is pressed halfway, the scene has exceeded the correct exposure limits. The camera will set the...
... indicates 1/160 second. • The fastest shutter speed when using the flash is chosen. • Depending on the zoom position, some shutter speeds may not be available. • When shutter speeds of processing time may be used , images are used (p. 96). 95 What if the aperture value appears in orange when the shutter button is pressed halfway, the scene has exceeded the correct exposure limits. The camera will set the...
User Manual
Page 96
The camera will set the appropriate shutter speed for the aperture value you want to shoot. Set the mode dial to set . What if the shutter speed appears in orange when the shutter button is set the aperture to a value at which refers to [On] in white. Safety shift can set to the size of the aperture opening inside the lens. If the shutter speed appears in orange? Safety Shift is disabled when the flash is...
The camera will set the appropriate shutter speed for the aperture value you want to shoot. Set the mode dial to set . What if the shutter speed appears in orange when the shutter button is set the aperture to a value at which refers to [On] in white. Safety shift can set to the size of the aperture opening inside the lens. If the shutter speed appears in orange? Safety Shift is disabled when the flash is...

User Manual
Page 154
... to the Software Guide for details. Changing Camera Settings Register the start-up image or sounds with the included software The dedicated operation sounds and start over with file number 0001, format the memory card before use a memory card already containing images, the newly assigned file numbers may continue the existing numbering for both [Continuous] and [Auto Reset]. Continuous Auto Reset Even if you shoot using a new memory card, the file numbers are automatically assigned file numbers in the order they were taken, from 0001 - 9999, and saved to folders of...
... to the Software Guide for details. Changing Camera Settings Register the start-up image or sounds with the included software The dedicated operation sounds and start over with file number 0001, format the memory card before use a memory card already containing images, the newly assigned file numbers may continue the existing numbering for both [Continuous] and [Auto Reset]. Continuous Auto Reset Even if you shoot using a new memory card, the file numbers are automatically assigned file numbers in the order they were taken, from 0001 - 9999, and saved to folders of...
User Manual
Page 170
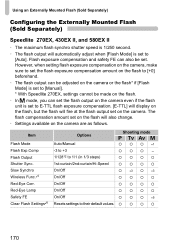
...; The maximum flash synchro shutter speed is 1/250 second. • The flash output will automatically adjust when [Flash Mode] is set to E-TTL flash exposure compensation. [E-TTL] will display on the flash, but the flash will also change. • Settings available on the camera. However, when setting flash exposure compensation on the camera, make sure to set the flash exposure compensation amount on the flash to [Auto]. Shooting mode G MB D { { { *1 {{{ - {{{{ {{{{ { *3 { *3 {{{{ {{{{ {{{{ { { { *5 {{{{ 170 Item Flash Mode Flash Exp.Comp Flash Output Shutter Sync. Red-Eye Lamp...
...; The maximum flash synchro shutter speed is 1/250 second. • The flash output will automatically adjust when [Flash Mode] is set to E-TTL flash exposure compensation. [E-TTL] will display on the flash, but the flash will also change. • Settings available on the camera. However, when setting flash exposure compensation on the camera, make sure to set the flash exposure compensation amount on the flash to [Auto]. Shooting mode G MB D { { { *1 {{{ - {{{{ {{{{ { *3 { *3 {{{{ {{{{ {{{{ { { { *5 {{{{ 170 Item Flash Mode Flash Exp.Comp Flash Output Shutter Sync. Red-Eye Lamp...
User Manual
Page 172
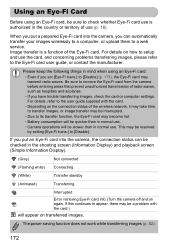
..., or upload them to [Disable] (p. 173), the Eye-Fi card may become hot. • Battery consumption will be checked in the shooting screen (Information Display) and playback screen (Simple Information Display). (Gray) Not connected (Flashing white) Connecting (White) Transfer standby (Animated) Transferring Interrupted Error retrieving Eye-Fi card info (Turn the camera off and on transferred images. Using an Eye-Fi Card Before using an Eye-Fi card. • Even if you can be slower than in normal use the card, and concerning problems transferring images...
..., or upload them to [Disable] (p. 173), the Eye-Fi card may become hot. • Battery consumption will be checked in the shooting screen (Information Display) and playback screen (Simple Information Display). (Gray) Not connected (Flashing white) Connecting (White) Transfer standby (Animated) Transferring Interrupted Error retrieving Eye-Fi card info (Turn the camera off and on transferred images. Using an Eye-Fi Card Before using an Eye-Fi card. • Even if you can be slower than in normal use the card, and concerning problems transferring images...

User Manual
Page 174
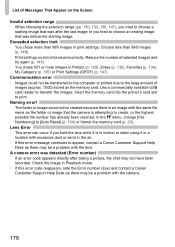
... on TV (p. 127). TV output Image is consumed quickly. • Battery performance decreases at low temperatures. Screen does not display properly while shooting. Clean the terminals with a tripod (p. 161). 174 Please note, the following . Screen does not display properly in Playback mode (p. 22), press the shutter button halfway (p. 24). Troubleshooting If you should set it in your problem, contact a Canon Customer Support Help Desk as listed on the...
... on TV (p. 127). TV output Image is consumed quickly. • Battery performance decreases at low temperatures. Screen does not display properly while shooting. Clean the terminals with a tripod (p. 161). 174 Please note, the following . Screen does not display properly in Playback mode (p. 22), press the shutter button halfway (p. 24). Troubleshooting If you should set it in your problem, contact a Canon Customer Support Help Desk as listed on the...

User Manual
Page 176
... be able to play back images or movies. • If the file name or folder structure is connected to a computer via cable by reducing the transfer speed. • Press the 1 button to enter Playback mode. Playback Cannot play back images or movies. Eye-Fi Card Cannot transfer images (p. 172). 176 Troubleshooting Recording images to the memory card takes a long time, or continuous shooting slows down. • Perform a low-level format of recording at high speeds (p. 111). The camera's internal memory was actually shot (pp. 23, 31...
... be able to play back images or movies. • If the file name or folder structure is connected to a computer via cable by reducing the transfer speed. • Press the 1 button to enter Playback mode. Playback Cannot play back images or movies. Eye-Fi Card Cannot transfer images (p. 172). 176 Troubleshooting Recording images to the memory card takes a long time, or continuous shooting slows down. • Perform a low-level format of recording at high speeds (p. 111). The camera's internal memory was actually shot (pp. 23, 31...
User Manual
Page 178
... camera. 178 Check the image in Playback mode. • If this error message continues to appear, contact a Canon Customer Support Help Desk as there may not have been recorded. Communication error • Images could not be a problem with excessive dust or sand in a location with the lens. In the 3 menu, change [File Numbering] to print. A camera error was after taking a picture, the shot may be saved correctly. Insert the memory card into the printer's card slot to [Auto Reset] (p. 154) or format the memory card...
... camera. 178 Check the image in Playback mode. • If this error message continues to appear, contact a Canon Customer Support Help Desk as there may not have been recorded. Communication error • Images could not be a problem with excessive dust or sand in a location with the lens. In the 3 menu, change [File Numbering] to print. A camera error was after taking a picture, the shot may be saved correctly. Insert the memory card into the printer's card slot to [Auto Reset] (p. 154) or format the memory card...
User Manual
Page 181
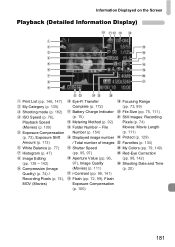
... Screen Playback (Detailed Information Display) Print List (pp. 146, 147) My Category (p. 135) Shooting mode (p. 182) ISO Speed (p. 76), Playback Speed (Movies) (p. 109) Exposure Compensation (p. 73), Exposure Shift Amount (p. 113) White Balance (p. 77) Histogram (p. 47) Image Editing (pp. 138 - 142) Compression (Image Quality) (p. 74) / Recording Pixels (p. 74), MOV (Movies) Eye-Fi Transfer Complete (p. 172) Battery Charge Indicator (p. 15) Metering Method (p. 92) Folder Number - File Number (p. 154) Displayed image number / Total number of images Shutter Speed (pp. 95, 97) Aperture Value...
... Screen Playback (Detailed Information Display) Print List (pp. 146, 147) My Category (p. 135) Shooting mode (p. 182) ISO Speed (p. 76), Playback Speed (Movies) (p. 109) Exposure Compensation (p. 73), Exposure Shift Amount (p. 113) White Balance (p. 77) Histogram (p. 47) Image Editing (pp. 138 - 142) Compression (Image Quality) (p. 74) / Recording Pixels (p. 74), MOV (Movies) Eye-Fi Transfer Complete (p. 172) Battery Charge Indicator (p. 15) Metering Method (p. 92) Folder Number - File Number (p. 154) Displayed image number / Total number of images Shutter Speed (pp. 95, 97) Aperture Value...

User Manual
Page 186
Home*/World Date and time settings m/cm* / ft/in NTSC/PAL Eye-Fi connection settings (only appears when Eye-Fi card is inserted) Choose display language. Returns camera to My Menu. Ref. Formats memory card, erasing all operation sounds (5 levels). Page p. 163 186 Add an image as a start-up Image Format File Numbering Create Folder Lens Retract Power Saving Time Zone Date/Time Distance Units Video System Eye-Fi Settings Language Reset All * Default setting Content On/Off* Set all data Continuous*/Auto Reset Monthly*/Daily 1 min.*/0 sec. Page p. 50 p. 50 p. 152 p. 152 p....
Home*/World Date and time settings m/cm* / ft/in NTSC/PAL Eye-Fi connection settings (only appears when Eye-Fi card is inserted) Choose display language. Returns camera to My Menu. Ref. Formats memory card, erasing all operation sounds (5 levels). Page p. 163 186 Add an image as a start-up Image Format File Numbering Create Folder Lens Retract Power Saving Time Zone Date/Time Distance Units Video System Eye-Fi Settings Language Reset All * Default setting Content On/Off* Set all data Continuous*/Auto Reset Monthly*/Daily 1 min.*/0 sec. Page p. 50 p. 50 p. 152 p. 152 p....
User Manual
Page 192
...21 Power Saving 52, 155 Recharge 14 Battery Charger 2, 39 Beach (Shooting Mode 64 Black and White Images 79 Blink Detection 101 Bracketing 90 C C1/C2 (Shooting Mode 102 Camera Default Settings 53 Camera Shake 27, 161 Clock Functions 55 Color Accent (Shooting Mode) ...... 103, 108 Color Swap (Shooting Mode) ........ 104, 108 Components Guide 44 Compression (Image Quality 74 Continuous Shooting 78 D Date and Time J Date/Time Date/Time Adding to Image 60 Changing 21 192 Date/Time Battery 21 Setting 20 World Clock 156 Default Settings 53 DIGITAL CAMERA Solution Disk 2 Digital...
...21 Power Saving 52, 155 Recharge 14 Battery Charger 2, 39 Beach (Shooting Mode 64 Black and White Images 79 Blink Detection 101 Bracketing 90 C C1/C2 (Shooting Mode 102 Camera Default Settings 53 Camera Shake 27, 161 Clock Functions 55 Color Accent (Shooting Mode) ...... 103, 108 Color Swap (Shooting Mode) ........ 104, 108 Components Guide 44 Compression (Image Quality 74 Continuous Shooting 78 D Date and Time J Date/Time Date/Time Adding to Image 60 Changing 21 192 Date/Time Battery 21 Setting 20 World Clock 156 Default Settings 53 DIGITAL CAMERA Solution Disk 2 Digital...
User Manual
Page 193
.../MMCplus J Memory Cards My Category 135 My Colors 79 P P (Shooting mode 72 Personal Printing Guide 2 PictBridge 41, 144 Playback J Viewing Playback With Transition Effects 126 Portrait (Shooting Mode 62 Poster Effect (Shooting Mode 65 Power JBattery and Charger Kit, AC Adapter Kit Power Saving 52, 155 Printing 144 Program AE 72 Protect 129 R Recording Pixels (Image Size 74 Red-Eye Correction 98, 142 Resizing (Making Images Smaller)......... 138 Rotate 137 193 Index Focus AF Frame 26, 84 AF Lock 87...
.../MMCplus J Memory Cards My Category 135 My Colors 79 P P (Shooting mode 72 Personal Printing Guide 2 PictBridge 41, 144 Playback J Viewing Playback With Transition Effects 126 Portrait (Shooting Mode 62 Poster Effect (Shooting Mode 65 Power JBattery and Charger Kit, AC Adapter Kit Power Saving 52, 155 Printing 144 Program AE 72 Protect 129 R Recording Pixels (Image Size 74 Red-Eye Correction 98, 142 Resizing (Making Images Smaller)......... 138 Rotate 137 193 Index Focus AF Frame 26, 84 AF Lock 87...
User Manual
Page 194
... Memory Cards Self-Timer 10 Second Self-Timer 61 Changing Delay and Number of Shots 81 Face Self-Timer (Shooting Mode) ..... 68 Two Second Self-Timer 80 Wink Self-Timer (Shooting Mode) ..... 67 Sepia Tones 79 Servo AF 86 Shooting Number of Shots 15, 18, 75 Shooting Date and Time J Date/Time Shooting Info 160, 179 Shooting Time 31, 111 Shooting Using a TV 82 Slideshow 123 Smart Shuffle 125 Smile (Shooting Mode 66 Snow (Shooting Mode 64 Software DIGITAL CAMERA Solution Disk ........ 2 Installation 34 Software Guide 2 Transferring Images to a Computer for Viewing 33 Sound Settings...
... Memory Cards Self-Timer 10 Second Self-Timer 61 Changing Delay and Number of Shots 81 Face Self-Timer (Shooting Mode) ..... 68 Two Second Self-Timer 80 Wink Self-Timer (Shooting Mode) ..... 67 Sepia Tones 79 Servo AF 86 Shooting Number of Shots 15, 18, 75 Shooting Date and Time J Date/Time Shooting Info 160, 179 Shooting Time 31, 111 Shooting Using a TV 82 Slideshow 123 Smart Shuffle 125 Smile (Shooting Mode 66 Snow (Shooting Mode 64 Software DIGITAL CAMERA Solution Disk ........ 2 Installation 34 Software Guide 2 Transferring Images to a Computer for Viewing 33 Sound Settings...


