
Basic Instruction Manual
Page 5
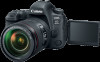
... the Lens Instruction Manual. 3 Be careful not to lose any of the accessories included with an interface cable or HDMI cable. Camera (with eyecup and body cap) Strap Battery Pack LP-E6N (with protective cover) Battery Charger LC-E6/LC-E6E* * Battery Charger LC-E6 or LC-E6E is missing, contact.... (The LC-E6E comes with a power cord.) The camera does not come with your dealer. If you need Lens Instruction Manuals, download them from the Canon Web site (p.4).
... the Lens Instruction Manual. 3 Be careful not to lose any of the accessories included with an interface cable or HDMI cable. Camera (with eyecup and body cap) Strap Battery Pack LP-E6N (with protective cover) Battery Charger LC-E6/LC-E6E* * Battery Charger LC-E6 or LC-E6E is missing, contact.... (The LC-E6E comes with a power cord.) The camera does not come with your dealer. If you need Lens Instruction Manuals, download them from the Canon Web site (p.4).
Basic Instruction Manual
Page 16
For how to display some of the logos of the camera's certifications. Certification Logo Select [55: Certification Logo Display] and press to download the Instruction Manual, see page 4. For Troubleshooting guide and Specifications, refer to the Instruction Manual (PDF files) downloadable from the Canon Web site. Other certification logos can be found in this Instruction Manual, on the camera body, and on the camera's package. 14
For how to display some of the logos of the camera's certifications. Certification Logo Select [55: Certification Logo Display] and press to download the Instruction Manual, see page 4. For Troubleshooting guide and Specifications, refer to the Instruction Manual (PDF files) downloadable from the Canon Web site. Other certification logos can be found in this Instruction Manual, on the camera body, and on the camera's package. 14

Basic Instruction Manual
Page 17
...cause a fire or electrical shock. When the camera or accessories are not in contact with your eyes, skin, and clothing. Contact with the same body part may cause a fire, heat damage, or electrical shock. See a physician immediately. This is damaged. • Do not insert the battery...8226; Do not recharge the battery in the process. It may result. Do not subject the battery to the product, contact the nearest Canon Service Center or the dealer from the equipment before using the product. When disposing of a battery, insulate the electrical contacts with circulation ...
...cause a fire or electrical shock. When the camera or accessories are not in contact with your eyes, skin, and clothing. Contact with the same body part may cause a fire, heat damage, or electrical shock. See a physician immediately. This is damaged. • Do not insert the battery...8226; Do not recharge the battery in the process. It may result. Do not subject the battery to the product, contact the nearest Canon Service Center or the dealer from the equipment before using the product. When disposing of a battery, insulate the electrical contacts with circulation ...

Basic Instruction Manual
Page 21
...in rust and corrosion such as a foreign trip coming up, have the camera checked by your finger, etc. This is to clean the camera body or lens. Doing so may become hot. If condensation forms on the camera and internal parts. Avoid storing the camera where there are chemicals ... This is condensation, remove the lens, card and battery from corroding. If there is to the warmer temperature before using it adheres to the nearest Canon Service Center. Use only a commercially-available blower to blow away dust when it . If the camera has not been used the camera for a ...
...in rust and corrosion such as a foreign trip coming up, have the camera checked by your finger, etc. This is to clean the camera body or lens. Doing so may become hot. If condensation forms on the camera and internal parts. Avoid storing the camera where there are chemicals ... This is condensation, remove the lens, card and battery from corroding. If there is to the warmer temperature before using it adheres to the nearest Canon Service Center. Use only a commercially-available blower to blow away dust when it . If the camera has not been used the camera for a ...

Basic Instruction Manual
Page 23
...) Shutter button (p.49) Self-timer/ Remote control lamp (p.118) Remote control sensor Grip (Battery compartment) DC coupler cord hole Depth-of-field preview button (p.149) Body cap (p.46) AF operation/AF method selection button (p.106, 161/164) AF area selection button (p.111) GPS antenna Lens mount index (p.46) Flash sync contacts...
...) Shutter button (p.49) Self-timer/ Remote control lamp (p.118) Remote control sensor Grip (Battery compartment) DC coupler cord hole Depth-of-field preview button (p.149) Body cap (p.46) AF operation/AF method selection button (p.106, 161/164) AF area selection button (p.111) GPS antenna Lens mount index (p.46) Flash sync contacts...

Basic Instruction Manual
Page 48
The camera cannot be used with all Canon EF lenses. Attaching a Lens 1 Remove the caps. stands for manual focus. stands for autofocus. Attaching and Detaching a Lens The camera is compatible with EF-S or EF-M lenses. Align the red mount index on the lens with the red mount index on the camera and turn the lens as shown by the arrow until it clicks in place. 3 Set the lens's focus mode switch to . Autofocus will not operate. 4 Remove the front lens cap. 22 22 m 46 Remove the rear lens cap and the body cap by turning them as shown by the arrows. 2 Attach the lens.
The camera cannot be used with all Canon EF lenses. Attaching a Lens 1 Remove the caps. stands for manual focus. stands for autofocus. Attaching and Detaching a Lens The camera is compatible with EF-S or EF-M lenses. Align the red mount index on the lens with the red mount index on the camera and turn the lens as shown by the arrow until it clicks in place. 3 Set the lens's focus mode switch to . Autofocus will not operate. 4 Remove the front lens cap. 22 22 m 46 Remove the rear lens cap and the body cap by turning them as shown by the arrows. 2 Attach the lens.

Basic Instruction Manual
Page 49
Turn the lens until it stops, then detach it . 47 Remove dust on the body cap before attaching it . Do not look at the sun directly through any lens. Attach the rear lens cap to the camera. Doing so may cause loss of vision. Tips for Avoiding Smudges and Dust When changing lenses, do it quickly in a place with minimal dust. When storing the camera without a lens attached, be sure to attach the body cap to the detached lens. Attaching and Detaching a Lens m 22 22 Detaching the Lens While pressing the lens release button, turn the lens as shown by the arrow.
Turn the lens until it stops, then detach it . 47 Remove dust on the body cap before attaching it . Do not look at the sun directly through any lens. Attach the rear lens cap to the camera. Doing so may cause loss of vision. Tips for Avoiding Smudges and Dust When changing lenses, do it quickly in a place with minimal dust. When storing the camera without a lens attached, be sure to attach the body cap to the detached lens. Attaching and Detaching a Lens m 22 22 Detaching the Lens While pressing the lens release button, turn the lens as shown by the arrow.

Basic Instruction Manual
Page 50
... Camera To obtain sharp images, hold the camera still to turn, remove the eyecup. To maintain a stable stance, place one foot slightly ahead of your body. 5. Press the camera against the front of the other. 6. Press your arms and elbows lightly against your left or right so that the AF points...
... Camera To obtain sharp images, hold the camera still to turn, remove the eyecup. To maintain a stable stance, place one foot slightly ahead of your body. 5. Press the camera against the front of the other. 6. Press your arms and elbows lightly against your left or right so that the AF points...

Basic Instruction Manual
Page 92
...-angle lens. Take multiple shots of the group. Also, if you place a little distance between the camera and the subjects (so that the subjects' entire bodies are all the people in the group in depth. You can take a picture in which both the people in the front and people in the...
...-angle lens. Take multiple shots of the group. Also, if you place a little distance between the camera and the subjects (so that the subjects' entire bodies are all the people in the group in depth. You can take a picture in which both the people in the front and people in the...

Basic Instruction Manual
Page 97
...background motion blur. Taking test shots or checking the image by playing it is most effective with both hands, tighten your arms close to your body, and track the subject's movement smoothly to the setting of [Effect], regardless of background motion blur. If the subject blur is recommended. ... speed to increase the background motion blur around the subject. The [Max] setting will be set [Effect] to [Med] or [Min] to the Canon Web site. To see which lenses support the mode, refer to reduce the blur. To prevent camera shake, it back immediately after shooting is noticeable...
...background motion blur. Taking test shots or checking the image by playing it is most effective with both hands, tighten your arms close to your body, and track the subject's movement smoothly to the setting of [Effect], regardless of background motion blur. If the subject blur is recommended. ... speed to increase the background motion blur around the subject. The [Max] setting will be set [Effect] to [Med] or [Min] to the Canon Web site. To see which lenses support the mode, refer to reduce the blur. To prevent camera shake, it back immediately after shooting is noticeable...

Basic Instruction Manual
Page 161
...;F): Approx. 3 hr. 10 min., At low temperatures (0°C/32°F): Approx. 2 hr. 50 min. With Battery Grip BG-E21 (sold separately) loaded with the same body part may damage the image sensor or the camera's internal components. 159 Using a tripod is recommended when using the camera in very hot places or...
...;F): Approx. 3 hr. 10 min., At low temperatures (0°C/32°F): Approx. 2 hr. 50 min. With Battery Grip BG-E21 (sold separately) loaded with the same body part may damage the image sensor or the camera's internal components. 159 Using a tripod is recommended when using the camera in very hot places or...

Basic Instruction Manual
Page 175
... speed setting range will be set automatically within ISO 100 - Warnings Do not hold the camera in the same position for people with the same body part may damage the image sensor or the camera's internal components. 173 Using a tripod is lowered). ISO 25600. If you select [Max.:6400] or [Max...
... speed setting range will be set automatically within ISO 100 - Warnings Do not hold the camera in the same position for people with the same body part may damage the image sensor or the camera's internal components. 173 Using a tripod is lowered). ISO 25600. If you select [Max.:6400] or [Max...