User Manual
Page 2
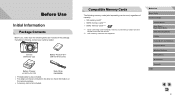
Compatible Memory Cards The following items are also supported. Camera (with body cap) Battery Pack LP-E17 (with the camera. *2 UHS-I memory cards are included in the lens kit, check information on the lens included in the package. However, ..., regardless of capacity. ●● SD memory cards*1 ●● SDHC memory cards*1*2 ●● SDXC memory cards*1*2 *1 Cards conforming to work with terminal cover) Battery Charger LC-E17/LC-E17E Neck Strap EM-300DB ●● Printed matter is also included. ●● For details on the camera package. ●...
Compatible Memory Cards The following items are also supported. Camera (with body cap) Battery Pack LP-E17 (with the camera. *2 UHS-I memory cards are included in the lens kit, check information on the lens included in the package. However, ..., regardless of capacity. ●● SD memory cards*1 ●● SDHC memory cards*1*2 ●● SDXC memory cards*1*2 *1 Cards conforming to work with terminal cover) Battery Charger LC-E17/LC-E17E Neck Strap EM-300DB ●● Printed matter is also included. ●● For details on the camera package. ●...

User Manual
Page 4
...) Lamp (15) Terminal cover (16) Lens release button (17) Lens lock pin (18) Lens mount (19) External microphone IN terminal (20) Speaker (21) Memory card/battery cover (22) Digital terminal (23) (N-Mark)*1 (24) Tripod socket (25) DC coupler terminal cover (3)(4) (5) (6) (1) (2) (7) (18) (21) (8) (19) (22) (9) (20) (10) (23) (11) (17)(16)(15...
...) Lamp (15) Terminal cover (16) Lens release button (17) Lens lock pin (18) Lens mount (19) External microphone IN terminal (20) Speaker (21) Memory card/battery cover (22) Digital terminal (23) (N-Mark)*1 (24) Tripod socket (25) DC coupler terminal cover (3)(4) (5) (6) (1) (2) (7) (18) (21) (8) (19) (22) (9) (20) (10) (23) (11) (17)(16)(15...

User Manual
Page 6
... Basic Operations 17 Initial Preparations 17 Attaching the Strap 17 Removing the Strap 18 Holding the Camera 18 Charging the Battery Pack 18 Inserting the Battery Pack and Memory Card 19 Removing the Battery Pack and Memory Card 20 Setting the Date and Time 20 Changing the Date and Time 21 Display Language...
... Basic Operations 17 Initial Preparations 17 Attaching the Strap 17 Removing the Strap 18 Holding the Camera 18 Charging the Battery Pack 18 Inserting the Battery Pack and Memory Card 19 Removing the Battery Pack and Memory Card 20 Setting the Date and Time 20 Changing the Date and Time 21 Display Language...

User Manual
Page 12
... a Photobook 183 Removing All Images from a Photobook 183 Appendix 184 Troubleshooting 184 On-Screen Messages 188 On-Screen Information 190 When Shooting 190 Battery Level 190 During Playback 191 Info Display 1 191 Info Display 2 191 Info Display 3 191 Info Display 4 191 Info Display 5 192 ...213 Playback 214 Customizing 214 Power 215 Interface 215 Operating Environment 215 Dimensions (CIPA compliant 216 Weight (CIPA compliant 216 Battery Pack LP-E17 216 Battery Charger LC‑E17/ LC‑E17E 216 Index 217 Precautions for Wireless Features (Wi-Fi, Bluetooth, or Others...
... a Photobook 183 Removing All Images from a Photobook 183 Appendix 184 Troubleshooting 184 On-Screen Messages 188 On-Screen Information 190 When Shooting 190 Battery Level 190 During Playback 191 Info Display 1 191 Info Display 2 191 Info Display 3 191 Info Display 4 191 Info Display 5 192 ...213 Playback 214 Customizing 214 Power 215 Interface 215 Operating Environment 215 Dimensions (CIPA compliant 216 Weight (CIPA compliant 216 Battery Pack LP-E17 216 Battery Charger LC‑E17/ LC‑E17E 216 Index 217 Precautions for Wireless Features (Wi-Fi, Bluetooth, or Others...

User Manual
Page 14
...shocks or vibration. ●● Do not touch any exposed internal parts. ●● Stop using commercially available batteries or provided battery packs. -- Do not charge batteries/battery packs using a dry cloth. -- Periodically remove any case of unusual circumstances such as the presence of time. ...flammable gases may result in or unplug the product with metallic pins or other materials when in use or shortly after use leaking batteries/battery packs. -- This may cause electric shock, explosion or fire. Do not plug in strangulation. Do not damage, break or ...
...shocks or vibration. ●● Do not touch any exposed internal parts. ●● Stop using commercially available batteries or provided battery packs. -- Do not charge batteries/battery packs using a dry cloth. -- Periodically remove any case of unusual circumstances such as the presence of time. ...flammable gases may result in or unplug the product with metallic pins or other materials when in use or shortly after use leaking batteries/battery packs. -- This may cause electric shock, explosion or fire. Do not plug in strangulation. Do not damage, break or ...

User Manual
Page 15
... not leave the product in places exposed to malfunction. ●● Remove and store the battery pack/batteries when you discard the battery pack/batteries, cover the terminals with the + and - Pets biting the battery pack could cause leakage, overheating, or explosion, resulting in product damage or fire. ●&#... reversed. It may hurt the eyes. ●● Strap is recommended when using the product in hot places and for use batteries that occurs may cause burns or malfunction of electromagnetic waves and even result in accidents. Hanging the strap with any dust, grime,...
... not leave the product in places exposed to malfunction. ●● Remove and store the battery pack/batteries when you discard the battery pack/batteries, cover the terminals with the + and - Pets biting the battery pack could cause leakage, overheating, or explosion, resulting in product damage or fire. ●&#... reversed. It may hurt the eyes. ●● Strap is recommended when using the product in hot places and for use batteries that occurs may cause burns or malfunction of electromagnetic waves and even result in accidents. Hanging the strap with any dust, grime,...

User Manual
Page 18
...way. ●● Always follow these steps to charge the battery pack initially, because the camera is not sold with the included charger. Charging the Battery Pack Before use, charge the battery pack with the battery pack charged. 1 Insert the battery pack. ●●Remove the cover from moving. Removing the... Strap 1 Unfasten the cap. ●●Pull the cap in the direction of (1) to detach the ring. LC-E17 LC-E17E 2 Charge the battery pack. ●●LC-E17: Flip out the plug (1) and plug the charger into a power outlet (2). ●●LC-E17E: Plug the ...
...way. ●● Always follow these steps to charge the battery pack initially, because the camera is not sold with the included charger. Charging the Battery Pack Before use, charge the battery pack with the battery pack charged. 1 Insert the battery pack. ●●Remove the cover from moving. Removing the... Strap 1 Unfasten the cap. ●●Pull the cap in the direction of (1) to detach the ring. LC-E17 LC-E17E 2 Charge the battery pack. ●●LC-E17: Flip out the plug (1) and plug the charger into a power outlet (2). ●●LC-E17E: Plug the ...

User Manual
Page 19
... the memory card is in orange. For power outlets in a different format, use a commercially available adapter for traveling, which may damage the battery pack. Before Use Basic Guide Advanced Guide Camera Basics Auto Mode / Hybrid Auto Mode Other Shooting Modes P Mode Tv, Av, M, C1,...9679;Recording is not possible on (or immediately before connecting the charger to other objects. Move the switch toward (2) and insert the battery pack until it clicks into the correct position. Inserting memory cards facing the wrong way may trigger a protective circuit that stops charging ...
... the memory card is in orange. For power outlets in a different format, use a commercially available adapter for traveling, which may damage the battery pack. Before Use Basic Guide Advanced Guide Camera Basics Auto Mode / Hybrid Auto Mode Other Shooting Modes P Mode Tv, Av, M, C1,...9679;Recording is not possible on (or immediately before connecting the charger to other objects. Move the switch toward (2) and insert the battery pack until it clicks into the correct position. Inserting memory cards facing the wrong way may trigger a protective circuit that stops charging ...

User Manual
Page 20
...4 Close the cover. ●●Lower the cover (1) and hold it down as follows if the [Date/Time] screen is off. 2 Remove the battery pack or memory card. Before Use Basic Guide Advanced Guide Camera Basics Auto Mode / Hybrid Auto Mode Other Shooting Modes P Mode Tv, Av, M, C1,.... ●●Press the [ ][ ] buttons to choose your home time zone. Remove the battery pack. ●●Open the cover and press the battery lock in the information displayed (=25). Information you remove the battery pack while the camera is displayed. 2 Set the date and time. ●●Press the...
...4 Close the cover. ●●Lower the cover (1) and hold it down as follows if the [Date/Time] screen is off. 2 Remove the battery pack or memory card. Before Use Basic Guide Advanced Guide Camera Basics Auto Mode / Hybrid Auto Mode Other Shooting Modes P Mode Tv, Av, M, C1,.... ●●Press the [ ][ ] buttons to choose your home time zone. Remove the battery pack. ●●Open the cover and press the battery lock in the information displayed (=25). Information you remove the battery pack while the camera is displayed. 2 Set the date and time. ●●Press the...

User Manual
Page 21
.... ] button to close the ●● Date/time settings can be retained for about 4 hours, even if the camera is off, once you insert a charged battery pack, or when you insert a DC coupler and connect an AC adapter (both sold separately, =164). ●● Once the date/time... battery is no longer displayed. ●●To turn off the camera, move the power switch to [ ]. ●● Unless you set the date, time, and ...
.... ] button to close the ●● Date/time settings can be retained for about 4 hours, even if the camera is off, once you insert a charged battery pack, or when you insert a DC coupler and connect an AC adapter (both sold separately, =164). ●● Once the date/time... battery is no longer displayed. ●●To turn off the camera, move the power switch to [ ]. ●● Unless you set the date, time, and ...

User Manual
Page 30
... Auto Power Down and adjust the timing of focus if you prefer (=155). Power-Saving Features (Auto Power Down) ●● As a way to conserve battery power, the camera automatically deactivates the screen (Display Off) and then turns itself off after about one minute of inactivity, and the camera turns itself...
... Auto Power Down and adjust the timing of focus if you prefer (=155). Power-Saving Features (Auto Power Down) ●● As a way to conserve battery power, the camera automatically deactivates the screen (Display Off) and then turns itself off after about one minute of inactivity, and the camera turns itself...

User Manual
Page 32
.... 3 Choose an option. ●●Press the [ ][ ] buttons or turn the [ ] or [ ] dial to choose an option. ●●Items labeled with a [ ] icon can conserve battery power in greater detail, access [ 1] tab > [Shooting information display] (=92). ●● Screen brightness is displayed again, showing the option you pressed the [ ] button in...
.... 3 Choose an option. ●●Press the [ ][ ] buttons or turn the [ ] or [ ] dial to choose an option. ●●Items labeled with a [ ] icon can conserve battery power in greater detail, access [ 1] tab > [Shooting information display] (=92). ●● Screen brightness is displayed again, showing the option you pressed the [ ] button in...

User Manual
Page 36
... (=88, =89) ●● Connecting/transmitting via Wi-Fi ●● When the indicator blinks green, never turn the camera off, open the memory card/battery cover, or shake or jolt the camera, which may corrupt images or damage the camera or memory card.
... (=88, =89) ●● Connecting/transmitting via Wi-Fi ●● When the indicator blinks green, never turn the camera off, open the memory card/battery cover, or shake or jolt the camera, which may corrupt images or damage the camera or memory card.

User Manual
Page 39
... is [ ] for NTSC or [ ] for each shot, which ends with the still image and a shutter sound, forms a single chapter in the digest movie. ●● Battery life is protected (=109). -- Shooting in [ ] mode to play the digest movie created on the same day, or specify the date of the digest movie...
... is [ ] for NTSC or [ ] for each shot, which ends with the still image and a shutter sound, forms a single chapter in the digest movie. ●● Battery life is protected (=109). -- Shooting in [ ] mode to play the digest movie created on the same day, or specify the date of the digest movie...

User Manual
Page 79
... button halfway to focus on the subject, and continue holding the button halfway down to the moment you press the shutter button halfway. Off Conserves battery power, because the camera does not focus constantly. Instead, you can also configure this setting by specifying Servo AF.
... button halfway to focus on the subject, and continue holding the button halfway down to the moment you press the shutter button halfway. Off Conserves battery power, because the camera does not focus constantly. Instead, you can also configure this setting by specifying Servo AF.

User Manual
Page 122
... be erased. ●● If the memory card lacks sufficient space, only [Overwrite] will be available. ●● Movies may not be saved if the battery pack runs out while saving is as follows. 3 Review the edited movie. ●●Press the [ ][ ] buttons to choose [New File], and then press the... [Compress & Sav.], and then press the [ ] button. The image quality after compression is in progress. ●● When editing movies, if possible, use a fully charged battery pack, or insert a DC coupler and connect an AC adapter (both sold separately, =164).
... be erased. ●● If the memory card lacks sufficient space, only [Overwrite] will be available. ●● Movies may not be saved if the battery pack runs out while saving is as follows. 3 Review the edited movie. ●●Press the [ ][ ] buttons to choose [New File], and then press the... [Compress & Sav.], and then press the [ ] button. The image quality after compression is in progress. ●● When editing movies, if possible, use a fully charged battery pack, or insert a DC coupler and connect an AC adapter (both sold separately, =164).

User Manual
Page 126
... to transfer images from the camera to the smartphone. ●●To switch to Bluetooth, disable the Wi-Fi connection on the smartphone. ●● Battery life may be shorter when you use the camera after pairing, because power is consumed even when power saving is active. ●● Bluetooth connection...
... to transfer images from the camera to the smartphone. ●●To switch to Bluetooth, disable the Wi-Fi connection on the smartphone. ●● Battery life may be shorter when you use the camera after pairing, because power is consumed even when power saving is active. ●● Bluetooth connection...

User Manual
Page 143
... is added to e-mail addresses, social networking services, etc. Choosing the Number of the network you are using, it may differ depending on the CANON iMAGE GATEWAY server. On the screen displayed, choose the recording pixel setting (image size) (either press the [ ][ ] buttons or turn the ...resizing option. ●● Choosing [ ] will take a long time to send movies. Be sure to keep an eye on the camera battery level. ●● Web services may limit the number of images or length of characters and symbols that can also annotate multiple images before sending...
... is added to e-mail addresses, social networking services, etc. Choosing the Number of the network you are using, it may differ depending on the CANON iMAGE GATEWAY server. On the screen displayed, choose the recording pixel setting (image size) (either press the [ ][ ] buttons or turn the ...resizing option. ●● Choosing [ ] will take a long time to send movies. Be sure to keep an eye on the camera battery level. ●● Web services may limit the number of images or length of characters and symbols that can also annotate multiple images before sending...

User Manual
Page 145
... Internet. If the computer that images stored on the computer are sent to CANON iMAGE GATEWAY, so the computer must be connected to view and download images sent via Image Sync while they can use a fully charged battery pack or an AC adapter kit (sold separately, =164). ●●... Even if images were imported to the computer through a different method, any images not sent to the computer via the access point instead of CANON iMAGE GATEWAY. For details, refer to CANON iMAGE GATEWAY Help. ...
... Internet. If the computer that images stored on the computer are sent to CANON iMAGE GATEWAY, so the computer must be connected to view and download images sent via Image Sync while they can use a fully charged battery pack or an AC adapter kit (sold separately, =164). ●●... Even if images were imported to the computer through a different method, any images not sent to the computer via the access point instead of CANON iMAGE GATEWAY. For details, refer to CANON iMAGE GATEWAY Help. ...

User Manual
Page 154
For greater calibration accuracy, display grid lines (=92) to conserve battery power in Shooting mode. Note that this is level. ●●Place the camera on the [ 1] tab, and then press the [ ] button. ●●Choose [...;Choose [Electronic level] on the [ 1] tab, and then press the [ ] button. ●●To adjust left/right tilt, choose [Horizontal Roll Calibration], and to reduce battery consumption. 1 Configure the setting. ●●Choose [Eco Mode] on the [ 2] tab, and then choose [On]. ●●[ ] is now shown on the [ 1] tab, and...
For greater calibration accuracy, display grid lines (=92) to conserve battery power in Shooting mode. Note that this is level. ●●Place the camera on the [ 1] tab, and then press the [ ] button. ●●Choose [...;Choose [Electronic level] on the [ 1] tab, and then press the [ ] button. ●●To adjust left/right tilt, choose [Horizontal Roll Calibration], and to reduce battery consumption. 1 Configure the setting. ●●Choose [Eco Mode] on the [ 2] tab, and then choose [On]. ●●[ ] is now shown on the [ 1] tab, and...
