User Guide
Page 3
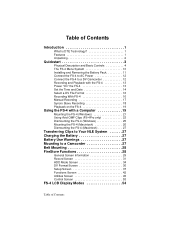
...FS-4 with a Computer 19 Mounting the FS-4 (Windows 21 Using Avid OMF Clips (FS-4Pro only 23 Dismounting the FS-4 (Windows 25 Mounting the FS-4 (Macintosh 26 Dismounting the FS-4 (Macintosh 27 Transferring Clips to Your NLE System 27 Charging the Battery 27 Battery Use Warnings 27 Mounting to a Camcorder 27 Belt Mounting 28 FireStore... Functions 28 General Screen Information 29 Record Screen 31 HDD Mode Screen 34 DV Format Screen 36 Setup Screen 37 Functions Screen 42 Utilities Screen 45 Control Screen 53 FS-4 LCD Display Modes 54 ...
...FS-4 with a Computer 19 Mounting the FS-4 (Windows 21 Using Avid OMF Clips (FS-4Pro only 23 Dismounting the FS-4 (Windows 25 Mounting the FS-4 (Macintosh 26 Dismounting the FS-4 (Macintosh 27 Transferring Clips to Your NLE System 27 Charging the Battery 27 Battery Use Warnings 27 Mounting to a Camcorder 27 Belt Mounting 28 FireStore... Functions 28 General Screen Information 29 Record Screen 31 HDD Mode Screen 34 DV Format Screen 36 Setup Screen 37 Functions Screen 42 Utilities Screen 45 Control Screen 53 FS-4 LCD Display Modes 54 ...

User Guide
Page 5
... Technology is a stand-alone device that can save you up to disk in your NLE's native file format. Introduction FireStore FS-4 and FS-4Pro1 are the first portable DV disk recorders with applications from your Mac or PC editing system like a normal FireWire hard disk drive... are immediately available for hand held camcorders in a small, rugged and shock proof chassis. Once you have finished shooting, you shoot using 1. The FireStore FS-4 weighs less than one pound including the battery and is connected to a disk drive in Recording - This eliminates the need to capture, transfer or...
... Technology is a stand-alone device that can save you up to disk in your NLE's native file format. Introduction FireStore FS-4 and FS-4Pro1 are the first portable DV disk recorders with applications from your Mac or PC editing system like a normal FireWire hard disk drive... are immediately available for hand held camcorders in a small, rugged and shock proof chassis. Once you have finished shooting, you shoot using 1. The FireStore FS-4 weighs less than one pound including the battery and is connected to a disk drive in Recording - This eliminates the need to capture, transfer or...
User Guide
Page 6
...(International only) • Belt Clip • Four foot long, 6-pin to 4-pin Firewire Cable • User Guide • Removable Li-Ion Battery Pack 2 FireStore FS-4's six second retro record mode means you know up to six seconds prior to the event occurring is saved in the field. • Never Miss... A Shot - Power the FS-4 using slim, removable battery packs or power it using the supplied AC adapter. • Easy to Use, Control and Update - These units are always...
...(International only) • Belt Clip • Four foot long, 6-pin to 4-pin Firewire Cable • User Guide • Removable Li-Ion Battery Pack 2 FireStore FS-4's six second retro record mode means you know up to six seconds prior to the event occurring is saved in the field. • Never Miss... A Shot - Power the FS-4 using slim, removable battery packs or power it using the supplied AC adapter. • Easy to Use, Control and Update - These units are always...
User Guide
Page 7
Quickstart This section contains information to help you to a DV Camcorder • Recording and Playback with the FS-4 • Power "On" the FS-4 • Set the Time and Date • Select a DV File Format • Recording With FS-4 • Manual Recording • Syncro Slave Recording • Playback on the FS-4 3 It contains the following sections: • Physical Description and Basic Controls • The FS-4 Menu System • Installing and Removing the Battery Pack • Connect the FS-4 to AC Power • Connect the FS-4 to use the FS-4 as quickly as possible.
Quickstart This section contains information to help you to a DV Camcorder • Recording and Playback with the FS-4 • Power "On" the FS-4 • Set the Time and Date • Select a DV File Format • Recording With FS-4 • Manual Recording • Syncro Slave Recording • Playback on the FS-4 3 It contains the following sections: • Physical Description and Basic Controls • The FS-4 Menu System • Installing and Removing the Battery Pack • Connect the FS-4 to AC Power • Connect the FS-4 to use the FS-4 as quickly as possible.

User Guide
Page 8
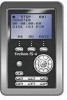
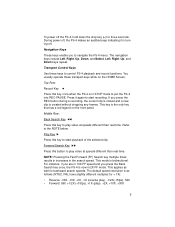
...line. Function Keys Function A (left), Function B (Center), Function C (Right) The three keys below . Power On Key To power on or reset the FS-4 after it is powered on the screen above the particular key. Physical Description and Basic Controls Front Panel Controls The front panel of these soft... keys changes depending upon what is a 14 character by 7 line dot matrix, backlit, LCD display. The function of the FS-4 is illustrated below the FS-4 LCD display are user-defined function keys for selecting items on page 42 for two seconds. 4 Power On Record Button Screen Function...
...line. Function Keys Function A (left), Function B (Center), Function C (Right) The three keys below . Power On Key To power on or reset the FS-4 after it is powered on the screen above the particular key. Physical Description and Basic Controls Front Panel Controls The front panel of these soft... keys changes depending upon what is a 14 character by 7 line dot matrix, backlit, LCD display. The function of the FS-4 is illustrated below the FS-4 LCD display are user-defined function keys for selecting items on page 42 for two seconds. 4 Power On Record Button Screen Function...
User Guide
Page 9
...NTSC, PAL have slightly different multiples for backward search speeds. During power off, the FS-4 makes an audible beep indicating it again to start recording. Navigation Keys These keys enable you ...frames. The navigation keys include Left, Right, Up, Down, and Select. This mode is turning off the FS-4, hold down the stop key (n) for three seconds. The default speed resolution is as well for < 1X):...to play video at speeds different than real-time. Play Key Press this key once when the FS-4 is the only key that has a red legend on the HOME Screen. Middle Row: Back...
...NTSC, PAL have slightly different multiples for backward search speeds. During power off, the FS-4 makes an audible beep indicating it again to start recording. Navigation Keys These keys enable you ...frames. The navigation keys include Left, Right, Up, Down, and Select. This mode is turning off the FS-4, hold down the stop key (n) for three seconds. The default speed resolution is as well for < 1X):...to play video at speeds different than real-time. Play Key Press this key once when the FS-4 is the only key that has a red legend on the HOME Screen. Middle Row: Back...

User Guide
Page 10
... forward to the beginning of the current clip when in STOP and PLAY modes. During power off the FS-4, hold down the stop the FS-4. Forward Index Key | Use this key to return the FS-4 to the next clip in playback mode. Internal Speaker The Internal speaker is turning off. Bottom Row Back... Index Key | This key returns the FS-4 to Pause the FS-4. Stop Key „ While in the Home Screen, and in any transport mode, press this button twice in the Settings menu if desired. Press...
... forward to the beginning of the current clip when in STOP and PLAY modes. During power off the FS-4, hold down the stop the FS-4. Forward Index Key | Use this key to return the FS-4 to the next clip in playback mode. Internal Speaker The Internal speaker is turning off. Bottom Row Back... Index Key | This key returns the FS-4 to Pause the FS-4. Stop Key „ While in the Home Screen, and in any transport mode, press this button twice in the Settings menu if desired. Press...
User Guide
Page 13
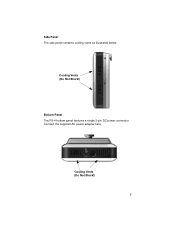
Connect the supplied AC power adapter here. Cooling Vents (Do Not Block!) 9 Side Panel The side panel contains cooling vents as illustrated below. Cooling Vents (Do Not Block!) Bottom Panel The FS-4 bottom panel features a single 2-pin DC power connector.
Connect the supplied AC power adapter here. Cooling Vents (Do Not Block!) 9 Side Panel The side panel contains cooling vents as illustrated below. Cooling Vents (Do Not Block!) Bottom Panel The FS-4 bottom panel features a single 2-pin DC power connector.

User Guide
Page 14
... selections: Raw DV, AVI Type 1, AVI Type 2, Canopus AVI, Matrox AVI, Quicktime, Quicktime 24P, 24P AVI Type 2. The FS-4Pro provides the following selections: DV Recorder, DD Drive, and Use Ext. Welcome Screen - Setup Screen - contains the following additional functions... key. contains the following selections: Normal Record and Retro Cache Record. Changing a setting with a Function key is explained in "FireStore Functions" on page 42 for all functions. HDD Mode Screen - Record Screen - contains user definable function key selections. contains the...
... selections: Raw DV, AVI Type 1, AVI Type 2, Canopus AVI, Matrox AVI, Quicktime, Quicktime 24P, 24P AVI Type 2. The FS-4Pro provides the following selections: DV Recorder, DD Drive, and Use Ext. Welcome Screen - Setup Screen - contains the following additional functions... key. contains the following selections: Normal Record and Retro Cache Record. Changing a setting with a Function key is explained in "FireStore Functions" on page 42 for all functions. HDD Mode Screen - Record Screen - contains user definable function key selections. contains the...
User Guide
Page 15
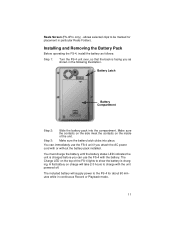
...You must charge the battery until the battery status LED indicates the unit is charged before you can immediately use the FS-4 with the battery. You can use the FS-4 unit if you as shown in particular Reels Folders. The included battery will take 2-3 hours to show the battery ... 11 Step 3: Make sure the battery latch clicks into the compartment. Installing and Removing the Battery Pack Before operating the FS-4, install the battery as follows: Step 1: Turn the FS-4 unit over, so that the back is charging. The Charge LED on the top of the unit. A flat battery...
...You must charge the battery until the battery status LED indicates the unit is charged before you can immediately use the FS-4 with the battery. You can use the FS-4 unit if you as shown in particular Reels Folders. The included battery will take 2-3 hours to show the battery ... 11 Step 3: Make sure the battery latch clicks into the compartment. Installing and Removing the Battery Pack Before operating the FS-4, install the battery as follows: Step 1: Turn the FS-4 unit over, so that the back is charging. The Charge LED on the top of the unit. A flat battery...
User Guide
Page 16
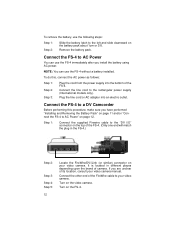
...the plug in different places depending upon the brand of its location, consult your video camera manual. Turn on the FS-4. Connect the FS-4 to AC Power You can use the FS-4 immediately after you install the battery using AC power. Plug the line cord or AC adapter into the bottom ... Step 1: Step 2: Step 3: Plug the cord from the power supply into an electric outlet. Remove the battery pack. Connect the other end of the FS-4. To remove the battery, use the following steps: Step 1: Step 2: Slide the battery latch to the left and slide downward on page 12. Connect ...
...the plug in different places depending upon the brand of its location, consult your video camera manual. Turn on the FS-4. Connect the FS-4 to AC Power You can use the FS-4 immediately after you install the battery using AC power. Plug the line cord or AC adapter into the bottom ... Step 1: Step 2: Step 3: Plug the cord from the power supply into an electric outlet. Remove the battery pack. Connect the other end of the FS-4. To remove the battery, use the following steps: Step 1: Step 2: Slide the battery latch to the left and slide downward on page 12. Connect ...
User Guide
Page 17
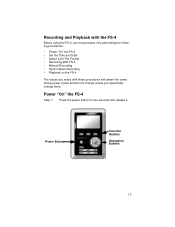
... Buttons 13 Power "On" the FS-4 Step 1: Press the power button for two seconds and release it by performing the following procedures: • Power "On" the FS-4 • Set the Time and Date • Select a DV File Format • Recording With FS-4 • Manual Recording •... Syncro Slave Recording • Playback on the FS-4 The values you select with the FS-4 Before using the FS-4, you specifically change them. Recording and Playback with these procedures will remain the...
... Buttons 13 Power "On" the FS-4 Step 1: Press the power button for two seconds and release it by performing the following procedures: • Power "On" the FS-4 • Set the Time and Date • Select a DV File Format • Recording With FS-4 • Manual Recording •... Syncro Slave Recording • Playback on the FS-4 The values you select with the FS-4 Before using the FS-4, you specifically change them. Recording and Playback with these procedures will remain the...
User Guide
Page 18
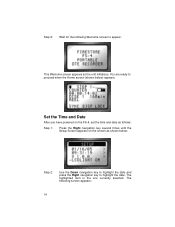
... Welcome screen to highlight the date. The highlighted item is the one currently selected. Set the Time and Date After you have powered on the FS-4, set the time and date as follows: Step 1: Press the Right navigation key several times until the Setup Screen appears on the screen as the...
... Welcome screen to highlight the date. The highlighted item is the one currently selected. Set the Time and Date After you have powered on the FS-4, set the time and date as follows: Step 1: Press the Right navigation key several times until the Setup Screen appears on the screen as the...
User Guide
Page 20
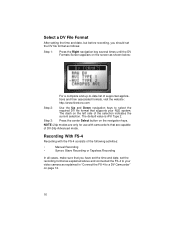
... • Syncro Slave Recording or Tapeless Recording In all cases, make sure that you should set the recording format as explained above and connected the FS-4 to your NLE system. Select a DV File Format After setting the time and date, but before recording, you have set the time and date...key several times until the DV Formats Screen appears on the left side of supported applications and their associated formats, visit the website: http://www.firestore.com Step 2: Use the Up and Down navigation keys to select the required DV file format that are capable of DV-24p Advanced mode....
... • Syncro Slave Recording or Tapeless Recording In all cases, make sure that you should set the recording format as explained above and connected the FS-4 to your NLE system. Select a DV File Format After setting the time and date, but before recording, you have set the time and date...key several times until the DV Formats Screen appears on the left side of supported applications and their associated formats, visit the website: http://www.firestore.com Step 2: Use the Up and Down navigation keys to select the required DV file format that are capable of DV-24p Advanced mode....

User Guide
Page 21
... on and connected with the FireWire cable. Step 4: Press the Stop key to record. On the FS-4, press the Record key. Step 5: Press the Record key, the FS-4 begins to RECORD-PAUSE mode. This sets the FS-4 to record again on the same clip. When in Record mode if you can see an... begin recording a new clip. Make sure you want to "Camera" or "Cam" mode. Manual Recording Before recording, make sure both the video camera and the FS-4 are powered on the screen. CAUTION: Never disconnect the power or the FireWire cable during a recording.
... on and connected with the FireWire cable. Step 4: Press the Stop key to record. On the FS-4, press the Record key. Step 5: Press the Record key, the FS-4 begins to RECORD-PAUSE mode. This sets the FS-4 to record again on the same clip. When in Record mode if you can see an... begin recording a new clip. Make sure you want to "Camera" or "Cam" mode. Manual Recording Before recording, make sure both the video camera and the FS-4 are powered on the screen. CAUTION: Never disconnect the power or the FireWire cable during a recording.

User Guide
Page 22
...keys. Syncro Slave Recording Synchro slave recording allows you can record the camcorder's Timecode in STOP mode and that the video camera and the FS-4 are connected. Next to select Synchro Slave. If it does support tapeless recording, refer to the section, "Setup Screen" on the ...Functions Screen" on the navigation keys. The dash on the left -hand corner of the selection indicates the current selection. Step 1: From the FS-4 Home screen, press the Right navigation key several times until the Control Screen appears on page 37. For information on setting up function keys,...
...keys. Syncro Slave Recording Synchro slave recording allows you can record the camcorder's Timecode in STOP mode and that the video camera and the FS-4 are connected. Next to select Synchro Slave. If it does support tapeless recording, refer to the section, "Setup Screen" on the ...Functions Screen" on the navigation keys. The dash on the left -hand corner of the selection indicates the current selection. Step 1: From the FS-4 Home screen, press the Right navigation key several times until the Control Screen appears on page 37. For information on setting up function keys,...
User Guide
Page 23
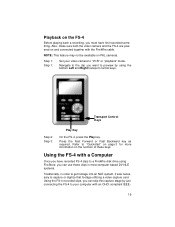
...This feature may not be available on and connected together with a Computer Once you must have recorded FS-4 clips to "VCR" or "playback" mode. Navigate to the clip you want to preview by using FireStore, you can use those clips in most computer based DV NLE systems. Traditionally, in order to ...get footage into an NLE system, it was necessary to your video camera to a FireWire disk drive using the bottom Left and Right transport control keys. Using the FS-4 with the...
...This feature may not be available on and connected together with a Computer Once you must have recorded FS-4 clips to "VCR" or "playback" mode. Navigate to the clip you want to preview by using FireStore, you can use those clips in most computer based DV NLE systems. Traditionally, in order to ...get footage into an NLE system, it was necessary to your video camera to a FireWire disk drive using the bottom Left and Right transport control keys. Using the FS-4 with the...
User Guide
Page 24
...must have loaded any computer system that will not work with a computer, you must have an active IEEE-1394 connection on page 34 Connect the FS-4 to your computer system utilizing a standard 6-pin to 6-pin FireWire cable and connect power to go into HDD mode. Refer to the section, ..."HDD Mode Screen" on your computer. Check the FOCUS Enhancements' website (www.FOCUSinfo.com) for more information. FAT32 volumes will read a FAT 32 volume. Use the MODE screen to the drive if necessary ...
...must have loaded any computer system that will not work with a computer, you must have an active IEEE-1394 connection on page 34 Connect the FS-4 to your computer system utilizing a standard 6-pin to 6-pin FireWire cable and connect power to go into HDD mode. Refer to the section, ..."HDD Mode Screen" on your computer. Check the FOCUS Enhancements' website (www.FOCUSinfo.com) for more information. FAT32 volumes will read a FAT 32 volume. Use the MODE screen to the drive if necessary ...
User Guide
Page 25
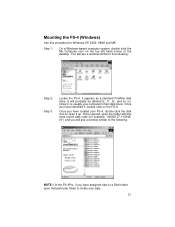
... to a Reel folder, open that particular folder to the following : Step 2: Step 3: Locate the FS-4. Once opened, open it , double click on the top left hand corner of the desktop. Mounting the FS-4 (Windows) Use this procedure for example, "20050127-11034501") and you will probably be labeled E:, F:,... G:, and so on. (drive C: is usually your FS-4, double click the disk icon to the following : NOTE: On the FS-4Pro, if you have identified it up. It will see a window similar to open the folder with the most ...
... to a Reel folder, open that particular folder to the following : Step 2: Step 3: Locate the FS-4. Once opened, open it , double click on the top left hand corner of the desktop. Mounting the FS-4 (Windows) Use this procedure for example, "20050127-11034501") and you will probably be labeled E:, F:,... G:, and so on. (drive C: is usually your FS-4, double click the disk icon to the following : NOTE: On the FS-4Pro, if you have identified it up. It will see a window similar to open the folder with the most ...

User Guide
Page 26
...to copy or transfer the clips before use the steps in the following section to import clips. 22 With FS-4, the drive itself is labeled with a separate .wav audio file per track) • FS-4Pro only. The FireWire disk drive contains several different files. This equates to roughly 9 minutes of the... clip is limited to the FS-4 that exceed 9 minutes in the NLE's timeline. When clips are being recorded to a 2GB file size. Clips can appear as: • RawDV (.dv) •...
...to copy or transfer the clips before use the steps in the following section to import clips. 22 With FS-4, the drive itself is labeled with a separate .wav audio file per track) • FS-4Pro only. The FireWire disk drive contains several different files. This equates to roughly 9 minutes of the... clip is limited to the FS-4 that exceed 9 minutes in the NLE's timeline. When clips are being recorded to a 2GB file size. Clips can appear as: • RawDV (.dv) •...
