
User Guide
Page 12
... that are Common to Each Function (Common Settings 6-6 Selecting the Initial Function at Power ON 6-6 Selecting the Default Display After Auto Clear 6-7 Setting Entry Tone, Error Tone, Job Done Tone 6-8 Setting Inch Input 6-9 Setting a Paper Drawer for Auto Paper Selection/ Auto Drawer Switching 6-10 Identifying the Type of Paper in a Paper...
... that are Common to Each Function (Common Settings 6-6 Selecting the Initial Function at Power ON 6-6 Selecting the Default Display After Auto Clear 6-7 Setting Entry Tone, Error Tone, Job Done Tone 6-8 Setting Inch Input 6-9 Setting a Paper Drawer for Auto Paper Selection/ Auto Drawer Switching 6-10 Identifying the Type of Paper in a Paper...
User Guide
Page 14
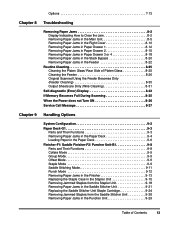
... Glass 8-25 Cleaning the Feeder 8-26 Original Scanned Using the Feeder Becomes Dirty (Feeder Cleaning 8-30 Output Sheets are Dirty (Wire Cleaning 8-31 Self-diagnostic (Error) Display 8-32 If Memory Becomes Full During Scanning 8-35 When the Power does not Turn ON 8-36 Service Call Message 8-37 Chapter 9 Handling Options System...
... Glass 8-25 Cleaning the Feeder 8-26 Original Scanned Using the Feeder Becomes Dirty (Feeder Cleaning 8-30 Output Sheets are Dirty (Wire Cleaning 8-31 Self-diagnostic (Error) Display 8-32 If Memory Becomes Full During Scanning 8-35 When the Power does not Turn ON 8-36 Service Call Message 8-37 Chapter 9 Handling Options System...
User Guide
Page 43
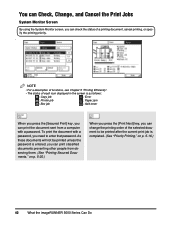
....) When you press the [Print Next] key, you can change the printing order of each icon displayed in the screen is as follows: : Copy job : Error : Printer job : Paper jam : Box job : Add toner When you press the [Secured Print] key, you can print the document sent from observing them. (See...
....) When you press the [Print Next] key, you can change the printing order of each icon displayed in the screen is as follows: : Copy job : Error : Printer job : Paper jam : Box job : Add toner When you press the [Secured Print] key, you can print the document sent from observing them. (See...

User Guide
Page 55
... Energy Saver ON / OFF Reset 1 Guide ?4 Additional Functions 7 Interrupt ID 23 56 89 Clear 0C Stop Start Processing /Data Error Power 11: Clip holder 19: Clear key 20: Main Power indicator 18: Error indicator 17: Processing/Data indicator 16: ID key 15: Interrupt key 14: Additional Functions key 13: Guide key 12...
... Energy Saver ON / OFF Reset 1 Guide ?4 Additional Functions 7 Interrupt ID 23 56 89 Clear 0C Stop Start Processing /Data Error Power 11: Clip holder 19: Clear key 20: Main Power indicator 18: Error indicator 17: Processing/Data indicator 16: ID key 15: Interrupt key 14: Additional Functions key 13: Guide key 12...

User Guide
Page 56
... priority copies. 16: ID key Press when setting the Department ID Management function. 17: Processing/Data indicator Flashes when this machine is performing operations. 18: Error indicator Flashes or lights when there is trouble in this machine. Counter Check key Display contrast dial COPY key MAIL BOX key SCAN key Numeric...
... priority copies. 16: ID key Press when setting the Department ID Management function. 17: Processing/Data indicator Flashes when this machine is performing operations. 18: Error indicator Flashes or lights when there is trouble in this machine. Counter Check key Display contrast dial COPY key MAIL BOX key SCAN key Numeric...
User Guide
Page 75
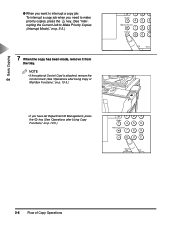
... Using Copy or Mail Box Functions," on p. 10-3.) 1 Guide ?4 Additional Functions 7 Interrupt ID 23 56 89 Clea 0C Processing /Data Error • If you need to make priority copies, press the Interrupt key. (See "Interrupting the Current Job to Make Priority Copies (Interrupt... Mode)," on p. 10-5.) 12 3 Guide ? 45 6 Additional Functions 78 9 Interrupt Clear ID 0 C Processing /Data Error 2-6 Flow of Copy Operations NOTE • If the optional Control Card is attached, remove the Control Card. (See "Operations after Using Copy Functions," on...
... Using Copy or Mail Box Functions," on p. 10-3.) 1 Guide ?4 Additional Functions 7 Interrupt ID 23 56 89 Clea 0C Processing /Data Error • If you need to make priority copies, press the Interrupt key. (See "Interrupting the Current Job to Make Priority Copies (Interrupt... Mode)," on p. 10-5.) 12 3 Guide ? 45 6 Additional Functions 78 9 Interrupt Clear ID 0 C Processing /Data Error 2-6 Flow of Copy Operations NOTE • If the optional Control Card is attached, remove the Control Card. (See "Operations after Using Copy Functions," on...
User Guide
Page 89
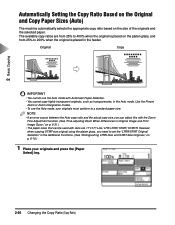
NOTE • If an error occurs between the Auto copy ratio and the actual copy size, you need to set the "LTRR/STMT Original Selection" in the feeder. Original Copy ...
NOTE • If an error occurs between the Auto copy ratio and the actual copy size, you need to set the "LTRR/STMT Original Selection" in the feeder. Original Copy ...
User Guide
Page 98
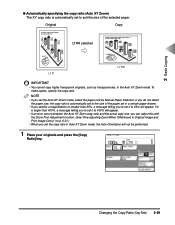
.... 2 Basic Copying ● Automatically specifying the copy ratio (Auto XY Zoom) The XY copy ratio is automatically set to 400% will appear. • If an error occurs between the Auto XY Zoom copy ratio and the actual copy size, you can adjust this with the Zoom Fine Adjustment function. (See "Fine...
.... 2 Basic Copying ● Automatically specifying the copy ratio (Auto XY Zoom) The XY copy ratio is automatically set to 400% will appear. • If an error occurs between the Auto XY Zoom copy ratio and the actual copy size, you can adjust this with the Zoom Fine Adjustment function. (See "Fine...
User Guide
Page 106
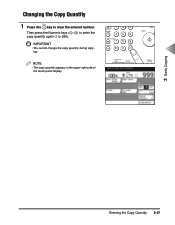
IMPORTANT • You cannot change the copy quantity during copy- NOTE • The copy quantity appears in the upper right side of the touch panel display. 1 Guide ?4 nal Functions 7 nterrupt ID 23 56 89 Clear 0C Start Stop Processing /Data Error Power 2 Basic Copying Entering the Copy Quantity 2-37 ing. Then press the Numeric keys ( 0 - 9 ) to enter the copy quantity again (1 to clear the entered number. Changing the Copy Quantity 1 Clear Press the C key to 999).
IMPORTANT • You cannot change the copy quantity during copy- NOTE • The copy quantity appears in the upper right side of the touch panel display. 1 Guide ?4 nal Functions 7 nterrupt ID 23 56 89 Clear 0C Start Stop Processing /Data Error Power 2 Basic Copying Entering the Copy Quantity 2-37 ing. Then press the Numeric keys ( 0 - 9 ) to enter the copy quantity again (1 to clear the entered number. Changing the Copy Quantity 1 Clear Press the C key to 999).
User Guide
Page 215
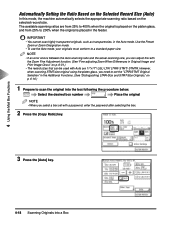
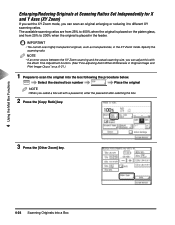
... the box. 2 Press the [Copy Ratio] key. 3 Press the [Auto] key. 4-18 Scanning Originals into the box following the procedure below. NOTE • If an error occurs between the Auto scanning ratio and the actual scanning size, you need to a standard paper size. IMPORTANT • You cannot scan highly transparent originals...
... the box. 2 Press the [Copy Ratio] key. 3 Press the [Auto] key. 4-18 Scanning Originals into the box following the procedure below. NOTE • If an error occurs between the Auto scanning ratio and the actual scanning size, you need to a standard paper size. IMPORTANT • You cannot scan highly transparent originals...
User Guide
Page 221
...] key. 3 Press the [Other Zoom] key. 4 Using the Mail Box Functions 4-24 Scanning Originals into the box following the procedure below. NOTE • If an error occurs between the XY Zoom scanning and the actual scanning size, you can scan an original enlarging or reducing it to different XY scanning ratios...
...] key. 3 Press the [Other Zoom] key. 4 Using the Mail Box Functions 4-24 Scanning Originals into the box following the procedure below. NOTE • If an error occurs between the XY Zoom scanning and the actual scanning size, you can scan an original enlarging or reducing it to different XY scanning ratios...
User Guide
Page 291
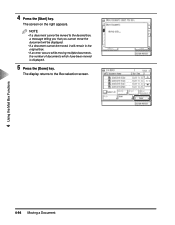
NOTE • If a document cannot be moved to the Box selection screen. 4-94 Moving a Document The screen on the right appears. The display returns to the desired box, a message telling you that you cannot move the document will be displayed. • If a document cannot be moved, it will remain in the original box. • If an error occurs while moving multiple documents, the number of documents which have been moved is displayed. 5 Press the [Done] key. 4 Using the Mail Box Functions 4 Press the [Start] key.
NOTE • If a document cannot be moved to the Box selection screen. 4-94 Moving a Document The screen on the right appears. The display returns to the desired box, a message telling you that you cannot move the document will be displayed. • If a document cannot be moved, it will remain in the original box. • If an error occurs while moving multiple documents, the number of documents which have been moved is displayed. 5 Press the [Done] key. 4 Using the Mail Box Functions 4 Press the [Start] key.
User Guide
Page 296
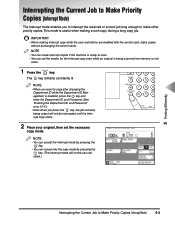
... being output will not be interrupted until the interrupt copy starts. 1 Guide ?4 Additional Functions 7 Interrupt ID 23 56 89 Clea 0C Interrupt Mode Processing /Data Error 2 Place your original, then set the necessary copy mode. The Interrupt key remains constantly lit. NOTE • When you want to make copies without exchanging...
... being output will not be interrupted until the interrupt copy starts. 1 Guide ?4 Additional Functions 7 Interrupt ID 23 56 89 Clea 0C Interrupt Mode Processing /Data Error 2 Place your original, then set the necessary copy mode. The Interrupt key remains constantly lit. NOTE • When you want to make copies without exchanging...
User Guide
Page 307
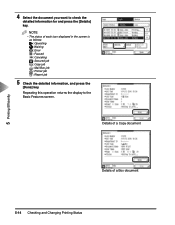
5 Printing Efficiently 4 Select the document you want to the Basic Features screen. NOTE • The status of a Box document 5-14 Checking and Changing Printing Status Details of a Copy document Details of each icon displayed in the screen is as follows: : Operating : Waiting : Error : Paused : Canceling : Secured job : Copy job : Mail Box job : Printer job : Report job 5 Check the detailed information, and press the [Done] key. Repeating this operation returns the display to check the detailed information for and press the [Details] key.
5 Printing Efficiently 4 Select the document you want to the Basic Features screen. NOTE • The status of a Box document 5-14 Checking and Changing Printing Status Details of a Copy document Details of each icon displayed in the screen is as follows: : Operating : Waiting : Error : Paused : Canceling : Secured job : Copy job : Mail Box job : Printer job : Report job 5 Check the detailed information, and press the [Done] key. Repeating this operation returns the display to check the detailed information for and press the [Details] key.
User Guide
Page 311
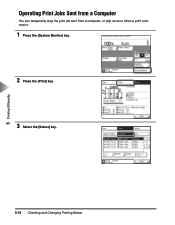
5 Printing Efficiently Operating Print Jobs Sent from a Computer You can temporarily stop the print job sent from a computer, or skip an error when a print error occurs. 1 Press the [System Monitor] key. 2 Press the [Print] key. 3 Select the [Status] key. 5-18 Checking and Changing Printing Status
5 Printing Efficiently Operating Print Jobs Sent from a Computer You can temporarily stop the print job sent from a computer, or skip an error when a print error occurs. 1 Press the [System Monitor] key. 2 Press the [Print] key. 3 Select the [Status] key. 5-18 Checking and Changing Printing Status
User Guide
Page 312
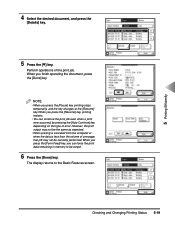
When you can continue the print job even when a print error occurred, by pressing the [Auto Continue] key, depending on the type of the print job. However, the print output may not be the same as ... Status 5-19 The display returns to the [Resume] key. NOTE • When you finish operating the document, press the [Done] key. Perform operations of error. 5 Printing Efficiently 4 Select the desired document, and press the [Details] key. 5 Press the [▼] key.
When you can continue the print job even when a print error occurred, by pressing the [Auto Continue] key, depending on the type of the print job. However, the print output may not be the same as ... Status 5-19 The display returns to the [Resume] key. NOTE • When you finish operating the document, press the [Done] key. Perform operations of error. 5 Printing Efficiently 4 Select the desired document, and press the [Details] key. 5 Press the [▼] key.
User Guide
Page 322
... that are Common to Each Function (Common Settings 6-6 Selecting the Initial Function at Power ON 6-6 Selecting the Default Display After Auto Clear 6-7 Setting Entry Tone, Error Tone, Job Done Tone 6-8 Setting Inch Input 6-9 Setting a Paper Drawer for Auto Paper Selection/ Auto Drawer Switching 6-10 Identifying the Type of Paper in a Paper...
... that are Common to Each Function (Common Settings 6-6 Selecting the Initial Function at Power ON 6-6 Selecting the Default Display After Auto Clear 6-7 Setting Entry Tone, Error Tone, Job Done Tone 6-8 Setting Inch Input 6-9 Setting a Paper Drawer for Auto Paper Selection/ Auto Drawer Switching 6-10 Identifying the Type of Paper in a Paper...
User Guide
Page 324
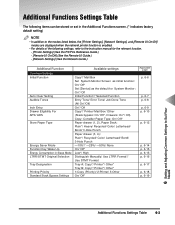
... Set System Monitor Screen as initial function: On/ Off* Set [Device] as the default for System Monitor : On*/ Off Initial Function*/ Selected Function Entry Tone/ Error Tone/ Job Done Tone (All On*/Off) On*/ Off Copy*/ Printer/ Mail Box/ Other (Stack bypass: On/ Off*, Drawers: On*/ Off) Copy: Consider Paper Type...
... Set System Monitor Screen as initial function: On/ Off* Set [Device] as the default for System Monitor : On*/ Off Initial Function*/ Selected Function Entry Tone/ Error Tone/ Job Done Tone (All On*/Off) On*/ Off Copy*/ Printer/ Mail Box/ Other (Stack bypass: On/ Off*, Drawers: On*/ Off) Copy: Consider Paper Type...
User Guide
Page 329
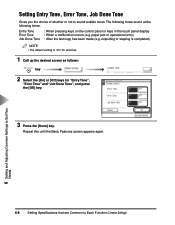
...all tones. 1 Call up the desired screen as follows: key Additional Functions Audible Tones 2 Select the [On] or [Off] keys for "Entry Tone", "Error Tone" and "Job Done Tone", and press the [OK] key. 3 Press the [Done] key. The following tones sound at the following times: Entry Tone... : When pressing keys on the control panel or keys in the touch panel display Error Tone : When a malfunction occurs (e.g. Repeat this until the Basic Features screen appears again. 6 Setting and Adjusting Common Settings to Suit Your Needs...
...all tones. 1 Call up the desired screen as follows: key Additional Functions Audible Tones 2 Select the [On] or [Off] keys for "Entry Tone", "Error Tone" and "Job Done Tone", and press the [OK] key. 3 Press the [Done] key. The following tones sound at the following times: Entry Tone... : When pressing keys on the control panel or keys in the touch panel display Error Tone : When a malfunction occurs (e.g. Repeat this until the Basic Features screen appears again. 6 Setting and Adjusting Common Settings to Suit Your Needs...
User Guide
Page 352
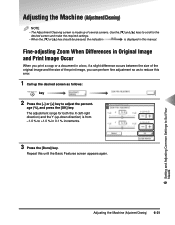
... a slight difference occurs between the size of the original image and the size of several screens. Zoom Fine Adjustment 3 Press the [Done] key. Repeat this error. 1 Call up the desired screen as follows: key Additional Functions Adjustment/ Cleaning 2 Press the [-] or [+] key to adjust the percent- Adjusting the Machine (Adjustment/Cleaning...
... a slight difference occurs between the size of the original image and the size of several screens. Zoom Fine Adjustment 3 Press the [Done] key. Repeat this error. 1 Call up the desired screen as follows: key Additional Functions Adjustment/ Cleaning 2 Press the [-] or [+] key to adjust the percent- Adjusting the Machine (Adjustment/Cleaning...


