User Guide
Page 15
... 9-34 Parts and Their Functions 9-34 Removing Paper Jams in the Copy Tray-C3 9-35 Chapter 10 Operation When User Restrictions are Enabled and How to Enter Alphabet Characters Operation When User Restrictions Are Enabled 10-2 Inserting the ...-7 Setting in Inches 10-8 Chapter 11 Appendix Specifications 11-2 Main Unit 11-2 Feeder 11-5 Paper Deck-G1 11-5 Finisher-F1/ Saddle Finisher-F2 11-6 Puncher Unit-B1 11-8 Copy Tray-C3 11-8 Card Reader-C1 11-8 Relation of Original Orientation and Paper Orientation 11-9 Chart of Available Combination of Functions 11...
... 9-34 Parts and Their Functions 9-34 Removing Paper Jams in the Copy Tray-C3 9-35 Chapter 10 Operation When User Restrictions are Enabled and How to Enter Alphabet Characters Operation When User Restrictions Are Enabled 10-2 Inserting the ...-7 Setting in Inches 10-8 Chapter 11 Appendix Specifications 11-2 Main Unit 11-2 Feeder 11-5 Paper Deck-G1 11-5 Finisher-F1/ Saddle Finisher-F2 11-6 Puncher Unit-B1 11-8 Copy Tray-C3 11-8 Card Reader-C1 11-8 Relation of Original Orientation and Paper Orientation 11-9 Chart of Available Combination of Functions 11...
User Guide
Page 414
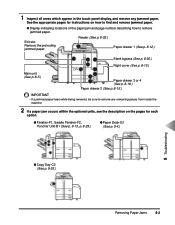
...drawer 2 (See p. 8-15.) IMPORTANT • If a jammed paper tears while being removed, be sure to remove any jammed paper. See the appropriate pages for instructions on the pages for each option. ● Finisher-F1, Saddle Finisher-F2, Puncher Unit-B1 (See p. 9-13, p. 9-29.) ● Paper Deck-G1... (See p. 9-4.) ● Copy Tray-C3 (See p. 9-35.) 8 Troubleshooting Removing Paper Jams 8-3 1 Inspect all areas which appear in the touch panel display, and remove any remaining ...
...drawer 2 (See p. 8-15.) IMPORTANT • If a jammed paper tears while being removed, be sure to remove any jammed paper. See the appropriate pages for instructions on the pages for each option. ● Finisher-F1, Saddle Finisher-F2, Puncher Unit-B1 (See p. 9-13, p. 9-29.) ● Paper Deck-G1... (See p. 9-4.) ● Copy Tray-C3 (See p. 9-35.) 8 Troubleshooting Removing Paper Jams 8-3 1 Inspect all areas which appear in the touch panel display, and remove any remaining ...
User Guide
Page 444
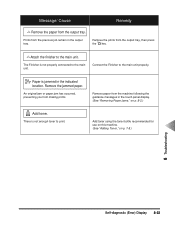
...unit properly. Attach the finisher to print. There is not enough toner to the main unit. Add toner using the toner bottle recommended for use on this machine. (See "Adding Toner," on p. 8-2.) Add toner. Remove the prints from the output tray. Connect the Finisher to the main unit.... Message/ Cause Remedy Remove the paper from the output tray, then press Start the key. Prints from making prints. An original jam or ...
...unit properly. Attach the finisher to print. There is not enough toner to the main unit. Add toner using the toner bottle recommended for use on this machine. (See "Adding Toner," on p. 8-2.) Add toner. Remove the prints from the output tray. Connect the Finisher to the main unit.... Message/ Cause Remedy Remove the paper from the output tray, then press Start the key. Prints from making prints. An original jam or ...
User Guide
Page 450
... if there is a paper jam in the Copy Tray-C3 9-35 9-1 System Configuration 9-2 Paper Deck-G1 9-3 Parts and Their Functions 9-3 Removing Paper Jams in the Paper Deck 9-4 Loading Paper in the Paper Deck 9-6 Finisher-F1/ Saddle Finisher-F2/ Puncher Unit-B1 9-8 Parts and Their Functions...Mode 9-9 Staple Mode 9-9 Saddle Stitching Mode 9-11 Punch Mode 9-12 Removing Paper Jams in the Finisher 9-13 Replacing the Staple Case in the Stapler Unit 9-15 Removing Jammed Staples from the Stapler Unit 9-18 Removing Paper Jams in the Saddle Stitcher Unit 9-21 Replacing the Saddle Stitcher ...
... if there is a paper jam in the Copy Tray-C3 9-35 9-1 System Configuration 9-2 Paper Deck-G1 9-3 Parts and Their Functions 9-3 Removing Paper Jams in the Paper Deck 9-4 Loading Paper in the Paper Deck 9-6 Finisher-F1/ Saddle Finisher-F2/ Puncher Unit-B1 9-8 Parts and Their Functions...Mode 9-9 Staple Mode 9-9 Saddle Stitching Mode 9-11 Punch Mode 9-12 Removing Paper Jams in the Finisher 9-13 Replacing the Staple Case in the Stapler Unit 9-15 Removing Jammed Staples from the Stapler Unit 9-18 Removing Paper Jams in the Saddle Stitcher Unit 9-21 Replacing the Saddle Stitcher ...
User Guide
Page 457
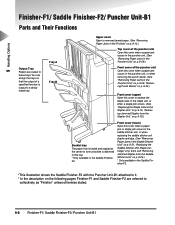
... Stapler Unit," on p. 9-15, "Removing Jammed Staples from the Stapler Unit," on the following pages Finisher-F1 and Saddle Finisher-F2 are output to these trays. 9 Handling Options Finisher-F1/ Saddle Finisher-F2/ Puncher Unit-B1 Parts and Their Functions Output Tray Papers are referred to collectively as "Finisher" unless otherwise stated. 9-8 Finisher-F1/ Saddle Finisher-F2/ Puncher Unit-B1
... Stapler Unit," on p. 9-15, "Removing Jammed Staples from the Stapler Unit," on the following pages Finisher-F1 and Saddle Finisher-F2 are output to these trays. 9 Handling Options Finisher-F1/ Saddle Finisher-F2/ Puncher Unit-B1 Parts and Their Functions Output Tray Papers are referred to collectively as "Finisher" unless otherwise stated. 9-8 Finisher-F1/ Saddle Finisher-F2/ Puncher Unit-B1
User Guide
Page 458
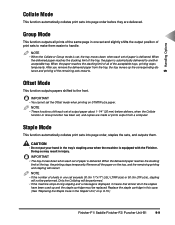
.../ Saddle Finisher-F2/ Puncher Unit-B1 9-9 IMPORTANT • You cannot set and slightly shifts the output position of output paper about 1-1/4" (30 mm) before they are made or prints output from the tray, the tray moves up and the staple cartridge must be performed. Remove all of the staples have... been used up the corresponding distance and printing of the tray, the paper is automatically delivered to the front. NOTE • ...
.../ Saddle Finisher-F2/ Puncher Unit-B1 9-9 IMPORTANT • You cannot set and slightly shifts the output position of output paper about 1-1/4" (30 mm) before they are made or prints output from the tray, the tray moves up and the staple cartridge must be performed. Remove all of the staples have... been used up the corresponding distance and printing of the tray, the paper is automatically delivered to the front. NOTE • ...

User Guide
Page 462
... it impossible to remove the toner stains. • When removing paper which has become jammed inside the machine, remove the jammed paper gently to prevent the toner on the paper from the output tray. IMPORTANT • When making prints with cold water. Finisher-F1/ Saddle Finisher-F2/ Puncher Unit...-B1 9-13 If toner enters your eyes or mouth, wash immediately with cold water and consult a physician. 1 Remove any paper protruding from scattering and ...
... it impossible to remove the toner stains. • When removing paper which has become jammed inside the machine, remove the jammed paper gently to prevent the toner on the paper from the output tray. IMPORTANT • When making prints with cold water. Finisher-F1/ Saddle Finisher-F2/ Puncher Unit...-B1 9-13 If toner enters your eyes or mouth, wash immediately with cold water and consult a physician. 1 Remove any paper protruding from scattering and ...
User Guide
Page 481
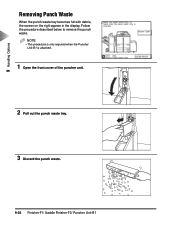
NOTE • This procedure is only required when the Puncher Unit-B1 is attached. 1 Open the front cover of the puncher unit. 2 Pull out the punch waste tray. 3 Discard the punch waste. 9-32 Finisher-F1/ Saddle Finisher-F2/ Puncher Unit-B1 Follow the procedure described below to remove the punch waste. 9 Handling Options Removing Punch Waste When the punch waste tray becomes full with debris, the screen on the right appear in the display.
NOTE • This procedure is only required when the Puncher Unit-B1 is attached. 1 Open the front cover of the puncher unit. 2 Pull out the punch waste tray. 3 Discard the punch waste. 9-32 Finisher-F1/ Saddle Finisher-F2/ Puncher Unit-B1 Follow the procedure described below to remove the punch waste. 9 Handling Options Removing Punch Waste When the punch waste tray becomes full with debris, the screen on the right appear in the display.

