/app/pdf/projector/lv5220-7220-7225_manual.pdf
Page 2
..., and 42.) ◆ PIN Code Lock Function The PIN code lock function prevents others except users from using the projector. (See page 20 and 47.) ◆ Digital Zoom (for Computer) The digital zoom function expands (to approx. 16 times of screen size) or compress the image size, allowing you to 13.1' (4m). ◆ Selectable Lamp Mode Brightness of the projection lamp can be selected in the Setting menu. (See page 45.) ◆...
..., and 42.) ◆ PIN Code Lock Function The PIN code lock function prevents others except users from using the projector. (See page 20 and 47.) ◆ Digital Zoom (for Computer) The digital zoom function expands (to approx. 16 times of screen size) or compress the image size, allowing you to 13.1' (4m). ◆ Selectable Lamp Mode Brightness of the projection lamp can be selected in the Setting menu. (See page 45.) ◆...
/app/pdf/projector/lv5220-7220-7225_manual.pdf
Page 3
...Input Source Selection (Component, RGB Scart 21-Pin) 36 Video System Selection 37 Image Level Selection 38 Image Level Adjustment 39 Screen Size Adjustment 41 Setting 42 Setting 42 Maintenance and Cleaning 49 Warning Indicator 49 Cleaning the Air Filters 50 Attaching the Lens Cover 50 Cleaning the Projection Lens 51 Cleaning the Projector Cabinet 51 Lamp Replacement 52 Lamp Replace Counter 53 Appendix 54 Troubleshooting 54 Menu Tree 56 Indicators and Projector Condition 58 Compatible Computer Specifications 59 Technical Specifications 60 Optional Parts...
...Input Source Selection (Component, RGB Scart 21-Pin) 36 Video System Selection 37 Image Level Selection 38 Image Level Adjustment 39 Screen Size Adjustment 41 Setting 42 Setting 42 Maintenance and Cleaning 49 Warning Indicator 49 Cleaning the Air Filters 50 Attaching the Lens Cover 50 Cleaning the Projection Lens 51 Cleaning the Projector Cabinet 51 Lamp Replacement 52 Lamp Replace Counter 53 Appendix 54 Troubleshooting 54 Menu Tree 56 Indicators and Projector Condition 58 Compatible Computer Specifications 59 Technical Specifications 60 Optional Parts...
/app/pdf/projector/lv5220-7220-7225_manual.pdf
Page 4
... USER-SERVICEABLE PARTS INSIDE EXCEPT LAMP REPLACEMENT. READ AND KEEP THIS OWNER'S MANUAL FOR LATER USE. CAUTION Not for an extended time, unplug the projector from the power outlet. If the problem still persists, contact the dealer where you to operate improperly, read this booklet. Do not stare directly into the lens as defined in the Standard for allowing air circulation and cooling the projector. If the projector...
... USER-SERVICEABLE PARTS INSIDE EXCEPT LAMP REPLACEMENT. READ AND KEEP THIS OWNER'S MANUAL FOR LATER USE. CAUTION Not for an extended time, unplug the projector from the power outlet. If the problem still persists, contact the dealer where you to operate improperly, read this booklet. Do not stare directly into the lens as defined in the Standard for allowing air circulation and cooling the projector. If the projector...
/app/pdf/projector/lv5220-7220-7225_manual.pdf
Page 10
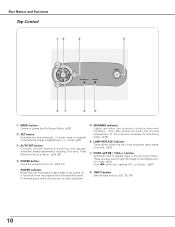
... Control qw e r MENU SET VO- This also blinks red when the internal temperature of the projector exceeds the operating range. (p49) y LAMP REPLACE indicator Turns yellow when the life of the projection lamp draws to pan the image in Digital zoom +/- These are used to be turned on or off. (p20, 21) t WARNING indicator Lights red when the projector detects abnormal condition. It remains green while the projector is also used as VOL +/- L VOL + AUTO SET LAMP REPLACE WARNING INPUT POWER iu y t q MENU button Opens or closes the On-Screen Menu...
... Control qw e r MENU SET VO- This also blinks red when the internal temperature of the projector exceeds the operating range. (p49) y LAMP REPLACE indicator Turns yellow when the life of the projection lamp draws to pan the image in Digital zoom +/- These are used to be turned on or off. (p20, 21) t WARNING indicator Lights red when the projector detects abnormal condition. It remains green while the projector is also used as VOL +/- L VOL + AUTO SET LAMP REPLACE WARNING INPUT POWER iu y t q MENU button Opens or closes the On-Screen Menu...
/app/pdf/projector/lv5220-7220-7225_manual.pdf
Page 11
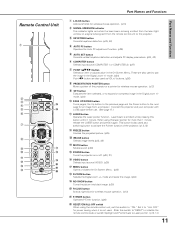
... the projected picture. (p25) !3 IMAGE button Selects image levels.(p32, 38) !4 MUTE button Mutes sound. (p26) !5 POWER button Turns the projector on or off. (p20, 21) !6 VIDEO button Selects input source (VIDEO). (p35) !7 MENU button Opens or closes the On-Screen Menu. (p22) !8 D.ZOOM button Selects the Digital zoom +/- Remote Control Unit q w e r !5 t !6 y u i o !7 !0 !8 !1 !2 !9 !3 @0 @1 !4 @2 Part Names and Functions q L-CLICK button Acts as left click for power saving when it is not used. Connect the projector and your computer with a USB cable before use...
... the projected picture. (p25) !3 IMAGE button Selects image levels.(p32, 38) !4 MUTE button Mutes sound. (p26) !5 POWER button Turns the projector on or off. (p20, 21) !6 VIDEO button Selects input source (VIDEO). (p35) !7 MENU button Opens or closes the On-Screen Menu. (p22) !8 D.ZOOM button Selects the Digital zoom +/- Remote Control Unit q w e r !5 t !6 y u i o !7 !0 !8 !1 !2 !9 !3 @0 @1 !4 @2 Part Names and Functions q L-CLICK button Acts as left click for power saving when it is not used. Connect the projector and your computer with a USB cable before use...
/app/pdf/projector/lv5220-7220-7225_manual.pdf
Page 14
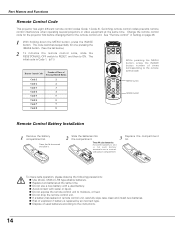
... batteries at the same time. MENU button IMAGE button Remote Control Battery Installation 1 Remove the battery compartment lid. Press the lid downward and slide it. 2 Slide the batteries into the compartment. 3 Replace the compartment lid. Switching remote control codes prevents remote control interference when operating several projectors or video equipment at the same time. ● Do not use a new battery with a used batteries according to the instructions. 14 The initial code is replaced by an incorrect...
... batteries at the same time. MENU button IMAGE button Remote Control Battery Installation 1 Remove the battery compartment lid. Press the lid downward and slide it. 2 Slide the batteries into the compartment. 3 Replace the compartment lid. Switching remote control codes prevents remote control interference when operating several projectors or video equipment at the same time. ● Do not use a new battery with a used batteries according to the instructions. 14 The initial code is replaced by an incorrect...

/app/pdf/projector/lv5220-7220-7225_manual.pdf
Page 20
... you can start to PIN code lock function in a moment and lights red. 3 Press the POWER button on the top control or on the screen. ✔Note: If the projector is PIN code? The number will change to operate the projector. Enter the correct number again. Enter the PIN code as instructed below. The POWER indicator turns green lighting and the cooling fans start to complete entering a four-digit number. The POWER indicator blinks red in Setting on the projector. 2 Connect the projector's AC power cord into...
... you can start to PIN code lock function in a moment and lights red. 3 Press the POWER button on the top control or on the screen. ✔Note: If the projector is PIN code? The number will change to operate the projector. Enter the correct number again. Enter the PIN code as instructed below. The POWER indicator turns green lighting and the cooling fans start to complete entering a four-digit number. The POWER indicator blinks red in Setting on the projector. 2 Connect the projector's AC power cord into...

/app/pdf/projector/lv5220-7220-7225_manual.pdf
Page 21
... hour in shortening the lamp life. Then you can turn off the projector. Basic Operation The message disappears after the POWER indicator lights red. • When the On start function.) • Do not operate the projector continuously without rest. OTHERWISE IT WILL RESULT IN SHORTENING LAMP LIFE. ✔Note: • The projector cannot be turned on again, the POWER indicator lights red. Turning Off the Projector 1 Press the POWER button on the top control or on the remote control...
... hour in shortening the lamp life. Then you can turn off the projector. Basic Operation The message disappears after the POWER indicator lights red. • When the On start function.) • Do not operate the projector continuously without rest. OTHERWISE IT WILL RESULT IN SHORTENING LAMP LIFE. ✔Note: • The projector cannot be turned on again, the POWER indicator lights red. Turning Off the Projector 1 Press the POWER button on the top control or on the remote control...
/app/pdf/projector/lv5220-7220-7225_manual.pdf
Page 23
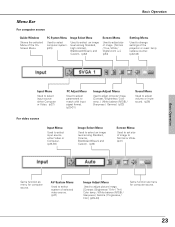
...(Green), and Custom. (p32) Screen Menu Used to adjust size of image. [Normal / True / Wide / Digital zoom +/-] (p34) Setting Menu Used to change settings of the projector or reset lamp replace counter. (p42-48) Basic Operation Input Menu Used to select input source either Computer or Video. (p27) PC Adjust Menu Used to adjust parameters to match with input signal format. (p29-31) Image Adjust Menu Used to adjust computer image. [Contrast / Brightness / Color temp. / White balance (R/G/B) / Sharpness / Gamma] (p33) Sound Menu Used to adjust volume or mute sound. (p26) For video source...
...(Green), and Custom. (p32) Screen Menu Used to adjust size of image. [Normal / True / Wide / Digital zoom +/-] (p34) Setting Menu Used to change settings of the projector or reset lamp replace counter. (p42-48) Basic Operation Input Menu Used to select input source either Computer or Video. (p27) PC Adjust Menu Used to adjust parameters to match with input signal format. (p29-31) Image Adjust Menu Used to adjust computer image. [Contrast / Brightness / Color temp. / White balance (R/G/B) / Sharpness / Gamma] (p33) Sound Menu Used to adjust volume or mute sound. (p26) For video source...
/app/pdf/projector/lv5220-7220-7225_manual.pdf
Page 34
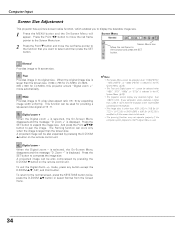
... original image size is higher than 1280 X 1024, reset the resolution to the lower before connecting to the projector. • The image data in other than 1280 X 1024. mode, press any resolution higher than XGA (1024 x 768 for LV7225 / LV-7220) or SVGA (800 x 600 for providing a squeezed video signal at 16 : 9. A projected image can be also compressed by pressing the D.ZOOM ▲ button on the remote control unit. When the Digital zoom - Screen Menu Screen Menu...
... original image size is higher than 1280 X 1024, reset the resolution to the lower before connecting to the projector. • The image data in other than 1280 X 1024. mode, press any resolution higher than XGA (1024 x 768 for LV7225 / LV-7220) or SVGA (800 x 600 for providing a squeezed video signal at 16 : 9. A projected image can be also compressed by pressing the D.ZOOM ▲ button on the remote control unit. When the Digital zoom - Screen Menu Screen Menu...
/app/pdf/projector/lv5220-7220-7225_manual.pdf
Page 42
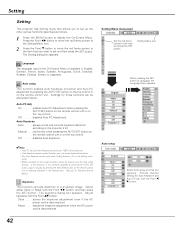
... Adjustment. Manual . . . .works only when pressing the AUTO SET button on the remote control unit or on the remote control unit. The keystone dialog box appears. Reset . . . . .resets the keystone adjustment when the AC power cord is available in English, German, French, Italian, Spanish, Portuguese, Dutch, Swedish, Russian, Chinese, Korean, or Japanese. Choose desired setting for those functions can be altered as follows; 1 Press the MENU button to display the On-Screen Menu. Auto setup...
... Adjustment. Manual . . . .works only when pressing the AUTO SET button on the remote control unit or on the remote control unit. The keystone dialog box appears. Reset . . . . .resets the keystone adjustment when the AC power cord is available in English, German, French, Italian, Spanish, Portuguese, Dutch, Swedish, Russian, Chinese, Korean, or Japanese. Choose desired setting for those functions can be altered as follows; 1 Press the MENU button to display the On-Screen Menu. Auto setup...
/app/pdf/projector/lv5220-7220-7225_manual.pdf
Page 43
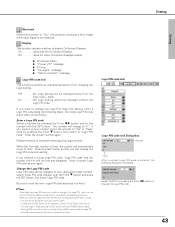
... projector produces a blue image while input signal is entered, the following steps. Enter a Logo PIN code Select a number by pressing the Point 7 8 button or change it at the factory. Enter the correct number again. As pressing the SET button on the projector, connect the AC Power Cord into an AC outlet again. Off . . . . .the Logo setting can be changed to your Logo PIN code and unable to change the Logo PIN code lock setting. Display...
... projector produces a blue image while input signal is entered, the following steps. Enter a Logo PIN code Select a number by pressing the Point 7 8 button or change it at the factory. Enter the correct number again. As pressing the SET button on the projector, connect the AC Power Cord into an AC outlet again. Off . . . . .the Logo setting can be changed to your Logo PIN code and unable to change the Logo PIN code lock setting. Display...
/app/pdf/projector/lv5220-7220-7225_manual.pdf
Page 45
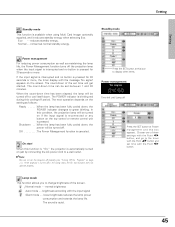
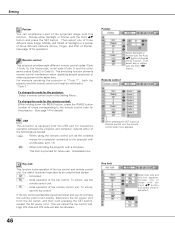
... of the screen. The count-down . Lamp mode This function allows you to display other items. Power management Time left until Lamp off Press the SET button at Power management and this cooling-off the projection lamp when the input signal is interrupted and no button is available when using Multi Card Imager optionally supplied, and it reduces standby energy when selecting Eco. The next operation depends on the screen. Setting Setting Standby mode This...
... of the screen. The count-down . Lamp mode This function allows you to display other items. Power management Time left until Lamp off Press the SET button at Power management and this cooling-off the projection lamp when the input signal is interrupted and no button is available when using Multi Card Imager optionally supplied, and it reduces standby energy when selecting Eco. The next operation depends on the screen. Setting Setting Standby mode This...
/app/pdf/projector/lv5220-7220-7225_manual.pdf
Page 46
... a part of the projected image with the Point 7 8 button. Then select size or pattern with this function. Selects either Spotlight or Pointer with the USB port for the remote control; When pressing the SET button at the same time. Logo PIN code and PIN code will cancel the top control lock. Key lock Select Key lock and this Setting Menu. To change the code for the projector; Key lock This function locks operation of the remote control unit...
... a part of the projected image with the Point 7 8 button. Then select size or pattern with this function. Selects either Spotlight or Pointer with the USB port for the remote control; When pressing the SET button at the same time. Logo PIN code and PIN code will cancel the top control lock. Key lock Select Key lock and this Setting Menu. To change the code for the projector; Key lock This function locks operation of the remote control unit...

/app/pdf/projector/lv5220-7220-7225_manual.pdf
Page 47
... settings for security. Change the PIN code lock setting Select a desired setting with the PIN code. The input numbers are required to complete entering a four-digit number. Enter the correct number again. "1234" is connected, the projector can be reset to the factory default setting (1234) according to "Set". Press the SET button so that you fixed a wrong number, move to operate the projector once the power cord is unlocked with the Point 7 8 button. The PIN code will be reset...
... settings for security. Change the PIN code lock setting Select a desired setting with the PIN code. The input numbers are required to complete entering a four-digit number. Enter the correct number again. "1234" is connected, the projector can be reset to the factory default setting (1234) according to "Set". Press the SET button so that you fixed a wrong number, move to operate the projector once the power cord is unlocked with the Point 7 8 button. The PIN code will be reset...
/app/pdf/projector/lv5220-7220-7225_manual.pdf
Page 52
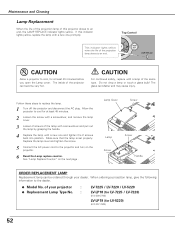
.... Allow the projector to an end, the LAMP REPLACE indicator lights yellow. Maintenance and Cleaning Lamp Replacement When the life of the projection lamp of this indicator lights yellow, replace the lamp with a new one and tighten the 2 screws back into position. If this projector draws to cool for LV-5220) (610 307 7925) 52 See "Lamp Replace Counter" on the projector. 6 Reset the Lamp replace counter. of the same type. Top Control This indicator lights yellow when the life of the projection lamp draws to cool...
.... Allow the projector to an end, the LAMP REPLACE indicator lights yellow. Maintenance and Cleaning Lamp Replacement When the life of the projection lamp of this indicator lights yellow, replace the lamp with a new one and tighten the 2 screws back into position. If this projector draws to cool for LV-5220) (610 307 7925) 52 See "Lamp Replace Counter" on the projector. 6 Reset the Lamp replace counter. of the same type. Top Control This indicator lights yellow when the life of the projection lamp draws to cool...
/app/pdf/projector/lv5220-7220-7225_manual.pdf
Page 53
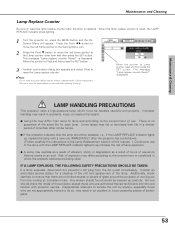
... SET button. Move the pointer to reset the lamp replace counter after the projector has cooled down. ( Follow carefully the instructions in an accident or injury caused by pieces of explosion may fail or terminate their life in which must be cleaned up , replace the lamp with a new one should be handled carefully and properly. No one IMMEDIATELY after the lamp is reset, the LAMP REPLACE indicator stops lighting. 1 Turn...
... SET button. Move the pointer to reset the lamp replace counter after the projector has cooled down. ( Follow carefully the instructions in an accident or injury caused by pieces of explosion may fail or terminate their life in which must be cleaned up , replace the lamp with a new one should be handled carefully and properly. No one IMMEDIATELY after the lamp is reset, the LAMP REPLACE indicator stops lighting. 1 Turn...
/app/pdf/projector/lv5220-7220-7225_manual.pdf
Page 54
... power cord of the projector. (See page 24.) - If the WARNING indicator lights red, the projector cannot be turned on . Select correct input source once again through menu operation. (See page 27, 35 and 36) - The projector can be turned on. (See "Warning Indicator" on page17-19. - Provide proper distance between your computer's instruction manual for assistance, check the items below once again. - Check the projection lamp. (See page 52.) - Check audio cable connection from your computer or video...
... power cord of the projector. (See page 24.) - If the WARNING indicator lights red, the projector cannot be turned on . Select correct input source once again through menu operation. (See page 27, 35 and 36) - The projector can be turned on. (See "Warning Indicator" on page17-19. - Provide proper distance between your computer's instruction manual for assistance, check the items below once again. - Check the projection lamp. (See page 52.) - Check audio cable connection from your computer or video...
/app/pdf/projector/lv5220-7220-7225_manual.pdf
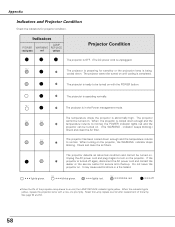
Page 58
...; temperature returns to normal, the POWER indicator lights red and the projector can be turned on with a new one promptly. indicator keeps blinking.) Check and clean the Air filter. When this indicator lights yellow, replace the projection lamp with the POWER button. ✽ The projector is operating normally. ✽ The projector is ready to an end, the LAMP REPLACE indicator lights yellow. Reset the Lamp replace counter after replacement of the projection lamp draws to be turned on . See page 52 and 53. 58 The projector cannot be turned on . (The WARNING...
...; temperature returns to normal, the POWER indicator lights red and the projector can be turned on with a new one promptly. indicator keeps blinking.) Check and clean the Air filter. When this indicator lights yellow, replace the projection lamp with the POWER button. ✽ The projector is operating normally. ✽ The projector is ready to an end, the LAMP REPLACE indicator lights yellow. Reset the Lamp replace counter after replacement of the projection lamp draws to be turned on . See page 52 and 53. 58 The projector cannot be turned on . (The WARNING...

/app/pdf/projector/lv5220-7220-7225_manual.pdf
Page 61
... Wired or Wireless LAN Card, set the following name in the U.S.A) (This cable is used for RGB 21-Pin Video output of the pixels are optionally available. Model No. COMPONENT-VGA Cable : LV-CA32 SCART - Appendix Accessories Owner's Manual AC Power Cord Remote Control Unit and Batteries DVI-VGA Cable USB Cable Lens Cover with String and Screw Soft Carrying Bag PIN Code Label ● The specifications are subject to change without notice. ● LCD panels are manufactured...
... Wired or Wireless LAN Card, set the following name in the U.S.A) (This cable is used for RGB 21-Pin Video output of the pixels are optionally available. Model No. COMPONENT-VGA Cable : LV-CA32 SCART - Appendix Accessories Owner's Manual AC Power Cord Remote Control Unit and Batteries DVI-VGA Cable USB Cable Lens Cover with String and Screw Soft Carrying Bag PIN Code Label ● The specifications are subject to change without notice. ● LCD panels are manufactured...


