/app/pdf/projector/lv5220-7220-7225_manual.pdf
Page 2
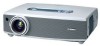
... reduces power consumption and maintain the lamp life. (See page 45.) ◆ Switchable Interface Terminal The projector provides a switchable interface terminal. You can be selected in the Setting menu. (See page 45.) ◆ Compact Design This projector is designed compact in size and weight. Features and Design This Multimedia Projector is designed with the most...
... reduces power consumption and maintain the lamp life. (See page 45.) ◆ Switchable Interface Terminal The projector provides a switchable interface terminal. You can be selected in the Setting menu. (See page 45.) ◆ Compact Design This projector is designed compact in size and weight. Features and Design This Multimedia Projector is designed with the most...
/app/pdf/projector/lv5220-7220-7225_manual.pdf
Page 3
...Wireless Mouse Operation 13 Operating Range 13 Remote Control Code 14 Remote Control Battery Installation 14 Installation 15 Positioning the Projector 15 Adjustable Feet 15 Connecting the AC Power Cord 16 Connecting to a Computer 17 Connecting to Video Equipment 18... the Lens Cover 50 Cleaning the Projection Lens 51 Cleaning the Projector Cabinet 51 Lamp Replacement 52 Lamp Replace Counter 53 Appendix 54 Troubleshooting 54 Menu Tree 56 Indicators and Projector Condition 58 Compatible Computer Specifications 59 Technical Specifications 60 Optional Parts ...
...Wireless Mouse Operation 13 Operating Range 13 Remote Control Code 14 Remote Control Battery Installation 14 Installation 15 Positioning the Projector 15 Adjustable Feet 15 Connecting the AC Power Cord 16 Connecting to a Computer 17 Connecting to Video Equipment 18... the Lens Cover 50 Cleaning the Projection Lens 51 Cleaning the Projector Cabinet 51 Lamp Replacement 52 Lamp Replace Counter 53 Appendix 54 Troubleshooting 54 Menu Tree 56 Indicators and Projector Condition 58 Compatible Computer Specifications 59 Technical Specifications 60 Optional Parts ...
/app/pdf/projector/lv5220-7220-7225_manual.pdf
Page 4
... NOT OPEN CAUTION : TO REDUCE THE RISK OF ELECTRIC SHOCK, DO NOT REMOVE COVER (OR BACK). Provide appropriate space on the projector. If the projector is to operate improperly, read this manual again, check operations and cable connections and try the solutions in the "Troubleshooting" section in... u ze niet weggooien maar inleveren als KCA. 4 Minimum clearance must be built into the beam. - NO USER-SERVICEABLE PARTS INSIDE EXCEPT LAMP REPLACEMENT. Ne puet être utillisé dans une salle d'ordinateurs telle que définie dans la norme ANSI/NFPA 75 Standard for...
... NOT OPEN CAUTION : TO REDUCE THE RISK OF ELECTRIC SHOCK, DO NOT REMOVE COVER (OR BACK). Provide appropriate space on the projector. If the projector is to operate improperly, read this manual again, check operations and cable connections and try the solutions in the "Troubleshooting" section in... u ze niet weggooien maar inleveren als KCA. 4 Minimum clearance must be built into the beam. - NO USER-SERVICEABLE PARTS INSIDE EXCEPT LAMP REPLACEMENT. Ne puet être utillisé dans une salle d'ordinateurs telle que définie dans la norme ANSI/NFPA 75 Standard for...
/app/pdf/projector/lv5220-7220-7225_manual.pdf
Page 6
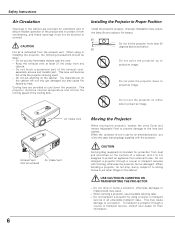
...case. - USE CAUTION IN CARRYING OR TRANSPORTING THE PROJECTOR - Improper Installation may cause damage to a projector. Do not touch a peripheral part of the cooling fans. This may reduce the lamp life and cause a fire hazard. 20˚ Do not tilt the projector more than 20 degrees above and below. 20˚...; Do not point the projector up to project an image. CAUTION Carrying Bag (supplied) is ...
...case. - USE CAUTION IN CARRYING OR TRANSPORTING THE PROJECTOR - Improper Installation may cause damage to a projector. Do not touch a peripheral part of the cooling fans. This may reduce the lamp life and cause a fire hazard. 20˚ Do not tilt the projector more than 20 degrees above and below. 20˚...; Do not point the projector up to project an image. CAUTION Carrying Bag (supplied) is ...

/app/pdf/projector/lv5220-7220-7225_manual.pdf
Page 8
Do not put heat-sensitive objects near this side. Part Names and Functions Front q w e r ty Back !6 o ui !0 !1 q Focus Ring w Speaker e Power Cord Connector r Infrared Remote Receiver t Zoom Lever y Projection Lens u Lens Cover (See page 50 for attaching.) i Air Intake Vent o Top Controls and Indicators !0 Air Intake Vent !1 Terminals and Connectors !2 Air Intake Vent (back and bottom) !3 Air Filter !4 Adjustable Feet !5 Lamp Cover !6 Exhaust Vent CAUTION Hot air is exhausted from the exhaust vent. Bottom !2 !3 !4 !2 !5 8
Do not put heat-sensitive objects near this side. Part Names and Functions Front q w e r ty Back !6 o ui !0 !1 q Focus Ring w Speaker e Power Cord Connector r Infrared Remote Receiver t Zoom Lever y Projection Lens u Lens Cover (See page 50 for attaching.) i Air Intake Vent o Top Controls and Indicators !0 Air Intake Vent !1 Terminals and Connectors !2 Air Intake Vent (back and bottom) !3 Air Filter !4 Adjustable Feet !5 Lamp Cover !6 Exhaust Vent CAUTION Hot air is exhausted from the exhaust vent. Bottom !2 !3 !4 !2 !5 8
/app/pdf/projector/lv5220-7220-7225_manual.pdf
Page 10
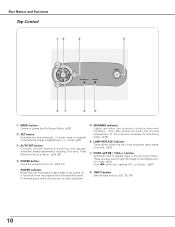
...input source. (p27, 35, 36 ) 10 This also blinks red when the internal temperature of the projector exceeds the operating range. (p49) y LAMP REPLACE indicator Turns yellow when the life of the projection lamp draws to pan the image in Digital zoom +/- Part Names and Functions Top Control qw e r ...MENU SET VO- mode. (p34) Point 7 8 button are also used as VOL +/- It remains green while the projector is also used to be turned on...
...input source. (p27, 35, 36 ) 10 This also blinks red when the internal temperature of the projector exceeds the operating range. (p49) y LAMP REPLACE indicator Turns yellow when the life of the projection lamp draws to pan the image in Digital zoom +/- Part Names and Functions Top Control qw e r ...MENU SET VO- mode. (p34) Point 7 8 button are also used as VOL +/- It remains green while the projector is also used to be turned on...

/app/pdf/projector/lv5220-7220-7225_manual.pdf
Page 20
..., etc.) before turning on the screen. ✔Note: If the projector is a security code using Personal Identification Number that was selected last and the Lamp mode status icon (see page 45) appear on the projector. 2 Connect the projector's AC power cord into an AC outlet. What is fixed, the pointer...the SET button. The POWER indicator turns green lighting and the cooling fans start to operate the projector. When the four-digit number is PIN code? Selected Image Level and Lamp Mode Lamp mode (See page 45 for locking operation of a four-digit number. The number will turn ...
..., etc.) before turning on the screen. ✔Note: If the projector is a security code using Personal Identification Number that was selected last and the Lamp mode status icon (see page 45) appear on the projector. 2 Connect the projector's AC power cord into an AC outlet. What is fixed, the pointer...the SET button. The POWER indicator turns green lighting and the cooling fans start to operate the projector. When the four-digit number is PIN code? Selected Image Level and Lamp Mode Lamp mode (See page 45 for locking operation of a four-digit number. The number will turn ...

/app/pdf/projector/lv5220-7220-7225_manual.pdf
Page 21
...disappears after the POWER indicator lights red. • When the On start function.) • Do not operate the projector continuously without rest. TO MAINTAIN THE LIFE OF LAMP, ONCE YOU TURN PROJECTOR ON, WAIT AT LEAST 5 MINUTES BEFORE TURNING IT OFF. DO NOT DISCONNECT AC POWER CORD WHILE COOLING FANS ...ARE RUNNING OR BEFORE POWER INDICATOR LIGHTS RED. Turning Off the Projector 1 Press the POWER button on the top ...
...disappears after the POWER indicator lights red. • When the On start function.) • Do not operate the projector continuously without rest. TO MAINTAIN THE LIFE OF LAMP, ONCE YOU TURN PROJECTOR ON, WAIT AT LEAST 5 MINUTES BEFORE TURNING IT OFF. DO NOT DISCONNECT AC POWER CORD WHILE COOLING FANS ...ARE RUNNING OR BEFORE POWER INDICATOR LIGHTS RED. Turning Off the Projector 1 Press the POWER button on the top ...
/app/pdf/projector/lv5220-7220-7225_manual.pdf
Page 23
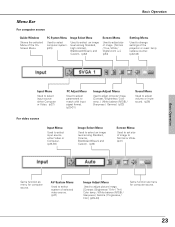
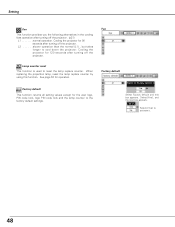
... Custom. (p32) Screen Menu Used to adjust size of image. [Normal / True / Wide / Digital zoom +/-] (p34) Setting Menu Used to change settings of the projector or reset lamp replace counter. (p42-48) Basic Operation Input Menu Used to select input source either Computer or Video. (p27) PC Adjust Menu Used to adjust...
... Custom. (p32) Screen Menu Used to adjust size of image. [Normal / True / Wide / Digital zoom +/-] (p34) Setting Menu Used to change settings of the projector or reset lamp replace counter. (p42-48) Basic Operation Input Menu Used to select input source either Computer or Video. (p27) PC Adjust Menu Used to adjust...
/app/pdf/projector/lv5220-7220-7225_manual.pdf
Page 45
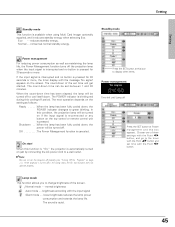
... been fully cooled down, the POWER indicator changes to display other items. Power management Time left until Lamp off properly (see "Turning Off the Projector" on page 21). The count-down . The count-down , the power will be turned off to the timer with the Point ed button and set ... this box appears. Shutdown . . .When the lamp has been fully cooled down time can be turned on if the input signal is reconnected or any button on just by connecting the AC power cord to a wall outlet. ✔Note: Be sure to turn the projector off Press the SET button at this...
... been fully cooled down, the POWER indicator changes to display other items. Power management Time left until Lamp off properly (see "Turning Off the Projector" on page 21). The count-down . The count-down , the power will be turned off to the timer with the Point ed button and set ... this box appears. Shutdown . . .When the lamp has been fully cooled down time can be turned on if the input signal is reconnected or any button on just by connecting the AC power cord to a wall outlet. ✔Note: Be sure to turn the projector off Press the SET button at this...
/app/pdf/projector/lv5220-7220-7225_manual.pdf
Page 48
...function provides you the following alternatives in the cooling fans operation after turning off the projector. Cooling the projector for the user logo, PIN code lock, logo PIN code lock and the lamp counter to cool down the projector. Select [Yes] , and the next box appears. See page 53 for ...90 seconds after turning off the projector. (p21) L1 normal operation. L2 . . . . . .slower operation than the normal (L1) , but...
...function provides you the following alternatives in the cooling fans operation after turning off the projector. Cooling the projector for the user logo, PIN code lock, logo PIN code lock and the lamp counter to cool down the projector. Select [Yes] , and the next box appears. See page 53 for ...90 seconds after turning off the projector. (p21) L1 normal operation. L2 . . . . . .slower operation than the normal (L1) , but...
/app/pdf/projector/lv5220-7220-7225_manual.pdf
Page 49
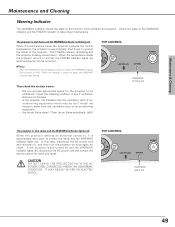
...? Then check the matters below: - Did you provide appropriate space for the projector to take proper maintenance. IT MAY RESULT IN FIRE OR ELECTRIC SHOCK. TOP CONTROL T VOL + AUTO SET LAMP REPLACE WARNING POWER WARNING lights red 49 Maintenance & Cleaning Maintenance and Cleaning Warning .... - Are the air filters clean? Clean the air filters periodically. (p50) TOP CONTROL VOL + AUTO SET LAMP REPLACE WARNING POWER WARNING blinking red The projector is shut down and the WARNING indicator is still turned off and the WARNING indicator lights red, disconnect the AC...
...? Then check the matters below: - Did you provide appropriate space for the projector to take proper maintenance. IT MAY RESULT IN FIRE OR ELECTRIC SHOCK. TOP CONTROL T VOL + AUTO SET LAMP REPLACE WARNING POWER WARNING lights red 49 Maintenance & Cleaning Maintenance and Cleaning Warning .... - Are the air filters clean? Clean the air filters periodically. (p50) TOP CONTROL VOL + AUTO SET LAMP REPLACE WARNING POWER WARNING blinking red The projector is shut down and the WARNING indicator is still turned off and the WARNING indicator lights red, disconnect the AC...
/app/pdf/projector/lv5220-7220-7225_manual.pdf
Page 52
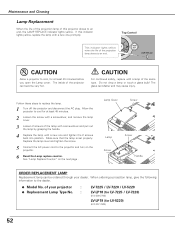
... back into position. The glass can be ordered through your projector : ● Replacement Lamp Type No. : LV-7225 / LV-7220 / LV-5220 LV-LP18 (for LV-7225 / LV-7220) (610 309 2706) LV-LP19 (for LV-5220) (610 307 7925) 52 T VOL + AUTO SET LAMP REPLACE CAUTION Allow a projector to an end. Allow the projector to cool for at least 45 minutes. 2 Loosen the screw...
... back into position. The glass can be ordered through your projector : ● Replacement Lamp Type No. : LV-7225 / LV-7220 / LV-5220 LV-LP18 (for LV-7225 / LV-7220) (610 309 2706) LV-LP19 (for LV-5220) (610 307 7925) 52 T VOL + AUTO SET LAMP REPLACE CAUTION Allow a projector to an end. Allow the projector to cool for at least 45 minutes. 2 Loosen the screw...
/app/pdf/projector/lv5220-7220-7225_manual.pdf
Page 53
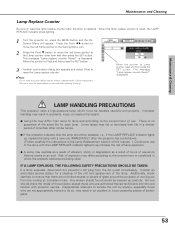
..., or create a fire hazard. ● Lamp life may differ from lamp to lamp and according to the environment of use of use as a result of hours of the lamp with projector service. If a lamp explodes, disconnect the projector's AC plug from the cooling air circulation holes...risk of lamp explosion. ● A Lamp may result in a shorter period of lamp replacement. The message "Lamp replace counter Reset?" When the lamp replace counter is no broken shards or pieces of the lamp. LAMP HANDLING PRECAUTIONS This projector uses a high-pressure lamp which the projector and lamp are ...
..., or create a fire hazard. ● Lamp life may differ from lamp to lamp and according to the environment of use of use as a result of hours of the lamp with projector service. If a lamp explodes, disconnect the projector's AC plug from the cooling air circulation holes...risk of lamp explosion. ● A Lamp may result in a shorter period of lamp replacement. The message "Lamp replace counter Reset?" When the lamp replace counter is no broken shards or pieces of the lamp. LAMP HANDLING PRECAUTIONS This projector uses a high-pressure lamp which the projector and lamp are ...
/app/pdf/projector/lv5220-7220-7225_manual.pdf
Page 54
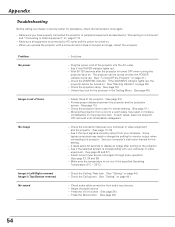
... the POWER indicator turns red. (See "Turning Off the Projector" on the projection lens. Check the projection lens to a projector. Press the Mute button. (See page 26.) 54 Wait 90-120 seconds after turning on page 49.) - Check the projection lamp. (See page 52.) - See if the selected system ...is turned on page 44.) - The projector can be turned on. (See "Warning Indicator" on the projector. - It takes about 30 seconds to AC outlet and the power is ...
... the POWER indicator turns red. (See "Turning Off the Projector" on the projection lens. Check the projection lens to a projector. Press the Mute button. (See page 26.) 54 Wait 90-120 seconds after turning on page 49.) - Check the projection lamp. (See page 52.) - See if the selected system ...is turned on page 44.) - The projector can be turned on. (See "Warning Indicator" on the projector. - It takes about 30 seconds to AC outlet and the power is ...

/app/pdf/projector/lv5220-7220-7225_manual.pdf
Page 57
...Keystone Blue back Display Logo PIN code lock Logo Capture Ceiling Rear Terminal Standby mode Power management On start Lamp mode Pointer Remote control USB Key lock PIN code lock Fan Lamp counter reset Factory default Quit English German French Italian Spanish Portuguese Dutch Swedish Russian Chinese Korean Japanese Quit ... Computer 2 Monitor out Eco / Normal Off Ready Shut down Timer(1-30 Min) Quit On / Off Normal Auto Silent Spotlight Pointer Quit Code 1 - 8 Quit Mouse / Projector Off Projector Remote Control Quit PIN code entry Off On1 On2 PIN code change Quit L1 / L2 Yes / No Yes / No 57
...Keystone Blue back Display Logo PIN code lock Logo Capture Ceiling Rear Terminal Standby mode Power management On start Lamp mode Pointer Remote control USB Key lock PIN code lock Fan Lamp counter reset Factory default Quit English German French Italian Spanish Portuguese Dutch Swedish Russian Chinese Korean Japanese Quit ... Computer 2 Monitor out Eco / Normal Off Ready Shut down Timer(1-30 Min) Quit On / Off Normal Auto Silent Spotlight Pointer Quit Code 1 - 8 Quit Mouse / Projector Off Projector Remote Control Quit PIN code entry Off On1 On2 PIN code change Quit L1 / L2 Yes / No Yes / No 57
/app/pdf/projector/lv5220-7220-7225_manual.pdf
Page 58
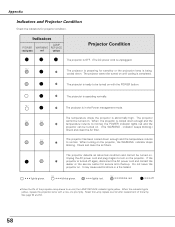
... ready to be turned on with a new one promptly. When the projector is preparing for projector condition. Indicators LAMP POWER WARNING REPLACE red/green red yellow Projector Condition The projector is OFF. (The AC power cord is unplugged.) ✽ The projector is cooled down enough and the temperature returns ✽ to normal, the POWER indicator lights...
... ready to be turned on with a new one promptly. When the projector is preparing for projector condition. Indicators LAMP POWER WARNING REPLACE red/green red yellow Projector Condition The projector is OFF. (The AC power cord is unplugged.) ✽ The projector is cooled down enough and the temperature returns ✽ to normal, the POWER indicator lights...
/app/pdf/projector/lv5220-7220-7225_manual.pdf
Page 60
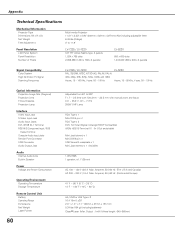
...Projector 11.81" x 3.23" x 8.94" (300mm x 82mm x 227mm) (Not including adjustable feet) 6.48 lbs (2.9kgs) 0˚ to 11.9˚ Panel Resolution LCD Panel System Panel Resolution Number of Pixels LV-7225 / LV-7220 0.8" TFT Active Matrix type, 3 panels 1,024 x 768 dots 2,359,296 (1,024 x 768 x 3 panels) LV-5220... 60 Adjustable from 40" to 300" F 1.7 ~ 2.5 lens with f 20.3mm ~ 32.5 mm with manual zoom and focus 3.3' ~ 25.3' (1.0m ~ 7.7m) 200W UHP Lamp RCA Type x 1 Mini DIN 4 pin x 1 RCA Type x 2 DVI-I Terminal (Digital / Analog) (HDCP Compatible) (VGA) HDB15 Terminal X 1 (In / Out switchable) ...
...Projector 11.81" x 3.23" x 8.94" (300mm x 82mm x 227mm) (Not including adjustable feet) 6.48 lbs (2.9kgs) 0˚ to 11.9˚ Panel Resolution LCD Panel System Panel Resolution Number of Pixels LV-7225 / LV-7220 0.8" TFT Active Matrix type, 3 panels 1,024 x 768 dots 2,359,296 (1,024 x 768 x 3 panels) LV-5220... 60 Adjustable from 40" to 300" F 1.7 ~ 2.5 lens with f 20.3mm ~ 32.5 mm with manual zoom and focus 3.3' ~ 25.3' (1.0m ~ 7.7m) 200W UHP Lamp RCA Type x 1 Mini DIN 4 pin x 1 RCA Type x 2 DVI-I Terminal (Digital / Analog) (HDCP Compatible) (VGA) HDB15 Terminal X 1 (In / Out switchable) ...
Basic_Serial_Command_Codes
Page 3
... 12 6.42. Freeze On Command 13 6.50. Computer 1 Analog RGB Command 13 6.52. Auto PC Adj. State Read Command ...16 7.1. Video S-Video Command 12 6.43. Lamp Time Read Command 18 7.6. Basic Serial Command Functional Specification Page 2 of 19 6.33. Pointer Left Command 12 6.45. Pointer Up Command 13 6.46. Freeze Off...
... 12 6.42. Freeze On Command 13 6.50. Computer 1 Analog RGB Command 13 6.52. Auto PC Adj. State Read Command ...16 7.1. Video S-Video Command 12 6.43. Lamp Time Read Command 18 7.6. Basic Serial Command Functional Specification Page 2 of 19 6.33. Pointer Left Command 12 6.45. Pointer Up Command 13 6.46. Freeze Off...
Basic_Serial_Command_Codes
Page 6
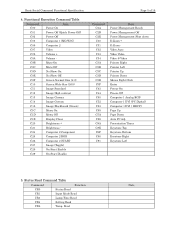
... Menu Off C1E Display Clear C20 Brightness + C21 Brightness - Status Read Command Table Command CR0 CR1 CR3 CR4 CR6 Function Status Read Input Mode Read Lamp Time Read Setting Read Temp. Functional Execution Command Table Command C00 Item Power On C01 Power Off (Quick Power Off) C02 Power Off C05 Computer...
... Menu Off C1E Display Clear C20 Brightness + C21 Brightness - Status Read Command Table Command CR0 CR1 CR3 CR4 CR6 Function Status Read Input Mode Read Lamp Time Read Setting Read Temp. Functional Execution Command Table Command C00 Item Power On C01 Power Off (Quick Power Off) C02 Power Off C05 Computer...


