/app/pdf/projector/lv5220-7220-7225_manual.pdf
Page 3
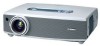
Table of Contents Features and Design 2 Table of Contents 3 To the Owner 4 Safety Instructions 5 Air Circulation 6 Installing the Projector in Proper Position 6 Moving the Projector 6 Compliance 7 Part Names and Functions 8 Front 8 Back 8 Bottom 8 Rear Terminal 9 Top Control 10 Remote Control Unit 11 Laser Pointer Function 12 Pointer Function 12 Wireless Mouse Operation 13 Operating Range 13...
Table of Contents Features and Design 2 Table of Contents 3 To the Owner 4 Safety Instructions 5 Air Circulation 6 Installing the Projector in Proper Position 6 Moving the Projector 6 Compliance 7 Part Names and Functions 8 Front 8 Back 8 Bottom 8 Rear Terminal 9 Top Control 10 Remote Control Unit 11 Laser Pointer Function 12 Pointer Function 12 Wireless Mouse Operation 13 Operating Range 13...
/app/pdf/projector/lv5220-7220-7225_manual.pdf
Page 9
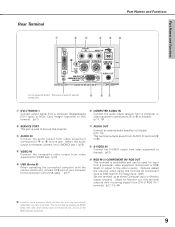
...equipment to VIDEO jack. (p18) t USB (Series B) When operating the connected computer with the remote control unit, connect USB port of your computer to this connector with a pen, which controls this button. e AUDIO IN Connect the audio output from video equipment to the other monitor. ... button with a USB cable. (p17) u AUDIO OUT Connect an external audio amplifier to this jack. (When the audio output is used for Monitor out, this projector. Part Names and Functions Rear Terminal Part Names and Functions q w e r t y DVI - I / RGB IN-1 terminal.) (p17, 19, 44) ✽...
...equipment to VIDEO jack. (p18) t USB (Series B) When operating the connected computer with the remote control unit, connect USB port of your computer to this connector with a pen, which controls this button. e AUDIO IN Connect the audio output from video equipment to the other monitor. ... button with a USB cable. (p17) u AUDIO OUT Connect an external audio amplifier to this jack. (When the audio output is used for Monitor out, this projector. Part Names and Functions Rear Terminal Part Names and Functions q w e r t y DVI - I / RGB IN-1 terminal.) (p17, 19, 44) ✽...
/app/pdf/projector/lv5220-7220-7225_manual.pdf
Page 11
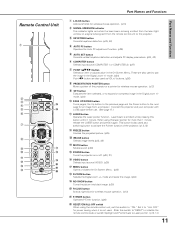
...(p26) @2 RESET/ON/ALL-OFF switch When using this switch to "RESET" to initialize the remote control code or switch Spotlight and Pointer back to the projector. When using the remote control unit, set this button within 1 minute. buttons. (p26) i PRESENTATION POINTER button Move a ...pointer of the projector. (p12,13) !2 FREEZE button Freezes the projected picture. (p25) !3 IMAGE button Selects image ...
...(p26) @2 RESET/ON/ALL-OFF switch When using this switch to "RESET" to initialize the remote control code or switch Spotlight and Pointer back to the projector. When using the remote control unit, set this button within 1 minute. buttons. (p26) i PRESENTATION POINTER button Move a ...pointer of the projector. (p12,13) !2 FREEZE button Freezes the projected picture. (p25) !3 IMAGE button Selects image ...

/app/pdf/projector/lv5220-7220-7225_manual.pdf
Page 12
... the laser light window while laser is displayed on the remote control unit toward the projector. Press the LASER button toward the projector and see if it lights green. ✔Note: You can move the Spotlight or Pointer with the remote control unit to "RESET". (p11) Spotlight Pointer While pressing ...The laser emitted is emitted with red light. Do not look into the laser light window or shine the laser beam on the remote control unit. Signal Emission Indicator These caution labels are the caution labels for more than 7 seconds or slide the RESET/ON/ALL-OFF...
... the laser light window while laser is displayed on the remote control unit toward the projector. Press the LASER button toward the projector and see if it lights green. ✔Note: You can move the Spotlight or Pointer with the remote control unit to "RESET". (p11) Spotlight Pointer While pressing ...The laser emitted is emitted with red light. Do not look into the laser light window or shine the laser beam on the remote control unit. Signal Emission Indicator These caution labels are the caution labels for more than 7 seconds or slide the RESET/ON/ALL-OFF...
/app/pdf/projector/lv5220-7220-7225_manual.pdf
Page 13
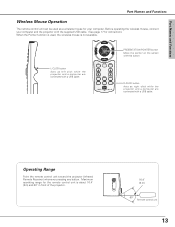
...When the Pointer function is used as a wireless mouse for your computer and the projector with this button. Part Names and Functions Part Names and Functions Wireless Mouse Operation The remote control unit can be used , the wireless mouse is about 16.4' (5m) and 60...° in front of the projector. 16.4' (5 m) 60° Remote control unit 13 Before operating the wireless mouse, connect your computer. Operating Range Point the remote control unit toward the projector (Infrared Remote Receiver)...
...When the Pointer function is used as a wireless mouse for your computer and the projector with this button. Part Names and Functions Part Names and Functions Wireless Mouse Operation The remote control unit can be used , the wireless mouse is about 16.4' (5m) and 60...° in front of the projector. 16.4' (5 m) 60° Remote control unit 13 Before operating the wireless mouse, connect your computer. Operating Range Point the remote control unit toward the projector (Infrared Remote Receiver)...
/app/pdf/projector/lv5220-7220-7225_manual.pdf
Page 14
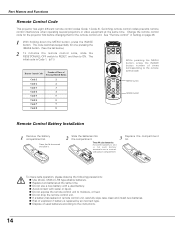
... polarity (+ and -), be sure battery terminals are in compartment. The code switches sequentially for the remote control unit. Part Names and Functions Remote Control Code This projector has eight different remote control codes (Code 1-Code 8). Switching remote control codes prevents remote control interference when operating several projectors or video equipment at the same time. ● Do not use a new battery with a used...
... polarity (+ and -), be sure battery terminals are in compartment. The code switches sequentially for the remote control unit. Part Names and Functions Remote Control Code This projector has eight different remote control codes (Code 1-Code 8). Switching remote control codes prevents remote control interference when operating several projectors or video equipment at the same time. ● Do not use a new battery with a used...
/app/pdf/projector/lv5220-7220-7225_manual.pdf
Page 15
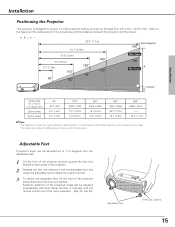
... adjustable feet. 1 Lift the front of the projector and pull upward the feet lock latches on picture quality. It is designed to project on a flat projection surface and can be focused from the actual size. Refer to 11.9 degrees with the remote control unit or the menu operation. (p24, 25,... and 42) Adjustable Feet Feet Lock Latches 15 Adjustable Feet Projection angle can be adjusted up to the figure and the table below for the screen size and the distance between the projector and the screen.
... adjustable feet. 1 Lift the front of the projector and pull upward the feet lock latches on picture quality. It is designed to project on a flat projection surface and can be focused from the actual size. Refer to 11.9 degrees with the remote control unit or the menu operation. (p24, 25,... and 42) Adjustable Feet Feet Lock Latches 15 Adjustable Feet Projection angle can be adjusted up to the figure and the table below for the screen size and the distance between the projector and the screen.

/app/pdf/projector/lv5220-7220-7225_manual.pdf
Page 20
...over again. A PIN code consists of the projector with a PIN code, PIN code Input Dialog Box will turn red and disappear. Refer to PIN code lock function in a moment and lights red. 3 Press the POWER button on the top control or on the remote control unit. The POWER indicator blinks red in ... code is a security code using Personal Identification Number that was selected last and the Lamp mode status icon (see page 45) appear on the projector. 2 Connect the projector's AC power cord into an AC outlet. If you entered a wrong PIN code, "PIN code" and the number will appear. Repeat this...
...over again. A PIN code consists of the projector with a PIN code, PIN code Input Dialog Box will turn red and disappear. Refer to PIN code lock function in a moment and lights red. 3 Press the POWER button on the top control or on the remote control unit. The POWER indicator blinks red in ... code is a security code using Personal Identification Number that was selected last and the Lamp mode status icon (see page 45) appear on the projector. 2 Connect the projector's AC power cord into an AC outlet. If you entered a wrong PIN code, "PIN code" and the number will appear. Repeat this...

/app/pdf/projector/lv5220-7220-7225_manual.pdf
Page 21
... 21 TO MAINTAIN THE LIFE OF LAMP, ONCE YOU TURN PROJECTOR ON, WAIT AT LEAST 5 MINUTES BEFORE TURNING IT OFF. Turning Off the Projector 1 Press the POWER button on the top control or on the remote control unit, and a message "Power off the projector. Turn off the projector and give it a rest about 90 seconds. (About 120...
... 21 TO MAINTAIN THE LIFE OF LAMP, ONCE YOU TURN PROJECTOR ON, WAIT AT LEAST 5 MINUTES BEFORE TURNING IT OFF. Turning Off the Projector 1 Press the POWER button on the top control or on the remote control unit, and a message "Power off the projector. Turn off the projector and give it a rest about 90 seconds. (About 120...

/app/pdf/projector/lv5220-7220-7225_manual.pdf
Page 22
Item data Press the Point 7 8 buttons to adjust value. 22 Quit to Operate the On-Screen Menu The projector can be adjusted or set via the On-Screen Menu. Refer to the following pages regarding each adjustment and setting procedure. 1 Press the MENU button ... Point 7 8 buttons to select a Menu icon to adjust. L VOL + AUTO SET LA INPUT MENU button POINT button (outer ring) SET button Remote Control Unit POINT button MENU button SET button Top Control MENU SET VO- Basic Operation How to exit this menu. Item SET button ✔Note: The selected item is not in...
Item data Press the Point 7 8 buttons to adjust value. 22 Quit to Operate the On-Screen Menu The projector can be adjusted or set via the On-Screen Menu. Refer to the following pages regarding each adjustment and setting procedure. 1 Press the MENU button ... Point 7 8 buttons to select a Menu icon to adjust. L VOL + AUTO SET LA INPUT MENU button POINT button (outer ring) SET button Remote Control Unit POINT button MENU button SET button Top Control MENU SET VO- Basic Operation How to exit this menu. Item SET button ✔Note: The selected item is not in...
/app/pdf/projector/lv5220-7220-7225_manual.pdf
Page 24
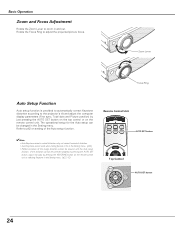
... Rotate the Zoom Lever to adjust the projected picture focus. Refer to the projector's tilt and adjust the computer display parameters (Fine sync, Total dots and Picture position) by pressing the KEYSTONE button on the remote control unit or selecting Keystone in the Setting menu. (p44) • Perfect... setup function. Zoom Lever Focus Ring Auto Setup Function Auto setup function is On in the Setting menu. (p25, 42) Remote Control Unit AUTO SET button Top Control MENU SET VO- L VOL + AUTO SET L INPUT AUTO SET button 24 If the distortion cannot be changed in and out...
... Rotate the Zoom Lever to adjust the projected picture focus. Refer to the projector's tilt and adjust the computer display parameters (Fine sync, Total dots and Picture position) by pressing the KEYSTONE button on the remote control unit or selecting Keystone in the Setting menu. (p44) • Perfect... setup function. Zoom Lever Focus Ring Auto Setup Function Auto setup function is On in the Setting menu. (p25, 42) Remote Control Unit AUTO SET button Top Control MENU SET VO- L VOL + AUTO SET L INPUT AUTO SET button 24 If the distortion cannot be changed in and out...
/app/pdf/projector/lv5220-7220-7225_manual.pdf
Page 25
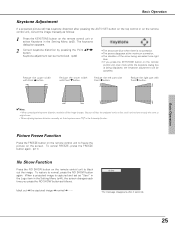
...being corrected turns light blue. • If you press the NO SHOW button as follows. To restore to freeze the picture on the remote control unit once more while the keystone dialog box is no correction. • The arrows disappear at the maximum correction. • The ...image ➜ normal The message disappears after pressing the AUTO SET button on the top control or on the remote control unit, correct the image manually as follows: 1 Press the KEYSTONE button on the remote control unit to black out the image. Basic Operation Keystone Adjustment If a projected picture still...
...being corrected turns light blue. • If you press the NO SHOW button as follows. To restore to freeze the picture on the remote control unit once more while the keystone dialog box is no correction. • The arrows disappear at the maximum correction. • The ...image ➜ normal The message disappears after pressing the AUTO SET button on the top control or on the remote control unit, correct the image manually as follows: 1 Press the KEYSTONE button on the remote control unit to black out the image. Basic Operation Keystone Adjustment If a projected picture still...

/app/pdf/projector/lv5220-7220-7225_manual.pdf
Page 26
...up the volume, and press the Point 7 button to cut off . The display disappears after 4 seconds. Mute Press the MUTE button on the remote control unit. indicates approximate level of volume. Sound Menu Sound Menu icon indicates approximate level of volume. And then, press the P-TIMER button again to... its previous level, press the MUTE button again or press the VOL (+/-) button. Basic Operation P-Timer Function Press the P-TIMER button on the remote control unit to turn down the volume. To restore sound to "On" and sound is cut off sound. To stop the P-Timer, press the ...
...up the volume, and press the Point 7 button to cut off . The display disappears after 4 seconds. Mute Press the MUTE button on the remote control unit. indicates approximate level of volume. Sound Menu Sound Menu icon indicates approximate level of volume. And then, press the P-TIMER button again to... its previous level, press the MUTE button again or press the VOL (+/-) button. Basic Operation P-Timer Function Press the P-TIMER button on the remote control unit to turn down the volume. To restore sound to "On" and sound is cut off sound. To stop the P-Timer, press the ...
/app/pdf/projector/lv5220-7220-7225_manual.pdf
Page 27
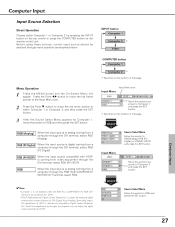
...Computer 2 Source Select Menu Move the pointer to Computer 1 and press the SET button. ✳ See Note on the bottom of this projector may not display the digital content protected by HDCP. Computer Input Input Source Selection Direct Operation Choose either Computer 1 or Computer 2, and then...from a computer through the DVI terminal, select RGB (AV HDCP). COMPUTER button Computer 1 Computer 2 ✳ ✳ See Note on the remote control unit. Computer Input 27 Input Menu icon Input Menu Move the pointer (red arrow) to RGB and press the SET button. RGB When the ...
...Computer 2 Source Select Menu Move the pointer to Computer 1 and press the SET button. ✳ See Note on the bottom of this projector may not display the digital content protected by HDCP. Computer Input Input Source Selection Direct Operation Choose either Computer 1 or Computer 2, and then...from a computer through the DVI terminal, select RGB (AV HDCP). COMPUTER button Computer 1 Computer 2 ✳ ✳ See Note on the remote control unit. Computer Input 27 Input Menu icon Input Menu Move the pointer (red arrow) to RGB and press the SET button. RGB When the ...
/app/pdf/projector/lv5220-7220-7225_manual.pdf
Page 29
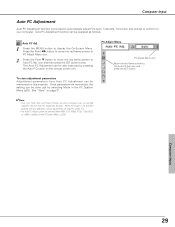
...Auto PC Adjustment function. Once parameters are required. (p30, 31) • The Auto PC Adjust cannot be fully adjusted with this projector. To store adjustment parameters Adjustment parameters from Auto PC Adjustment can be memorized in this operation, manual adjustments are memorized, the setting ...the red frame pointer to display the On-Screen Menu. icon and then press the SET button twice. See "Store" on the remote control unit. Computer Input Auto PC Adjustment Auto PC Adjustment function is provided to automatically adjust Fine sync, Total dots, Horizontal, and Vertical...
...Auto PC Adjustment function. Once parameters are required. (p30, 31) • The Auto PC Adjust cannot be fully adjusted with this projector. To store adjustment parameters Adjustment parameters from Auto PC Adjustment can be memorized in this operation, manual adjustments are memorized, the setting ...the red frame pointer to display the On-Screen Menu. icon and then press the SET button twice. See "Store" on the remote control unit. Computer Input Auto PC Adjustment Auto PC Adjustment function is provided to automatically adjust Fine sync, Total dots, Horizontal, and Vertical...

/app/pdf/projector/lv5220-7220-7225_manual.pdf
Page 32
Blackboard(Green) Picture level suitable for the image projected on the remote control unit. See above for the image projected on this projector. The level being selected. 32 Computer Input Image Level Selection Direct Operation Select an image level among Standard, High contrast, Blackboard(Green...effective on a green colored board, not truly effective on a black colored board. This mode assists to enhance the image projected on this projector. Custom User preset image in the Image Adjust Menu (p33). Image Select Menu Image Select Menu icon Move the red frame pointer to set...
Blackboard(Green) Picture level suitable for the image projected on the remote control unit. See above for the image projected on this projector. The level being selected. 32 Computer Input Image Level Selection Direct Operation Select an image level among Standard, High contrast, Blackboard(Green...effective on a green colored board, not truly effective on a black colored board. This mode assists to enhance the image projected on this projector. Custom User preset image in the Image Adjust Menu (p33). Image Select Menu Image Select Menu icon Move the red frame pointer to set...
/app/pdf/projector/lv5220-7220-7225_manual.pdf
Page 34
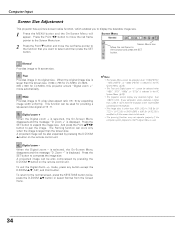
... image can be used . 34 Zoom -" is displayed. mode, press any resolution higher than the screen size (1024 x 768 for LV-7225 / LV-7220, 800 x 600 for LV-5220), this projector enters "Digital zoom +" mode automatically. cannot be operated when "720p(HDTV)", "1035i (HDTV)", or "1080i (HDTV)" is higher than...The Panning function can be also compressed by pressing the D.ZOOM ▲ button on the remote control unit. When the original image size is larger than XGA (1024 x 768 for LV7225 / LV-7220) or SVGA (800 x 600 for providing a squeezed video signal at 16 : 9. This function can ...
... image can be used . 34 Zoom -" is displayed. mode, press any resolution higher than the screen size (1024 x 768 for LV-7225 / LV-7220, 800 x 600 for LV-5220), this projector enters "Digital zoom +" mode automatically. cannot be operated when "720p(HDTV)", "1035i (HDTV)", or "1080i (HDTV)" is higher than...The Panning function can be also compressed by pressing the D.ZOOM ▲ button on the remote control unit. When the original image size is larger than XGA (1024 x 768 for LV7225 / LV-7220) or SVGA (800 x 600 for providing a squeezed video signal at 16 : 9. This function can ...

/app/pdf/projector/lv5220-7220-7225_manual.pdf
Page 35
...and the On-Screen Menu will appear. 3 Move the pointer to the source that you want to select and press the SET button. The projector selects connection in the Setting Menu, Computer 2 is connected to Video and then press the SET button. Video When video input signal is ... VIDEO jack under the condition of this page. INPUT button Video Computer 1 Computer 2 ✳ VIDEO button Video ✳ See Note on the remote control unit. Auto When selecting Auto, the projector automatically detects incoming video signal, and adjusts itself to select and then press the SET button.
...and the On-Screen Menu will appear. 3 Move the pointer to the source that you want to select and press the SET button. The projector selects connection in the Setting Menu, Computer 2 is connected to Video and then press the SET button. Video When video input signal is ... VIDEO jack under the condition of this page. INPUT button Video Computer 1 Computer 2 ✳ VIDEO button Video ✳ See Note on the remote control unit. Auto When selecting Auto, the projector automatically detects incoming video signal, and adjusts itself to select and then press the SET button.

/app/pdf/projector/lv5220-7220-7225_manual.pdf
Page 36
...press the SET button. INPUT button Computer 1 Computer 2 ✳ Video COMPUTER button Computer 1 Computer 2 ✳ ✳ See Note on the remote control unit. RGB (Scart) When the input source is set as described below. Video Input Input Source Selection (Component, RGB Scart 21-Pin) Direct Operation... Choose Computer 2 by pressing the INPUT button on the top control or press the COMPUTER button on the bottom of this page. Source Select Menu Move the pointer to the RGB IN-2/ COMPONENT IN...
...press the SET button. INPUT button Computer 1 Computer 2 ✳ Video COMPUTER button Computer 1 Computer 2 ✳ ✳ See Note on the remote control unit. RGB (Scart) When the input source is set as described below. Video Input Input Source Selection (Component, RGB Scart 21-Pin) Direct Operation... Choose Computer 2 by pressing the INPUT button on the top control or press the COMPUTER button on the bottom of this page. Source Select Menu Move the pointer to the RGB IN-2/ COMPONENT IN...

/app/pdf/projector/lv5220-7220-7225_manual.pdf
Page 38
Cinema Picture level adjusted for further description. Blackboard(Green) Picture level suitable for the image projected on the remote control unit. IMAGE button Standard Cinema Blackboard(Green) Custom Menu Operation 1 Press the MENU button and the On-Screen Menu will appear. See ...Blackboard(Green) Picture level suitable for the picture with fine tone. This is mainly effective on a green colored board, not truly effective on this projector. Image Select Menu Image Select Menu icon Move the red frame pointer to a level and press the SET button. Custom User preset image in ...
Cinema Picture level adjusted for further description. Blackboard(Green) Picture level suitable for the image projected on the remote control unit. IMAGE button Standard Cinema Blackboard(Green) Custom Menu Operation 1 Press the MENU button and the On-Screen Menu will appear. See ...Blackboard(Green) Picture level suitable for the picture with fine tone. This is mainly effective on a green colored board, not truly effective on this projector. Image Select Menu Image Select Menu icon Move the red frame pointer to a level and press the SET button. Custom User preset image in ...


