
lv7555_manual.pdf
Page 2
...OR ELECTRIC SHOCK, DO NOT EXPOSE THIS APPLIANCE TO RAIN OR MOISTURE. G Remote Control Unit, supplied to operate improperly, read this manual thoroughly and operate the projector properly. G This projector produces intense light from the power outlet. This projector provides many convenient features and... spray can also be used for an extended time, unplug the projector from the projection lens. READ AND KEEP THIS OWNER'S MANUAL FOR LATER USE. NO USERSERVICEABLE PARTS INSIDE EXCEPT LAMP REPLACEMENT. Be especially careful that children do not stare directly into a compartment...
...OR ELECTRIC SHOCK, DO NOT EXPOSE THIS APPLIANCE TO RAIN OR MOISTURE. G Remote Control Unit, supplied to operate improperly, read this manual thoroughly and operate the projector properly. G This projector produces intense light from the power outlet. This projector provides many convenient features and... spray can also be used for an extended time, unplug the projector from the projection lens. READ AND KEEP THIS OWNER'S MANUAL FOR LATER USE. NO USERSERVICEABLE PARTS INSIDE EXCEPT LAMP REPLACEMENT. Be especially careful that children do not stare directly into a compartment...
lv7555_manual.pdf
Page 5
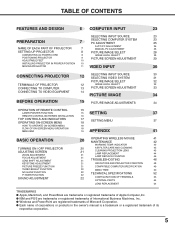
G Each name of corporations or products in the owner's manual is a trademark or a registered trademark of Microsoft Corporation. G Windows and PowerPoint are registered trademarks of its respective corporation. 5 TABLE OF CONTENTS FEATURES AND... INPUT 23 SELECTING INPUT SOURCE 23 PREPARATION 7 SELECTING COMPUTER SYSTEM PC ADJUSTMENT 23 25 AUTO PC ADJUSTMENT 25 NAME OF EACH PART OF PROJECTOR 7 MANUAL PC ADJUSTMENT 26 SETTING-UP PROJECTOR CONNECTING AC POWER CORD POSITIONING PROJECTOR ADJUSTABLE FEET 8 PICTURE IMAGE SELECT 28 8 IMAGE LEVEL SELECT 28 9 PICTURE ...
G Each name of corporations or products in the owner's manual is a trademark or a registered trademark of Microsoft Corporation. G Windows and PowerPoint are registered trademarks of its respective corporation. 5 TABLE OF CONTENTS FEATURES AND... INPUT 23 SELECTING INPUT SOURCE 23 PREPARATION 7 SELECTING COMPUTER SYSTEM PC ADJUSTMENT 23 25 AUTO PC ADJUSTMENT 25 NAME OF EACH PART OF PROJECTOR 7 MANUAL PC ADJUSTMENT 26 SETTING-UP PROJECTOR CONNECTING AC POWER CORD POSITIONING PROJECTOR ADJUSTABLE FEET 8 PICTURE IMAGE SELECT 28 8 IMAGE LEVEL SELECT 28 9 PICTURE ...
lv7555_manual.pdf
Page 7
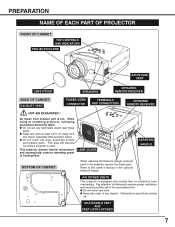
... the these vents. Pay attention to following precautions should be taken. G Do not cover vent slots. When using or installing projector, following to the owner's manual in the optional Network Imager. This projector detects internal temperature and automatically controls operating power of fire and malfunction. This area will become hot while...
... the these vents. Pay attention to following precautions should be taken. G Do not cover vent slots. When using or installing projector, following to the owner's manual in the optional Network Imager. This projector detects internal temperature and automatically controls operating power of fire and malfunction. This area will become hot while...
lv7555_manual.pdf
Page 24
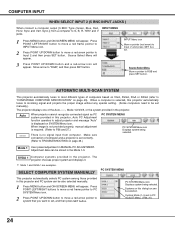
...projects the proper image without any special setting. (Some computers need to TROUBLESHOOTING on SYSTEM Menu icon. Adjustment data can be also selected manually. 1 Press MENU button and ON-SCREEN MENU will appear. Custom Mode (1~5) set correctly. (Refer to be selected. Source Select Menu... UP/DOWN button and a red-arrow icon will appear. Mode 1 User preset adjustment in the projector. When image is not provided properly, manual adjustment is required. (Refer to Input 2 and then press SET button. The projector chooses proper system and displays it. ✽ Mode 1...
...projects the proper image without any special setting. (Some computers need to TROUBLESHOOTING on SYSTEM Menu icon. Adjustment data can be also selected manually. 1 Press MENU button and ON-SCREEN MENU will appear. Custom Mode (1~5) set correctly. (Refer to be selected. Source Select Menu... UP/DOWN button and a red-arrow icon will appear. Mode 1 User preset adjustment in the projector. When image is not provided properly, manual adjustment is required. (Refer to Input 2 and then press SET button. The projector chooses proper system and displays it. ✽ Mode 1...

lv7555_manual.pdf
Page 25
... on Remote Control Unit. icon and press SET button. Store adjustment parameters. NOTE G Fine sync, Total dots and Picture Position of MANUAL PC ADJUSTMENT section (P27). COMPUTER INPUT PC ADJUSTMENT AUTO PC ADJUSTMENT Auto PC Adjustment function is provided to automatically adjust Fine sync, Total...button to move a red frame pointer to your computer. Adjustment parameters from Auto PC Adjustment can be fully adjusted with this function, manual adjustments are memorized, setting can be done just by pressing AUTO PC ADJ. icon and then press SET button. Once parameters are...
... on Remote Control Unit. icon and press SET button. Store adjustment parameters. NOTE G Fine sync, Total dots and Picture Position of MANUAL PC ADJUSTMENT section (P27). COMPUTER INPUT PC ADJUSTMENT AUTO PC ADJUSTMENT Auto PC Adjustment function is provided to automatically adjust Fine sync, Total...button to move a red frame pointer to your computer. Adjustment parameters from Auto PC Adjustment can be fully adjusted with this function, manual adjustments are memorized, setting can be done just by pressing AUTO PC ADJ. icon and then press SET button. Once parameters are...

lv7555_manual.pdf
Page 26
...to adjust "Clamp," "Display area (H/V)" or set "Full screen." This projector has a Manual PC Adjustment to enable you to precisely adjust several parameters to match with those parameters manually adjusted. This projector has 5 independent memory areas to memorize those special signal formats. Press ...Selected Mode Shows status (Stored / Free) of computer selected. When image has a dark bar(s), try this projector. COMPUTER INPUT MANUAL PC ADJUSTMENT This projector can automatically tune to display signals from standard ones and may be tuned by Multi-Scan system of this adjustment...
...to adjust "Clamp," "Display area (H/V)" or set "Full screen." This projector has a Manual PC Adjustment to enable you to precisely adjust several parameters to match with those parameters manually adjusted. This projector has 5 independent memory areas to memorize those special signal formats. Press ...Selected Mode Shows status (Stored / Free) of computer selected. When image has a dark bar(s), try this projector. COMPUTER INPUT MANUAL PC ADJUSTMENT This projector can automatically tune to display signals from standard ones and may be tuned by Multi-Scan system of this adjustment...

lv7555_manual.pdf
Page 31
...a specific broadcast signal format among 480i, 575i, 480p, 575p, 720p, 1035i and 1080i. When Video System is 1035i or 1080i, select system manually first. Y, Pb/Cb, Pr/Cr JACKS Auto Projector automatically detects incoming Video signal, and adjusts itself to optimize its performance. PAL / SECAM ... SELECTING VIDEO SYSTEM 1 Press MENU button and ON-SCREEN MENU will appear. When Video System is PAL-M or PAL-N, select system manually first. VIDEO JACK OR S-VIDEO JACK Auto Projector automatically detects incoming Video system, and adjusts itself to select a specific component video ...
...a specific broadcast signal format among 480i, 575i, 480p, 575p, 720p, 1035i and 1080i. When Video System is 1035i or 1080i, select system manually first. Y, Pb/Cb, Pr/Cr JACKS Auto Projector automatically detects incoming Video signal, and adjusts itself to optimize its performance. PAL / SECAM ... SELECTING VIDEO SYSTEM 1 Press MENU button and ON-SCREEN MENU will appear. When Video System is PAL-M or PAL-N, select system manually first. VIDEO JACK OR S-VIDEO JACK Auto Projector automatically detects incoming Video system, and adjusts itself to select a specific component video ...

lv7555_manual.pdf
Page 36
... image level, move a red frame pointer to store manual adjustment. The message "OK?" Select [Yes] to Store icon and press SET button. Reset Reset all adjustment to OFF. Press POINT LEFT/RIGHT button(s) again, ... at this icon to display other items. Press SET button at this icon to change noise reduction mode. Store icon Press SET button at this manual adjustment, select Custom by pressing IMAGE button or through IMAGE SELECT MENU (refer to "Off", "L1", "L2". Progressive cannot be adjusted when the video system...
... image level, move a red frame pointer to store manual adjustment. The message "OK?" Select [Yes] to Store icon and press SET button. Reset Reset all adjustment to OFF. Press POINT LEFT/RIGHT button(s) again, ... at this icon to display other items. Press SET button at this icon to change noise reduction mode. Store icon Press SET button at this manual adjustment, select Custom by pressing IMAGE button or through IMAGE SELECT MENU (refer to "Off", "L1", "L2". Progressive cannot be adjusted when the video system...
lv7555_manual.pdf
Page 45
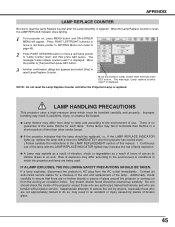
... button. The message "Lamp replace counter reset?" Risk of explosion may differ according to the environment or conditions in the LAMP REPLACEMENT section of this manual. ) Continuous use as its lifetime draws to ensure that the lamp should be cleaned up , replace the lamp with a new one should be replaced, i.e., if...
... button. The message "Lamp replace counter reset?" Risk of explosion may differ according to the environment or conditions in the LAMP REPLACEMENT section of this manual. ) Continuous use as its lifetime draws to ensure that the lamp should be cleaned up , replace the lamp with a new one should be replaced, i.e., if...

lv7555_manual.pdf
Page 52
... / Wave length : 650±20nm) Owner's Manual AC Power Cord Wireless/Wired Remote Control Transmitter and Batteries Remote Control Cable VGA Cable USB Cable Control Cable for Serial port Protective Dust Cover Lens Cover (LV-7555) Lens Attachment (LV-7555F) G Specifications are effective, a tiny fraction ... ~ 100 KHz, V-sync. 50 ~ 100 Hz F1.7 ~ 2.0 lens with f=48.2 mm ~ 62.6 mm Motor zoom and focus (Model LV-7555) 4.6' (1.4 m) ~ 48.3' (14.7 m) Model LV-7555 Up and Down Adjustable from 31" to change without notice. G LCD panels are manufactured to 10.5˚ AC 100 ~ 120 V (5.0 A Max...
... / Wave length : 650±20nm) Owner's Manual AC Power Cord Wireless/Wired Remote Control Transmitter and Batteries Remote Control Cable VGA Cable USB Cable Control Cable for Serial port Protective Dust Cover Lens Cover (LV-7555) Lens Attachment (LV-7555F) G Specifications are effective, a tiny fraction ... ~ 100 KHz, V-sync. 50 ~ 100 Hz F1.7 ~ 2.0 lens with f=48.2 mm ~ 62.6 mm Motor zoom and focus (Model LV-7555) 4.6' (1.4 m) ~ 48.3' (14.7 m) Model LV-7555 Up and Down Adjustable from 31" to change without notice. G LCD panels are manufactured to 10.5˚ AC 100 ~ 120 V (5.0 A Max...
lv7555_manual.pdf
Page 54
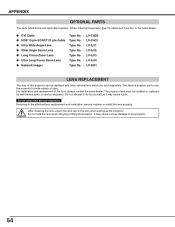
...replaced with other optional lens which are optionally supplied. For installation and replacement of uses. Do not attempt to the attached lens replacement and installation manual, replace or install the lens properly. It may cause injury. G DVI Cable G HDB 15 pin-SCART 21 pin Cable G Ultra Wide ... Focus Zoom Lens G Ultra Long Focus Zoom Lens G Network Imager Type No. : LV-CA29 Type No. : LV-CA31 Type No. : LV-IL01 Type No. : LV-IL02 Type No. : LV-IL03 Type No. : LV-IL04 Type No. : LV-NI01 LENS REPLACEMENT The lens of this projector can be installed or replaced by yourself as...
...replaced with other optional lens which are optionally supplied. For installation and replacement of uses. Do not attempt to the attached lens replacement and installation manual, replace or install the lens properly. It may cause injury. G DVI Cable G HDB 15 pin-SCART 21 pin Cable G Ultra Wide ... Focus Zoom Lens G Ultra Long Focus Zoom Lens G Network Imager Type No. : LV-CA29 Type No. : LV-CA31 Type No. : LV-IL01 Type No. : LV-IL02 Type No. : LV-IL03 Type No. : LV-IL04 Type No. : LV-NI01 LENS REPLACEMENT The lens of this projector can be installed or replaced by yourself as...


