
User Manual
Page 2
... Adjusting the sound 42 Personalizing the projector menu display 42 Shutting down the projector 42 Direct power off 43 Watching 3D content 44 Supervising and controlling by computer 46 Configuring the LAN Settings ....... 46 Controlling the projector remotely through a web browser (e-Control 47 Controlling the projector using PJLink™ application 49 Menu operation 52 Maintenance 59 Care of the projector 59 Lamp information 60 Indicators 65 Troubleshooting 66 Specifications 67 Projector specifications 67 Dimensions 69 Timing chart 70 Control Commands...
... Adjusting the sound 42 Personalizing the projector menu display 42 Shutting down the projector 42 Direct power off 43 Watching 3D content 44 Supervising and controlling by computer 46 Configuring the LAN Settings ....... 46 Controlling the projector remotely through a web browser (e-Control 47 Controlling the projector using PJLink™ application 49 Menu operation 52 Maintenance 59 Care of the projector 59 Lamp information 60 Indicators 65 Troubleshooting 66 Specifications 67 Projector specifications 67 Dimensions 69 Timing chart 70 Control Commands...

User Manual
Page 3
... Equipment, ANSI / NFPA 75. If the problem still persists, contact the Canon Customer Support Center. This projector provides many years to be operating properly, read this manual again, check operations and cable connections, and try the solutions in the "Troubleshooting" section in the user's manual. Copyright notice Please note that enlarging or reducing the size of an image for commercial purposes or public presentation any...
... Equipment, ANSI / NFPA 75. If the problem still persists, contact the Canon Customer Support Center. This projector provides many years to be operating properly, read this manual again, check operations and cable connections, and try the solutions in the "Troubleshooting" section in the user's manual. Copyright notice Please note that enlarging or reducing the size of an image for commercial purposes or public presentation any...
User Manual
Page 4
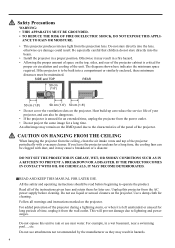
... MOISTURE. • This projector produces intense light from the ceiling, clean the air intake vents and top of time, unplug it may result in a wet basement, near water. This will prevent damage due to operate the product. Do not use . SIDE and TOP REAR 50 cm (1.6') 50 cm (1.6') 50 cm (1.6') 50 cm (1.6') • Do not cover the ventilation slots...
... MOISTURE. • This projector produces intense light from the ceiling, clean the air intake vents and top of time, unplug it may result in a wet basement, near water. This will prevent damage due to operate the product. Do not use . SIDE and TOP REAR 50 cm (1.6') 50 cm (1.6') 50 cm (1.6') 50 cm (1.6') • Do not cover the ventilation slots...
User Manual
Page 15
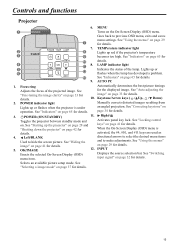
... flashes when the lamp has developed a problem. 10 See "Indicators" on page 65 for details. 10. INPUT Enacts the selected On-Screen Display (OSD) Displays the source selection bar. See "Switching menu item. MENU 1 Turns on . Goes back to make adjustments. LAMP indicator light Indicates the status of the projected image. AUTO PC 1. activated, the #4, #10, and #11 keys are used as 4. Selects an available picture setup mode. details. POWER indicator light Manually corrects distorted images resulting from Lights up red if the projector's temperature...
... flashes when the lamp has developed a problem. 10 See "Indicators" on page 65 for details. 10. INPUT Enacts the selected On-Screen Display (OSD) Displays the source selection bar. See "Switching menu item. MENU 1 Turns on . Goes back to make adjustments. LAMP indicator light Indicates the status of the projected image. AUTO PC 1. activated, the #4, #10, and #11 keys are used as 4. Selects an available picture setup mode. details. POWER indicator light Manually corrects distorted images resulting from Lights up red if the projector's temperature...
User Manual
Page 16
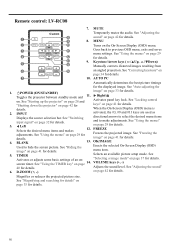
... menu items and to hide the screen picture. See "Using the TIMER key" on . Adjusts the sound level. Remote control: LV-RC08 7. Keystone/Arrow keys ( / Up, / Down) 5 9 Manually corrects distorted images resulting from 6 14 an angled projection. II POWER (ON/STANDBY) Toggles the projector between standby mode and on page 14. See "Using the menus" on page 42 for details. 7 10. See "Starting up the projector" on page 28 and "Shutting down the projector...
... menu items and to hide the screen picture. See "Using the TIMER key" on . Adjusts the sound level. Remote control: LV-RC08 7. Keystone/Arrow keys ( / Up, / Down) 5 9 Manually corrects distorted images resulting from 6 14 an angled projection. II POWER (ON/STANDBY) Toggles the projector between standby mode and on page 14. See "Using the menus" on page 42 for details. 7 10. See "Starting up the projector" on page 28 and "Shutting down the projector...
User Manual
Page 19
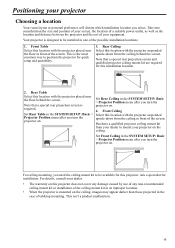
... the ceiling, images may appear darker than those projected in one of your dealer to be available for installation. Select this projector. For ceiling mounting, you turn the projector on . This isn't a product malfunction. 19 ENGLISH Positioning your screen, the location of a suitable power outlet, as well as the location and distance between the projector and the rest of the possible installation locations: 1. Take into consideration the size...
... the ceiling, images may appear darker than those projected in one of your dealer to be available for installation. Select this projector. For ceiling mounting, you turn the projector on . This isn't a product malfunction. 19 ENGLISH Positioning your screen, the location of a suitable power outlet, as well as the location and distance between the projector and the rest of the possible installation locations: 1. Take into consideration the size...
User Manual
Page 28
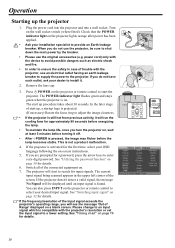
... change to an input signal which is pressed, the image may flicker before energizing the lamp. • To maintain the lamp life, once you will start up the projector 1. Operation Starting up procedure takes about 30 seconds. Check that the POWER indicator light on -screen instructions. 5. The start to select your dealer to enter a six-digit password. If the projector is on page 30 for details. Switch all of start the projector. The current input signal being...
... change to an input signal which is pressed, the image may flicker before energizing the lamp. • To maintain the lamp life, once you will start up the projector 1. Operation Starting up procedure takes about 30 seconds. Check that the POWER indicator light on -screen instructions. 5. The start to select your dealer to enter a six-digit password. If the projector is on page 30 for details. Switch all of start the projector. The current input signal being...
User Manual
Page 30
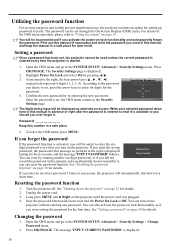
... Settings > Change Password menu. 2. If you forget the password If the password function is displayed. 30 You can reset the password function. Utilizing the password function For security purposes and to help prevent unauthorized use, the projector includes an option for the first time. If you enter the wrong password, the password error message as if you turn on page 29. Long press MENU and Right on -screen. Press OK/IMAGE. The digits...
... Settings > Change Password menu. 2. If you forget the password If the password function is displayed. 30 You can reset the password function. Utilizing the password function For security purposes and to help prevent unauthorized use, the projector includes an option for the first time. If you enter the wrong password, the password error message as if you turn on page 29. Long press MENU and Right on -screen. Press OK/IMAGE. The digits...
User Manual
Page 31
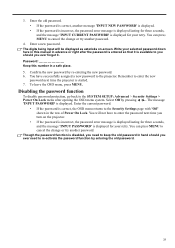
... the projector. • If the password is incorrect, the password error message is displayed lasting for three seconds, and the message 'INPUT PASSWORD' is correct, another password. Enter the old password. • If the password is displayed for your selected password down here in this number in the row of Power On Lock. Confirm the new password by pressing / . You have to keep the old password in advance or right after opening...
... the projector. • If the password is incorrect, the password error message is displayed lasting for three seconds, and the message 'INPUT PASSWORD' is correct, another password. Enter the old password. • If the password is displayed for your selected password down here in this number in the row of Power On Lock. Confirm the new password by pressing / . You have to keep the old password in advance or right after opening...
User Manual
Page 41
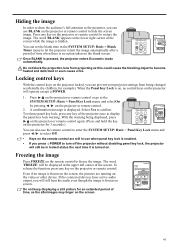
... mode automatically. You can set the blank time in the SYSTEM SETUP: Basic > Blank Timer menu to restore the image. Even if an image is frozen on the screen, the pictures are still in use BLANK on screen. Press on . Do not block the projection lens from projecting as the afterimages may linger on the projector locked, you can prevent your projector settings from being displayed, press on the projector or remote control...
... mode automatically. You can set the blank time in the SYSTEM SETUP: Basic > Blank Timer menu to restore the image. Even if an image is frozen on the screen, the pictures are still in use BLANK on screen. Press on . Do not block the projection lens from projecting as the afterimages may linger on the projector locked, you can prevent your projector settings from being displayed, press on the projector or remote control...
User Manual
Page 42
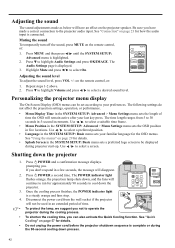
... the audio input is a steady orange and fans stop. 4. Personalizing the projector menu display The On-Screen Display (OSD) menus can also activate the Quick Cooling function. Once the cooling process finishes, the POWER indicator light is connected. Press MENU and then press / until the SYSTEM SETUP: Advanced menu is displayed. 3. Press to your last key press. Adjusting the sound level To adjust the sound level, press VOL +/- Use / to the projector audio input. The Audio Settings...
... the audio input is a steady orange and fans stop. 4. Personalizing the projector menu display The On-Screen Display (OSD) menus can also activate the Quick Cooling function. Once the cooling process finishes, the POWER indicator light is connected. Press MENU and then press / until the SYSTEM SETUP: Advanced menu is displayed. 3. Press to your last key press. Adjusting the sound level To adjust the sound level, press VOL +/- Use / to the projector audio input. The Audio Settings...
User Manual
Page 44
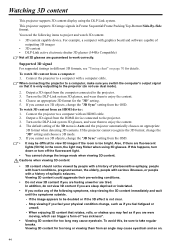
... objects, change the "3D Sync" setting from an angle may flicker when using the DLP Link system. This projector supports 3D image signals in the room, the light may cause eyestrain and so on the DLP-Link system 3D glasses, and wear them to the projector. 3. Output a 3D signal from the HDMI device connected to enjoy the content. 4. Turn on . 44 The default setting of "sea sickness". • Viewing 3D...
... objects, change the "3D Sync" setting from an angle may flicker when using the DLP Link system. This projector supports 3D image signals in the room, the light may cause eyestrain and so on the DLP-Link system 3D glasses, and wear them to the projector. 3. Output a 3D signal from the HDMI device connected to enjoy the content. 4. Turn on . 44 The default setting of "sea sickness". • Viewing 3D...

User Manual
Page 47
... address for the projector and the projector is on or in standby state, you can use the projector control panel or remote control to change the OSD menu settings, it . You can adjust the LAN Settings. 47 When using the Crestron Control System, please refer to the user manual of it may take a while for setup information. See "2. ii. When you use any computer that is displayed. i ii iv iii v vi i. When using this projector...
... address for the projector and the projector is on or in standby state, you can use the projector control panel or remote control to change the OSD menu settings, it . You can adjust the LAN Settings. 47 When using the Crestron Control System, please refer to the user manual of it may take a while for setup information. See "2. ii. When you use any computer that is displayed. i ii iv iii v vi i. When using this projector...
User Manual
Page 48
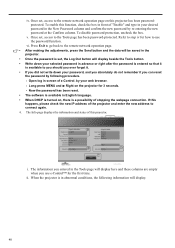
... will display. 48 iv. Long press MENU and Right on this function, check the box in front of the projector and enter the new address to the remote network operation page on the projector for the first time. If this projector. v. Open log in English language. • When DHCP is turned on, there is available in screen of stopping the webpage connection. Now the password has been reset...
... will display. 48 iv. Long press MENU and Right on this function, check the box in front of the projector and enter the new address to the remote network operation page on the projector for the first time. If this projector. v. Open log in English language. • When DHCP is turned on, there is available in screen of stopping the webpage connection. Now the password has been reset...
User Manual
Page 54
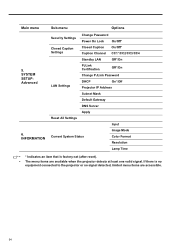
... is factory-set (after reset). • The menu items are accessible. 54 INFORMATION Sub-menu Options Security Settings Change Password Power On Lock On/Off* Closed Caption Settings Closed Caption Caption Channel On/Off* CC1*/CC2/CC3/CC4 Standby LAN Off*/On PJLink Certification Off*/On Change PJLink Password LAN Settings DHCP On*/Off Projector IP Address Subnet Mask Default Gateway DNS Server Apply Reset All Settings Input Image Mode Current System Status Color Format Resolution Lamp Time • * Indicates an...
... is factory-set (after reset). • The menu items are accessible. 54 INFORMATION Sub-menu Options Security Settings Change Password Power On Lock On/Off* Closed Caption Settings Closed Caption Caption Channel On/Off* CC1*/CC2/CC3/CC4 Standby LAN Off*/On PJLink Certification Off*/On Change PJLink Password LAN Settings DHCP On*/Off Projector IP Address Subnet Mask Default Gateway DNS Server Apply Reset All Settings Input Image Mode Current System Status Color Format Resolution Lamp Time • * Indicates an...
User Manual
Page 58
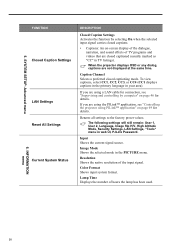
...: User 1, User 2, Language, Image flip H/V, High Altitude Mode, Security Settings, LAN Settings, "Tools" menu in your area). Image Mode Shows the selected mode in TV listings). Lamp Time Displays the number of TV programs and videos that are not displayed at the same time. Caption Channel Selects a preferred closed captioned (usually marked as "CC" in the PICTURE menu. Input Shows the current signal source. SYSTEM SETUP: Advanced menu FUNCTION Closed Caption Settings LAN Settings Reset All Settings Current System Status DESCRIPTION Closed Caption Settings...
...: User 1, User 2, Language, Image flip H/V, High Altitude Mode, Security Settings, LAN Settings, "Tools" menu in your area). Image Mode Shows the selected mode in TV listings). Lamp Time Displays the number of TV programs and videos that are not displayed at the same time. Caption Channel Selects a preferred closed captioned (usually marked as "CC" in the PICTURE menu. Input Shows the current signal source. SYSTEM SETUP: Advanced menu FUNCTION Closed Caption Settings LAN Settings Reset All Settings Current System Status DESCRIPTION Closed Caption Settings...
User Manual
Page 60
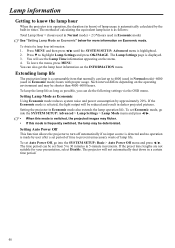
... Lamp Time information appearing on the operating environment and may be set Auto Power Off, go into the SYSTEM SETUP: Basic > Auto Power Off menu and press / . Press MENU and then press / until the SYSTEM SETUP: Advanced menu is displayed. 3. To set Economic mode, go into the SYSTEM SETUP: Advanced > Lamp Settings > Lamp Mode menu and press / . • When this mode is switched, the projected images may flicker. • If this mode is as follows: Total Lamp Hour = (hours used in Normal mode) + 2/3*(hours used...
... Lamp Time information appearing on the operating environment and may be set Auto Power Off, go into the SYSTEM SETUP: Basic > Auto Power Off menu and press / . Press MENU and then press / until the SYSTEM SETUP: Advanced menu is displayed. 3. To set Economic mode, go into the SYSTEM SETUP: Advanced > Lamp Settings > Lamp Mode menu and press / . • When this mode is switched, the projected images may flicker. • If this mode is as follows: Total Lamp Hour = (hours used in Normal mode) + 2/3*(hours used...
User Manual
Page 62
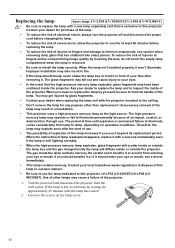
..., see a doctor immediately. • This lamp contains mercury. Use of lamp replacement appears, replace it . When the instruction of other than replacement. The gas inside the lamp contains mercury. Unscrew the screws on operation conditions. The high-pressure mercury lamp may have been scattered inside the projector. Replacing the lamp Spare lamp: LV-LP38 (LV-X300ST)/LV-LP40 (LV-WX300ST) • Be sure to replace the lamp with a new lamp separately sold that is still...
..., see a doctor immediately. • This lamp contains mercury. Use of lamp replacement appears, replace it . When the instruction of other than replacement. The gas inside the lamp contains mercury. Unscrew the screws on operation conditions. The high-pressure mercury lamp may have been scattered inside the projector. Replacing the lamp Spare lamp: LV-LP38 (LV-X300ST)/LV-LP40 (LV-WX300ST) • Be sure to replace the lamp with a new lamp separately sold that is still...
User Manual
Page 66
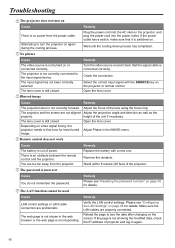
... LAN control settings. If the page is an obstacle between the remote control and the projector. Plug the power cord into the power outlet. The projector and the screen are problematic. Remove the obstacle. Attempting to the input signal device. Wait until the cooling down process has completed. No picture Cause The video source is still closed . The lens cover is not turned on page 30 for details. Check the connection. Open the lens cover...
... LAN control settings. If the page is an obstacle between the remote control and the projector. Plug the power cord into the power outlet. The projector and the screen are problematic. Remove the obstacle. Attempting to the input signal device. Wait until the cooling down process has completed. No picture Cause The video source is still closed . The lens cover is not turned on page 30 for details. Check the connection. Open the lens cover...
User Manual
Page 68
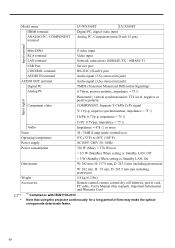
Model name HDMI terminal ANALOG PC / COMPONENT terminal LV-WX300ST LV-X300ST Digital PC, digital video input Analog PC, Component (mini D-sub 15-pin) Input terminal Mini-DIN4 S video input RCA terminal Video input LAN terminal Network connection (100BASE-TX / 10BASE-T) USB Port Service port CONTROL terminal RS-232C (D-sub 9-pin) AUDIO IN terminal AUDIO OUT terminal Audio signal (3.5 stereo mini jack) Audio signal (3.5 stereo mini jack) Digital PC TMDS (Transition Minimized Differential Signaling) Analog PC 0.7Vp-p, positive polarity...
Model name HDMI terminal ANALOG PC / COMPONENT terminal LV-WX300ST LV-X300ST Digital PC, digital video input Analog PC, Component (mini D-sub 15-pin) Input terminal Mini-DIN4 S video input RCA terminal Video input LAN terminal Network connection (100BASE-TX / 10BASE-T) USB Port Service port CONTROL terminal RS-232C (D-sub 9-pin) AUDIO IN terminal AUDIO OUT terminal Audio signal (3.5 stereo mini jack) Audio signal (3.5 stereo mini jack) Digital PC TMDS (Transition Minimized Differential Signaling) Analog PC 0.7Vp-p, positive polarity...


