Owners Manual
Page 2
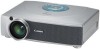
... Setting menu. (See page 44.) ◆ Blackboard Function Blackboard✳ can use . ◆ Compatibility The projector widely accepts various video and computer input signals including; You can be selected in size and weight. This projector utilizes built-in multimedia features, a palette of 16.77 million colors, and matrix liquid crystal display (LCD) technology. ◆...
... Setting menu. (See page 44.) ◆ Blackboard Function Blackboard✳ can use . ◆ Compatibility The projector widely accepts various video and computer input signals including; You can be selected in size and weight. This projector utilizes built-in multimedia features, a palette of 16.77 million colors, and matrix liquid crystal display (LCD) technology. ◆...
Owners Manual
Page 3
... 13 Operating Range 13 Remote Control Battery Installation 14 Installation 15 Positioning the Projector 15 Adjustable Feet 15 Connecting the AC Power Cord 16 Connecting to a Computer 17 Connecting to Video Equipment 18 Connecting to Component Video Equipment 19 Basic... 48 Cleaning the Projection Lens 49 Cleaning the Projector Cabinet 49 Lamp Replacement 50 Lamp Replace Counter 51 Appendix 52 Troubleshooting 52 Indicators and Projector Condition 54 Menu Tree 55 Compatible Computer Specifications 57 Technical Specifications 58 Configurations of Terminals ...
... 13 Operating Range 13 Remote Control Battery Installation 14 Installation 15 Positioning the Projector 15 Adjustable Feet 15 Connecting the AC Power Cord 16 Connecting to a Computer 17 Connecting to Video Equipment 18 Connecting to Component Video Equipment 19 Basic... 48 Cleaning the Projection Lens 49 Cleaning the Projector Cabinet 49 Lamp Replacement 50 Lamp Replace Counter 51 Appendix 52 Troubleshooting 52 Indicators and Projector Condition 54 Menu Tree 55 Compatible Computer Specifications 57 Technical Specifications 58 Configurations of Terminals ...

Owners Manual
Page 4
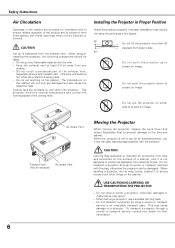
...3.3'(1m) 3.3'(1m) 3.3'(1m) 3.3'(1m) - NO USER-SERVICEABLE PARTS INSIDE EXCEPT LAMP REPLACEMENT. Install the projector in a proper position. If not, it in better condition for use in a computer room as possible. Do not put any flammable object or spray can also be built into the beam. ... from the ventilation holes. - Do not cover the ventilation slot on the top, sides and rear of the projector cabinet for Protection of Electronic Computer/Data Processing Equipment NOTE FOR CUSTOMERS IN THE US Hg LAMP(S) INSIDE THIS PRODUCT CONTAIN MERCURY AND MUST BE RECYCLED...
...3.3'(1m) 3.3'(1m) 3.3'(1m) 3.3'(1m) - NO USER-SERVICEABLE PARTS INSIDE EXCEPT LAMP REPLACEMENT. Install the projector in a proper position. If not, it in better condition for use in a computer room as possible. Do not put any flammable object or spray can also be built into the beam. ... from the ventilation holes. - Do not cover the ventilation slot on the top, sides and rear of the projector cabinet for Protection of Electronic Computer/Data Processing Equipment NOTE FOR CUSTOMERS IN THE US Hg LAMP(S) INSIDE THIS PRODUCT CONTAIN MERCURY AND MUST BE RECYCLED...
Owners Manual
Page 5
...in a wet basement, near the ventilation duct of the instructions given here and retain them for ventilation, to service this projector yourself as this projector from AC power supply before the product is damaged or frayed. d. When replacement parts are covered by the operating instructions... the same characteristics as they may expose you are provided for later use near or over a radiator or heat register. This projector should never be sure the service technician has used replacement parts specified by the manufacturer as the original part. Quick stops, excessive...
...in a wet basement, near the ventilation duct of the instructions given here and retain them for ventilation, to service this projector yourself as this projector from AC power supply before the product is damaged or frayed. d. When replacement parts are covered by the operating instructions... the same characteristics as they may expose you are provided for later use near or over a radiator or heat register. This projector should never be sure the service technician has used replacement parts specified by the manufacturer as the original part. Quick stops, excessive...
Owners Manual
Page 6
... the exhaust vent. Improper Installation may reduce the lamp life and cause a fire hazard. 20˚ Do not tilt the projector more than 20 degrees from external forces. CAUTION Carrying Bag (supplied) is not in the cabinet are provided to project an image...protect it is exhausted from any flammable objects near the vent. - To transport a projector through a courier or transport services with the projector. Do not point the projector down the projector. When carrying a projector, use for ventilation and to ensure reliable operation of a cabinet, and it from ...
... the exhaust vent. Improper Installation may reduce the lamp life and cause a fire hazard. 20˚ Do not tilt the projector more than 20 degrees from external forces. CAUTION Carrying Bag (supplied) is not in the cabinet are provided to project an image...protect it is exhausted from any flammable objects near the vent. - To transport a projector through a courier or transport services with the projector. Do not point the projector down the projector. When carrying a projector, use for ventilation and to ensure reliable operation of a cabinet, and it from ...
Owners Manual
Page 7
...feature to be unable to radio communications. Consult the dealer or an experienced radio/TV technician for a Class B digital device, pursuant to correct the interference by ... be determined by the Canadian Standard Association (CSA). Compliance Federal Communication Commission Notice Multimedia Projector, Model : LV-X4E, LV-X4U, LV-7230E, LV-7230U This device ...with class B limits in a residential installation. Reorient or relocate the receiving antenna. - Canon U.S.A., Inc. Operation is no guarantee that to provide reasonable protection against harmful interference in ...
...feature to be unable to radio communications. Consult the dealer or an experienced radio/TV technician for a Class B digital device, pursuant to correct the interference by ... be determined by the Canadian Standard Association (CSA). Compliance Federal Communication Commission Notice Multimedia Projector, Model : LV-X4E, LV-X4U, LV-7230E, LV-7230U This device ...with class B limits in a residential installation. Reorient or relocate the receiving antenna. - Canon U.S.A., Inc. Operation is no guarantee that to provide reasonable protection against harmful interference in ...

Owners Manual
Page 9
...and can be done by pressing the RESET button with a USB cable. (p17) y COMPUTER AUDIO IN Connect the audio output (stereo) from a computer or video equipment connected to q or u to this projector. Set the terminal up as component input or RGB Scart 21-Pin Video input. (p17.... Connect the composite video output from video equipment to VIDEO jack. (p18) t USB (Series B) When operating the connected computer with the remote control unit, connect USB port of your computer to this connector with a pen, which controls this terminal. Terminal Part Names and Functions q we r t y RGB...
...and can be done by pressing the RESET button with a USB cable. (p17) y COMPUTER AUDIO IN Connect the audio output (stereo) from a computer or video equipment connected to q or u to this projector. Set the terminal up as component input or RGB Scart 21-Pin Video input. (p17.... Connect the composite video output from video equipment to VIDEO jack. (p18) t USB (Series B) When operating the connected computer with the remote control unit, connect USB port of your computer to this connector with a pen, which controls this terminal. Terminal Part Names and Functions q we r t y RGB...
Owners Manual
Page 10
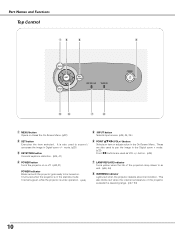
...It is also used to an end. (p50, 54) i WARNING indicator Lights red when the projector detects abnormal condition. It turns red when the projector is under operation. (p54) u LAMP REPLACE indicator Turns yellow when the life of the projector exceeds the operating range. (p47, 54) 10 It remains green while the... projector is in Digital zoom +/- These are used to be turned on or off. (p20,21) POWER indicator Blinks red until the projector gets ready to pan the image in ...
...It is also used to an end. (p50, 54) i WARNING indicator Lights red when the projector detects abnormal condition. It turns red when the projector is under operation. (p54) u LAMP REPLACE indicator Turns yellow when the life of the projector exceeds the operating range. (p47, 54) 10 It remains green while the... projector is in Digital zoom +/- These are used to be turned on or off. (p20,21) POWER indicator Blinks red until the projector gets ready to pan the image in ...
Owners Manual
Page 11
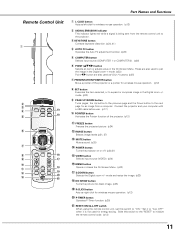
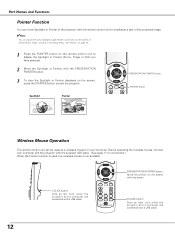
... unit, set this switch to the "RESET" to initialize the remote control code. (p13) 11 Connect the projector and your computer with a USB cable before use. (p17.) !0 POINTER button Activates the Pointer function of the projector or a pointer for wireless mouse operation. (p12) w SIGNAL EMISSION indicator This indicator lights red while a signal is...
... unit, set this switch to the "RESET" to initialize the remote control code. (p13) 11 Connect the projector and your computer with a USB cable before use. (p17.) !0 POINTER button Activates the Pointer function of the projector or a pointer for wireless mouse operation. (p12) w SIGNAL EMISSION indicator This indicator lights red while a signal is...
Owners Manual
Page 12
...) you have selected. 2 Move the Spotlight or Pointer with a USB cable. 12 R-CLICK button Acts as left click while the projector and a computer are connected with the PRESENTATION POINTER button. 3 To clear the Spotlight or Pointer displayed on the screen, press the POINTER button toward the... used as a wireless mouse for connection.) When the Pointer function is not available. Before operating the wireless mouse, connect your computer and the projector with this button. PRESENTATION POINTER button Move the pointer on the screen with the supplied USB cable. (See page 17 for your...
...) you have selected. 2 Move the Spotlight or Pointer with a USB cable. 12 R-CLICK button Acts as left click while the projector and a computer are connected with the PRESENTATION POINTER button. 3 To clear the Spotlight or Pointer displayed on the screen, press the POINTER button toward the... used as a wireless mouse for connection.) When the Pointer function is not available. Before operating the wireless mouse, connect your computer and the projector with this button. PRESENTATION POINTER button Move the pointer on the screen with the supplied USB cable. (See page 17 for your...
Owners Manual
Page 13
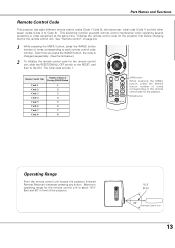
...number. The initial code is about 16.4' (5m) and 60° in front of the projector. IMAGE button Operating Range Point the remote control unit toward the projector (Infrared Remote Receiver) whenever pressing any button. Each time you press the IMAGE button, the ...function prevents remote control interference when operating several projectors or video equipment at the same time. (Change the remote control code for the projector first before changing that for the projector. Part Names and Functions Remote Control Code This projector has eight different remote control codes (Code ...
...number. The initial code is about 16.4' (5m) and 60° in front of the projector. IMAGE button Operating Range Point the remote control unit toward the projector (Infrared Remote Receiver) whenever pressing any button. Each time you press the IMAGE button, the ...function prevents remote control interference when operating several projectors or video equipment at the same time. (Change the remote control code for the projector first before changing that for the projector. Part Names and Functions Remote Control Code This projector has eight different remote control codes (Code ...
Owners Manual
Page 15
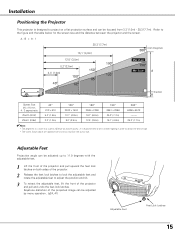
... flat projection surface and can be focused from the actual size. Installation Positioning the Projector This projector is recommended to limit ambient lighting in a room has a great influence on both sides of the projector. 2 Release the feet lock latches to lock the adjustable feet and rotate the ...adjustable feet to the figure and the table below for the screen size and the distance between the projector and the screen. Zoom (max) 3.3' (1.0m) 8.2' (2.5m) 12.5' (3.8m) 16.1' (4.9m) 25.3' (7.7m) ✔Note: • The brightness in...
... flat projection surface and can be focused from the actual size. Installation Positioning the Projector This projector is recommended to limit ambient lighting in a room has a great influence on both sides of the projector. 2 Release the feet lock latches to lock the adjustable feet and rotate the ...adjustable feet to the figure and the table below for the screen size and the distance between the projector and the screen. Zoom (max) 3.3' (1.0m) 8.2' (2.5m) 12.5' (3.8m) 16.1' (4.9m) 25.3' (7.7m) ✔Note: • The brightness in...
Owners Manual
Page 16
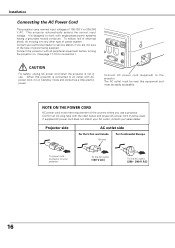
... if you use . To reduce risk of electrical shock, do not plug into any other type of 100-120 V or 200-240 V AC. This projector automatically selects the correct input voltage. Connect AC power cord (supplied) to work with AC power cord, it is not in Stand-by mode and... consumes a little electric power. The AC outlet must be near this projector is connected to an outlet with single-phase power systems having a grounded neutral conductor. and Canada Ground For Continental Europe To power cord connector on...
... if you use . To reduce risk of electrical shock, do not plug into any other type of 100-120 V or 200-240 V AC. This projector automatically selects the correct input voltage. Connect AC power cord (supplied) to work with AC power cord, it is not in Stand-by mode and... consumes a little electric power. The AC outlet must be near this projector is connected to an outlet with single-phase power systems having a grounded neutral conductor. and Canada Ground For Continental Europe To power cord connector on...
Owners Manual
Page 17
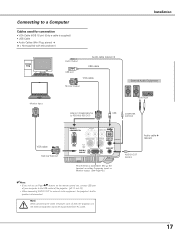
... ✔Note: • If you wish to use Page ed buttons on the remote control unit, connect USB port of your computer to the USB socket of both the projector and the external equipment should be disconnected from AC outlet. Note: When connecting the cable, the power cords of the... projector. (p9,12 and 44) • When connecting AUDIO OUT to a Computer Cables used for connection • VGA Cable (HDB 15 pin) (Only a cable is supplied.) • USB Cable • Audio...
... ✔Note: • If you wish to use Page ed buttons on the remote control unit, connect USB port of your computer to the USB socket of both the projector and the external equipment should be disconnected from AC outlet. Note: When connecting the cable, the power cords of the... projector. (p9,12 and 44) • When connecting AUDIO OUT to a Computer Cables used for connection • VGA Cable (HDB 15 pin) (Only a cable is supplied.) • USB Cable • Audio...
Owners Manual
Page 18
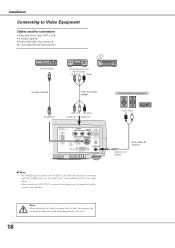
...8226; Video and Audio Cable (RCA x 3) ✽ • S-VIDEO Cable ✽ • Audio Cable (Mini Plug: stereo Not supplied with this projector.) S-Video Output Composite Video and Audio Output (R) (L) (Video) S-Video cable ✽ Video and audio cable✽ S-VIDEO IN (R) (L) (Video) AUDIO ...IN VIDEO IN RGB IN-1/ COMPONENT IN AUDIO R IN L VIDEO IN SERVICE PORT S-VIDEO IN COMPUTER AUDIO IN RESET RGB IN-2/ RGB OUT AUDIO OUT External Audio Equipment Audio Input Audio cable ✽ (stereo) AUDIO OUT (stereo) ✔Note:...
...8226; Video and Audio Cable (RCA x 3) ✽ • S-VIDEO Cable ✽ • Audio Cable (Mini Plug: stereo Not supplied with this projector.) S-Video Output Composite Video and Audio Output (R) (L) (Video) S-Video cable ✽ Video and audio cable✽ S-VIDEO IN (R) (L) (Video) AUDIO ...IN VIDEO IN RGB IN-1/ COMPONENT IN AUDIO R IN L VIDEO IN SERVICE PORT S-VIDEO IN COMPUTER AUDIO IN RESET RGB IN-2/ RGB OUT AUDIO OUT External Audio Equipment Audio Input Audio cable ✽ (stereo) AUDIO OUT (stereo) ✔Note:...
Owners Manual
Page 19
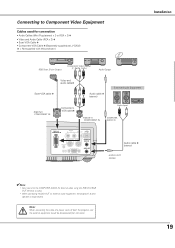
...10045; • Scart-VGA Cable ✽ • Component-VGA Cable ✽ (Separately supplied as LV-CA32) (✽ = Not supplied with this projector.) Installation RGB Scart 21-pin Output Component Video Output (Y, Pb/Cb, Pr/Cr) Audio Output Video and audio cable✽ Scart-VGA cable ✽ ... OUT Audio cable ✽ (stereo) AUDIO OUT (stereo) ✔Note: • Input sound to the COMPUTER AUDIO IN terminal when using the RGB IN-2/RGB OUT terminal as input. • When connecting AUDIO OUT to external audio equipment, the projector's built-in speaker is disconnected.
...10045; • Scart-VGA Cable ✽ • Component-VGA Cable ✽ (Separately supplied as LV-CA32) (✽ = Not supplied with this projector.) Installation RGB Scart 21-pin Output Component Video Output (Y, Pb/Cb, Pr/Cr) Audio Output Video and audio cable✽ Scart-VGA cable ✽ ... OUT Audio cable ✽ (stereo) AUDIO OUT (stereo) ✔Note: • Input sound to the COMPUTER AUDIO IN terminal when using the RGB IN-2/RGB OUT terminal as input. • When connecting AUDIO OUT to external audio equipment, the projector's built-in speaker is disconnected.
Owners Manual
Page 20
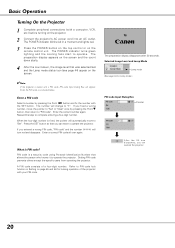
...in a moment and lights red. 3 Press the POWER button on the top control or on the remote control unit. What is locked with a computer, VCR, etc.) before turning on page 45 and 46 for Lamp mode.) PIN code Input Dialog Box Pointer After the OK icon disappears, you entered... operation of a four-digit number. The POWER indicator turns green lighting and the cooling fans start to "PIN code". Basic Operation Turning On the Projector 1 Complete peripheral connections (with a PIN code, PIN code Input Dialog Box will appear. The preparation display appears on the screen and the count ...
...in a moment and lights red. 3 Press the POWER button on the top control or on the remote control unit. What is locked with a computer, VCR, etc.) before turning on page 45 and 46 for Lamp mode.) PIN code Input Dialog Box Pointer After the OK icon disappears, you entered... operation of a four-digit number. The POWER indicator turns green lighting and the cooling fans start to "PIN code". Basic Operation Turning On the Projector 1 Complete peripheral connections (with a PIN code, PIN code Input Dialog Box will appear. The preparation display appears on the screen and the count ...
Owners Manual
Page 21
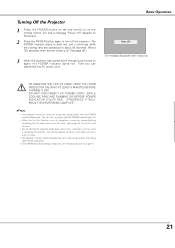
... indicator starts to an AC outlet. (See page 43 for about an hour in shortening the lamp life. Then you can turn off the projector. Basic Operation The message disappears after the POWER indicator lights red. • When the On start function.) • Do not operate the...temperature and automatically controls the running speed of the cooling fans. • If the WARNING indicator blinks or lights red, see "Warning Indicator" on , this projector is L2. appears on the screen. 2 Press the POWER button again to turn it a rest about 90 seconds. (About 120 seconds when the fan mode...
... indicator starts to an AC outlet. (See page 43 for about an hour in shortening the lamp life. Then you can turn off the projector. Basic Operation The message disappears after the POWER indicator lights red. • When the On start function.) • Do not operate the...temperature and automatically controls the running speed of the cooling fans. • If the WARNING indicator blinks or lights red, see "Warning Indicator" on , this projector is L2. appears on the screen. 2 Press the POWER button again to turn it a rest about 90 seconds. (About 120 seconds when the fan mode...
Owners Manual
Page 22
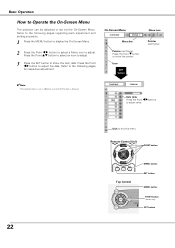
... the Point 7 8 button to move the pointer. Basic Operation How to the following pages for respective adjustment. Refer to Operate the On-Screen Menu The projector can be adjusted or set via the On-Screen Menu.
... the Point 7 8 button to move the pointer. Basic Operation How to the following pages for respective adjustment. Refer to Operate the On-Screen Menu The projector can be adjusted or set via the On-Screen Menu.
Owners Manual
Page 23
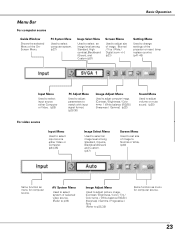
...to select computer system. (p27) Image Select Menu Used to select an image level among Standard, High contrast,Blackboard (Green), and Custom.(p31) Screen Menu Used to adjust size of image. [Normal / True / Wide / Digital zoom +/-] (p33) Setting Menu Used to change settings of the projector or reset... lamp replace counter. (p41-46) Input Menu Used to select input source either Computer or Video. (p26) PC Adjust Menu Used to adjust parameters to match with input signal format. (p28-...
...to select computer system. (p27) Image Select Menu Used to select an image level among Standard, High contrast,Blackboard (Green), and Custom.(p31) Screen Menu Used to adjust size of image. [Normal / True / Wide / Digital zoom +/-] (p33) Setting Menu Used to change settings of the projector or reset... lamp replace counter. (p41-46) Input Menu Used to select input source either Computer or Video. (p26) PC Adjust Menu Used to adjust parameters to match with input signal format. (p28-...


