Owners Manual
Page 3
...Operating Range 13 Remote Control Battery Installation 14 Installation 15 Positioning the Projector 15 Adjustable Feet 15 Connecting the AC Power Cord 16 Connecting to a Computer 17 Connecting to Video Equipment 18 Connecting to Component Video Equipment ...Projector 21 How to Operate the On-Screen Menu 22 Menu Bar 23 Zoom and Focus Adjustment 24 Keystone Adjustment 24 Picture Freeze Function 24 No Show Function 25 P-Timer Function 25 Sound Adjustment 25 Computer Input 26 Input Source Selection 26 Computer System Selection 27 Auto PC Adjustment 28 Manual...
...Operating Range 13 Remote Control Battery Installation 14 Installation 15 Positioning the Projector 15 Adjustable Feet 15 Connecting the AC Power Cord 16 Connecting to a Computer 17 Connecting to Video Equipment 18 Connecting to Component Video Equipment ...Projector 21 How to Operate the On-Screen Menu 22 Menu Bar 23 Zoom and Focus Adjustment 24 Keystone Adjustment 24 Picture Freeze Function 24 No Show Function 25 P-Timer Function 25 Sound Adjustment 25 Computer Input 26 Input Source Selection 26 Computer System Selection 27 Auto PC Adjustment 28 Manual...

Owners Manual
Page 4
... any flammable object or spray can also be maintained. THIS SYMBOL INDICATES THAT THERE ARE IMPORTANT OPERATING AND MAINTENANCE INSTRUCTIONS IN THE OWNER'S MANUAL WITH THIS UNIT. Eye damage could result. Install the projector in a computer room as possible. Do not cover the ventilation slot on the top, sides and rear of Electronic...
... any flammable object or spray can also be maintained. THIS SYMBOL INDICATES THAT THERE ARE IMPORTANT OPERATING AND MAINTENANCE INSTRUCTIONS IN THE OWNER'S MANUAL WITH THIS UNIT. Eye damage could result. Install the projector in a computer room as possible. Do not cover the ventilation slot on the top, sides and rear of Electronic...
Owners Manual
Page 27
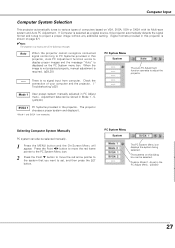
...formats provided in PC Adjust menu. Check the connection of your computer and the projector. ( " Troubleshooting" p52 ) Mode 1 User preset system manually adjusted in this projector is shown on page 57 ) ✔Note: The projector may display one of computers based on VGA, SVGA, XGA or SXGA with its Multi-...scan system and Auto PC Adjustment. Selecting Computer System Manually PC system can also be stored in Mode 1 - 5. ( p29,30 ) SVGA 1 PC Systems provided in the projector. Adjustment data can be selected. Press the Point 7 8 button to move the ...
...formats provided in PC Adjust menu. Check the connection of your computer and the projector. ( " Troubleshooting" p52 ) Mode 1 User preset system manually adjusted in this projector is shown on page 57 ) ✔Note: The projector may display one of computers based on VGA, SVGA, XGA or SXGA with its Multi-...scan system and Auto PC Adjustment. Selecting Computer System Manually PC system can also be stored in Mode 1 - 5. ( p29,30 ) SVGA 1 PC Systems provided in the projector. Adjustment data can be selected. Press the Point 7 8 button to move the ...

Owners Manual
Page 28
... Mode in this Auto PC Adjustment function. icon and then press the SET button twice. When the image is not provided properly with this projector. Auto PC Adjustment function can be memorized in the PC System Menu (p27). icon and press the SET button. 28 To store adjustment ... pressing the Auto PC button on page 30. ✔Note: • Fine sync, Total dots and Picture Position of some computers can not be fully adjusted with this operation, manual adjustments are memorized, the setting can be operated when 480i, 575i, 480p, 575p, 720p,1035i, or 1080i is provided to...
... Mode in this Auto PC Adjustment function. icon and then press the SET button twice. When the image is not provided properly with this projector. Auto PC Adjustment function can be memorized in the PC System Menu (p27). icon and press the SET button. 28 To store adjustment ... pressing the Auto PC button on page 30. ✔Note: • Fine sync, Total dots and Picture Position of some computers can not be fully adjusted with this operation, manual adjustments are memorized, the setting can be operated when 480i, 575i, 480p, 575p, 720p,1035i, or 1080i is provided to...

Owners Manual
Page 29
... at this projector. PC Adjust Menu PC Adjust Menu icon 2 Press the Point d button to move the red frame pointer to the PC Adjust Menu icon. Press the Point 7 8 button to adjust value. (From 0 to show H-Freq. Computer Input Manual PC Adjustment Some computers employ special... signal formats which may not be tuned by Multi-scan system of this icon to jump to the top item. 29 Press the Point 7 8 button to show the information of the connected computer. Horizontal Adjusts horizontal picture...
... at this projector. PC Adjust Menu PC Adjust Menu icon 2 Press the Point d button to move the red frame pointer to the PC Adjust Menu icon. Press the Point 7 8 button to adjust value. (From 0 to show H-Freq. Computer Input Manual PC Adjustment Some computers employ special... signal formats which may not be tuned by Multi-scan system of this icon to jump to the top item. 29 Press the Point 7 8 button to show the information of the connected computer. Horizontal Adjusts horizontal picture...
Owners Manual
Page 32
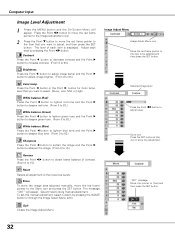
... Menu icon Move the red frame pointer to the item to [Yes] and then press the SET button. Store To store the image data adjusted manually, move the red frame pointer to the item that you want to select. (XLow, Low, Mid, or High) White balance (Red) Press the Point 7 button... to move the red frame pointer to obtain better balance of each level by pressing the IMAGE button or through the Image Select Menu (p31). Computer Input Image Level Adjustment 1 Press the MENU button and the On-Screen Menu will appear. Press the Point 7 button or the Point 8 button for Color...
... Menu icon Move the red frame pointer to the item to [Yes] and then press the SET button. Store To store the image data adjusted manually, move the red frame pointer to the item that you want to select. (XLow, Low, Mid, or High) White balance (Red) Press the Point 7 button... to move the red frame pointer to obtain better balance of each level by pressing the IMAGE button or through the Image Select Menu (p31). Computer Input Image Level Adjustment 1 Press the MENU button and the On-Screen Menu will appear. Press the Point 7 button or the Point 8 button for Color...

Owners Manual
Page 36
... itself to select a specific broadcast signal format among 480i, 575i, 480p, 575p, 720p, 1035i, and 1080i. Component Auto The projector automatically detects incoming video signal, and adjusts itself to select and then press the SET button. AV System Menu (Component) AV System... PAL / SECAM / NTSC / NTSC4.43 / PAL-M / PAL-N If the projector cannot reproduce proper video image, it is PAL-M or PAL-N, select system manually. COMPONENT VIDEO SIGNAL FORMAT If the projector cannot reproduce proper video image, it is necessary to optimize its performance. When Video ...
... itself to select a specific broadcast signal format among 480i, 575i, 480p, 575p, 720p, 1035i, and 1080i. Component Auto The projector automatically detects incoming video signal, and adjusts itself to select and then press the SET button. AV System Menu (Component) AV System... PAL / SECAM / NTSC / NTSC4.43 / PAL-M / PAL-N If the projector cannot reproduce proper video image, it is PAL-M or PAL-N, select system manually. COMPONENT VIDEO SIGNAL FORMAT If the projector cannot reproduce proper video image, it is necessary to optimize its performance. When Video ...

Owners Manual
Page 39
... 30fps so the 24 fps film needs to get the best film-like images. Store icon 39 To select this function On, the projector reproduces pictures faithful to video mode. "OK?" message Move the pointer to the Store icon and press the SET button. When selecting ... video signal can only be activated in any state shown below. 1. Off . . . .Not activated. will appear. The message "OK?" With this manual adjustment, select Custom by pressing the IMAGE button or through the Image Select Menu (p37). Quit Closes the Image Adjust Menu. ✔Note: • Progressive...
... 30fps so the 24 fps film needs to get the best film-like images. Store icon 39 To select this function On, the projector reproduces pictures faithful to video mode. "OK?" message Move the pointer to the Store icon and press the SET button. When selecting ... video signal can only be activated in any state shown below. 1. Off . . . .Not activated. will appear. The message "OK?" With this manual adjustment, select Custom by pressing the IMAGE button or through the Image Select Menu (p37). Quit Closes the Image Adjust Menu. ✔Note: • Progressive...
Owners Manual
Page 51
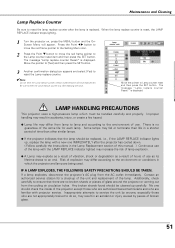
...message "Lamp replace counter Reset?" Some lamps may fail or terminate their life in the Lamp Replacement section of this manual. ) Continuous use of the lamp with projector service. Move the pointer to the Lamp counter reset item and then press the SET button. Contact an authorized service... station for each lamp. is reset, the LAMP REPLACE indicator stops lighting. 1 Turn the projector on, press the MENU button and the OnScreen Menu will appear. The message "Lamp replace counter Reset?" When the lamp replace counter is ...
...message "Lamp replace counter Reset?" Some lamps may fail or terminate their life in the Lamp Replacement section of this manual. ) Continuous use of the lamp with projector service. Move the pointer to the Lamp counter reset item and then press the SET button. Contact an authorized service... station for each lamp. is reset, the LAMP REPLACE indicator stops lighting. 1 Turn the projector on, press the MENU button and the OnScreen Menu will appear. The message "Lamp replace counter Reset?" When the lamp replace counter is ...
Owners Manual
Page 52
...: No power Image is Top/Bottom reversed. Wait 90-120 seconds after turning on the projector. - In such cases, leave the projector OFF and wait until condensation disappears. - See your computer's instruction manual for monitor output when connecting to a projector. Select correct input source once again through menu operation. (See page 26, 34 and 35...
...: No power Image is Top/Bottom reversed. Wait 90-120 seconds after turning on the projector. - In such cases, leave the projector OFF and wait until condensation disappears. - See your computer's instruction manual for monitor output when connecting to a projector. Select correct input source once again through menu operation. (See page 26, 34 and 35...

Owners Manual
Page 58
... Net Weight Feet Adjustment Multi-media Projector 11.81" x 3.23" x...768 dots 2,359,296 (1,024 x 768 x 3 panels) Signal Compatibility Color System High Definition TV Signal Scanning Frequency PAL, SECAM, NTSC, NTSC4.43, PAL-M, PAL-N 480i, 480p, 575i... 300" F 1.7 ~ 2.5 lens with f 20.3 mm ~ 32.5 mm with manual zoom and focus 3.3' ~ 25.3' (1.0m ~ 7,7m) 200W Interface Video Input Jacks... S-Video Audio Input Jacks RGB Input 1/ Component Input Terminal RGB Input 2/ RGB Output Terminal Computer Audio Input Jacks Service Port Connector USB Connector Audio Output Jack RCA Type x 1 Mini DIN 4 ...
... Net Weight Feet Adjustment Multi-media Projector 11.81" x 3.23" x...768 dots 2,359,296 (1,024 x 768 x 3 panels) Signal Compatibility Color System High Definition TV Signal Scanning Frequency PAL, SECAM, NTSC, NTSC4.43, PAL-M, PAL-N 480i, 480p, 575i... 300" F 1.7 ~ 2.5 lens with f 20.3 mm ~ 32.5 mm with manual zoom and focus 3.3' ~ 25.3' (1.0m ~ 7,7m) 200W Interface Video Input Jacks... S-Video Audio Input Jacks RGB Input 1/ Component Input Terminal RGB Input 2/ RGB Output Terminal Computer Audio Input Jacks Service Port Connector USB Connector Audio Output Jack RCA Type x 1 Mini DIN 4 ...
Owners Manual
Page 59
Even though 99.99% of the pixels are manufactured to change without notice. ● LCD panels are effective, a tiny fraction of the pixels (0.01% or less) may be ineffective by the characteristics of the LCD panels. ● The On-Screen Menu and figures in this manual may differ slightly from the product. 59 Appendix Accessories Owner's Manual AC Power Cord Remote Control Unit and Batteries VGA Cable USB Cable Lens Cover with String and Screw Soft Carrying Bag PIN code Label ● The specifications are subject to the highest possible standards.
Even though 99.99% of the pixels are manufactured to change without notice. ● LCD panels are effective, a tiny fraction of the pixels (0.01% or less) may be ineffective by the characteristics of the LCD panels. ● The On-Screen Menu and figures in this manual may differ slightly from the product. 59 Appendix Accessories Owner's Manual AC Power Cord Remote Control Unit and Batteries VGA Cable USB Cable Lens Cover with String and Screw Soft Carrying Bag PIN code Label ● The specifications are subject to the highest possible standards.


