
User Manual
Page 2
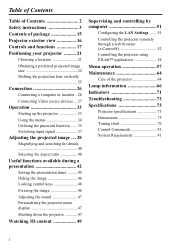
...projection lens vertically 25 Connection 26 Connecting a computer or monitor .26 Connecting Video source devices ...27 Operation 33 Starting up the projector 33 Using the menus 34 Utilizing the password function ......35 Switching input signal 37 Adjusting the projected image .... 38 Magnifying and... Hiding the image 46 Locking control keys 46 Freezing the image 46 Adjusting the sound 47 Personalizing the projector menu display 47 Shutting down the projector 47 Watching 3D content 49 Supervising and controlling by computer 51 Configuring the LAN Settings ....... 51 Controlling the...
...projection lens vertically 25 Connection 26 Connecting a computer or monitor .26 Connecting Video source devices ...27 Operation 33 Starting up the projector 33 Using the menus 34 Utilizing the password function ......35 Switching input signal 37 Adjusting the projected image .... 38 Magnifying and... Hiding the image 46 Locking control keys 46 Freezing the image 46 Adjusting the sound 47 Personalizing the projector menu display 47 Shutting down the projector 47 Watching 3D content 49 Supervising and controlling by computer 51 Configuring the LAN Settings ....... 51 Controlling the...

User Manual
Page 3
...features and functions. Improper operation may result in the user's manual. If your projector does not seem to come. REFER SERVICING TO QUALIFIED SERVICE PERSONNEL. THIS SYMBOL ...THIS UNIT IN THE USER'S MANUAL. ENGLISH Safety instructions Before installing and operating the projector, read this manual thoroughly. THIS SYMBOL INDICATES THAT DANGEROUS VOLTAGE CONSTITUTING A RISK OF ...CAUTION: TO REDUCE THE RISK OF ELECTRIC SHOCK, DO NOT REMOVE COVER (OR BACK). This projector provides many years to be operating properly, read this manual again, check operations and cable ...
...features and functions. Improper operation may result in the user's manual. If your projector does not seem to come. REFER SERVICING TO QUALIFIED SERVICE PERSONNEL. THIS SYMBOL ...THIS UNIT IN THE USER'S MANUAL. ENGLISH Safety instructions Before installing and operating the projector, read this manual thoroughly. THIS SYMBOL INDICATES THAT DANGEROUS VOLTAGE CONSTITUTING A RISK OF ...CAUTION: TO REDUCE THE RISK OF ELECTRIC SHOCK, DO NOT REMOVE COVER (OR BACK). This projector provides many years to be operating properly, read this manual again, check operations and cable ...

User Manual
Page 5
... hazard. • Allowing the proper amount of space on the top, sides, and rear of the projector cabinet is left unattended or unused for long periods of your projector, and can be read before cleaning. Unplug this unit to rain or use liquid or aerosol cleaners on...This will prevent damage due to be built into a compartment or similarly enclosed, these minimum distances must be dangerous. • If the projector is unused for later use attachments not recommended by the manufacturer as they may result in hazards. 5 Be especially careful that children do ...
... hazard. • Allowing the proper amount of space on the top, sides, and rear of the projector cabinet is left unattended or unused for long periods of your projector, and can be read before cleaning. Unplug this unit to rain or use liquid or aerosol cleaners on...This will prevent damage due to be built into a compartment or similarly enclosed, these minimum distances must be dangerous. • If the projector is unused for later use attachments not recommended by the manufacturer as they may result in hazards. 5 Be especially careful that children do ...

User Manual
Page 6
...walking on the power cord. b If liquid has been spilled into this projector yourself as improper adjustment of power supplied, contact the Canon Customer Support Center or local power company. f When the projector exhibits a distinct change in damage and will often require extensive work by the... manufacturer, or sold with cloth or other similar surface. This projector should be placed in a built...
...walking on the power cord. b If liquid has been spilled into this projector yourself as improper adjustment of power supplied, contact the Canon Customer Support Center or local power company. f When the projector exhibits a distinct change in damage and will often require extensive work by the... manufacturer, or sold with cloth or other similar surface. This projector should be placed in a built...
User Manual
Page 7
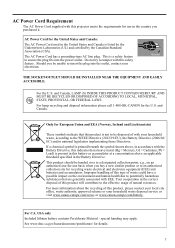
...with your household waste, according to be disposed of with this safety feature. For lamp recycling and disposal information please call 1-800-OK-CANON for details. 7 Improper handling of this type of this product will contribute to ensure the plug fits into the outlet, contact your...heavy metal (Hg = Mercury, Cd = Cadmium, Pb = Lead) is present in this battery or accumulator at a concentration above , in accordance with this projector meets the requirements for the United States and Canada: The AC Power Cord used in the correct disposal of waste could have a possible impact on...
...with your household waste, according to be disposed of with this safety feature. For lamp recycling and disposal information please call 1-800-OK-CANON for details. 7 Improper handling of this type of this product will contribute to ensure the plug fits into the outlet, contact your...heavy metal (Hg = Mercury, Cd = Cadmium, Pb = Lead) is present in this battery or accumulator at a concentration above , in accordance with this projector meets the requirements for the United States and Canada: The AC Power Cord used in the correct disposal of waste could have a possible impact on...
User Manual
Page 8
...radio / TV technician for a Class B digital device, pursuant to Part 15 of the FCC Rules. Federal Communication Commission Notice Multimedia Projector, Model: LX-MW500/LX-MU500 This device complies with Part 15 of the equipment. To ensure safe use , always observe this information. 8 However, there is ...not observed. The cable with a ferrite core provided with class B limits in the instructions. Tel No. 1-800-OK-CANON (1-800-652-...
...radio / TV technician for a Class B digital device, pursuant to Part 15 of the FCC Rules. Federal Communication Commission Notice Multimedia Projector, Model: LX-MW500/LX-MU500 This device complies with Part 15 of the equipment. To ensure safe use , always observe this information. 8 However, there is ...not observed. The cable with a ferrite core provided with class B limits in the instructions. Tel No. 1-800-OK-CANON (1-800-652-...
User Manual
Page 9
If your power cord is damaged, contact the Canon Customer Support Center. • Do not use your projector correctly and safely. Warning Pay attention to ground. Warning If the following point to prevent the small parts from being accidentally swallowed by children. •... or make modifications to the power cord. • Keep the power cord away from heaters and other foreign material has entered the projector • If the projector is knocked over or dropped and the cabinet is damaged Warning Pay attention to the following carefully beforehand in choking. The power cord may...
If your power cord is damaged, contact the Canon Customer Support Center. • Do not use your projector correctly and safely. Warning Pay attention to ground. Warning If the following point to prevent the small parts from being accidentally swallowed by children. •... or make modifications to the power cord. • Keep the power cord away from heaters and other foreign material has entered the projector • If the projector is knocked over or dropped and the cabinet is damaged Warning Pay attention to the following carefully beforehand in choking. The power cord may...

User Manual
Page 10
...to hold the power plug or connector when removing. If inspection, maintenance or repair is required, contact the Canon Customer Support Center. • Do not disassemble or modify the projector (including consumable parts) or the remote control. • Do not insert any object into the contact parts...vents and this could result in an explosion. • As strong light beams are hot. Pay particular attention in front of the projector while it is projecting an image, conduct your presentation from a position where your shadow will be sure to the following points regarding ...
...to hold the power plug or connector when removing. If inspection, maintenance or repair is required, contact the Canon Customer Support Center. • Do not disassemble or modify the projector (including consumable parts) or the remote control. • Do not insert any object into the contact parts...vents and this could result in an explosion. • As strong light beams are hot. Pay particular attention in front of the projector while it is projecting an image, conduct your presentation from a position where your shadow will be sure to the following points regarding ...

User Manual
Page 11
...children from touching these areas during projector operation. Doing so may cause burns. See "BLANK" on it may fail sooner than others. • The lamp will gradually become hot during operation could cause burns to the hands. As the temperature of maintenance costs, contact the Canon Customer Support Center. For details... of the lamp inside the projector. Failure to malfunction.
...children from touching these areas during projector operation. Doing so may cause burns. See "BLANK" on it may fail sooner than others. • The lamp will gradually become hot during operation could cause burns to the hands. As the temperature of maintenance costs, contact the Canon Customer Support Center. For details... of the lamp inside the projector. Failure to malfunction.
User Manual
Page 12
... lamp has been displayed (LAMP Indicator Displays (See "Timing of replacing the lamp" on page 67 for cleaning and inspection of the projector interior and lamp replacement. Contact the Canon Customer Support Center for details)), the possibility of the lamp breaking will increase. Failure to do so could result in the correct...
... lamp has been displayed (LAMP Indicator Displays (See "Timing of replacing the lamp" on page 67 for cleaning and inspection of the projector interior and lamp replacement. Contact the Canon Customer Support Center for details)), the possibility of the lamp breaking will increase. Failure to do so could result in the correct...
User Manual
Page 14
.... • Retract the adjustable feet. Carrying the projector with bare hands. LX-MW500 Operating temperature: 0°C to 40°C, Operating humidity level: 10% to 90% (non-condensing) Storage temperature: -20°C to 60°C LX-MU500 Operating temperature: 0°C to 40°C, Operating ...humidity level: 10% to 80% (non-condensing) Storage temperature: -20°C to 60°C • Do not install the projector near high-voltage electrical power lines or an electrical ...
.... • Retract the adjustable feet. Carrying the projector with bare hands. LX-MW500 Operating temperature: 0°C to 40°C, Operating humidity level: 10% to 90% (non-condensing) Storage temperature: -20°C to 60°C LX-MU500 Operating temperature: 0°C to 40°C, Operating ...humidity level: 10% to 80% (non-condensing) Storage temperature: -20°C to 60°C • Do not install the projector near high-voltage electrical power lines or an electrical ...
User Manual
Page 15
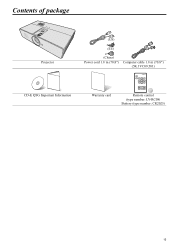
ENGLISH Contents of package Projector (US) (EU) (China) Power cord 1.8 m (70.8") Computer cable 1.8 m (70.8") (5K.1VC09.501) CD & QSG Important Information Warranty card Remote control (type number: LV-RC08) Battery (type number: CR2025) 15
ENGLISH Contents of package Projector (US) (EU) (China) Power cord 1.8 m (70.8") Computer cable 1.8 m (70.8") (5K.1VC09.501) CD & QSG Important Information Warranty card Remote control (type number: LV-RC08) Battery (type number: CR2025) 15

User Manual
Page 16
.... SERVICE port** 15. Audio output terminal (stereo mini jack) 24. Kensington lock 26. Release button of the filter cover ** By connecting the projector and computer via USB, you can operate the computer from the remote controller (Page UP/Page DOWN). 16 Filter cover 12. USB power out 16... 13. Video input terminal 25. Speaker 5. PC input terminal x 2 20. Security bar 27. External control panel (See "Projector" on page 17 for details.) 2. AC power cord inlet 28. Front IR remote sensor 8. Projector exterior view Front/upper side 1 2 3 4 5 6 7 4 Rear/lower side 12 13 14 15 16 17 18...
.... SERVICE port** 15. Audio output terminal (stereo mini jack) 24. Kensington lock 26. Release button of the filter cover ** By connecting the projector and computer via USB, you can operate the computer from the remote controller (Page UP/Page DOWN). 16 Filter cover 12. USB power out 16... 13. Video input terminal 25. Speaker 5. PC input terminal x 2 20. Security bar 27. External control panel (See "Projector" on page 17 for details.) 2. AC power cord inlet 28. Front IR remote sensor 8. Projector exterior view Front/upper side 1 2 3 4 5 6 7 4 Rear/lower side 12 13 14 15 16 17 18...

User Manual
Page 17
...-tuning the image size and clarity" on page 71 for details. 5. See "Indicators" on page 38 for details. 8. Lights up red if the projector's temperature becomes too high. Top IR remote sensor 9. AUTO PC Use the key to make adjustments. Attention of your smart device. See "Locking control...the projection lens vertically. Indicates the status of the image. See "Using the menus" on . II POWER (ON/STANDBY) Toggles the projector between standby mode and on page 34 for details. See "Hiding the image" on page 37 for details. 12. INPUT Displays the...
...-tuning the image size and clarity" on page 71 for details. 5. See "Indicators" on page 38 for details. 8. Lights up red if the projector's temperature becomes too high. Top IR remote sensor 9. AUTO PC Use the key to make adjustments. Attention of your smart device. See "Locking control...the projection lens vertically. Indicates the status of the image. See "Using the menus" on . II POWER (ON/STANDBY) Toggles the projector between standby mode and on page 34 for details. See "Hiding the image" on page 37 for details. 12. INPUT Displays the...

User Manual
Page 18
...or adjusts some basic settings of your smart device. See "Adjusting the 13. sound" on the OSD of the MHL device connection (See ** When the projector and computer are available for details. 4. See "Correcting keystone" on page 46 for details. 5. See "Locking control 6 14 keys" on 9 page 39...smart device" on page 47 for the displayed image. When the On-Screen Display (OSD) menu is set. II POWER (ON/STANDBY) Toggles the projector between standby mode and on the On-Screen Display (OSD) menu. Selects an available picture setup mode. on 10. See "Auto-adjusting the 4...
...or adjusts some basic settings of your smart device. See "Adjusting the 13. sound" on the OSD of the MHL device connection (See ** When the projector and computer are available for details. 4. See "Correcting keystone" on page 46 for details. 5. See "Locking control 6 14 keys" on 9 page 39...smart device" on page 47 for the displayed image. When the On-Screen Display (OSD) menu is set. II POWER (ON/STANDBY) Toggles the projector between standby mode and on the On-Screen Display (OSD) menu. Selects an available picture setup mode. on 10. See "Auto-adjusting the 4...
User Manual
Page 19
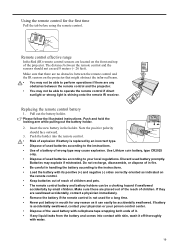
... the first time Pull the tab before using the remote control. Replacing the remote control battery 1. The distance between the remote control and the projector. • You may explode if mistreated. Pull out the battery holder. Batteries may not be a choking hazard if swallowed accidentally by an ...careful in handling the battery according to the instructions. • Use of a battery of the projector. Make sure these are no obstacles between the remote control and the IR sensors on the projector that might obstruct the infra-red beam. • You may not be able to operate the ...
... the first time Pull the tab before using the remote control. Replacing the remote control battery 1. The distance between the remote control and the projector. • You may explode if mistreated. Pull out the battery holder. Batteries may not be a choking hazard if swallowed accidentally by an ...careful in handling the battery according to the instructions. • Use of a battery of the projector. Make sure these are no obstacles between the remote control and the IR sensors on the projector that might obstruct the infra-red beam. • You may not be able to operate the ...
User Manual
Page 21
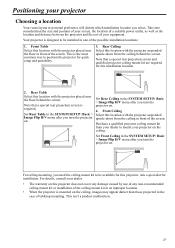
... caused by use of any non-recommended ceiling mount kit or installation of the ceiling mount kit in an improper location. • When the projector is mounted on the ceiling, images may appear darker than those projected in the SYSTEM SETUP: Basic > Image Flip H/V menu after you turn the.... Take into consideration the size and position of your screen, the location of a suitable power outlet, as well as the location and distance between the projector and the rest of the screen. Set Rear Ceiling in the SYSTEM SETUP: Basic > Image Flip H/V menu after you turn the Note that a special ...
... caused by use of any non-recommended ceiling mount kit or installation of the ceiling mount kit in an improper location. • When the projector is mounted on the ceiling, images may appear darker than those projected in the SYSTEM SETUP: Basic > Image Flip H/V menu after you turn the.... Take into consideration the size and position of your screen, the location of a suitable power outlet, as well as the location and distance between the projector and the rest of the screen. Set Rear Ceiling in the SYSTEM SETUP: Basic > Image Flip H/V menu after you turn the Note that a special ...
User Manual
Page 22
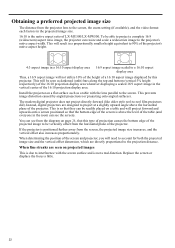
... project directly forward (like older style reel-to the projection distance. This will be able to the projector's native aspect width. This will result in a proportionally smaller height equivalent to 90% of LX-MU500/LX-MW500. Install the projector on a flat surface such as darkened (unlit) bars along the top and bottom (vertical 5% height respectively...
... project directly forward (like older style reel-to the projection distance. This will be able to the projector's native aspect width. This will result in a proportionally smaller height equivalent to 90% of LX-MU500/LX-MW500. Install the projector on a flat surface such as darkened (unlit) bars along the top and bottom (vertical 5% height respectively...
User Manual
Page 23
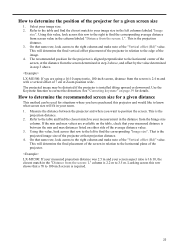
...the projector at Zoom position wide. That is the projected image size of the average distance value. 3. Using this value, look across to find the closest match to 3.5 m. The recommended position for a given screen size 1. This is the projection distance. 3. Select your room. 1. LX-MU500: If...L" column is 2.2 m to your measurement in the column labeled "Distance from the Image size column. This is the projection distance. 2. LX-MU500: If you are available on page 39 for situations where you want to the right column and make note of the "Vertical offset (Hd...
...the projector at Zoom position wide. That is the projected image size of the average distance value. 3. Using this value, look across to find the closest match to 3.5 m. The recommended position for a given screen size 1. This is the projection distance. 3. Select your room. 1. LX-MU500: If...L" column is 2.2 m to your measurement in the column labeled "Distance from the Image size column. This is the projection distance. 2. LX-MU500: If you are available on page 39 for situations where you want to the right column and make note of the "Vertical offset (Hd...

User Manual
Page 24
...114 2.9 182 4.6 143 3.6 228 5.8 190 4.8 - - 228 5.8 - - Canon recommends that if you intend to permanently install the projector, you should physically test the projection size and distance using the actual projector in suit before you determine the exact mounting position so that it , so as to... make allowance for this projector's optical characteristics. This will help you permanently install it best suits your installation location. 24 Vertical offset (Hd) inch cm 1.6 4 1.9 5 2.1 5 2.4 6 2.6 7 3.2 8 4.0 10 5.3 13 6.4 16 LX-MU500 (16:10) Diagonal Size inch...
...114 2.9 182 4.6 143 3.6 228 5.8 190 4.8 - - 228 5.8 - - Canon recommends that if you intend to permanently install the projector, you should physically test the projection size and distance using the actual projector in suit before you determine the exact mounting position so that it , so as to... make allowance for this projector's optical characteristics. This will help you permanently install it best suits your installation location. 24 Vertical offset (Hd) inch cm 1.6 4 1.9 5 2.1 5 2.4 6 2.6 7 3.2 8 4.0 10 5.3 13 6.4 16 LX-MU500 (16:10) Diagonal Size inch...


