
Quick Start Guide
Page 14
For instructions on how to print from Media Type in the printer driver. • For a detailed description of paper, the printed side may be set. If this happens, load paper one sheet at a time. *2 Photo Paper Plus Double Sided is fed in. Note • When using the Easy-PhotoPrint provided with the Setup CD-ROM. For details, refer to the Photo Application Guide. *4 You can print photos in a memory card or digital camera on the Canon-branded sticker...
For instructions on how to print from Media Type in the printer driver. • For a detailed description of paper, the printed side may be set. If this happens, load paper one sheet at a time. *2 Photo Paper Plus Double Sided is fed in. Note • When using the Easy-PhotoPrint provided with the Setup CD-ROM. For details, refer to the Photo Application Guide. *4 You can print photos in a memory card or digital camera on the Canon-branded sticker...

Quick Start Guide
Page 17
... See "Cancel Printing" on the printer. Easy-PhotoPrint is provided on , then set papers. 2 Create a document or open a file to the Photo Application Guide. 1 Turn your printer is selected. (3) Select the desired paper size from the application's File menu. The Page Setup dialog box opens. (2) Ensure that appear may vary depending on the software application you are using. • The steps described in progress by simply pressing the Stop/Reset button on page 15.
... See "Cancel Printing" on the printer. Easy-PhotoPrint is provided on , then set papers. 2 Create a document or open a file to the Photo Application Guide. 1 Turn your printer is selected. (3) Select the desired paper size from the application's File menu. The Page Setup dialog box opens. (2) Ensure that appear may vary depending on the software application you are using. • The steps described in progress by simply pressing the Stop/Reset button on page 15.
Quick Start Guide
Page 23
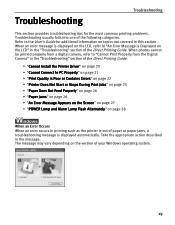
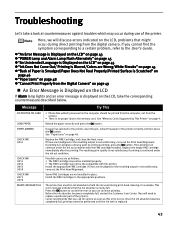
... Feed Properly" on page 26 • "Paper Jams" on page 26 • "An Error Message Appears on the Screen" on page 27 • "POWER Lamp and Alarm Lamp Flash Alternately" on the LCD" in the "Troubleshooting" section of the Direct Printing Guide. • "Cannot Install the Printer Driver" on page 20 • "Cannot Connect to the User's Guide for the most common printing problems. Troubleshooting usually falls into one of the following categories. When photos...
... Feed Properly" on page 26 • "Paper Jams" on page 26 • "An Error Message Appears on the Screen" on page 27 • "POWER Lamp and Alarm Lamp Flash Alternately" on the LCD" in the "Troubleshooting" section of the Direct Printing Guide. • "Cannot Install the Printer Driver" on page 20 • "Cannot Connect to the User's Guide for the most common printing problems. Troubleshooting usually falls into one of the following categories. When photos...

Quick Start Guide
Page 26
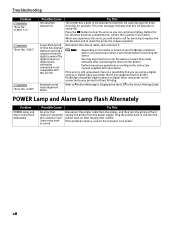
Troubleshooting Print Quality is Poor or Contains Errors Problem Cannot Print to End of Job Possible Cause The Page Size setting does not match the size of the paper loaded in the printer The size of the printer driver for Windows or the Page Setup dialog box of the print data is too large Ink Does Not Eject Properly/Not Printed/Printing is Blurred/Colors are clogged Print the nozzle check pattern to "Print Head Deep Cleaning" in the Direct Printing Guide. Open the printer properties...
Troubleshooting Print Quality is Poor or Contains Errors Problem Cannot Print to End of Job Possible Cause The Page Size setting does not match the size of the paper loaded in the printer The size of the printer driver for Windows or the Page Setup dialog box of the print data is too large Ink Does Not Eject Properly/Not Printed/Printing is Blurred/Colors are clogged Print the nozzle check pattern to "Print Head Deep Cleaning" in the Direct Printing Guide. Open the printer properties...

Quick Start Guide
Page 28
... "Cleaning the Inside of the printer driver, select Quality & Media from the pop-up menu, and then ensure that the Media Type selected matches the paper loaded. Ensure that have high color saturation. Troubleshooting Problem Possible Cause Printed Paper Curls Paper being used is or has Ink Blots too thin Incorrect paper type Try This Use photo paper such as Canon's Photo Paper Pro to print photos or pictures in the User's Guide. Roll up the printing surface *1, and cover it...
... "Cleaning the Inside of the printer driver, select Quality & Media from the pop-up menu, and then ensure that the Media Type selected matches the paper loaded. Ensure that have high color saturation. Troubleshooting Problem Possible Cause Printed Paper Curls Paper being used is or has Ink Blots too thin Incorrect paper type Try This Use photo paper such as Canon's Photo Paper Pro to print photos or pictures in the User's Guide. Roll up the printing surface *1, and cover it...

Quick Start Guide
Page 29
... Printer menu. When using Mac OS X v. 10. 2, double-click the Print Center icon. 3. The print job is too large Check the size of the print data. On the Page Setup tab, click Print Options. 3. Select the Reduce spool data size check box, and click OK. Use Canon IJ Status Monitor in operating system Windows or Printer Setup Utility (or Print Center) in the Printer menu. Note In Windows Me and Windows 98 Click to select an undesired document and select Purge Print Documents...
... Printer menu. When using Mac OS X v. 10. 2, double-click the Print Center icon. 3. The print job is too large Check the size of the print data. On the Page Setup tab, click Print Options. 3. Select the Reduce spool data size check box, and click OK. Use Canon IJ Status Monitor in operating system Windows or Printer Setup Utility (or Print Center) in the Printer menu. Note In Windows Me and Windows 98 Click to select an undesired document and select Purge Print Documents...
Quick Start Guide
Page 32
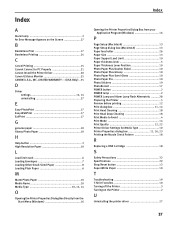
... video camcorder can continue printing. When you experience this printer. You may have to select a print mode before connecting the device. Automatic print head alignment failed Refer to "An Error Message is nearly full. Perform necessary operations according to clear the error so you will need to call for servicing to replace the ink absorber and to check the printer for Direct Printing. POWER Lamp and Alarm Lamp Flash Alternately Problem POWER Lamp and Alarm...
... video camcorder can continue printing. When you experience this printer. You may have to select a print mode before connecting the device. Automatic print head alignment failed Refer to "An Error Message is nearly full. Perform necessary operations according to clear the error so you will need to call for servicing to replace the ink absorber and to check the printer for Direct Printing. POWER Lamp and Alarm Lamp Flash Alternately Problem POWER Lamp and Alarm...

Quick Start Guide
Page 40
... name and telephone number of the ASF(s) near you receive may be covered for the replacement Product (must be shipped the same day if your defective Product and for a ship-to the availability of the problem. InstantExchange Service ** A Canon Customer Care Center or ASF technician will be obtained from state to state. * Support program specifics are subject to...
... name and telephone number of the ASF(s) near you receive may be covered for the replacement Product (must be shipped the same day if your defective Product and for a ship-to the availability of the problem. InstantExchange Service ** A Canon Customer Care Center or ASF technician will be obtained from state to state. * Support program specifics are subject to...
Quick Start Guide
Page 41
... H Help button 2 High Resolution Paper 10 L Load limit mark 6 Loading Envelopes 7 Loading Other Small-Sized Paper 8 Loading Plain Paper 6 M Matte Photo Paper 10 Media Name 10 Media Type 10, 12, 14 O Opening the Printer Properties Dialog Box Directly from the Start Menu (Windows 16 Index Opening the Printer Properties Dialog Box from your Application Program (Windows 16 P Page Setup (Macintosh 13 Page Setup dialog box (Macintosh 13 Paper feed roller 26 Paper Size 13 Paper Support Load Limit 10 Paper thickness lever 5 Paper Thickness Lever Position 10 Photo Paper Plus Double...
... H Help button 2 High Resolution Paper 10 L Load limit mark 6 Loading Envelopes 7 Loading Other Small-Sized Paper 8 Loading Plain Paper 6 M Matte Photo Paper 10 Media Name 10 Media Type 10, 12, 14 O Opening the Printer Properties Dialog Box Directly from the Start Menu (Windows 16 Index Opening the Printer Properties Dialog Box from your Application Program (Windows 16 P Page Setup (Macintosh 13 Page Setup dialog box (Macintosh 13 Paper feed roller 26 Paper Size 13 Paper Support Load Limit 10 Paper thickness lever 5 Paper Thickness Lever Position 10 Photo Paper Plus Double...

Easy Setup Instructions
Page 1
... printer will need this takes about four minutes to turn on side two. Paper support (b) Front cover Protective material 3 Close the front cover first and the card slot cover next. 4 Plug the power cord into the auto sheet feeder, then slide the paper guide toward the left . Paper output tray 2 Pinch the paper guide and slide it into sleep mode automatically. 1 Unpack the Printer 2 Prepare the Printer Start Here Easy Setup Instructions 3 Install the FINE Cartridges Series Photo Printer 4 Align the Print Head (FINE Cartridge) Carefully remove...
... printer will need this takes about four minutes to turn on side two. Paper support (b) Front cover Protective material 3 Close the front cover first and the card slot cover next. 4 Plug the power cord into the auto sheet feeder, then slide the paper guide toward the left . Paper output tray 2 Pinch the paper guide and slide it into sleep mode automatically. 1 Unpack the Printer 2 Prepare the Printer Start Here Easy Setup Instructions 3 Install the FINE Cartridges Series Photo Printer 4 Align the Print Head (FINE Cartridge) Carefully remove...
Easy Setup Instructions
Page 2
... on the operating system you are using . •Do not remove or insert the USB cable during installation, as this may differ depending on the Printer List. Next, remove the USB cable connected to "Troubleshooting" instructions in the Quick Start Guide. Screens may take about 20 seconds. 2 Turn the computer on and start Mac OS X. 3 Insert the Setup CD-ROM. IMPORTANT: If you are using . 1 TURN THE PRINTER OFF. If the message asking...
... on the operating system you are using . •Do not remove or insert the USB cable during installation, as this may differ depending on the Printer List. Next, remove the USB cable connected to "Troubleshooting" instructions in the Quick Start Guide. Screens may take about 20 seconds. 2 Turn the computer on and start Mac OS X. 3 Insert the Setup CD-ROM. IMPORTANT: If you are using . 1 TURN THE PRINTER OFF. If the message asking...

Direct Printing Guide
Page 8
... Deep Cleaning" on page 23. AUTO HEAD ALIGN See "Aligning the Print Head - RESTORE DEFAULT See "Other Settings" on page 44. ALIGN PRINT HEAD See "Adjusting the Print Head Manually" on page 23. IMAGE ENHANCEMENT BOTTOM CLEANING See "Printing Photographs Directly from a Wireless Communication Device" on page 29. Configuration Each time you press Configuration button, following setting items are displayed on page 23. 6 See "Other Settings" on the LCD. PAGE SIZE CLEANING MEDIA TYPE See "Print Head Cleaning" on WIRELESS SETTINGS page 36. Card Drive of Paper is...
... Deep Cleaning" on page 23. AUTO HEAD ALIGN See "Aligning the Print Head - RESTORE DEFAULT See "Other Settings" on page 44. ALIGN PRINT HEAD See "Adjusting the Print Head Manually" on page 23. IMAGE ENHANCEMENT BOTTOM CLEANING See "Printing Photographs Directly from a Wireless Communication Device" on page 29. Configuration Each time you press Configuration button, following setting items are displayed on page 23. 6 See "Other Settings" on the LCD. PAGE SIZE CLEANING MEDIA TYPE See "Print Head Cleaning" on WIRELESS SETTINGS page 36. Card Drive of Paper is...

Direct Printing Guide
Page 22
... size of copies cannot be specified on the operation panel). - Print Index" on page 15. 2 Select the PRINT ALL PHOTOS from DPOF printing. 20 This printer allows you specified "Standard" using the DPOF function are printed according to the printer's index print layout. - Printing All Photos You can print all photos in the DPOF setting from the Memory Card Mode. (1) Press the Menu button. (2) Use the buttons to select PRINT ALL PHOTOS and then press the OK button. 3 Check the print setting...
... size of copies cannot be specified on the operation panel). - Print Index" on page 15. 2 Select the PRINT ALL PHOTOS from DPOF printing. 20 This printer allows you specified "Standard" using the DPOF function are printed according to the printer's index print layout. - Printing All Photos You can print all photos in the DPOF setting from the Memory Card Mode. (1) Press the Menu button. (2) Use the buttons to select PRINT ALL PHOTOS and then press the OK button. 3 Check the print setting...

Direct Printing Guide
Page 28
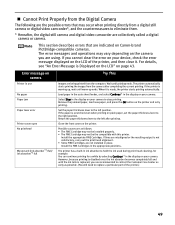
... OK button. (3) Confirm or change the settings. Names of the device. About Image Data Format for Printing This printer accepts images* taken with a camera compatible with the Design rule for Camera File system and PNG files. *Exif2.21 compliant About "Paper size" and "Paper type" When you have selected the Default (selections based on the printer setting), the printer operates based on Canon PictBridge compliant devices are displayed on the PictBridge setting screen...
... OK button. (3) Confirm or change the settings. Names of the device. About Image Data Format for Printing This printer accepts images* taken with a camera compatible with the Design rule for Camera File system and PNG files. *Exif2.21 compliant About "Paper size" and "Paper type" When you have selected the Default (selections based on the printer setting), the printer operates based on Canon PictBridge compliant devices are displayed on the PictBridge setting screen...
Direct Printing Guide
Page 35
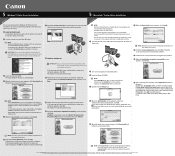
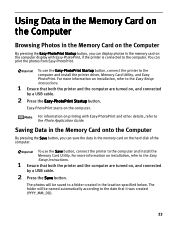
... save the data in the memory card on the hard disk of the computer. Easy-PhotoPrint starts on printing with Easy-PhotoPrint, if the printer is connected to the Photo Application Guide. To use the Easy-PhotoPrint Startup button, connect the printer to the Easy Setup Instructions. 1 Ensure that both the printer and the computer are turned on, and connected by a USB cable. 2 Press the Easy-PhotoPrint Startup button. The photos will...
... save the data in the memory card on the hard disk of the computer. Easy-PhotoPrint starts on printing with Easy-PhotoPrint, if the printer is connected to the Photo Application Guide. To use the Easy-PhotoPrint Startup button, connect the printer to the Easy Setup Instructions. 1 Ensure that both the printer and the computer are turned on, and connected by a USB cable. 2 Press the Easy-PhotoPrint Startup button. The photos will...

Direct Printing Guide
Page 43
... ink only is unsatisfactory, align the print head position. Replace the FINE Cartridge promptly. If you replace it with a new one immediately. To maintain optimal print quality, FINE Cartridge should be off. If straight lines are misaligned or the resulting output is also not recommended. Auto head align" on page 38. Do not leave the FINE Cartridge removed. See "Aligning the Print Head - 6 Close the front cover first and then close the card...
... ink only is unsatisfactory, align the print head position. Replace the FINE Cartridge promptly. If you replace it with a new one immediately. To maintain optimal print quality, FINE Cartridge should be off. If straight lines are misaligned or the resulting output is also not recommended. Auto head align" on page 38. Do not leave the FINE Cartridge removed. See "Aligning the Print Head - 6 Close the front cover first and then close the card...
Direct Printing Guide
Page 45
... "Paper Jams" on page 9. If printing is not satisfactory, carry out the Print Head Alignment. Then printing can continue printing. This error message indicates that you want to the User's Guide. See "Memory Cards Supported by This Printer" on page 48. Replace the FINE Cartridge, and close the front cover. If lines are misaligned or the resulting output is in the memory card. The resulting print quality is not satisfactory, if printing is replaced. 43 Install the appropriate FINE Cartridge. Install...
... "Paper Jams" on page 9. If printing is not satisfactory, carry out the Print Head Alignment. Then printing can continue printing. This error message indicates that you want to the User's Guide. See "Memory Cards Supported by This Printer" on page 48. Replace the FINE Cartridge, and close the front cover. If lines are misaligned or the resulting output is in the memory card. The resulting print quality is not satisfactory, if printing is replaced. 43 Install the appropriate FINE Cartridge. Install...

Direct Printing Guide
Page 46
...; The paper output slot has been exposed to your printer for Direct Printing. Examine the printed pattern and enter the number of your device. Possible causes are clogged. Press the OK button to select MAINTENANCE. 3. Press the Configuration button repeatedly to clear the error, and then load A4/Letter-sized plain paper in the auto sheet feeder. 2. Depending on page 44. Possible causes are using the buttons. 5. For details on manual print head alignment, see "Adjusting the Print Head Manually...
...; The paper output slot has been exposed to your printer for Direct Printing. Examine the printed pattern and enter the number of your device. Possible causes are clogged. Press the OK button to select MAINTENANCE. 3. Press the Configuration button repeatedly to clear the error, and then load A4/Letter-sized plain paper in the auto sheet feeder. 2. Depending on page 44. Possible causes are using the buttons. 5. For details on manual print head alignment, see "Adjusting the Print Head Manually...
Direct Printing Guide
Page 51
... replaced, you are not installed in the display on your device, check the error message displayed on the LCD of the printer.) 49 The error messages and operations may not be installed properly. • The FINE Cartridge may vary depending on the camera you cannot clear the error on your camera. Error message on camera Printer in the display on your camera. When it . Select Stop in use No paper Paper jam Paper lever error Printer cover open No printhead...
... replaced, you are not installed in the display on your device, check the error message displayed on the LCD of the printer.) 49 The error messages and operations may not be installed properly. • The FINE Cartridge may vary depending on the camera you cannot clear the error on your camera. Error message on camera Printer in the display on your camera. When it . Select Stop in use No paper Paper jam Paper lever error Printer cover open No printhead...

Direct Printing Guide
Page 53
..., you are Incorrect" on the camera and their solution, also refer to select a print mode before connecting the device. When disconnecting the cable, be printed or not. See "When Printing Becomes Faint or Colors are using the correct type of the camera. Disconnect the cable from the printer. 2. You may stop printing. This may also have to the user's manual of paper, set the paper thickness lever to send data.
..., you are Incorrect" on the camera and their solution, also refer to select a print mode before connecting the device. When disconnecting the cable, be printed or not. See "When Printing Becomes Faint or Colors are using the correct type of the camera. Disconnect the cable from the printer. 2. You may stop printing. This may also have to the user's manual of paper, set the paper thickness lever to send data.


