
Quick Start Guide
Page 4
... and recommendations in this manual and in any form, in whole or in part, without notice. Canon PIXMA iP6320D/iP6310D Photo Printer Quick Start Guide The diagrams and computer screens in this guide refer to your Canon PIXMA iP6320D/iP6310D Photo Printer. The operations are not intended to be, nor should they are the exactly the same with...
... and recommendations in this manual and in any form, in whole or in part, without notice. Canon PIXMA iP6320D/iP6310D Photo Printer Quick Start Guide The diagrams and computer screens in this guide refer to your Canon PIXMA iP6320D/iP6310D Photo Printer. The operations are not intended to be, nor should they are the exactly the same with...

Quick Start Guide
Page 5
... Printing Maintenance When Printing Becomes Faint or Colors are Incorrect 18 Troubleshooting Cannot Install the Printer Driver 20 Cannot Connect to PC Properly 21 Print Quality is Poor or Contains Errors 22 Printer Does Not Start or Stops During Print Jobs 25 Paper Does Not Feed Properly 26... Paper Jams 26 An Error Message Appears on the Screen 27 POWER Lamp and Alarm Lamp Flash Alternately 28 Appendix Specifications 29 Safety Precautions 32 Regulatory Information 34 CANON U.S.A., INC....
... Printing Maintenance When Printing Becomes Faint or Colors are Incorrect 18 Troubleshooting Cannot Install the Printer Driver 20 Cannot Connect to PC Properly 21 Print Quality is Poor or Contains Errors 22 Printer Does Not Start or Stops During Print Jobs 25 Paper Does Not Feed Properly 26... Paper Jams 26 An Error Message Appears on the Screen 27 POWER Lamp and Alarm Lamp Flash Alternately 28 Appendix Specifications 29 Safety Precautions 32 Regulatory Information 34 CANON U.S.A., INC....

Quick Start Guide
Page 6
When the Help window appears, select your printer and how to know more information, view the iP6320D/iP6310D User's Guide, Printer Driver Guide, and Photo Application Guide installed on page 28. 2 While in the Page Setup dialog box or Print dialog box, click in the "Troubleshooting" ...
When the Help window appears, select your printer and how to know more information, view the iP6320D/iP6310D User's Guide, Printer Driver Guide, and Photo Application Guide installed on page 28. 2 While in the Page Setup dialog box or Print dialog box, click in the "Troubleshooting" ...

Quick Start Guide
Page 7
When the POWER lamp stops blinking, the printer is not lit. Basic Printing About the Power Plug When removing the power plug after turning off the printer, be unable to check that the POWER lamp is turned off the printer, press the POWER button. If the power plug is removed from the wall outlet with the POWER lamp lit or blinking, the printer cannot protect its print heads and may be sure to print. 3 Turning off the Printer 1 To turn off .
When the POWER lamp stops blinking, the printer is not lit. Basic Printing About the Power Plug When removing the power plug after turning off the printer, be unable to check that the POWER lamp is turned off the printer, press the POWER button. If the power plug is removed from the wall outlet with the POWER lamp lit or blinking, the printer cannot protect its print heads and may be sure to print. 3 Turning off the Printer 1 To turn off .

Quick Start Guide
Page 8
Using such paper will not only produce unsatisfactory results, but can also cause the printer to Avoid Do not use a cut paper or memo pad, when printing on a paper smaller than A5 size. 4 Basic Printing Loading Paper Print Media to ... with an affixed photo or sticker • Envelopes with double flaps • Envelopes with pressure seals • Envelopes with an embossed or treated surface *Non-Canon genuine paper Also, do not use the following types of paper.
Using such paper will not only produce unsatisfactory results, but can also cause the printer to Avoid Do not use a cut paper or memo pad, when printing on a paper smaller than A5 size. 4 Basic Printing Loading Paper Print Media to ... with an affixed photo or sticker • Envelopes with double flaps • Envelopes with pressure seals • Envelopes with an embossed or treated surface *Non-Canon genuine paper Also, do not use the following types of paper.

Quick Start Guide
Page 9
.... • Do not place any obstacles in use with its left position for plain paper, and move it to "Paper is ejected. Printing with the printer's ejecting process. • When performing duplex printing, pay great attention to load paper. (1) Open the paper support. (2) Pull out the paper output tray. Paper ... the dust and stain on the area (desk, etc.) where the printed paper is ejected. Note When paper is stacked with printed sheets it . See "Canon genuine paper" on page 10. Basic Printing Preparing the Printer Note • For detailed information on the specialty media...
.... • Do not place any obstacles in use with its left position for plain paper, and move it to "Paper is ejected. Printing with the printer's ejecting process. • When performing duplex printing, pay great attention to load paper. (1) Open the paper support. (2) Pull out the paper output tray. Paper ... the dust and stain on the area (desk, etc.) where the printed paper is ejected. Note When paper is stacked with printed sheets it . See "Canon genuine paper" on page 10. Basic Printing Preparing the Printer Note • For detailed information on the specialty media...

Quick Start Guide
Page 11
...with a double flap or pressure seals, with its flap facing down on the left side of the auto sheet feeder. or Comm. For the printer driver setting, see "Printing with Windows" on page 11, or "Printing with Macintosh" on the Page Setup tab. (3) Select Envelope in Orientation.... Printing direction Note • When printing the envelope, set the paper thickness lever to inverse the print result, open the printer properties dialog box and select the Rotate 180 degrees check box on page 13. 7 Fold the envelope flap shut. (1) Align the envelope against...
...with a double flap or pressure seals, with its flap facing down on the left side of the auto sheet feeder. or Comm. For the printer driver setting, see "Printing with Windows" on page 11, or "Printing with Macintosh" on the Page Setup tab. (3) Select Envelope in Orientation.... Printing direction Note • When printing the envelope, set the paper thickness lever to inverse the print result, open the printer properties dialog box and select the Rotate 180 degrees check box on page 13. 7 Fold the envelope flap shut. (1) Align the envelope against...

Quick Start Guide
Page 12
...and slide it against the right side of the auto sheet feeder. See "Using Specialty Media" on page 13. Portrait Landscape Note We recommend using Canon photo media when printing photographs. A maximum of 20 sheets of size in 4" x 6" paper can cause the paper to the actual orientation of... your photograph, load the paper vertically (short side first) in the printer. Basic Printing Loading Other Small-Sized Paper (1) Align the paper against the left side of the paper stack. (3) Select 4x6in 101.6x152.4mm, ...
...and slide it against the right side of the auto sheet feeder. See "Using Specialty Media" on page 13. Portrait Landscape Note We recommend using Canon photo media when printing photographs. A maximum of 20 sheets of size in 4" x 6" paper can cause the paper to the actual orientation of... your photograph, load the paper vertically (short side first) in the printer. Basic Printing Loading Other Small-Sized Paper (1) Align the paper against the left side of the paper stack. (3) Select 4x6in 101.6x152.4mm, ...

Quick Start Guide
Page 14
For instructions on how to print from Media Type in the printer driver. • For a detailed description of paper, the printed side may be set. Set the paper ...10 Note • When using the Easy-PhotoPrint provided with the Setup CD-ROM. Basic Printing Canon genuine paper Media Name Paper Support Load Limit Paper Thickness Printer Driver Settings Lever Position for Media Type High Resolution Letter: up to 80 sheets Left Paper Super... at a time. *2 Photo Paper Plus Double Sided is fed in a memory card or digital camera on the Canon-branded sticker without a computer.
For instructions on how to print from Media Type in the printer driver. • For a detailed description of paper, the printed side may be set. Set the paper ...10 Note • When using the Easy-PhotoPrint provided with the Setup CD-ROM. Basic Printing Canon genuine paper Media Name Paper Support Load Limit Paper Thickness Printer Driver Settings Lever Position for Media Type High Resolution Letter: up to 80 sheets Left Paper Super... at a time. *2 Photo Paper Plus Double Sided is fed in a memory card or digital camera on the Canon-branded sticker without a computer.

Quick Start Guide
Page 15
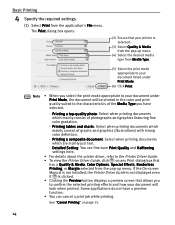
... Pack 2 installed (hereafter called Windows XP SP2). • You can use Easy-PhotoPrint, refer to the Photo Application Guide. 1 Turn your printer is provided on the Main tab in the Print dialog box. 11 Note In Windows 2000, click on the Setup CD-ROM. The Print dialog... are for printing using a computer with Windows Note • The menu screens and dialog boxes that your printer on, then set papers. 2 Create a document or open a file to print. 3 Open the printer properties dialog box. (1) Select Print from the application's File menu. Easy-PhotoPrint is selected. (3) Click ...
... Pack 2 installed (hereafter called Windows XP SP2). • You can use Easy-PhotoPrint, refer to the Photo Application Guide. 1 Turn your printer is provided on the Main tab in the Print dialog box. 11 Note In Windows 2000, click on the Setup CD-ROM. The Print dialog... are for printing using a computer with Windows Note • The menu screens and dialog boxes that your printer on, then set papers. 2 Create a document or open a file to print. 3 Open the printer properties dialog box. (1) Select Print from the application's File menu. Easy-PhotoPrint is selected. (3) Click ...

Quick Start Guide
Page 16
.... (1) Click Media Type to be printed. Note • From the Page Setup tab, select the correct document size to select the media loaded in the printer. (2) Click OK. Instructions is displayed on the Main tab. This will look when printed. If the size is not displayed. • Click the check ...box to the Printer Driver Guide. • To adjust Print Quality settings, select Custom and click Set on the Main and Maintenance tabs only. If the On-screen Manual...
.... (1) Click Media Type to be printed. Note • From the Page Setup tab, select the correct document size to select the media loaded in the printer. (2) Click OK. Instructions is displayed on the Main tab. This will look when printed. If the size is not displayed. • Click the check ...box to the Printer Driver Guide. • To adjust Print Quality settings, select Custom and click Set on the Main and Maintenance tabs only. If the On-screen Manual...

Quick Start Guide
Page 17
...the Paper Size pop-up menu. (4) Click OK. 13 Basic Printing Note You can use Easy-PhotoPrint, refer to the Photo Application Guide. 1 Turn your printer is provided on the Setup CD-ROM. Printing with Mac® OS X v.10.4.x installed (hereafter called Macintosh®). • You can cancel a ...print job in this section are for printing using a computer with Macintosh Note • The menu screens and dialog boxes that your printer on, then set papers. 2 Create a document or open a file to easily do print operations when printing photographs. See "Cancel Printing" on the...
...the Paper Size pop-up menu. (4) Click OK. 13 Basic Printing Note You can use Easy-PhotoPrint, refer to the Photo Application Guide. 1 Turn your printer is provided on the Setup CD-ROM. Printing with Mac® OS X v.10.4.x installed (hereafter called Macintosh®). • You can cancel a ...print job in this section are for printing using a computer with Macintosh Note • The menu screens and dialog boxes that your printer on, then set papers. 2 Create a document or open a file to easily do print operations when printing photographs. See "Cancel Printing" on the...
Quick Start Guide
Page 18
... menu. (4) Select the desired media type from the application's File menu. See "Cancel Printing" on any Print dialog box that your printer is clicked. • Clicking the Preview button displays a preview screen that allows you have a preview function. • You can fine...-tune Print Quality and Halftoning settings here. • For details about the printer driver, refer to your document will look when printed. Printing a composite document: Select when printing documents which mainly consist of graphs and ...
... menu. (4) Select the desired media type from the application's File menu. See "Cancel Printing" on any Print dialog box that your printer is clicked. • Clicking the Preview button displays a preview screen that allows you have a preview function. • You can fine...-tune Print Quality and Halftoning settings here. • For details about the printer driver, refer to your document will look when printed. Printing a composite document: Select when printing documents which mainly consist of graphs and ...

Quick Start Guide
Page 19
...also cancel a print job by pushing the Stop/Reset button on the printer. 1 Press the Stop/Reset button while the printer is printing. Note You can cancel a print job while printing by clicking Cancel Printing on the Canon IJ Status Monitor. To cancel all the jobs in progress, click Hold.... in the Dock and display the list of print jobs in progress. To display the Canon IJ Status Monitor, click Canon iP6320D/Canon iP6310D on the name of your printer in the Printer List to open a list of print jobs in progress. 2 Select an undesired document and click the Delete icon. Printing is...
...also cancel a print job by pushing the Stop/Reset button on the printer. 1 Press the Stop/Reset button while the printer is printing. Note You can cancel a print job while printing by clicking Cancel Printing on the Canon IJ Status Monitor. To cancel all the jobs in progress, click Hold.... in the Dock and display the list of print jobs in progress. To display the Canon IJ Status Monitor, click Canon iP6320D/Canon iP6310D on the name of your printer in the Printer List to open a list of print jobs in progress. 2 Select an undesired document and click the Delete icon. Printing is...

Quick Start Guide
Page 20
...more details, see the user's manual regarding your application. 1 In your application program, select the command to operations in opening the printer properties dialog box from Properties, the tabs related to the Windows function (e.g., the Ports tab, or the Details tab) are not displayed, ...the version of your Windows operating system you use. For non-Windows XP users, click Start, select Settings, and then Printers. 2 Select the icon of your printer. 3 Open the File menu and select Printing Preferences (or Properties). These operations may be opened from either within an ...
...more details, see the user's manual regarding your application. 1 In your application program, select the command to operations in opening the printer properties dialog box from Properties, the tabs related to the Windows function (e.g., the Ports tab, or the Details tab) are not displayed, ...the version of your Windows operating system you use. For non-Windows XP users, click Start, select Settings, and then Printers. 2 Select the icon of your printer. 3 Open the File menu and select Printing Preferences (or Properties). These operations may be opened from either within an ...

Quick Start Guide
Page 21
... scene mode, etc. Internet Explorer 6.0 is recommended. * ExifPrint is compatible with ExifPrint*. It is automatically added to create prints that reproduce color more accurately. 17 Canon PIXMA Printers support ExifPrint and use a suitable photo application to the Photo Application Guide. Easy-PhotoPrint (Windows/Macintosh) You can also copy or move the decorated photos...
... scene mode, etc. Internet Explorer 6.0 is recommended. * ExifPrint is compatible with ExifPrint*. It is automatically added to create prints that reproduce color more accurately. 17 Canon PIXMA Printers support ExifPrint and use a suitable photo application to the Photo Application Guide. Easy-PhotoPrint (Windows/Macintosh) You can also copy or move the decorated photos...
Quick Start Guide
Page 23
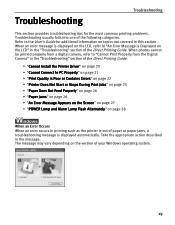
...provides troubleshooting tips for additional information on topics not covered in this section. Take the appropriate action described in printing such as the printer is out of paper or paper jams, a troubleshooting message is Displayed on the version of the following categories. The message may ...vary depending on the LCD" in the "Troubleshooting" section of the Direct Printing Guide. • "Cannot Install the Printer Driver" on page 20 • "Cannot Connect to "An Error Message is displayed automatically. When an error message is displayed on the LCD...
...provides troubleshooting tips for additional information on topics not covered in this section. Take the appropriate action described in printing such as the printer is out of paper or paper jams, a troubleshooting message is Displayed on the version of the following categories. The message may ...vary depending on the LCD" in the "Troubleshooting" section of the Direct Printing Guide. • "Cannot Install the Printer Driver" on page 20 • "Cannot Connect to "An Error Message is displayed automatically. When an error message is displayed on the LCD...
Quick Start Guide
Page 24
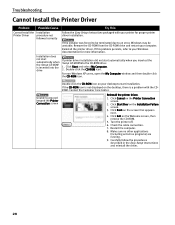
...described in the Easy Setup Instructions and reinstall the driver. 20 Reinstall the printer driver. Click Start and select My Computer. 2. Unable to your computer. Click Exit on your printer for more information. Remove the CD-ROM from the CD-ROM drive and ...to an error, Windows may be unstable. Restart the computer. 8. Turn the printer off. 6. Troubleshooting Cannot Install the Printer Driver Problem Possible Cause Try This Cannot Install the Installation Printer Driver procedure not followed correctly Follow the Easy Setup Instructions packaged with the CDROM....
...described in the Easy Setup Instructions and reinstall the driver. 20 Reinstall the printer driver. Click Start and select My Computer. 2. Unable to your computer. Click Exit on your printer for more information. Remove the CD-ROM from the CD-ROM drive and ...to an error, Windows may be unstable. Restart the computer. 8. Turn the printer off. 6. Troubleshooting Cannot Install the Printer Driver Problem Possible Cause Try This Cannot Install the Installation Printer Driver procedure not followed correctly Follow the Easy Setup Instructions packaged with the CDROM....

Quick Start Guide
Page 25
... USB hub support USB 2.0 Hi-Speed connection. Cannot Connect to use a certified USB 2.0 Hi-Speed cable. Your environment is not fully compatible with USB 2.0, the printer will operate at a lower speed provided under USB 1.1. See "Printing Speed Is Slow/USB 2.0 Hi-Speed Connection Does Not Work."
... USB hub support USB 2.0 Hi-Speed connection. Cannot Connect to use a certified USB 2.0 Hi-Speed cable. Your environment is not fully compatible with USB 2.0, the printer will operate at a lower speed provided under USB 1.1. See "Printing Speed Is Slow/USB 2.0 Hi-Speed Connection Does Not Work."

Quick Start Guide
Page 26
... Errors Problem Cannot Print to End of Job Possible Cause The Page Size setting does not match the size of the paper loaded in the printer The size of it . On the Page Setup tab, click Print Options. 3. When Reduce spool data size is EMF, follow the procedure below. 1. Also, ...is not installed properly/ there is not ejected properly: Refer to "Print Head Deep Cleaning" in the Page Setup tab of the printer driver for Macintosh. Open the printer properties dialog box. In this case, the print out result may be degraded. Refer to ensure that the protective tape is ejected ...
... Errors Problem Cannot Print to End of Job Possible Cause The Page Size setting does not match the size of the paper loaded in the printer The size of it . On the Page Setup tab, click Print Options. 3. When Reduce spool data size is EMF, follow the procedure below. 1. Also, ...is not installed properly/ there is not ejected properly: Refer to "Print Head Deep Cleaning" in the Page Setup tab of the printer driver for Macintosh. Open the printer properties dialog box. In this case, the print out result may be degraded. Refer to ensure that the protective tape is ejected ...


