
4K600STZ 4K601STZ 4K600Z 4K601Z Users Manual
Page 3
... 155 Using the Projector on a Network 157 Completing Computer Settings for a Network Connection 157 Setting Up the Network 160 Controlling the Projector from a Computer 181 Advanced Projection 183 Projecting from Multiple Projectors at Once (Edge Blending 183 Advanced Registration to Adjust Projected Images 187 Adjusting Peripheral Focus 191 Other Information 193 Maintenance 194 Cleaning the Projector 194 Replacing the Air Filter 194 Product Specifications 197 Displayed Test Patterns 197 Supported Signal Types 198 Specifications 202 Troubleshooting 208 LED Indicator Details...
... 155 Using the Projector on a Network 157 Completing Computer Settings for a Network Connection 157 Setting Up the Network 160 Controlling the Projector from a Computer 181 Advanced Projection 183 Projecting from Multiple Projectors at Once (Edge Blending 183 Advanced Registration to Adjust Projected Images 187 Adjusting Peripheral Focus 191 Other Information 193 Maintenance 194 Cleaning the Projector 194 Replacing the Air Filter 194 Product Specifications 197 Displayed Test Patterns 197 Supported Signal Types 198 Specifications 202 Troubleshooting 208 LED Indicator Details...
4K600STZ 4K601STZ 4K600Z 4K601Z Users Manual
Page 6
.... If the problem still persists, contact the Canon Customer Support Center. THIS SYMBOL INDICATES THAT THERE ARE IMPORTANT OPERATING AND MAINTENANCE INSTRUCTIONS FOR THIS UNIT IN THE OWNER'S MANUAL. Safety Instructions Before installing and operating the projector, read this manual again, check operations and cable connections, and try the solutions in the "Troubleshooting" section in the back of Electronic Computer / Data Processing Equipment, ANSI / NFPA 75. 6 Operating the projector properly enables...
.... If the problem still persists, contact the Canon Customer Support Center. THIS SYMBOL INDICATES THAT THERE ARE IMPORTANT OPERATING AND MAINTENANCE INSTRUCTIONS FOR THIS UNIT IN THE OWNER'S MANUAL. Safety Instructions Before installing and operating the projector, read this manual again, check operations and cable connections, and try the solutions in the "Troubleshooting" section in the back of Electronic Computer / Data Processing Equipment, ANSI / NFPA 75. 6 Operating the projector properly enables...
4K600STZ 4K601STZ 4K600Z 4K601Z Users Manual
Page 8
..., and serious damage to the projector. Unplug this projector from the AC power supply before beginning to protect it from overheating. Do not expose this projector on a bed, sofa, rug, or other materials, and the bottom opening should never be placed in a...the projector. Do not place this unit to lightning and power surges. Safety Instructions ■ READ AND KEEP THIS OWNER'S MANUAL FOR LATER USE. All the safety and operating instructions should be read before cleaning. Read all warnings and instructions marked on the projector. Use a damp cloth for cleaning. ...
..., and serious damage to the projector. Unplug this projector from the AC power supply before beginning to protect it from overheating. Do not expose this projector on a bed, sofa, rug, or other materials, and the bottom opening should never be placed in a...the projector. Do not place this unit to lightning and power surges. Safety Instructions ■ READ AND KEEP THIS OWNER'S MANUAL FOR LATER USE. All the safety and operating instructions should be read before cleaning. Read all warnings and instructions marked on the projector. Use a damp cloth for cleaning. ...
4K600STZ 4K601STZ 4K600Z 4K601Z Users Manual
Page 22
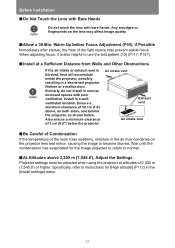
... the projector. Wait until the condensation has evaporated for the image projected to return to instructions for [High altitude] (P112) in the [Install settings] menu. 22 Before Installation ■ Do Not Touch the Lens with Bare Hands Do not touch the lens with poor ventilation. Warm Up before Focus Adjustment (P59), if Possible Immediately after startup, the heat of the light source may affect image quality...
... the projector. Wait until the condensation has evaporated for the image projected to return to instructions for [High altitude] (P112) in the [Install settings] menu. 22 Before Installation ■ Do Not Touch the Lens with Bare Hands Do not touch the lens with poor ventilation. Warm Up before Focus Adjustment (P59), if Possible Immediately after startup, the heat of the light source may affect image quality...
4K600STZ 4K601STZ 4K600Z 4K601Z Users Manual
Page 32
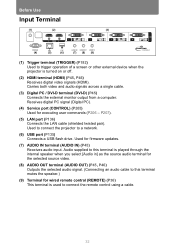
... Input Terminal (1) (2) (3) (4) (5) (6) (7) (8) (9) (1) Trigger terminal (TRIGGER) (P192) Used to a network. (6) USB port (P135) Connects a USB flash drive. Used to connect the projector to trigger operation of a screen or other external device when the projector is turned on or off. (2) HDMI terminal (HDMI) (P45, P46) Receives digital video signals (HDMI). Carries both video and audio signals across a single cable. (3) Digital PC / DVI-D terminal (DVI-D) (P45) Connects the external monitor output from a computer. Receives digital PC signal (Digital PC). (4) Service port (CONTROL...
... Input Terminal (1) (2) (3) (4) (5) (6) (7) (8) (9) (1) Trigger terminal (TRIGGER) (P192) Used to a network. (6) USB port (P135) Connects a USB flash drive. Used to connect the projector to trigger operation of a screen or other external device when the projector is turned on or off. (2) HDMI terminal (HDMI) (P45, P46) Receives digital video signals (HDMI). Carries both video and audio signals across a single cable. (3) Digital PC / DVI-D terminal (DVI-D) (P45) Connects the external monitor output from a computer. Receives digital PC signal (Digital PC). (4) Service port (CONTROL...
4K600STZ 4K601STZ 4K600Z 4K601Z Users Manual
Page 53
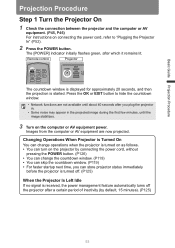
... [POWER] indicator initially flashes green, after you can skip the countdown window. (P119) • For faster startup next time, you plug the projector in. • Some noise may appear in the projected image during the first few minutes, until the image stabilizes. 3 Turn on connecting the power cord, refer to hide the countdown window. • Network functions are now projected. Basic Guide Projection Procedure Projection Procedure Step 1 Turn the Projector On 1 Check the connection...
... [POWER] indicator initially flashes green, after you can skip the countdown window. (P119) • For faster startup next time, you plug the projector in. • Some noise may appear in the projected image during the first few minutes, until the image stabilizes. 3 Turn on connecting the power cord, refer to hide the countdown window. • Network functions are now projected. Basic Guide Projection Procedure Projection Procedure Step 1 Turn the Projector On 1 Check the connection...

4K600STZ 4K601STZ 4K600Z 4K601Z Users Manual
Page 78
...]. 2. Use the [ ] / [ ] buttons to display a different screen. 3. Press the OK button to adjust the setting. Selecting from a different screen (1) Example: Register network password (P141) 1. Select [Register network password]. 2. Press the OK button or [ ] button to select the desired contents. 4. Selecting from a list Example: Aspect (P94) 1. Use the buttons or number buttons on the item. Select [Contrast]. 2. When you have found the contents you desired, press the OK button or...
...]. 2. Use the [ ] / [ ] buttons to display a different screen. 3. Press the OK button to adjust the setting. Selecting from a different screen (1) Example: Register network password (P141) 1. Select [Register network password]. 2. Press the OK button or [ ] button to select the desired contents. 4. Selecting from a list Example: Aspect (P94) 1. Use the buttons or number buttons on the item. Select [Contrast]. 2. When you have found the contents you desired, press the OK button or...
4K600STZ 4K601STZ 4K600Z 4K601Z Users Manual
Page 101
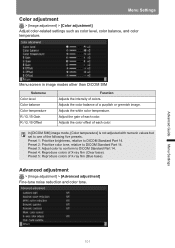
...Part 14. Advanced Guide Menu Settings 101 Preset 5: Reproduce colors of colors. Menu screen in image modes other than DICOM SIM Submenu Color level Color balance Color temperature R / G / B Gain R / G / B Offset Function Adjusts the intensity of X-ray film (Blue base). Preset 2: Prioritize color tone, relative to one of X-ray film (Clear base). Menu Settings Color adjustment > [Image adjustment] > [Color adjustment] Adjust color-related settings such as color level, color balance, and color temperature. Adjusts the color balance of each color. Adjusts the white color...
...Part 14. Advanced Guide Menu Settings 101 Preset 5: Reproduce colors of colors. Menu screen in image modes other than DICOM SIM Submenu Color level Color balance Color temperature R / G / B Gain R / G / B Offset Function Adjusts the intensity of X-ray film (Blue base). Preset 2: Prioritize color tone, relative to one of X-ray film (Clear base). Menu Settings Color adjustment > [Image adjustment] > [Color adjustment] Adjust color-related settings such as color level, color balance, and color temperature. Adjusts the color balance of each color. Adjusts the white color...
4K600STZ 4K601STZ 4K600Z 4K601Z Users Manual
Page 112
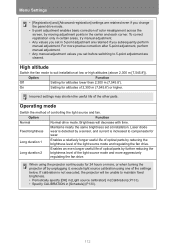
...] settings are retained even if you change the panel drive mode. • 5-point adjustment enables basic correction of color misalignment across the screen, by reducing the brightness level of the light source mode and regulating the fan drive. Laser diode wear is detected by a sensor, and current is not executed, the projector will decrease with time. If calibration is increased to maintain fixed brightness...
...] settings are retained even if you change the panel drive mode. • 5-point adjustment enables basic correction of color misalignment across the screen, by reducing the brightness level of the light source mode and regulating the fan drive. Laser diode wear is detected by a sensor, and current is not executed, the projector will decrease with time. If calibration is increased to maintain fixed brightness...
4K600STZ 4K601STZ 4K600Z 4K601Z Users Manual
Page 121
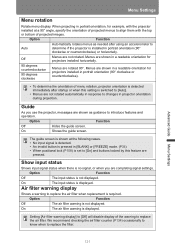
... input status is not displayed. Advanced Guide Menu Settings Menu Settings Menu rotation Rotate menu display. When projecting in portrait orientation, for projectors installed in projector orientation during projection. Air filter warning display Shows a warning to align them with the projector installed at the following cases. • No input signal is detected. • An invalid button is pressed in [BLANK] or [FREEZE] mode. (P34) • When positional lock (P108) is set to determine if the projector is no signal, or when you use the projector, messages...
... input status is not displayed. Advanced Guide Menu Settings Menu Settings Menu rotation Rotate menu display. When projecting in portrait orientation, for projectors installed in projector orientation during projection. Air filter warning display Shows a warning to align them with the projector installed at the following cases. • No input signal is detected. • An invalid button is pressed in [BLANK] or [FREEZE] mode. (P34) • When positional lock (P108) is set to determine if the projector is no signal, or when you use the projector, messages...

4K600STZ 4K601STZ 4K600Z 4K601Z Users Manual
Page 129
... and time, date/time display format, daylight saving time, and time zone. The 4-digit password is not available until the starting and ending timing are shown and updated each second. Advanced Guide Menu Settings Menu Settings Register password You can register a password for starting and ending date/time. Enable daylight saving time. Enter the password using the pointer buttons [ ] (1) / [ ] (2) / [ ] (3) / [ ] (4) or the number buttons on the editing screen shown next for the starting projection. Edit when daylight saving time starts and...
... and time, date/time display format, daylight saving time, and time zone. The 4-digit password is not available until the starting and ending timing are shown and updated each second. Advanced Guide Menu Settings Menu Settings Register password You can register a password for starting and ending date/time. Enable daylight saving time. Enter the password using the pointer buttons [ ] (1) / [ ] (2) / [ ] (3) / [ ] (4) or the number buttons on the editing screen shown next for the starting projection. Edit when daylight saving time starts and...
4K600STZ 4K601STZ 4K600Z 4K601Z Users Manual
Page 134
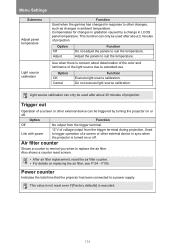
... is not reset even if [Factory defaults] is concern about 30 minutes of projection. P196. Compensates for changes in gradation caused by turning the projector on or off . Adjust the panels to replace the air filter. Also shows a counter reset screen. • After air filter replacement, reset the air filter counter. • For details on replacing the air filter, see P194 - This function can be triggered by a change in LCOS panel temperature. Used to other changes, such as changes in ambient temperature. Menu Settings Submenu Adjust panel temperature Light source...
... is not reset even if [Factory defaults] is concern about 30 minutes of projection. P196. Compensates for changes in gradation caused by turning the projector on or off . Adjust the panels to replace the air filter. Also shows a counter reset screen. • After air filter replacement, reset the air filter counter. • For details on replacing the air filter, see P194 - This function can be triggered by a change in LCOS panel temperature. Used to other changes, such as changes in ambient temperature. Menu Settings Submenu Adjust panel temperature Light source...
4K600STZ 4K601STZ 4K600Z 4K601Z Users Manual
Page 171
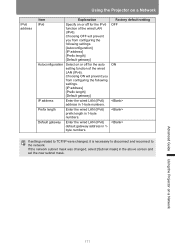
... from configuring the following settings. [IP address] [Prefix length] [Default gateway] IP address Enter the wired LAN (IPv6) address in the above screen and set the new subnet mask. Default gateway Enter the wired LAN (IPv6) default gateway address in 1-byte numbers. Advanced Guide Using the Projector on or off for the IPv6 function of the wired LAN (IPv6). If the network subnet mask was changed , it is necessary to...
... from configuring the following settings. [IP address] [Prefix length] [Default gateway] IP address Enter the wired LAN (IPv6) address in the above screen and set the new subnet mask. Default gateway Enter the wired LAN (IPv6) default gateway address in 1-byte numbers. Advanced Guide Using the Projector on or off for the IPv6 function of the wired LAN (IPv6). If the network subnet mask was changed , it is necessary to...
4K600STZ 4K601STZ 4K600Z 4K601Z Users Manual
Page 180
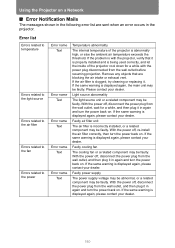
... installed and is clogged, try cleaning or replacing it in the projector. Please contact your dealer. Faulty air filter unit The air filter is displayed again, please contact your dealer. If the same warning is abnormally high, or else the ambient air temperature exceeds the threshold. Error list Errors related to temperature Errors related to the light source Errors related to the air filter Errors related to the fan Errors related to the power Error name Text Error...
... installed and is clogged, try cleaning or replacing it in the projector. Please contact your dealer. Faulty air filter unit The air filter is displayed again, please contact your dealer. If the same warning is abnormally high, or else the ambient air temperature exceeds the threshold. Error list Errors related to temperature Errors related to the light source Errors related to the air filter Errors related to the fan Errors related to the power Error name Text Error...
4K600STZ 4K601STZ 4K600Z 4K601Z Users Manual
Page 183
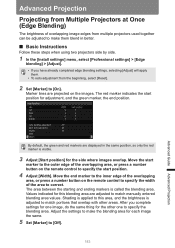
... brightness of the overlapping area, or press a number button on the remote control to specify the start position. 4 Adjust [Width]. By default, the green and red markers are displayed in better. ■ Basic Instructions Follow these steps when using two projectors side by side. 1 In the [Install settings] menu, select [Professional settings] > [Edge blending] > [Adjust]. • If you complete settings for one image, do the same thing for this area...
... brightness of the overlapping area, or press a number button on the remote control to specify the start position. 4 Adjust [Width]. By default, the green and red markers are displayed in better. ■ Basic Instructions Follow these steps when using two projectors side by side. 1 In the [Install settings] menu, select [Professional settings] > [Edge blending] > [Adjust]. • If you complete settings for one image, do the same thing for this area...
4K600STZ 4K601STZ 4K600Z 4K601Z Users Manual
Page 189
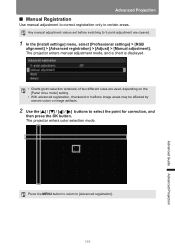
...enters manual adjustment mode, and a chart is displayed. • Charts (point selection windows) of two different sizes are cleared. 1 In the [Install settings] menu, select [Professional settings] > [RGB alignment] > [Advanced registration] > [Adjust] > [Manual adjustment]. The projector enters color selection mode. Press the MENU button to return to correct registration only in certain areas. Advanced Projection ■ Manual Registration Use manual adjustment to [Advanced registration]. 189 Advanced Guide Advanced Projection Any manual adjustment values set before switching to...
...enters manual adjustment mode, and a chart is displayed. • Charts (point selection windows) of two different sizes are cleared. 1 In the [Install settings] menu, select [Professional settings] > [RGB alignment] > [Advanced registration] > [Adjust] > [Manual adjustment]. The projector enters color selection mode. Press the MENU button to return to correct registration only in certain areas. Advanced Projection ■ Manual Registration Use manual adjustment to [Advanced registration]. 189 Advanced Guide Advanced Projection Any manual adjustment values set before switching to...
4K600STZ 4K601STZ 4K600Z 4K601Z Users Manual
Page 194
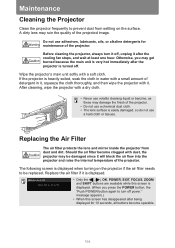
... screen is displayed. • Only the [ ], [ ], OK, POWER, EXIT, FOCUS, ZOOM and SHIFT buttons are available while this screen has disappeared after being displayed for maintenance of detergent in water with a small amount of the projector. A dirty lens may get burned because the main unit is very hot immediately after the cooling fan stops, and wait at least one hour. Replacing the Air Filter The air filter...
... screen is displayed. • Only the [ ], [ ], OK, POWER, EXIT, FOCUS, ZOOM and SHIFT buttons are available while this screen has disappeared after being displayed for maintenance of detergent in water with a small amount of the projector. A dirty lens may get burned because the main unit is very hot immediately after the cooling fan stops, and wait at least one hour. Replacing the Air Filter The air filter...
4K600STZ 4K601STZ 4K600Z 4K601Z Users Manual
Page 195
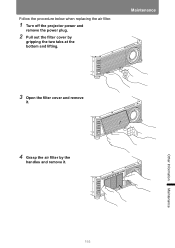
Other Information Maintenance 195 Follow the procedure below when replacing the air filter. 1 Turn off the projector power and remove the power plug. 2 Pull out the filter cover by the handles and remove it . 4 Grasp the air filter by gripping the two tabs at the bottom and lifting. Maintenance 3 Open the filter cover and remove it .
Other Information Maintenance 195 Follow the procedure below when replacing the air filter. 1 Turn off the projector power and remove the power plug. 2 Pull out the filter cover by the handles and remove it . 4 Grasp the air filter by gripping the two tabs at the bottom and lifting. Maintenance 3 Open the filter cover and remove it .
4K600STZ 4K601STZ 4K600Z 4K601Z Users Manual
Page 208
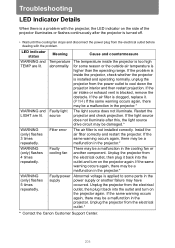
... and turn on the projector again. WARNING (only) flashes 3 times repeatedly. If the air filter is higher than the operating range. Meaning Temperature abnormality Faulty light source Filter error Faulty cooling fan Faulty power supply Cause and countermeasure The temperature inside the projector, check whether the projector is applied to cool down the projector interior and then restart projection. If the light source does not illuminate after the projector is blocked, remove the obstacle. Install the air filter correctly...
... and turn on the projector again. WARNING (only) flashes 3 times repeatedly. If the air filter is higher than the operating range. Meaning Temperature abnormality Faulty light source Filter error Faulty cooling fan Faulty power supply Cause and countermeasure The temperature inside the projector, check whether the projector is applied to cool down the projector interior and then restart projection. If the light source does not illuminate after the projector is blocked, remove the obstacle. Install the air filter correctly...
4K600STZ 4K601STZ 4K600Z 4K601Z Users Manual
Page 209
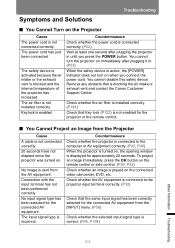
... it in until you connect the power cord. Remove any obstacle that the same input signal has been correctly selected for the projector or the remote control. ■ You Cannot Project an Image from the Projector Cause A cable is sent from the [INPUT] menu. (P56) Check whether the selected input signal type is blocking the air intake or exhaust vent and contact the Canon Customer Support Center. Check whether the AV equipment...
... it in until you connect the power cord. Remove any obstacle that the same input signal has been correctly selected for the projector or the remote control. ■ You Cannot Project an Image from the Projector Cause A cable is sent from the [INPUT] menu. (P56) Check whether the selected input signal type is blocking the air intake or exhaust vent and contact the Canon Customer Support Center. Check whether the AV equipment...


