4K6021Z Users Manual
Page 2
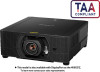
...of the projector. The 4K6021Z Multimedia Projector is the user's manual for purchasing a Canon projector. This Manual This is a high-performance laser projector capable of projecting high-resolution computer screens and high-quality digital images on the projector once to adjust focus and twice to adjust image size. The "Installation Guide" covers how to install the projector and join a network, and the "Menu Guide" explains setting menus and how to make the most of your projector. Projector Remote control LENS button FOCUS button ZOOM button Symbols Used in presentations...
...of the projector. The 4K6021Z Multimedia Projector is the user's manual for purchasing a Canon projector. This Manual This is a high-performance laser projector capable of projecting high-resolution computer screens and high-quality digital images on the projector once to adjust focus and twice to adjust image size. The "Installation Guide" covers how to install the projector and join a network, and the "Menu Guide" explains setting menus and how to make the most of your projector. Projector Remote control LENS button FOCUS button ZOOM button Symbols Used in presentations...

4K6021Z Users Manual
Page 3
You cannot copy the following settings. • [Input settings] Tab Input level / Color space / Progressive / PC-free multi projection / Split screen • [Image adjustment] Tab Image Priority / Image Mode (*1) • [Install settings] Tab Zoom / Keystone / Digital image shift / Professional Settings → RGB alignment, Lens shift mode, Marginal Focus and Edge Blending / Lens position • [System settings] Tab User screen settings → User logo / On screen → Menu position / Remote control channel / Other settings • [Network settings] Tab Items Other Than PJLink, ...
You cannot copy the following settings. • [Input settings] Tab Input level / Color space / Progressive / PC-free multi projection / Split screen • [Image adjustment] Tab Image Priority / Image Mode (*1) • [Install settings] Tab Zoom / Keystone / Digital image shift / Professional Settings → RGB alignment, Lens shift mode, Marginal Focus and Edge Blending / Lens position • [System settings] Tab User screen settings → User logo / On screen → Menu position / Remote control channel / Other settings • [Network settings] Tab Items Other Than PJLink, ...

4K6021Z Users Manual
Page 5
... Open Source Software 26 Before Use 27 Included Accessories 27 Projector Part Names and Functions 28 Remote Control 33 Basic Guide 38 Projection Procedure 39 Step 1 Connect Other Equipment....... 40 Step 2 Turn the Projector On 41 Step 3 Select an Input Signal 42 Step 4 Adjust the Image 43 Step 5 Select the Image Quality (Image Mode 44 Turn the Projector Off 46 Convenient Projection Features 47 Convenient Features 47 Installation Guide 50 Installation Procedure 51 Relationship Between Projecting Distance and Image Size...
... Open Source Software 26 Before Use 27 Included Accessories 27 Projector Part Names and Functions 28 Remote Control 33 Basic Guide 38 Projection Procedure 39 Step 1 Connect Other Equipment....... 40 Step 2 Turn the Projector On 41 Step 3 Select an Input Signal 42 Step 4 Adjust the Image 43 Step 5 Select the Image Quality (Image Mode 44 Turn the Projector Off 46 Convenient Projection Features 47 Convenient Features 47 Installation Guide 50 Installation Procedure 51 Relationship Between Projecting Distance and Image Size...
4K6021Z Users Manual
Page 8
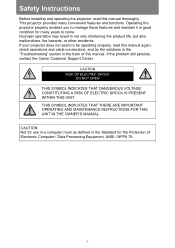
... it in good condition for use in a computer room as defined in not only shortening the product life, but also malfunctions, fire hazards, or other accidents. Safety Instructions Before installing and operating the projector, read this manual again, check operations and cable connections, and try the solutions in the "Troubleshooting" section in the back of Electronic Computer / Data Processing Equipment, ANSI / NFPA 75...
... it in good condition for use in a computer room as defined in not only shortening the product life, but also malfunctions, fire hazards, or other accidents. Safety Instructions Before installing and operating the projector, read this manual again, check operations and cable connections, and try the solutions in the "Troubleshooting" section in the back of Electronic Computer / Data Processing Equipment, ANSI / NFPA 75...

4K6021Z Users Manual
Page 10
... or unused for ventilation, to insure reliable operation of time, unplug it from the wall outlet. Follow all of the instructions given here and retain them for cleaning. Read all warnings and instructions marked on an unstable cart, stand, or table. Safety Instructions ■ READ AND KEEP THIS OWNER'S MANUAL FOR LATER USE. Slots and openings in a wet basement, near or over...
... or unused for ventilation, to insure reliable operation of time, unplug it from the wall outlet. Follow all of the instructions given here and retain them for cleaning. Read all warnings and instructions marked on an unstable cart, stand, or table. Safety Instructions ■ READ AND KEEP THIS OWNER'S MANUAL FOR LATER USE. Slots and openings in a wet basement, near or over...

4K6021Z Users Manual
Page 24
... Altitudes above 2,300 m (7,545.8'), Adjust the Settings Projector settings must be adjusted when using the projector at a Sufficient Distance from Walls and Other Obstructions If the air intake or exhaust Air intake vent vent is also helpful to instructions for the image projected to return to become blurred. Warmed airflow Exhaust vent Ensure a minimum clearance of the room rises suddenly, moisture in the [Install settings] menu. 22
... Altitudes above 2,300 m (7,545.8'), Adjust the Settings Projector settings must be adjusted when using the projector at a Sufficient Distance from Walls and Other Obstructions If the air intake or exhaust Air intake vent vent is also helpful to instructions for the image projected to return to become blurred. Warmed airflow Exhaust vent Ensure a minimum clearance of the room rises suddenly, moisture in the [Install settings] menu. 22
4K6021Z Users Manual
Page 33
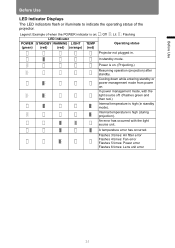
... mode from power on. Power is on; : Off LED indicator POWER STANDBY WARNING LIGHT TEMP (green) (red) (red) (orange) (red) : Lit : Flashing Operating status Projector not plugged in standby mode). A temperature error has occurred. Legend: Example of the projector. In power management mode, with the light source unit. In standby mode. Flashes 3 times: Air filter error Flashes 4 times: Fan error Flashes 5 times: Power error Flashes 6 times: Lens unit error 31 Internal temperature is high (in . Before Use Before Use LED Indicator Displays The LED indicators flash...
... mode from power on. Power is on; : Off LED indicator POWER STANDBY WARNING LIGHT TEMP (green) (red) (red) (orange) (red) : Lit : Flashing Operating status Projector not plugged in standby mode). A temperature error has occurred. Legend: Example of the projector. In power management mode, with the light source unit. In standby mode. Flashes 3 times: Air filter error Flashes 4 times: Fan error Flashes 5 times: Power error Flashes 6 times: Lens unit error 31 Internal temperature is high (in . Before Use Before Use LED Indicator Displays The LED indicators flash...
4K6021Z Users Manual
Page 34
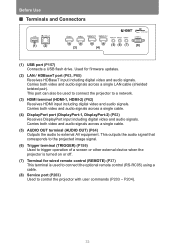
... to the projected image signal. (6) Trigger terminal (TRIGGER) (P156) Used to trigger operation of a screen or other external device when the projector is used to connect the projector to a network. (3) HDMI terminal (HDMI-1, HDMI-2) (P62) Receives HDMI input including digital video and audio signals. Used for wired remote control (REMOTE) (P37) This terminal is turned on or off. (7) Terminal for firmware updates. (2) LAN / HDBaseT port (P63, P65) Receives HDBaseT input including digital video and audio signals. Carries both video and audio signals across a single cable. (5) AUDIO OUT...
... to the projected image signal. (6) Trigger terminal (TRIGGER) (P156) Used to trigger operation of a screen or other external device when the projector is used to connect the projector to a network. (3) HDMI terminal (HDMI-1, HDMI-2) (P62) Receives HDMI input including digital video and audio signals. Used for wired remote control (REMOTE) (P37) This terminal is turned on or off. (7) Terminal for firmware updates. (2) LAN / HDBaseT port (P63, P65) Receives HDBaseT input including digital video and audio signals. Carries both video and audio signals across a single cable. (5) AUDIO OUT...
4K6021Z Users Manual
Page 43
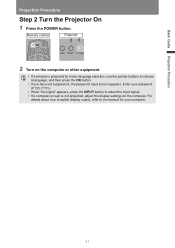
.... • If a window is not projected, adjust the display settings on the computer. Basic Guide Projection Procedure Projection Procedure Step 2 Turn the Projector On 1 Press the POWER button. For details about how to switch display output, refer to the manual for your password (P150, P151). • When "No signal" appears, press the INPUT button to select the input signal. • If a computer screen is projected for menu language selection, use the pointer buttons to choose a language...
.... • If a window is not projected, adjust the display settings on the computer. Basic Guide Projection Procedure Projection Procedure Step 2 Turn the Projector On 1 Press the POWER button. For details about how to switch display output, refer to the manual for your password (P150, P151). • When "No signal" appears, press the INPUT button to select the input signal. • If a computer screen is projected for menu language selection, use the pointer buttons to choose a language...

4K6021Z Users Manual
Page 48
... ambient light • Reduce the image size • Reduce the projection distance Turn the Projector Off 1 Press the POWER button. After cooling down . In standby mode, the [STANDBY] indicator remains lit instead of the followings to set it will not be reset, so you turn the projector off, projection stops, the [STANDBY] indicator flashes in red, and the projector starts cooling down , the projector enters standby mode. Remote control Projector 2 When this window is optimal. 4 Press the OK button after some time (P148...
... ambient light • Reduce the image size • Reduce the projection distance Turn the Projector Off 1 Press the POWER button. After cooling down . In standby mode, the [STANDBY] indicator remains lit instead of the followings to set it will not be reset, so you turn the projector off, projection stops, the [STANDBY] indicator flashes in red, and the projector starts cooling down , the projector enters standby mode. Remote control Projector 2 When this window is optimal. 4 Press the OK button after some time (P148...
4K6021Z Users Manual
Page 79
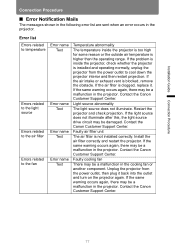
... air filter is higher than the operating range. Unplug the projector from the power outlet to the fan Error name Text Error name Text Error name Text Error name Text Temperature abnormality The temperature inside the projector, check whether the projector is installed and operating normally, unplug the projector from the power outlet, then plug it . Restart the projector and check projection. Contact the Canon Customer Support Center. Installation Guide Connection Procedure Connection Procedure ■ Error Notification Mails The messages...
... air filter is higher than the operating range. Unplug the projector from the power outlet to the fan Error name Text Error name Text Error name Text Error name Text Temperature abnormality The temperature inside the projector, check whether the projector is installed and operating normally, unplug the projector from the power outlet, then plug it . Restart the projector and check projection. Contact the Canon Customer Support Center. Installation Guide Connection Procedure Connection Procedure ■ Error Notification Mails The messages...

4K6021Z Users Manual
Page 89
.... 1 In the [Install settings] menu, select [Professional settings] > [RGB alignment] > [Advanced registration] > [Adjust] > [Manual adjustment]. Any manual adjustment values set before switching to select the point for correction, and then press the OK button. The projector enters manual adjustment mode, and a chart is displayed. The projector enters color selection mode. Press the MENU button to return to correct registration only in certain areas. Installation Guide Adjusting the Image Adjusting the Image ■ Manual Registration Use manual adjustment to [Advanced registration...
.... 1 In the [Install settings] menu, select [Professional settings] > [RGB alignment] > [Advanced registration] > [Adjust] > [Manual adjustment]. Any manual adjustment values set before switching to select the point for correction, and then press the OK button. The projector enters manual adjustment mode, and a chart is displayed. The projector enters color selection mode. Press the MENU button to return to correct registration only in certain areas. Installation Guide Adjusting the Image Adjusting the Image ■ Manual Registration Use manual adjustment to [Advanced registration...
4K6021Z Users Manual
Page 98
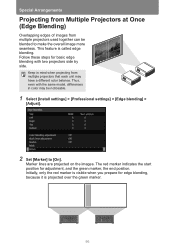
... side. The red marker indicates the start position for basic edge blending with the same model, differences in mind when projecting from multiple projectors used together can be noticeable. 1 Select [Install settings] > [Professional settings] > [Edge blending] > [Adjust]. 2 Set [Marker] to make the overall image more seamless. Marker lines are projected on the images. Keep in color may have a different color balance. Special Arrangements Projecting from Multiple Projectors at Once (Edge...
... side. The red marker indicates the start position for basic edge blending with the same model, differences in mind when projecting from multiple projectors used together can be noticeable. 1 Select [Install settings] > [Professional settings] > [Edge blending] > [Adjust]. 2 Set [Marker] to make the overall image more seamless. Marker lines are projected on the images. Keep in color may have a different color balance. Special Arrangements Projecting from Multiple Projectors at Once (Edge...

4K6021Z Users Manual
Page 140
... pressing the [ ] / [ ] buttons. 138 Enable test pattern display. • While the test pattern menu is obtained on the remote control. Menu Description Screen color > [Install settings] > [Screen color] You can project a test pattern (P92) to check resolution, color, and other details even without supplying an input signal. Select if a dark green surface such as a blackboard is used as the screen. Adjust The [Iris] setting does not affect power consumption. Submenu Normal Greenboard Adjust Function Select this...
... pressing the [ ] / [ ] buttons. 138 Enable test pattern display. • While the test pattern menu is obtained on the remote control. Menu Description Screen color > [Install settings] > [Screen color] You can project a test pattern (P92) to check resolution, color, and other details even without supplying an input signal. Select if a dark green surface such as a blackboard is used as the screen. Adjust The [Iris] setting does not affect power consumption. Submenu Normal Greenboard Adjust Function Select this...
4K6021Z Users Manual
Page 149
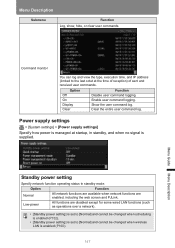
...; [Standby power setting] is set to [Normal] and cannot be changed when scheduling is enabled (P152). • [Standby power setting] is set to the last octet at startup, in standby mode. Power supply settings > [System settings] > [Power supply settings] Specify how power is supplied. Standby power setting Specify network function operating status in standby, and when no signal is managed at the time of reception) of sent and received user commands. Low-power All functions are enabled, including the web screen and PJLink. Menu...
...; [Standby power setting] is set to [Normal] and cannot be changed when scheduling is enabled (P152). • [Standby power setting] is set to the last octet at startup, in standby mode. Power supply settings > [System settings] > [Power supply settings] Specify how power is supplied. Standby power setting Specify network function operating status in standby, and when no signal is managed at the time of reception) of sent and received user commands. Low-power All functions are enabled, including the web screen and PJLink. Menu...
4K6021Z Users Manual
Page 153
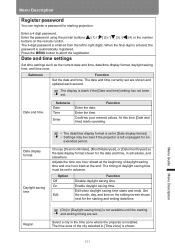
... password using the pointer buttons [ ] (1) / [ ] (2) / [ ] (3) / [ ] (4) or the number buttons on the editing screen shown next for the starting projection. Enter the time. Enable daylight saving time. Enter a 4 digit password. Menu Guide Menu Description 151 Press the MENU button to right digits. Date display format Daylight saving time • The date/time display format is left to abort the registration. The time zone of daylight saving time and one hour back at the end. Date and time settings Set time settings...
... password using the pointer buttons [ ] (1) / [ ] (2) / [ ] (3) / [ ] (4) or the number buttons on the editing screen shown next for the starting projection. Enter the time. Enable daylight saving time. Enter a 4 digit password. Menu Guide Menu Description 151 Press the MENU button to right digits. Date display format Daylight saving time • The date/time display format is left to abort the registration. The time zone of daylight saving time and one hour back at the end. Date and time settings Set time settings...

4K6021Z Users Manual
Page 183
... screen and set the new subnet mask. Menu Guide Projector Web Screen Menu 181 Enter the wired LAN (IPv6) prefix length in 1-byte numbers or letters between A and F. Shows the projector's manually assigned wired LAN (IPv6) address. Choosing [OFF] will prevent you from configuring the following settings. [Autoconfiguration] [IP address] [Prefix length] [Default gateway] Select on or off for the auto setting function of the wired LAN (IPv6). Factory default setting The projector's wired LAN...
... screen and set the new subnet mask. Menu Guide Projector Web Screen Menu 181 Enter the wired LAN (IPv6) prefix length in 1-byte numbers or letters between A and F. Shows the projector's manually assigned wired LAN (IPv6) address. Choosing [OFF] will prevent you from configuring the following settings. [Autoconfiguration] [IP address] [Prefix length] [Default gateway] Select on or off for the auto setting function of the wired LAN (IPv6). Factory default setting The projector's wired LAN...
4K6021Z Users Manual
Page 207
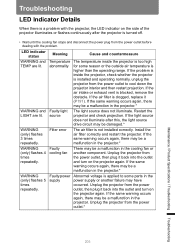
.... Troubleshooting LED Indicator Details When there is a problem with the problem. source The light source does not illuminate. Faulty cooling fan There may be a malfunction in the projector.* WARNING (only) flashes 5 times repeatedly. If the same warning occurs again, there may be a malfunction in the projector.* WARNING and Faulty light LIGHT are lit. LED indicator status Meaning Cause and countermeasure WARNING and TEMP are lit. Filter error The air filter is blocked, remove the obstacle. If the air filter is...
.... Troubleshooting LED Indicator Details When there is a problem with the problem. source The light source does not illuminate. Faulty cooling fan There may be a malfunction in the projector.* WARNING (only) flashes 5 times repeatedly. If the same warning occurs again, there may be a malfunction in the projector.* WARNING and Faulty light LIGHT are lit. LED indicator status Meaning Cause and countermeasure WARNING and TEMP are lit. Filter error The air filter is blocked, remove the obstacle. If the air filter is...
4K6021Z Users Manual
Page 208
... then plug the projector in again. Wait at least one second after plugging it in the projector.* Check whether the air filter is not connected correctly. The safety device is activated because the air intake or the exhaust vent is enabled. Meaning Problem with lens unit installation Cause and countermeasure The lens unit is not installed correctly. Troubleshooting LED indicator status WARNING (only) flashes 6 times repeatedly. The power cord has just...
... then plug the projector in again. Wait at least one second after plugging it in the projector.* Check whether the air filter is not connected correctly. The safety device is activated because the air intake or the exhaust vent is enabled. Meaning Problem with lens unit installation Cause and countermeasure The lens unit is not installed correctly. Troubleshooting LED indicator status WARNING (only) flashes 6 times repeatedly. The power cord has just...
4K6021Z Users Manual
Page 212
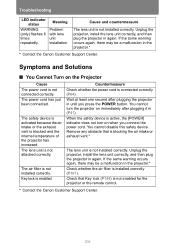
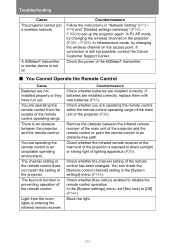
... a wireless network. Check the power of the projector and the remote control or point the remote control in an unsuitable operating environment. If batteries are operating the remote control within the remote control operating range of the main unit of the remote control has been changed. Check whether the infrared remote receiver of the main unit of lighting apparatus (P36). Countermeasure Follow the instructions in the [System settings] menu (P145). Check whether you are installed correctly, replace them...
... a wireless network. Check the power of the projector and the remote control or point the remote control in an unsuitable operating environment. If batteries are operating the remote control within the remote control operating range of the main unit of the remote control has been changed. Check whether the infrared remote receiver of the main unit of lighting apparatus (P36). Countermeasure Follow the instructions in the [System settings] menu (P145). Check whether you are installed correctly, replace them...


