

User Manual
Page 4
... Projection (P56 - P58) Selecting an Input Signal (P59 - P60) Resetting Projector Setting Resetting Password (P128) Initializing the Network Setting (P176) Resetting to AV Equipment (P52 - P70) Eliminating Flickers from Computer Screen and Adjusting Positional Shift (P96, P97) Adjusting Colors and Image Quality Projecting an Image on the Projector by Connecting the Power Cord (P121) Disabling the Beep During Operation (P122) Disabling Buttons (P123) Hiding Guide Messages (P126) Setting a Password (P128) Reducing the Lamp Brightness (P119) Displaying Test Pattern (P138) Selecting Audio...
... Projection (P56 - P58) Selecting an Input Signal (P59 - P60) Resetting Projector Setting Resetting Password (P128) Initializing the Network Setting (P176) Resetting to AV Equipment (P52 - P70) Eliminating Flickers from Computer Screen and Adjusting Positional Shift (P96, P97) Adjusting Colors and Image Quality Projecting an Image on the Projector by Connecting the Power Cord (P121) Disabling the Beep During Operation (P122) Disabling Buttons (P123) Hiding Guide Messages (P126) Setting a Password (P128) Reducing the Lamp Brightness (P119) Displaying Test Pattern (P138) Selecting Audio...

User Manual
Page 10
... Controlling the Projector from a Computer 188 Error Mail ...190 Maintenance 191 Cleaning the Projector 192 Cleaning and Replacing the Air Filter 193 Replacing the Air Filter ...193 Cleaning the Air Filter...194 Replacing the Lamp 195 Replacement Lamp ...196 Replacing the Lamp ...196 Appendix 199 Appendix ...201 Troubleshooting...202 LED Indicator Meanings ...202 Symptoms and Solutions...203 ■ You Cannot Turn on the Projector 203 ■ You Cannot Project an Image from the Projector 203 ■ There is no Sound...
... Controlling the Projector from a Computer 188 Error Mail ...190 Maintenance 191 Cleaning the Projector 192 Cleaning and Replacing the Air Filter 193 Replacing the Air Filter ...193 Cleaning the Air Filter...194 Replacing the Lamp 195 Replacement Lamp ...196 Replacing the Lamp ...196 Appendix 199 Appendix ...201 Troubleshooting...202 LED Indicator Meanings ...202 Symptoms and Solutions...203 ■ You Cannot Turn on the Projector 203 ■ You Cannot Project an Image from the Projector 203 ■ There is no Sound...

User Manual
Page 12
... accidents. If the problem still persists, contact the Canon Customer Support Center. CAUTION RISK OF ELECTRIC SHOCK DO NOT OPEN CAUTION: TO REDUCE THE RISK OF ELECTRIC SHOCK, DO NOT REMOVE COVER (OR BACK). THIS SYMBOL INDICATES THAT THERE ARE IMPORTANT OPERATING AND MAINTENANCE INSTRUCTIONS FOR THIS UNIT IN THE OWNER'S MANUAL. Operating the projector properly enables you to come. NO USER-SERVICEABLE PARTS INSIDE EXCEPT LAMP REPLACEMENT.
... accidents. If the problem still persists, contact the Canon Customer Support Center. CAUTION RISK OF ELECTRIC SHOCK DO NOT OPEN CAUTION: TO REDUCE THE RISK OF ELECTRIC SHOCK, DO NOT REMOVE COVER (OR BACK). THIS SYMBOL INDICATES THAT THERE ARE IMPORTANT OPERATING AND MAINTENANCE INSTRUCTIONS FOR THIS UNIT IN THE OWNER'S MANUAL. Operating the projector properly enables you to come. NO USER-SERVICEABLE PARTS INSIDE EXCEPT LAMP REPLACEMENT.

User Manual
Page 14
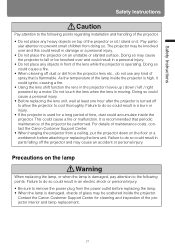
... from the wall outlet. Safety Instructions ■READ AND KEEP THIS OWNER'S MANUAL FOR LATER USE. Do not use near or over a radiator or heat register. Follow all of the instructions given here and retain them for long periods of time, unplug it from the AC power supply before beginning to insure reliable operation of the projector during a lightning storm, or when...
... from the wall outlet. Safety Instructions ■READ AND KEEP THIS OWNER'S MANUAL FOR LATER USE. Do not use near or over a radiator or heat register. Follow all of the instructions given here and retain them for long periods of time, unplug it from the AC power supply before beginning to insure reliable operation of the projector during a lightning storm, or when...
User Manual
Page 21
... on the floor or a workbench before replacing the lamp. • When the lamp is operating. This could cause a personal injury. • Before replacing the lens unit, wait at least one hour after the projector is high, it . Do not touch the lens when the lens is flammable. Precautions on the lamp Warning When replacing the lamp, or when the lamp is damaged, pay attention to the...
... on the floor or a workbench before replacing the lamp. • When the lamp is operating. This could cause a personal injury. • Before replacing the lens unit, wait at least one hour after the projector is high, it . Do not touch the lens when the lens is flammable. Precautions on the lamp Warning When replacing the lamp, or when the lamp is damaged, pay attention to the...

User Manual
Page 38
...error occurs. • LAMP (orange) : Flashes when the time for replacing the lamp is high, it will illuminate at the same time as the [WARNING] indicator. • TEMP (red) : When the temperature inside the projector increases further and a temperature error occurs, it will also flash. For indicator status, refer to focus adjustment (P73), zoom (image size) adjustment (P71), or lens shift (image position) adjustment (P74). If the temperature inside the projector is near. To adjust, use the [ ] / [ ] or the [ ] / [ ] buttons. (5) INPUT button (P60) Switches the input signal...
...error occurs. • LAMP (orange) : Flashes when the time for replacing the lamp is high, it will illuminate at the same time as the [WARNING] indicator. • TEMP (red) : When the temperature inside the projector increases further and a temperature error occurs, it will also flash. For indicator status, refer to focus adjustment (P73), zoom (image size) adjustment (P71), or lens shift (image position) adjustment (P74). If the temperature inside the projector is near. To adjust, use the [ ] / [ ] or the [ ] / [ ] buttons. (5) INPUT button (P60) Switches the input signal...

User Manual
Page 39
...The time for replacing the lamp is on the power status. 39 Internal temperature is not connected. Ready to high internal temperature. A lamp error has occurred. Another error has occurred. * Either the [POWER ON] or [STAND BY] indicator illuminates, depending on . Before Use Part Names ■LED Indicator Displays The LED indicators flash or illuminate to indicate the operating status of the projector. : Off : Lit : Flashing LED indicator POWER ON (green) STAND BY (red) WARNING (red) LAMP (orange) TEMP (red) Operating status Power is high. The lamp cover is open.
...The time for replacing the lamp is on the power status. 39 Internal temperature is not connected. Ready to high internal temperature. A lamp error has occurred. Another error has occurred. * Either the [POWER ON] or [STAND BY] indicator illuminates, depending on . Before Use Part Names ■LED Indicator Displays The LED indicators flash or illuminate to indicate the operating status of the projector. : Off : Lit : Flashing LED indicator POWER ON (green) STAND BY (red) WARNING (red) LAMP (orange) TEMP (red) Operating status Power is high. The lamp cover is open.
User Manual
Page 57
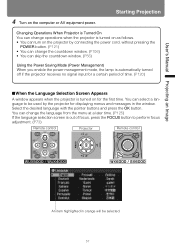
User's Manual Projecting an Image 4 Turn on the projector by the projector for displaying menus and messages in orange will be used by connecting the power cord, without pressing the POWER button. (P121) • You can change operations when the projector is automatically turned off if the projector receives no signal input for the first time. You can change the language from the menu at a later time. (P125) If the language selection screen is out of time. (P120) ■When...
User's Manual Projecting an Image 4 Turn on the projector by the projector for displaying menus and messages in orange will be used by connecting the power cord, without pressing the POWER button. (P121) • You can change operations when the projector is automatically turned off if the projector receives no signal input for the first time. You can change the language from the menu at a later time. (P125) If the language selection screen is out of time. (P120) ■When...
User Manual
Page 111
... the menu as adjusted values for the input signals and image mode of displayed user memories is 5, however it is possible to save up to 10 settings. • The image mode name which was the base for when the connected equipment is a computer (ANALOG PC, DIGITAL PC or HDMI (when [HDMI In] (P127) is [Computer]) and when AV equipment is connected (COMPONENT, HDMI (when [HDMI In] (P127) is [Auto...
... the menu as adjusted values for the input signals and image mode of displayed user memories is 5, however it is possible to save up to 10 settings. • The image mode name which was the base for when the connected equipment is a computer (ANALOG PC, DIGITAL PC or HDMI (when [HDMI In] (P127) is [Computer]) and when AV equipment is connected (COMPONENT, HDMI (when [HDMI In] (P127) is [Auto...
User Manual
Page 119
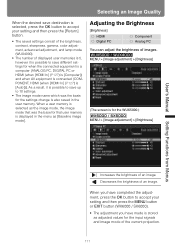
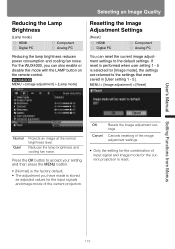
...the factory default. • The adjustment you can reset the current image adjustment settings to the settings that were saved in [User setting 1 - 5]. MENU > [Image adjustment] > [Lamp mode] Selecting an Image Quality Resetting the Image Adjustment Settings [Reset] HDMI Digital PC Component Analog PC You can also enable or disable this mode with the LAMP button on the remote control. Cancels resetting of the image adjustment settings. • Only the setting for the combination of input signal and image mode for the input signals and image mode of the current projection. If reset...
...the factory default. • The adjustment you can reset the current image adjustment settings to the settings that were saved in [User setting 1 - 5]. MENU > [Image adjustment] > [Lamp mode] Selecting an Image Quality Resetting the Image Adjustment Settings [Reset] HDMI Digital PC Component Analog PC You can also enable or disable this mode with the LAMP button on the remote control. Cancels resetting of the image adjustment settings. • Only the setting for the combination of input signal and image mode for the input signals and image mode of the current projection. If reset...

User Manual
Page 126
...], [FREEZE] or [D.ZOOM] mode. (P82, P84) - Setting Various Functions Showing / Hiding the Guide Screen [Guide] HDMI Digital PC Component Analog PC You can be detected. (P58) - An invalid button is set to [On] (WX6000 / SX6000) MENU > [Install settings] > [On screen] > [Guide] Off Hides the guide screen. Power is shown at the following times. - Press the OK button to show or hide the guide screen which explains operations. On Shows the guide screen. MENU > [System settings] > [Guide] - No input signal can select...
...], [FREEZE] or [D.ZOOM] mode. (P82, P84) - Setting Various Functions Showing / Hiding the Guide Screen [Guide] HDMI Digital PC Component Analog PC You can be detected. (P58) - An invalid button is set to [On] (WX6000 / SX6000) MENU > [Install settings] > [On screen] > [Guide] Off Hides the guide screen. Power is shown at the following times. - Press the OK button to show or hide the guide screen which explains operations. On Shows the guide screen. MENU > [System settings] > [Guide] - No input signal can select...
User Manual
Page 128
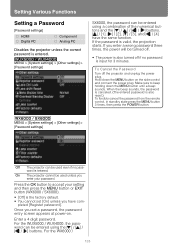
... the MENU button until a beep sounds. Press the OK button to keep holding down the MENU button on . For the WX6000 / 128 Make sure to accept your password. T o Cancel the P assword Turn off if no password is the factory default. • You cannot set a password, the password entry screen appears at power-on the side control and connect the power plug. On The projector cannot be used even if no password is also reset.) To...
... the MENU button until a beep sounds. Press the OK button to keep holding down the MENU button on . For the WX6000 / 128 Make sure to accept your password. T o Cancel the P assword Turn off if no password is the factory default. • You cannot set a password, the password entry screen appears at power-on the side control and connect the power plug. On The projector cannot be used even if no password is also reset.) To...
User Manual
Page 139
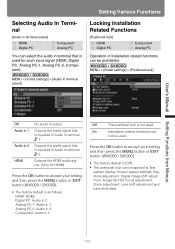
... your setting and then press the MENU button or EXIT button (WX6000 / SX6000). • The factory default is [Off]. • The positional lock can - Outputs the audio signal that is used for HDMI) Press the OK button to Test pattern display, Screen aspect settings, Keystone adjustment, Digital image shift adjustment, Image flip H/V, Focus adjustment, Zoom adjustment, Lens shift adjustment and Lens shift reset. 139 Outputs the HDMI audio signal. (Only for each input signal (HDMI, Digital PC, Analog PC-1, Analog PC-2, Component). HDMI: HDMI Digital PC: Audio in 2 Analog PC-1: Audio in...
... your setting and then press the MENU button or EXIT button (WX6000 / SX6000). • The factory default is [Off]. • The positional lock can - Outputs the audio signal that is used for HDMI) Press the OK button to Test pattern display, Screen aspect settings, Keystone adjustment, Digital image shift adjustment, Image flip H/V, Focus adjustment, Zoom adjustment, Lens shift adjustment and Lens shift reset. 139 Outputs the HDMI audio signal. (Only for each input signal (HDMI, Digital PC, Analog PC-1, Analog PC-2, Component). HDMI: HDMI Digital PC: Audio in 2 Analog PC-1: Audio in...
User Manual
Page 140
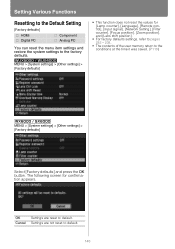
... to the conditions at the time it was saved. (P110) MENU > [System settings] > [Other settings] > [Factory defaults] Select [Factory defaults] and press the OK button. MENU > [System settings] > [Other settings] > [Factory defaults] • This function does not reset the values for confirmation appears. OK Settings are not reset to default. The following screen for [Lamp counter], [Language], [Remote control], [Input signal], [Network Setting], [Filter counter], [Focus position], [Zoom position], and [Lens shift position]. • For factory defaults settings, refer to pages 232...
... to the conditions at the time it was saved. (P110) MENU > [System settings] > [Other settings] > [Factory defaults] Select [Factory defaults] and press the OK button. MENU > [System settings] > [Other settings] > [Factory defaults] • This function does not reset the values for confirmation appears. OK Settings are not reset to default. The following screen for [Lamp counter], [Language], [Remote control], [Input signal], [Network Setting], [Filter counter], [Focus position], [Zoom position], and [Lens shift position]. • For factory defaults settings, refer to pages 232...
User Manual
Page 190
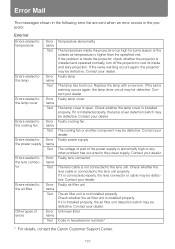
... temperature Errors related to the lamp Errors related to the lamp cover Errors related to the cooling fan Errors related to the power supply Errors related to the lens connector Errors related to cool its inside the projector, check whether the projector is installed properly. Replace the lamp with a new one . Contact your dealer. Check whether the air filter unit is installed and operated normally, turn off the projector to the air filter Other types of the power supply is open. Error Mail The messages...
... temperature Errors related to the lamp Errors related to the lamp cover Errors related to the cooling fan Errors related to the power supply Errors related to the lens connector Errors related to cool its inside the projector, check whether the projector is installed properly. Replace the lamp with a new one . Contact your dealer. Check whether the air filter unit is installed and operated normally, turn off the projector to the air filter Other types of the power supply is open. Error Mail The messages...

User Manual
Page 194
... raise the internal temperature of the projector, and remove the air filter. The filter replacement screen will block the air flow into the projector. • Handle the air filter carefully. Cleaning and Replacing the Air Filter 5 Securely insert the air filter all buttons become clogged with dust, the projector may be damaged since it will disappear. • This screen is not displayed when [Filter warning display] is set to turn off and pull out the power plug. •...
... raise the internal temperature of the projector, and remove the air filter. The filter replacement screen will block the air flow into the projector. • Handle the air filter carefully. Cleaning and Replacing the Air Filter 5 Securely insert the air filter all buttons become clogged with dust, the projector may be damaged since it will disappear. • This screen is not displayed when [Filter warning display] is set to turn off and pull out the power plug. •...
User Manual
Page 202
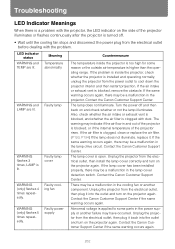
... the outside air temperature is higher than the operating range. Turn the power off . • Wait until the cooling fan stops and disconnect the power plug from the electrical outlet before dealing with dust. Contact the Canon Customer Support Center if the same warning occurs again. 202 If the problem is inside the projector is too high for some parts in the lamp cover detection switch. Troubleshooting LED Indicator Meanings...
... the outside air temperature is higher than the operating range. Turn the power off . • Wait until the cooling fan stops and disconnect the power plug from the electrical outlet before dealing with dust. Contact the Canon Customer Support Center if the same warning occurs again. 202 If the problem is inside the projector is too high for some parts in the lamp cover detection switch. Troubleshooting LED Indicator Meanings...
User Manual
Page 203
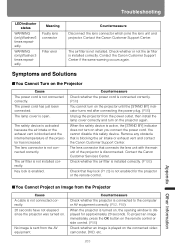
... air intake or exhaust vent and contact the Canon Customer Support Center. Countermeasure Check whether the power cord is not connected correctly. Contact the Canon Customer Services Center. Troubleshooting LED indicator status WARNING (only) flashes 6 times repeatedly. Contact the Canon Customer Support Center if the same warning occurs again. Contact the Canon Customer Support Center. Appendix Other Information ■You Cannot Project an Image from the power outlet, then install the lamp cover correctly and turn on , the opening window...
... air intake or exhaust vent and contact the Canon Customer Support Center. Countermeasure Check whether the power cord is not connected correctly. Contact the Canon Customer Services Center. Troubleshooting LED indicator status WARNING (only) flashes 6 times repeatedly. Contact the Canon Customer Support Center if the same warning occurs again. Contact the Canon Customer Support Center. Appendix Other Information ■You Cannot Project an Image from the power outlet, then install the lamp cover correctly and turn on , the opening window...

User Manual
Page 206
... instructions on page 21. If batteries are installed correctly. You can check the [Remote control] setting in an obstacle-free path. The operating temperature is a lamp malfunction). The key lock function is an obstacle between the projector and the remote control. In the System settings menu, set [Key lock] to direct sunlight or strong light of lighting apparatus. (P29) Check whether the channel setting of the projector. There is preventing operation of the projector or remote control (WX6000...
... instructions on page 21. If batteries are installed correctly. You can check the [Remote control] setting in an obstacle-free path. The operating temperature is a lamp malfunction). The key lock function is an obstacle between the projector and the remote control. In the System settings menu, set [Key lock] to direct sunlight or strong light of lighting apparatus. (P29) Check whether the channel setting of the projector. There is preventing operation of the projector or remote control (WX6000...
User Manual
Page 219
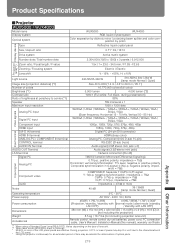
...36dB (lamp mode Normal / Quiet) Operating temperature 5°C - 35°C Power supply AC100V - 240V 50 / 60Hz Power consumption 450W / 1.7W / 0.35W 410W / 365W / 1.7W / 0.35W (Projection / standby / standby with (normal mode / silent mode / standby LAN OFF) / standby with LAN OFF) Dimensions 380 mm (W) x 150 mm (H) x 430 mm (D) / 15.0 (W) x 5.9 (H) x 16.9 (D) in (not including the projection) Weight 8.5 kg / 18.7 lbs (not including projection lens unit) Accessories Remote control, remote control dry-cell batteries, power cord, PC connection cable, User's Manual / Installation...
...36dB (lamp mode Normal / Quiet) Operating temperature 5°C - 35°C Power supply AC100V - 240V 50 / 60Hz Power consumption 450W / 1.7W / 0.35W 410W / 365W / 1.7W / 0.35W (Projection / standby / standby with (normal mode / silent mode / standby LAN OFF) / standby with LAN OFF) Dimensions 380 mm (W) x 150 mm (H) x 430 mm (D) / 15.0 (W) x 5.9 (H) x 16.9 (D) in (not including the projection) Weight 8.5 kg / 18.7 lbs (not including projection lens unit) Accessories Remote control, remote control dry-cell batteries, power cord, PC connection cable, User's Manual / Installation...


