

User Manual
Page 1
MULTIMEDIA PROJECTOR User's Manual Table of contents/Safety Instructions Before Use Setting Up the Projector Projecting an Image from the Computer Projecting an Image from AV Equipment Useful Functions Available During a Presentation Setting Up Functions from Menus Maintenance Troubleshooting Appendix Index ENG
MULTIMEDIA PROJECTOR User's Manual Table of contents/Safety Instructions Before Use Setting Up the Projector Projecting an Image from the Computer Projecting an Image from AV Equipment Useful Functions Available During a Presentation Setting Up Functions from Menus Maintenance Troubleshooting Appendix Index ENG

User Manual
Page 2
... again. Press the button. automatically with the auto PC function (Skip this step if the projector is projecting an image properly.) 9. P60-61 2 Quick Reference - Press the button twice. z Turn on the projector. z Specify the aspect ratio or display area in accord with the signal from the remote ...control. Turn off the projector z Turn off the projector and unplug the power cord. P32-33 2. P44-45 6. Turn on the computer and set the resolution. P54 z Optimize the input signal...
... again. Press the button. automatically with the auto PC function (Skip this step if the projector is projecting an image properly.) 9. P60-61 2 Quick Reference - Press the button twice. z Turn on the projector. z Specify the aspect ratio or display area in accord with the signal from the remote ...control. Turn off the projector z Turn off the projector and unplug the power cord. P32-33 2. P44-45 6. Turn on the computer and set the resolution. P54 z Optimize the input signal...

User Manual
Page 3
... AV equipment and play the video image. 6. Press the button twice. z Adjust the focus of the projecting image (P43). z Turn on the projector. z Select DIGITAL VIDEO as required (P73, 90, 91). Press the button twice again. P46-47 5. Select the input signal by pressing the ...button. Finishing the projection... z Select a display language when turning on the projector for projection. Set up the AV equipment. P70-72 7. P70 z Adjust the input signal, focusing, keystone distortion, etc. P60-61 * Connect the...
... AV equipment and play the video image. 6. Press the button twice. z Adjust the focus of the projecting image (P43). z Turn on the projector. z Select DIGITAL VIDEO as required (P73, 90, 91). Press the button twice again. P46-47 5. Select the input signal by pressing the ...button. Finishing the projection... z Select a display language when turning on the projector for projection. Set up the AV equipment. P70-72 7. P70 z Adjust the input signal, focusing, keystone distortion, etc. P60-61 * Connect the...

User Manual
Page 4
...12 Precautions on Handling the Batteries in the Remote Controller 13 Lamp Handling Precautions 13 Carrying/Transporting the Projector 14 Installation Precautions 14 Features of the Multimedia Projector SX7 MarkII/SX60 16 Supplied Manuals and Symbols Used in This Manual 17 Supplied Manuals...17 Before Use ......20 Supplied Accessories ...20 Part Names...22 Preparing the Remote Control 29 Setting Up the Projector 32 Determining the Distance to...
...12 Precautions on Handling the Batteries in the Remote Controller 13 Lamp Handling Precautions 13 Carrying/Transporting the Projector 14 Installation Precautions 14 Features of the Multimedia Projector SX7 MarkII/SX60 16 Supplied Manuals and Symbols Used in This Manual 17 Supplied Manuals...17 Before Use ......20 Supplied Accessories ...20 Part Names...22 Preparing the Remote Control 29 Setting Up the Projector 32 Determining the Distance to...

User Manual
Page 6
... Making Advanced Color Adjustment (2 107 Making Advanced Color Adjustment (3 107 Correcting the Image According to the Ambient Light (SX7 II 108 Reducing the Lamp Brightness 109 Resetting the Image Settings 110 Setting Various Function 111 Setting Auto Setup Function 111... Setting a Password...116 Registering a Password 117 Resetting to the Default Setting 117 Resetting the Lamp Counter 118 Maintenance...120 Cleaning the Projector 120 Cleaning and Replacing the Air Filter 121 Replacing the Lamp ...122 Troubleshooting 126 WARNING Lamp Flash Patterns 126 Symptoms and Solutions 127...
... Making Advanced Color Adjustment (2 107 Making Advanced Color Adjustment (3 107 Correcting the Image According to the Ambient Light (SX7 II 108 Reducing the Lamp Brightness 109 Resetting the Image Settings 110 Setting Various Function 111 Setting Auto Setup Function 111... Setting a Password...116 Registering a Password 117 Resetting to the Default Setting 117 Resetting the Lamp Counter 118 Maintenance...120 Cleaning the Projector 120 Cleaning and Replacing the Air Filter 121 Replacing the Lamp ...122 Troubleshooting 126 WARNING Lamp Flash Patterns 126 Symptoms and Solutions 127...

User Manual
Page 7
...hazards, or other accidents. If the problem still persists, contact the service center or the dealer where you to operate the projector properly. CAUTION RISK OF ELECTRIC SHOCK DO NOT OPEN CAUTION: TO REDUCE THE RISK OF ELECTRIC SHOCK, DO NOT REMOVE COVER...THIS UNIT. REFER SERVICING TO QUALIFIED SERVICE PERSONNEL. This projector offers many convenient features and functions. If your projector is not operating correctly, read this booklet. SAFETY INSTRUCTIONS Safety Instructions Before operating this projector, read this manual again, check operations and cable connections,...
...hazards, or other accidents. If the problem still persists, contact the service center or the dealer where you to operate the projector properly. CAUTION RISK OF ELECTRIC SHOCK DO NOT OPEN CAUTION: TO REDUCE THE RISK OF ELECTRIC SHOCK, DO NOT REMOVE COVER...THIS UNIT. REFER SERVICING TO QUALIFIED SERVICE PERSONNEL. This projector offers many convenient features and functions. If your projector is not operating correctly, read this booklet. SAFETY INSTRUCTIONS Safety Instructions Before operating this projector, read this manual again, check operations and cable connections,...

User Manual
Page 8
...stare directly into the lens if possible, as the hot air exhausted from the projection lens. Installing the projector in an inappropriate position may result in an explosion. z This projector projects intense light from the ventilation holes may result in eye damage. z Allow for appropriate space above... beside and behind of the projector cabinet for an extended period of your projector, and can also be maintained. Heat build-up can reduce the service life of time, unplug it from the power...
...stare directly into the lens if possible, as the hot air exhausted from the projection lens. Installing the projector in an inappropriate position may result in an explosion. z This projector projects intense light from the ventilation holes may result in eye damage. z Allow for appropriate space above... beside and behind of the projector cabinet for an extended period of your projector, and can also be maintained. Heat build-up can reduce the service life of time, unplug it from the power...

User Manual
Page 9
... or aerosol cleaners on a bed, sofa, rug, or other materials, and the bottom opening should not be carried out in accordance with the projector. This will prevent damage due to rain or use near water... Do not expose this unit to lightning and power surges. for example, in ... moved with a cart or stand recommended by the manufacturers. Slots and openings in a wet basement, near or over a radiator or heat register. This projector should be placed near a swimming pool, etc... SAFETY INSTRUCTIONS READ AND KEEP THIS OWNER'S MANUAL FOR LATER USE. Use only with care. Do not ...
... or aerosol cleaners on a bed, sofa, rug, or other materials, and the bottom opening should not be carried out in accordance with the projector. This will prevent damage due to rain or use near water... Do not expose this unit to lightning and power surges. for example, in ... moved with a cart or stand recommended by the manufacturers. Slots and openings in a wet basement, near or over a radiator or heat register. This projector should be placed near a swimming pool, etc... SAFETY INSTRUCTIONS READ AND KEEP THIS OWNER'S MANUAL FOR LATER USE. Use only with care. Do not ...

User Manual
Page 10
...or local power company. Refer all servicing to normal operating condition. If liquid has been spilled into this projector through cabinet slots as this projector, ask the service technician to perform routine safety checks to qualified service personnel under the following the operating...dangerous voltages or other controls may result in fire or electric shock. c. Never spill liquid of air-conditioning equipment. This projector should be sure the service technician uses replacement parts specified by people walking on the marking label. d. Unauthorized substitutions may ...
...or local power company. Refer all servicing to normal operating condition. If liquid has been spilled into this projector through cabinet slots as this projector, ask the service technician to perform routine safety checks to qualified service personnel under the following the operating...dangerous voltages or other controls may result in fire or electric shock. c. Never spill liquid of air-conditioning equipment. This projector should be sure the service technician uses replacement parts specified by people walking on the marking label. d. Unauthorized substitutions may ...

User Manual
Page 11
...authority, approved scheme or your national laws implementing those Directives. SAFETY INSTRUCTIONS AC Power Cord Requirement The AC Power Cord supplied with this projector meets the requirements for the United States and Canada: The AC Power Cord used in the United States and Canada is present in this...or to the WEEE Directive (2002/96/EC), the Battery Directive (2006/66/EC) and/or your household waste disposal service or visit www.canon-europe.com/environment. (EEA: Norway, Iceland and Liechtenstein) 11 NOTE FOR CUSTOMERS IN THE US LAMP(S) INSIDE THIS PRODUCT CONTAIN MERCURY AND ...
...authority, approved scheme or your national laws implementing those Directives. SAFETY INSTRUCTIONS AC Power Cord Requirement The AC Power Cord supplied with this projector meets the requirements for the United States and Canada: The AC Power Cord used in the United States and Canada is present in this...or to the WEEE Directive (2002/96/EC), the Battery Directive (2006/66/EC) and/or your household waste disposal service or visit www.canon-europe.com/environment. (EEA: Norway, Iceland and Liechtenstein) 11 NOTE FOR CUSTOMERS IN THE US LAMP(S) INSIDE THIS PRODUCT CONTAIN MERCURY AND ...
User Manual
Page 12
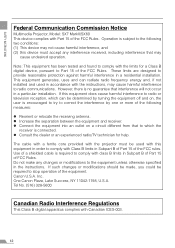
...class B limits in a residential installation. Do not make any interference received, including interference that may cause undesired operation. One Canon Plaza, Lake Success, NY 11042-1198, U.S.A. Operation is required to comply with Class B limits in a particular installation. ...subject to the following measures: z Reorient or relocate the receiving antenna. SAFETY INSTRUCTIONS Federal Communication Commission Notice Multimedia Projector, Model: SX7 MarkII/SX60 This device complies with the instructions, may cause harmful interference to radio communications. This equipment generates, ...
...class B limits in a residential installation. Do not make any interference received, including interference that may cause undesired operation. One Canon Plaza, Lake Success, NY 11042-1198, U.S.A. Operation is required to comply with Class B limits in a particular installation. ...subject to the following measures: z Reorient or relocate the receiving antenna. SAFETY INSTRUCTIONS Federal Communication Commission Notice Multimedia Projector, Model: SX7 MarkII/SX60 This device complies with the instructions, may cause harmful interference to radio communications. This equipment generates, ...
User Manual
Page 13
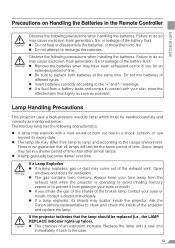
... below. Open windows and doors for an extended period of different types. z The gas contains toxic mercury. Lamp Handling Precautions This projector uses a high-pressure mercury lamp which must be replaced (i.e., the LAMP REPLACE indicator lights up twice), z The chances of time....batteries. The mercury lamp has the following precautions when handling the batteries. Caution If the projector indicates that all lamps will last for the same period of an explosion increase. Ask the Canon service representative to a shock, scratch, or use for ventilation. z If a lamp ...
... below. Open windows and doors for an extended period of different types. z The gas contains toxic mercury. Lamp Handling Precautions This projector uses a high-pressure mercury lamp which must be replaced (i.e., the LAMP REPLACE indicator lights up twice), z The chances of time....batteries. The mercury lamp has the following precautions when handling the batteries. Caution If the projector indicates that all lamps will last for the same period of an explosion increase. Ask the Canon service representative to a shock, scratch, or use for ventilation. z If a lamp ...

User Manual
Page 14
...or malfunctioned. SAFETY INSTRUCTIONS Disposal of Waste Lamp z Dispose of it when you carry the projector. z Wait until the cooling fan stops rotating. Do not put any metallic object on the projector. z The carrying bag is not designed to protect it from the exhaust vent. Observe the... following: z Do not put the projector in the carrying bag. Hot air 14 Carrying/Transporting the Projector Caution z This projector is the case. z Install the lens cap to protect the lens and put it down. ...
...or malfunctioned. SAFETY INSTRUCTIONS Disposal of Waste Lamp z Dispose of it when you carry the projector. z Wait until the cooling fan stops rotating. Do not put any metallic object on the projector. z The carrying bag is not designed to protect it from the exhaust vent. Observe the... following: z Do not put the projector in the carrying bag. Hot air 14 Carrying/Transporting the Projector Caution z This projector is the case. z Install the lens cap to protect the lens and put it down. ...

User Manual
Page 15
... Sea Level z If you want to move or topple, resulting in a horizontal position. If the projector is raised rapidly, condensation may cause the projector to use the projector in poor picture quality. Contact your projector 20° pointing up or down, make sure to the neighboring object such as a wall. z...to do so may form on an unstable or slanted surface. z Do not place it in the Following Environments z Do not place the projector on the lens and mirror due to bad exhaust ventilation. Wait until condensation evaporates and normal picture is required to heat. Doing so may...
... Sea Level z If you want to move or topple, resulting in a horizontal position. If the projector is raised rapidly, condensation may cause the projector to use the projector in poor picture quality. Contact your projector 20° pointing up or down, make sure to the neighboring object such as a wall. z...to do so may form on an unstable or slanted surface. z Do not place it in the Following Environments z Do not place the projector on the lens and mirror due to bad exhaust ventilation. Wait until condensation evaporates and normal picture is required to heat. Doing so may...

User Manual
Page 16
... Immediately After the Use You can project the image with a high degree of Your Projector (SX7 II) When projecting a digital still photo image or an image that has been processed on an sRGB-compatible monitor, you for purchasing a Canon projector. Various Image Modes for a Particular Use of resolution. Native SXGA+ Resolution Native SXGA+ resolution...
... Immediately After the Use You can project the image with a high degree of Your Projector (SX7 II) When projecting a digital still photo image or an image that has been processed on an sRGB-compatible monitor, you for purchasing a Canon projector. Various Image Modes for a Particular Use of resolution. Native SXGA+ Resolution Native SXGA+ resolution...

User Manual
Page 17
...safety. In this manual, the button operation is given here. An important matter that you to SX7 MarkII. The remote control allows you should be aware of the projector. Indicates the button operation on the main unit. Supplied Manuals and Symbols Used in this manual thoroughly... to start and stop the projector, as well as the functions available for the projector, SX7 MarkII/SX60. Adjusting the Focus You can be pressed. The Focus adjustment window appears. Read this manual are as follows: (SX7 II) Function or description only applicable to ...
...safety. In this manual, the button operation is given here. An important matter that you to SX7 MarkII. The remote control allows you should be aware of the projector. Indicates the button operation on the main unit. Supplied Manuals and Symbols Used in this manual thoroughly... to start and stop the projector, as well as the functions available for the projector, SX7 MarkII/SX60. Adjusting the Focus You can be pressed. The Focus adjustment window appears. Read this manual are as follows: (SX7 II) Function or description only applicable to ...

User Manual
Page 19
BEFORE USE Table of contents/Safety Instructions Before Use Setting Up the Projector Projecting an Image from the Computer Projecting an Image from AV Equipment Useful Functions Available During a Presentation Setting Up Functions from Menus Maintenance Troubleshooting Appendix Index
BEFORE USE Table of contents/Safety Instructions Before Use Setting Up the Projector Projecting an Image from the Computer Projecting an Image from AV Equipment Useful Functions Available During a Presentation Setting Up Functions from Menus Maintenance Troubleshooting Appendix Index

User Manual
Page 20
z Remote control z Batteries (type AAA, two) for remote control z Computer connection cable (DVI/Mini D-sub, 15-pin) (1.8m/5.9') YH7-2052 BEFORE USE z Power cord (1.8m/5.9') For Continental Europe z USB cable (1.8m/5.9') YH7-2054 z Component cable (RCA/Mini D-sub, 15-pin) (0.4m/1.3') YH7-2084 For the U.S.A and Canada z Carrying bag z Lens cap z Lens cap strap z User's Manual (CD-ROM) z Warranty card z Important Information and Quick Start Guide 20 Before Use Supplied Accessories Check whether the following accessories are supplied with the projector.
z Remote control z Batteries (type AAA, two) for remote control z Computer connection cable (DVI/Mini D-sub, 15-pin) (1.8m/5.9') YH7-2052 BEFORE USE z Power cord (1.8m/5.9') For Continental Europe z USB cable (1.8m/5.9') YH7-2054 z Component cable (RCA/Mini D-sub, 15-pin) (0.4m/1.3') YH7-2084 For the U.S.A and Canada z Carrying bag z Lens cap z Lens cap strap z User's Manual (CD-ROM) z Warranty card z Important Information and Quick Start Guide 20 Before Use Supplied Accessories Check whether the following accessories are supplied with the projector.
User Manual
Page 21
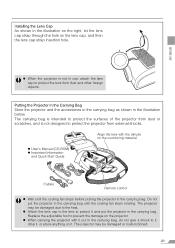
... the cooling fan stops rotating. Installing the Lens Cap As shown in the carrying bag. z When carrying the projector with the dimple on it. Putting the Projector in the Carrying Bag Store the projector and the accessories in the carrying bag as shown in the carrying bag until the cooling fan stops before... not put in the carrying bag, do not give a shock to the heat. The carrying bag is intended to protect the surfaces of the projector from external shocks. z Attach the lens cap to the lens to prevent the damage on the lens cap, and then the lens cap strap insertion ...
... the cooling fan stops rotating. Installing the Lens Cap As shown in the carrying bag. z When carrying the projector with the dimple on it. Putting the Projector in the Carrying Bag Store the projector and the accessories in the carrying bag as shown in the carrying bag until the cooling fan stops before... not put in the carrying bag, do not give a shock to the heat. The carrying bag is intended to protect the surfaces of the projector from external shocks. z Attach the lens cap to the lens to prevent the damage on the lens cap, and then the lens cap strap insertion ...

User Manual
Page 22
...fire hazards. rectly. Failure to do so will result in malCaution functions or fire hazards. BEFORE USE Part Names Main Unit of Projector (SX7 MarkII is used in the following illustrations) Front Side Terminals and Connectors Infrared Remote Receiver (P29) Ranging Window Do not place any... obstacle between the projector and the Caution screen, as the auto focusing function may fail to remove the lens cap during projection. Power Cord Connector (...
...fire hazards. rectly. Failure to do so will result in malCaution functions or fire hazards. BEFORE USE Part Names Main Unit of Projector (SX7 MarkII is used in the following illustrations) Front Side Terminals and Connectors Infrared Remote Receiver (P29) Ranging Window Do not place any... obstacle between the projector and the Caution screen, as the auto focusing function may fail to remove the lens cap during projection. Power Cord Connector (...


