
i560_spec.pdf
Page 1
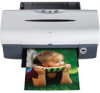
... Internet Explorer version 5.5, version 6.0 recommended. The i560 printer features the unique Canon Think Tank System™ that combines four individual ink tanks with conventional high-speed, bi-directional printing. It features a symmetrical print head design with 1,600 nozzles to virtually eliminate color...picoliters • Up to 22 ppm black/up to -edge, true borderless photos with a maximum resolution of Web printing. The Canon i560 Desktop Photo Printer delivers fast, professional-level performance for bold, sharp text on printer driver setting. Produce enlargements-up to...
... Internet Explorer version 5.5, version 6.0 recommended. The i560 printer features the unique Canon Think Tank System™ that combines four individual ink tanks with conventional high-speed, bi-directional printing. It features a symmetrical print head design with 1,600 nozzles to virtually eliminate color...picoliters • Up to 22 ppm black/up to -edge, true borderless photos with a maximum resolution of Web printing. The Canon i560 Desktop Photo Printer delivers fast, professional-level performance for bold, sharp text on printer driver setting. Produce enlargements-up to...
i560 Easy Setup Instructions
Page 1
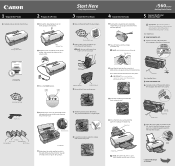
...open 2 Remove the orange protective cap from the print head nozzles. Press down until it clicks into place. Continue with Step 6 on the printer. 4 Open the front cover. Paper Guide Tear at notch to the center. Protective Cap i560 Series Desktop Photo Printer 5 Connect the Printer and Load ... back the orange tab and completely remove the plastic wrapper from the front and back of the tank. Documentation and Software Kit i 560 Series Print Head Power Cord 3 Press the POWER button. You will rest at the bottom of the printer. click 3 Insert the ink tank into the...
...open 2 Remove the orange protective cap from the print head nozzles. Press down until it clicks into place. Continue with Step 6 on the printer. 4 Open the front cover. Paper Guide Tear at notch to the center. Protective Cap i560 Series Desktop Photo Printer 5 Connect the Printer and Load ... back the orange tab and completely remove the plastic wrapper from the front and back of the tank. Documentation and Software Kit i 560 Series Print Head Power Cord 3 Press the POWER button. You will rest at the bottom of the printer. click 3 Insert the ink tank into the...
i560 Easy Setup Instructions
Page 2
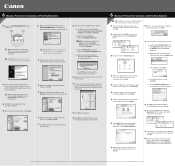
...Double-click the CD-ROM icon, then the Mac OS X folder, then the Printer Driver folder. 3 Double-click the i560 200.pkg icon. 11 Start the print head alignment procedure. The setup program should run , click Start, then Run, then type D:\msetup.exe, where D is ... Print Head Alignment window that corresponds with the installation, click Continue Installation. 9 When the message "The software was successfully installed" appears, click Restart. 14 Follow the on the Print Head Alignment icon. Part no. Specifications subject to the "Appendix" of Canon Inc. P-i560-ESI-0703-V03 Printed ...
...Double-click the CD-ROM icon, then the Mac OS X folder, then the Printer Driver folder. 3 Double-click the i560 200.pkg icon. 11 Start the print head alignment procedure. The setup program should run , click Start, then Run, then type D:\msetup.exe, where D is ... Print Head Alignment window that corresponds with the installation, click Continue Installation. 9 When the message "The software was successfully installed" appears, click Restart. 14 Follow the on the Print Head Alignment icon. Part no. Specifications subject to the "Appendix" of Canon Inc. P-i560-ESI-0703-V03 Printed ...

i560 Quick Start Guide
Page 3
... 24 Printing Borderless Photographs with Windows 25 Printing Borderless Photographs with Macintosh 27 Printing Maintenance Replacing an Ink Tank 29 When Printing Becomes Faint or Colors are Incorrect 33 Printing the Nozzle Check Pattern 34 Print Head Cleaning 38 Print Head Deep Cleaning 40 Aligning the Print Head 42... on the Screen 53 Cannot Print Properly from the Digital Camera 55 Appendix Installing the Printer Driver when using Mac OS 9.x 56 User's Guide Table of Contents 57 Specifications 58 Safety Precautions 60 Regulatory Information 62 CANON LIMITED WARRANTY --- (USA Only...
... 24 Printing Borderless Photographs with Windows 25 Printing Borderless Photographs with Macintosh 27 Printing Maintenance Replacing an Ink Tank 29 When Printing Becomes Faint or Colors are Incorrect 33 Printing the Nozzle Check Pattern 34 Print Head Cleaning 38 Print Head Deep Cleaning 40 Aligning the Print Head 42... on the Screen 53 Cannot Print Properly from the Digital Camera 55 Appendix Installing the Printer Driver when using Mac OS 9.x 56 User's Guide Table of Contents 57 Specifications 58 Safety Precautions 60 Regulatory Information 62 CANON LIMITED WARRANTY --- (USA Only...
i560 Quick Start Guide
Page 16
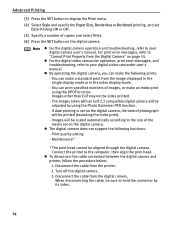
...the date of the media set Date Printing ON or OFF. (5) Specify a number of images, or make a standard print from the Digital Camera" on the digital camera. Print quality setting - Maintenance* * The print head cannot be printed (excluding the index print). - Connect the printer to the size... according to the computer, then align the print head. z For the digital video camcorder operation, print error messages, and troubleshooting, refer to display the Print menu. (4) Select Style and specify the Paper Size, Borderless or Bordered printing, and set on the digital camera. The...
...the date of the media set Date Printing ON or OFF. (5) Specify a number of images, or make a standard print from the Digital Camera" on the digital camera. Print quality setting - Maintenance* * The print head cannot be printed (excluding the index print). - Connect the printer to the size... according to the computer, then align the print head. z For the digital video camcorder operation, print error messages, and troubleshooting, refer to display the Print menu. (4) Select Style and specify the Paper Size, Borderless or Bordered printing, and set on the digital camera. The...
i560 Quick Start Guide
Page 17
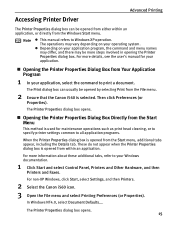
For more details, see the user's manual for maintenance operations such as print head cleaning, or to specify printer settings common to all application programs. When the Printer Properties dialog box is opened from the Start menu, additional tabs ... can be opened from either within an application. For non-XP Windows, click Start, select Settings, and then Printers. 2 Select the Canon i560 icon. 3 Open the File menu and select Printing Preferences (or Properties). These do not appear when the Printer Properties dialog box is opened from within an application, or directly from...
For more details, see the user's manual for maintenance operations such as print head cleaning, or to specify printer settings common to all application programs. When the Printer Properties dialog box is opened from the Start menu, additional tabs ... can be opened from either within an application. For non-XP Windows, click Start, select Settings, and then Printers. 2 Select the Canon i560 icon. 3 Open the File menu and select Printing Preferences (or Properties). These do not appear when the Printer Properties dialog box is opened from within an application, or directly from...

i560 Quick Start Guide
Page 33
The print head holder moves to avoid staining clothing or the surrounding area. Printing Maintenance „ Replacing an Ink Tank When an ink tank runs out of the ink tank and discard it using the following steps. 1 Ensure that ...
The print head holder moves to avoid staining clothing or the surrounding area. Printing Maintenance „ Replacing an Ink Tank When an ink tank runs out of the ink tank and discard it using the following steps. 1 Ensure that ...

i560 Quick Start Guide
Page 34
... and hands. z Color ink consumption may occur even when black-and-white or grayscale printing is now complete. z Once the protective cap is removed, do not remove it from the printer and leave it out in the print head holder. (2) Press on the "PUSH" mark until the ink tank snaps firmly into place.... 5 Close the front cover. Note z To maintain optimal print quality, use an ink tank within six months of ink, replace the ink tank...
... and hands. z Color ink consumption may occur even when black-and-white or grayscale printing is now complete. z Once the protective cap is removed, do not remove it from the printer and leave it out in the print head holder. (2) Press on the "PUSH" mark until the ink tank snaps firmly into place.... 5 Close the front cover. Note z To maintain optimal print quality, use an ink tank within six months of ink, replace the ink tank...
i560 Quick Start Guide
Page 35
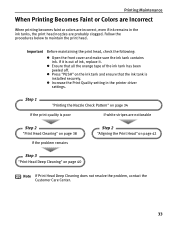
... the following: z Open the front cover and make sure the ink tank contains ink. z Press "PUSH" on page 40 Note If Print Head Deep Cleaning does not resolve the problem, contact the Customer Care Center. 33 z Ensure that the ink tank is installed securely. If it is ...poor If white stripes are noticeable Step 2 "Print Head Cleaning" on page 38 If the problem remains Step 2 "Aligning the Print Head" on page 42 Step 3 "Print Head Deep Cleaning" on the ink tank and ensure that all the orange tape of ink, replace it. Step...
... the following: z Open the front cover and make sure the ink tank contains ink. z Press "PUSH" on page 40 Note If Print Head Deep Cleaning does not resolve the problem, contact the Customer Care Center. 33 z Ensure that the ink tank is installed securely. If it is ...poor If white stripes are noticeable Step 2 "Print Head Cleaning" on page 38 If the problem remains Step 2 "Aligning the Print Head" on page 42 Step 3 "Print Head Deep Cleaning" on the ink tank and ensure that all the orange tape of ink, replace it. Step...

i560 Quick Start Guide
Page 36
... printer on , load a sheet of Letter paper in the printer. 2 Open the Printer Properties dialog box. Note Nozzle check pattern printing can be executed also from the print head nozzles, and to verify print head alignment. See "Opening the Printer Properties Dialog Box Directly from the Start Menu" on page 36. 34 Use this function...
... printer on , load a sheet of Letter paper in the printer. 2 Open the Printer Properties dialog box. Note Nozzle check pattern printing can be executed also from the print head nozzles, and to verify print head alignment. See "Opening the Printer Properties Dialog Box Directly from the Start Menu" on page 36. 34 Use this function...

i560 Quick Start Guide
Page 38
...If lines are missing as follows when ink is discharged properly. When white stripes appear See "Print Head Cleaning" on page 38. (2) White stripes in this pattern indicates the print head requires alignment. Printing Maintenance „ Examining the Nozzle Check Pattern The nozzle check pattern should appear as in .... When line are even See "Aligning the Print Head" on page 42. 36 When lines are uneven When lines are missing See "Print Head Cleaning" on page 38. (3) Unevenness in this pattern require running print head cleaning procedure for Black 3eBK. Examine the nozzle...
...If lines are missing as follows when ink is discharged properly. When white stripes appear See "Print Head Cleaning" on page 38. (2) White stripes in this pattern indicates the print head requires alignment. Printing Maintenance „ Examining the Nozzle Check Pattern The nozzle check pattern should appear as in .... When line are even See "Aligning the Print Head" on page 42. 36 When lines are uneven When lines are missing See "Print Head Cleaning" on page 38. (3) Unevenness in this pattern require running print head cleaning procedure for Black 3eBK. Examine the nozzle...
i560 Quick Start Guide
Page 39
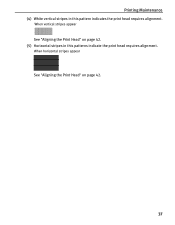
When vertical stripes appear See "Aligning the Print Head" on page 42. 37 Printing Maintenance (4) White vertical stripes in this pattern indicates the print head requires alignment. When horizontal stripes appear See "Aligning the Print Head" on page 42. (5) Horizontal stripes in this patterns indicate the print head requires alignment.
When vertical stripes appear See "Aligning the Print Head" on page 42. 37 Printing Maintenance (4) White vertical stripes in this pattern indicates the print head requires alignment. When horizontal stripes appear See "Aligning the Print Head" on page 42. (5) Horizontal stripes in this patterns indicate the print head requires alignment.
i560 Quick Start Guide
Page 40
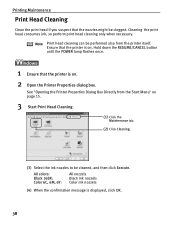
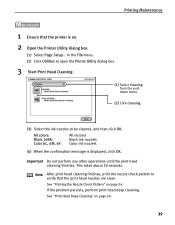
...ink nozzels Color ink nozzels (4) When the confirmation message is on. 2 Open the Printer Properties dialog box. Printing Maintenance Print Head Cleaning Clean the print head if you suspect that the nozzles might be cleaned, and then click Execute. See "Opening the Printer Properties ...Dialog Box Directly from the printer itself. Cleaning the print head consumes ink, so perform print head cleaning only when necessary. Ensure that the printer is on page 15. 3 Start Print Head Cleaning. (1) Click the Maintenance tab. (2) Click Cleaning. (3) Select the ...
...ink nozzels Color ink nozzels (4) When the confirmation message is on. 2 Open the Printer Properties dialog box. Printing Maintenance Print Head Cleaning Clean the print head if you suspect that the nozzles might be cleaned, and then click Execute. See "Opening the Printer Properties ...Dialog Box Directly from the printer itself. Cleaning the print head consumes ink, so perform print head cleaning only when necessary. Ensure that the printer is on page 15. 3 Start Print Head Cleaning. (1) Click the Maintenance tab. (2) Click Cleaning. (3) Select the ...
i560 Quick Start Guide
Page 41
...Printer Utility dialog box. (1) Select Page Setup... See "Print Head Deep Cleaning" on page 34. Important Do not perform any other operations until the print head cleaning finishes. Printing Maintenance 1 Ensure that the print head nozzles are clean. in the File menu. (2) Click ...Utilities to open the Printer Utility dialog box. 3 Start Print Head Cleaning. (1) Select Cleaning from the pulldown menu...
...Printer Utility dialog box. (1) Select Page Setup... See "Print Head Deep Cleaning" on page 34. Important Do not perform any other operations until the print head cleaning finishes. Printing Maintenance 1 Ensure that the print head nozzles are clean. in the File menu. (2) Click ...Utilities to open the Printer Utility dialog box. 3 Start Print Head Cleaning. (1) Select Cleaning from the pulldown menu...

i560 Quick Start Guide
Page 42
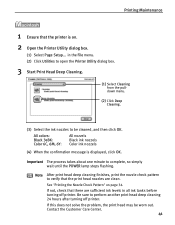
... nozzels Black ink nozzels Color ink nozzels (4) When the confirmation message is a more powerful process. Printing Maintenance Print Head Deep Cleaning If print quality does not improve by standard print head cleaning, try print head deep cleaning, which is displayed, click OK. 40 Print head deep cleaning consumes ink, so perform this procedure only when necessary. 1 Ensure that the printer...
... nozzels Black ink nozzels Color ink nozzels (4) When the confirmation message is a more powerful process. Printing Maintenance Print Head Deep Cleaning If print quality does not improve by standard print head cleaning, try print head deep cleaning, which is displayed, click OK. 40 Print head deep cleaning consumes ink, so perform this procedure only when necessary. 1 Ensure that the printer...
i560 Quick Start Guide
Page 43
...nozzels (4) When the confirmation message is on page 34. Contact the Customer Care Center. 41 Note After print head deep cleaning finishes, print the nozzle check pattern to verify that the print head nozzles are sufficient ink levels in the File menu. (2) Click Utilities to open the Printer Utility dialog ... Click Deep Cleaning. (3) Select the ink nozzles to be worn out. If this does not solve the problem, the print head may be cleaned, and then click OK. See "Printing the Nozzle Check Pattern" on . 2 Open the Printer Utility dialog box. (1) Select Page Setup... Be sure to complete...
...nozzels (4) When the confirmation message is on page 34. Contact the Customer Care Center. 41 Note After print head deep cleaning finishes, print the nozzle check pattern to verify that the print head nozzles are sufficient ink levels in the File menu. (2) Click Utilities to open the Printer Utility dialog ... Click Deep Cleaning. (3) Select the ink nozzles to be worn out. If this does not solve the problem, the print head may be cleaned, and then click OK. See "Printing the Nozzle Check Pattern" on . 2 Open the Printer Utility dialog box. (1) Select Page Setup... Be sure to complete...
i560 Quick Start Guide
Page 44
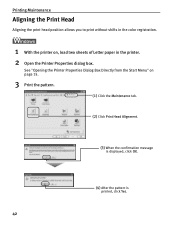
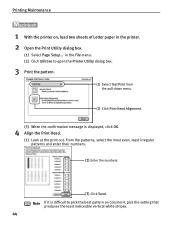
See "Opening the Printer Properties Dialog Box Directly from the Start Menu" on , load two sheets of Letter paper in the printer. 2 Open the Printer Properties dialog box. Printing Maintenance Aligning the Print Head Aligning the print head position allows you to print without shifts in the color registration. 1 With the printer on page 15. 3 Print the pattern. (1) Click the Maintenance tab. (2) Click Print Head Alignment. (3) When the confirmation message is displayed, click OK. (4) After the pattern is printed, click Yes. 42
See "Opening the Printer Properties Dialog Box Directly from the Start Menu" on , load two sheets of Letter paper in the printer. 2 Open the Printer Properties dialog box. Printing Maintenance Aligning the Print Head Aligning the print head position allows you to print without shifts in the color registration. 1 With the printer on page 15. 3 Print the pattern. (1) Click the Maintenance tab. (2) Click Print Head Alignment. (3) When the confirmation message is displayed, click OK. (4) After the pattern is printed, click Yes. 42
i560 Quick Start Guide
Page 45
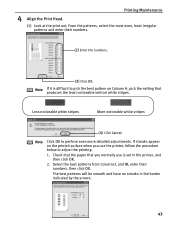
... stripes (4) Click Cancel. If streaks appear on Column H, pick the setting that you use is difficult to perform even more detailed adjustments. Printing Maintenance 4 Align the Print Head. (1) Look at the print out. Note If it is set in the border indicated by the arrows. 43 Select the best patterns from Columns L and M, enter...
... stripes (4) Click Cancel. If streaks appear on Column H, pick the setting that you use is difficult to perform even more detailed adjustments. Printing Maintenance 4 Align the Print Head. (1) Look at the print out. Note If it is set in the border indicated by the arrows. 43 Select the best patterns from Columns L and M, enter...
i560 Quick Start Guide
Page 46
...click OK. 4 Align the Print Head. (1) Look at the print out. in the printer. 2 Open the Print Utility dialog box. (1) Select Page Setup... From the patterns, select the most even, least irregular patterns and enter their numbers. (2) Enter the numbers. (3) Click Send. Printing Maintenance 1 With the printer... Letter paper in the File menu. (2) Click Utilities to open the Printer Utility dialog box. 3 Print the pattern. (1) Select Test Print from the pull-down menu. (2) Click Print Head Alignment. (3) When the confirmation message is difficult to pick the best pattern on Column H, pick the...
...click OK. 4 Align the Print Head. (1) Look at the print out. in the printer. 2 Open the Print Utility dialog box. (1) Select Page Setup... From the patterns, select the most even, least irregular patterns and enter their numbers. (2) Enter the numbers. (3) Click Send. Printing Maintenance 1 With the printer... Letter paper in the File menu. (2) Click Utilities to open the Printer Utility dialog box. 3 Print the pattern. (1) Select Test Print from the pull-down menu. (2) Click Print Head Alignment. (3) When the confirmation message is difficult to pick the best pattern on Column H, pick the...
i560 Quick Start Guide
Page 50
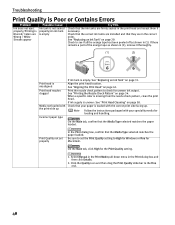
...box, confirm that the Media Type selected matches the paper loaded. Align the print head location. Check that your speciality media for uneven ink output. See "Aligning the Print Head" on page 34. Print Quality not set the Print Quality setting to see if all the orange tape has been peeled off as... shown in (2), remove it thoroughly. Select Manual in the Print Mode pull-down menu in the print head and reseat them if necessary. If ink supply is missing from the nozzle check pattern, clean the print head. See "Replacing an Ink Tank" on page 31. Check to High...
...box, confirm that the Media Type selected matches the paper loaded. Align the print head location. Check that your speciality media for uneven ink output. See "Aligning the Print Head" on page 34. Print Quality not set the Print Quality setting to see if all the orange tape has been peeled off as... shown in (2), remove it thoroughly. Select Manual in the Print Mode pull-down menu in the print head and reseat them if necessary. If ink supply is missing from the nozzle check pattern, clean the print head. See "Replacing an Ink Tank" on page 31. Check to High...


