iPF650 655 750 755 Basic Guide Step1
Page 6
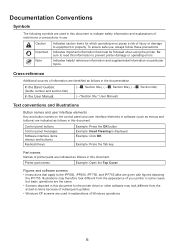
...printer driver or other software may therefore look different from the actual screens because of subsequent updates. • Windows XP screens are used in this information to the iPF650, iPF655, iPF750..., and iPF755 alike are given with figures depicting the iPF755. Indicates important information that apply to prevent printer... Part names Names of printer parts are indicated as follows...8226; Instructions that must be followed when using the printer. In the Basic Guides: (Guide number and section...different from the appearance of your printer in some cases, but basic ...
...printer driver or other software may therefore look different from the actual screens because of subsequent updates. • Windows XP screens are used in this information to the iPF650, iPF655, iPF750..., and iPF755 alike are given with figures depicting the iPF755. Indicates important information that apply to prevent printer... Part names Names of printer parts are indicated as follows...8226; Instructions that must be followed when using the printer. In the Basic Guides: (Guide number and section...different from the appearance of your printer in some cases, but basic ...

iPF650 655 750 755 Basic Guide Step1
Page 8
...cutting. When loading the sheets , move the guide to load rolls. Use this cover to operate the printer and check the printer status. Slide the Roll Holder along these slots. When loading paper, insert it . (iPF750 and iPF755 only.) Load the roll on the Roll Holder with casters to cut .... A stand that holds the printer. Equipped with this holder slot. • The Stand is provided as a standard accessory with the iPF750 and iPF755. • With the iPF650 and iPF655, the Stand is full.) A round-bladed cutter for alignment of paper. Open this cover to replace an Ink Tank....
...cutting. When loading the sheets , move the guide to load rolls. Use this cover to operate the printer and check the printer status. Slide the Roll Holder along these slots. When loading paper, insert it . (iPF750 and iPF755 only.) Load the roll on the Roll Holder with casters to cut .... A stand that holds the printer. Equipped with this holder slot. • The Stand is provided as a standard accessory with the iPF750 and iPF755. • With the iPF650 and iPF655, the Stand is full.) A round-bladed cutter for alignment of paper. Open this cover to replace an Ink Tank....

iPF650 655 750 755 Basic Guide Step1
Page 9
... in detecting the Carriage position. Important in printing. Vacuum holes on the Platen. • Do not touch the Carriage Shaft (b) or Linear Scale (f). Parts Top Cover (Inside) g a b c f d Name a Carriage b Carriage Shaft c Paper Retainer d Platen e Borderless Printing Ink Grooves f Linear Scale g Cleaning Brush e Operation Moves the Printhead. The ... printing. This retainer holds paper as it is fed. Be careful not to touch this part when cleaning inside the Top Cover or clearing paper jams. When cleaning inside the printer under the Top Cover, use this shaft.
... in detecting the Carriage position. Important in printing. Vacuum holes on the Platen. • Do not touch the Carriage Shaft (b) or Linear Scale (f). Parts Top Cover (Inside) g a b c f d Name a Carriage b Carriage Shaft c Paper Retainer d Platen e Borderless Printing Ink Grooves f Linear Scale g Cleaning Brush e Operation Moves the Printhead. The ... printing. This retainer holds paper as it is fed. Be careful not to touch this part when cleaning inside the Top Cover or clearing paper jams. When cleaning inside the printer under the Top Cover, use this shaft.

iPF650 655 750 755 Basic Guide Step1
Page 14
...c 14 If these areas are dirty, we recommend cleaning them in the printer as follows. • Before loading rolls, make sure the printer is shown requesting you to the next step. 3 Positioning your hands as shown, open the Roll Cover. 4 Holding the Roll Holder flange (a), rest the Roll Holder shaft...At this time, position the holder so that will not be used, a message is clean inside the Top Cover and around the Ejection Guide. Remove the paper and go to remove it. Loading Rolls in the Printer Load rolls in advance. (→ , If Paper is aligned with the R label on the...
...c 14 If these areas are dirty, we recommend cleaning them in the printer as follows. • Before loading rolls, make sure the printer is shown requesting you to the next step. 3 Positioning your hands as shown, open the Roll Cover. 4 Holding the Roll Holder flange (a), rest the Roll Holder shaft...At this time, position the holder so that will not be used, a message is clean inside the Top Cover and around the Ejection Guide. Remove the paper and go to remove it. Loading Rolls in the Printer Load rolls in advance. (→ , If Paper is aligned with the R label on the...

iPF650 655 750 755 Basic Guide Step1
Page 15
... loading rolls. 6 Advance the leading edge of Manuals) 8 Holding it at the positions indicated, close the Roll Cover. 15 b c Loading Rolls in the Roll Holder Slot, keeping it level. This may damage the printer or Roll Holder when paper is shown on the Display Screen. • Be careful not to select, see...
... loading rolls. 6 Advance the leading edge of Manuals) 8 Holding it at the positions indicated, close the Roll Cover. 15 b c Loading Rolls in the Roll Holder Slot, keeping it level. This may damage the printer or Roll Holder when paper is shown on the Display Screen. • Be careful not to select, see...
iPF650 655 750 755 Basic Guide Step1
Page 16
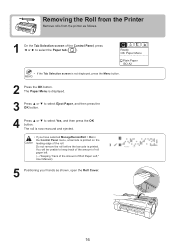
... leading edge of the Control Panel, press ◄ or ► to select the Paper tab ( ). Removing the Roll from the Printer Remove rolls from the printer as shown, open the Roll Cover. 16 The roll is now rewound and ejected. • If you have selected ManageRemainRoll > On in the Control Panel menu, a barcode...
... leading edge of the Control Panel, press ◄ or ► to select the Paper tab ( ). Removing the Roll from the Printer Remove rolls from the printer as shown, open the Roll Cover. 16 The roll is now rewound and ejected. • If you have selected ManageRemainRoll > On in the Control Panel menu, a barcode...

iPF650 655 750 755 Basic Guide Step1
Page 17
a • See the following procedure for instructions on removing the Roll Holder from the roll. (→"Removing the Roll Holder from the Roll Holder Slot. 6 Using both hands, rotate the Roll Holder toward the back to rewind the roll. Removing the Roll from the Printer 7 Holding the Roll Holder flange (a), remove the holder from Rolls," User Manual) 8 Holding it at the positions indicated, close the Roll Cover. • To load new paper in the printer at this point, see the following procedure. (→ , Loading Rolls in the Printer) 17
a • See the following procedure for instructions on removing the Roll Holder from the roll. (→"Removing the Roll Holder from the Roll Holder Slot. 6 Using both hands, rotate the Roll Holder toward the back to rewind the roll. Removing the Roll from the Printer 7 Holding the Roll Holder flange (a), remove the holder from Rolls," User Manual) 8 Holding it at the positions indicated, close the Roll Cover. • To load new paper in the printer at this point, see the following procedure. (→ , Loading Rolls in the Printer) 17

iPF650 655 750 755 Basic Guide Step1
Page 18
... and reload it with the mark for the size of paper can be used, a message is flat against the Roll Cover. Loading paper askew will not be loaded in the printer as the paper source. • If a print job was received 1. Press the Load button. a 18 Press ▲ or ▼ to.... 2 Slide the Width Guide (a) to align it . • Load the paper straight. Do not load more than one sheet at a time. Loading Sheets in the Printer Load sheets in the Paper Feed Slot at a time. The sheet may jam.
... and reload it with the mark for the size of paper can be used, a message is flat against the Roll Cover. Loading paper askew will not be loaded in the printer as the paper source. • If a print job was received 1. Press the Load button. a 18 Press ▲ or ▼ to.... 2 Slide the Width Guide (a) to align it . • Load the paper straight. Do not load more than one sheet at a time. Loading Sheets in the Printer Load sheets in the Paper Feed Slot at a time. The sheet may jam.

iPF650 655 750 755 Basic Guide Step1
Page 19
Set the Width Guide against the edge of the paper to the right of the Roll Cover. 3 Load the sheet printing-side up in the Printer a 4 Move the Width Guide (a) carefully to select, see the Paper Reference Guide. (→ , Types of Manuals) 19 a 5 Press the OK button. • If a print... job was received The printer now starts feeding the paper. • If no print job was received A menu for selection of the type of paper is automatically shown on types...
Set the Width Guide against the edge of the paper to the right of the Roll Cover. 3 Load the sheet printing-side up in the Printer a 4 Move the Width Guide (a) carefully to select, see the Paper Reference Guide. (→ , Types of Manuals) 19 a 5 Press the OK button. • If a print... job was received The printer now starts feeding the paper. • If no print job was received A menu for selection of the type of paper is automatically shown on types...

iPF650 655 750 755 Basic Guide Step1
Page 23
Remove the Ink Tank at this point. 1 On the Tab Selection screen of the color for ink tank replacement Replacing Ink Tanks • This step is not displayed, press the Menu button. 2 Press... Menu CMY M B K M B K B K • If the Tab Selection screen is not necessary if a message requests you to open the Ink Tank Cover. Remove the Ink Tank at this point. Ink lamps flash when there is displayed. 3 Press ▲ or ▼ to select the Ink tab (... 23 Ink Tank, and then press the OK button. Remove the ink tanks 1 Open the Ink Tank Cover and check ink lamps.
Remove the Ink Tank at this point. 1 On the Tab Selection screen of the color for ink tank replacement Replacing Ink Tanks • This step is not displayed, press the Menu button. 2 Press... Menu CMY M B K M B K B K • If the Tab Selection screen is not necessary if a message requests you to open the Ink Tank Cover. Remove the Ink Tank at this point. Ink lamps flash when there is displayed. 3 Press ▲ or ▼ to select the Ink tab (... 23 Ink Tank, and then press the OK button. Remove the ink tanks 1 Open the Ink Tank Cover and check ink lamps.

iPF650 655 750 755 Basic Guide Step1
Page 25
... place. 5 Make sure the Ink Lamp is lit in the holder if the color or orientation is not lit, reload the tank. 6 Close the Ink Tank Cover. 25 Make sure the color of the Ink Tank Lock Lever matches the color of the Ink Tank and check the orientation of the Ink Tank before...
... place. 5 Make sure the Ink Lamp is lit in the holder if the color or orientation is not lit, reload the tank. 6 Close the Ink Tank Cover. 25 Make sure the color of the Ink Tank Lock Lever matches the color of the Ink Tank and check the orientation of the Ink Tank before...

iPF650 655 750 755 Basic Guide Step1
Page 27
... screen is displayed. 3 Press ▲ or ▼ to select Maintenance, and then press the OK button. 4 Press ▲ or ▼ to open the Maintenance Cartridge Cover. The Set./Adj.
... screen is displayed. 3 Press ▲ or ▼ to select Maintenance, and then press the OK button. 4 Press ▲ or ▼ to open the Maintenance Cartridge Cover. The Set./Adj.

iPF650 655 750 755 Basic Guide Step1
Page 28
...; Always put it in the plastic bag. a • Used maintenance cartridges are heavy. Do not install a used Maintenance Cartridge in another printer. 4 Keep the used maintenance cartridge level as you put the used Maintenance Cartridge back in . 28 Replacing the Maintenance Cartridge 2 At this point..., open the Maintenance Cartridge Cover. 3 Hold the used Maintenance Cartridge by the grip (a) with one hand and put your other hand under the Maintenance Cartridge to hold...
...; Always put it in the plastic bag. a • Used maintenance cartridges are heavy. Do not install a used Maintenance Cartridge in another printer. 4 Keep the used maintenance cartridge level as you put the used Maintenance Cartridge back in . 28 Replacing the Maintenance Cartridge 2 At this point..., open the Maintenance Cartridge Cover. 3 Hold the used Maintenance Cartridge by the grip (a) with one hand and put your other hand under the Maintenance Cartridge to hold...

iPF650 655 750 755 Basic Guide Step1
Page 29
OK The printer now initializes the Maintenance Cartridge. 29 Replacing the Maintenance Cartridge 8 Press the OK button. 7 Close the Maintenance Cartridge Cover.
OK The printer now initializes the Maintenance Cartridge. 29 Replacing the Maintenance Cartridge 8 Press the OK button. 7 Close the Maintenance Cartridge Cover.

iPF650 655 750 755 Basic Guide Step1
Page 30
...ejected because of Head Cleaning B from the pouch, install it . (→"Cutting Roll Paper After Printing," User Manual) 2 Clean inside the Top Cover. (→ , If Paper is opened, the nozzles may dry out, which may stain clothing. • Do not open the Printhead pouch ...; Your hands may become dirty during Printhead replacement. After removing the Printhead from the printer menu • If the Display Screen indicates Open top cover and replace the printhead. • If your Canon dealer has advised you remove. Replacing the Printhead Replace the Printhead as follows. The ...
...ejected because of Head Cleaning B from the pouch, install it . (→"Cutting Roll Paper After Printing," User Manual) 2 Clean inside the Top Cover. (→ , If Paper is opened, the nozzles may dry out, which may stain clothing. • Do not open the Printhead pouch ...; Your hands may become dirty during Printhead replacement. After removing the Printhead from the printer menu • If the Display Screen indicates Open top cover and replace the printhead. • If your Canon dealer has advised you remove. Replacing the Printhead Replace the Printhead as follows. The ...

iPF650 655 750 755 Basic Guide Step1
Page 31
... a warning tone, and Printhead replacement is no longer possible. Replacing the Printhead Ready OK:Setting/Adj. Replace the printhead 1 Open the Top Cover. Remaining Amount 㪏㪇㩼 • If the Tab Selection screen is now filled. After about two minutes, a message is...Press ▲ or ▼ to select Maintenance, and then press the OK button. 6 Press ▲ or ▼ to open the Top Cover. Menu Maint. Menu is shown on the Display Screen regarding Printhead replacement. • During Printhead replacement, do not move the Carriage by mistake,...
... a warning tone, and Printhead replacement is no longer possible. Replacing the Printhead Ready OK:Setting/Adj. Replace the printhead 1 Open the Top Cover. Remaining Amount 㪏㪇㩼 • If the Tab Selection screen is now filled. After about two minutes, a message is...Press ▲ or ▼ to select Maintenance, and then press the OK button. 6 Press ▲ or ▼ to open the Top Cover. Menu Maint. Menu is shown on the Display Screen regarding Printhead replacement. • During Printhead replacement, do not move the Carriage by mistake,...

iPF650 655 750 755 Basic Guide Step1
Page 32
This may damage the printer. 3 Pull the Printhead Fixer Lever forward all the way to open it clean. • Never touch the metal contacts of the used Printhead in accordance with local regulations. 32 Replacing the Printhead 2 If the Printhead Fixer Cover or Printhead Fixer Lever is dirty, use a damp cloth that you have wrung out completely to open it completely. 4 Pull up the Printhead Fixer Cover to wipe it completely. 5 Remove the Printhead and press the OK button. • Dispose of the Carriage.
This may damage the printer. 3 Pull the Printhead Fixer Lever forward all the way to open it clean. • Never touch the metal contacts of the used Printhead in accordance with local regulations. 32 Replacing the Printhead 2 If the Printhead Fixer Cover or Printhead Fixer Lever is dirty, use a damp cloth that you have wrung out completely to open it completely. 4 Pull up the Printhead Fixer Cover to wipe it completely. 5 Remove the Printhead and press the OK button. • Dispose of the Carriage.

iPF650 655 750 755 Basic Guide Step1
Page 34
... Printhead into the Carriage. It takes about six minutes for Printhead adjustment. Adj. (Auto(Advanced)) yourself. (→ , If Vertical Lines are Warped or Colors are Misaligned) 34 If Rep.P.head Print is Off, perform Head Posi. Adj. (Auto(Advanced)) is performed if you have selected Rep.P.head Print > ...On in place. 10 Push the Printhead Fixer Lever toward the back of the printer until it clicks. 11 Close the Top Cover. Replacing the Printhead 8 With the nozzles facing down toward the front to fill the system. • Never remove ...
... Printhead into the Carriage. It takes about six minutes for Printhead adjustment. Adj. (Auto(Advanced)) yourself. (→ , If Vertical Lines are Warped or Colors are Misaligned) 34 If Rep.P.head Print is Off, perform Head Posi. Adj. (Auto(Advanced)) is performed if you have selected Rep.P.head Print > ...On in place. 10 Push the Printhead Fixer Lever toward the back of the printer until it clicks. 11 Close the Top Cover. Replacing the Printhead 8 With the nozzles facing down toward the front to fill the system. • Never remove ...

iPF650 655 750 755 Basic Guide Step1
Page 39
...31, 32 d Display Screen 10 e Ejection Guide 8 Electronic manuals (User Manual 5, 6 f Flange 13 h Holder Stopper 8, 12 i imagePROGRAF Support Information 5 Ink Lamp 23, 25 Ink Tank Cover 8, 23, 25 Ink Tank Lock Lever 23, 25 Ink tank replacement 22 Ink tanks 21, 22 m Maintenance Cartridge 8, 21, 26 ...Maintenance Cartridge Cover 8 Maintenance cartridge replacement 26 Menu map (menu structure 35 p Paper Alignment Line 8 Paper Feed Slot 8, 15 Paper Reference Guide 5 Paper...
...31, 32 d Display Screen 10 e Ejection Guide 8 Electronic manuals (User Manual 5, 6 f Flange 13 h Holder Stopper 8, 12 i imagePROGRAF Support Information 5 Ink Lamp 23, 25 Ink Tank Cover 8, 23, 25 Ink Tank Lock Lever 23, 25 Ink tank replacement 22 Ink tanks 21, 22 m Maintenance Cartridge 8, 21, 26 ...Maintenance Cartridge Cover 8 Maintenance cartridge replacement 26 Menu map (menu structure 35 p Paper Alignment Line 8 Paper Feed Slot 8, 15 Paper Reference Guide 5 Paper...
iPF650 655 750 755 Basic Guide Step2
Page 2
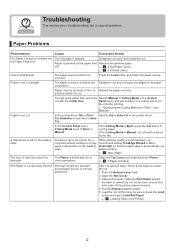
...Reload to On or Automatic so that the paper edge is automatically cut before it may leave a depression on the leading edge. Open the Roll Cover. 3. position before printing. (→ , Menu Map) The size of clear film cannot be detected The Platen is left on it is ... sure to cut the roll after printing. (→"Specifying the Cutting Method for a long time without printing on the leading edge Keeping a roll in the printer for Rolls," User Manual) Paper is incorrect. slot. (→ , If Roll Paper Jams) (→ , If a Sheet Jams) Cannot load sheets The ...
...Reload to On or Automatic so that the paper edge is automatically cut before it may leave a depression on the leading edge. Open the Roll Cover. 3. position before printing. (→ , Menu Map) The size of clear film cannot be detected The Platen is left on it is ... sure to cut the roll after printing. (→"Specifying the Cutting Method for a long time without printing on the leading edge Keeping a roll in the printer for Rolls," User Manual) Paper is incorrect. slot. (→ , If Roll Paper Jams) (→ , If a Sheet Jams) Cannot load sheets The ...


