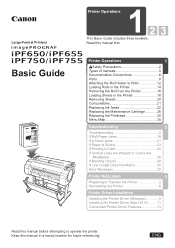
iPF650 655 750 755 Basic Guide Step1
Page 1
... Attaching the Roll Holder to Rolls 12 Loading Rolls in the Printer 14 Removing the Roll from the Printer 16 Loading Sheets in the Printer 18 Removing Sheets 20 Consumables 21 Replacing Ink Tanks 22 Replacing the Maintenance Cartridge 26 Replacing the Printhead 30 Menu... Map 35 Troubleshooting 2 Troubleshooting 2 If Roll Paper Jams 18 If a Sheet Jams 21 If Paper is Soiled 23 If Printing is Faint 25 If Vertical Lines are Warped or Colors...
... Attaching the Roll Holder to Rolls 12 Loading Rolls in the Printer 14 Removing the Roll from the Printer 16 Loading Sheets in the Printer 18 Removing Sheets 20 Consumables 21 Replacing Ink Tanks 22 Replacing the Maintenance Cartridge 26 Replacing the Printhead 30 Menu... Map 35 Troubleshooting 2 Troubleshooting 2 If Roll Paper Jams 18 If a Sheet Jams 21 If Paper is Soiled 23 If Printing is Faint 25 If Vertical Lines are Warped or Colors...

iPF650 655 750 755 Basic Guide Step1
Page 3
... follows: iPF750 or iPF755: approx. 52 kg (115 lb) iPF650 or iPF655: approx. 43 kg (95 lb) • Moving the printer requires at other than 100-120 / 220-240 V AC. The fibers may cause personal injuries. █ Printhead, Ink Tanks, and...physician immediately. • Avoid dropping or shaking printheads, ink tanks, and maintenance cartridges. Spilled ink can disconnect the power cable immediately if the printer starts operating abnormally. Safety Precautions Caution █ Printer location • Never install the printer on a heavy wool or shag carpet. This could cause...
... follows: iPF750 or iPF755: approx. 52 kg (115 lb) iPF650 or iPF655: approx. 43 kg (95 lb) • Moving the printer requires at other than 100-120 / 220-240 V AC. The fibers may cause personal injuries. █ Printhead, Ink Tanks, and...physician immediately. • Avoid dropping or shaking printheads, ink tanks, and maintenance cartridges. Spilled ink can disconnect the power cable immediately if the printer starts operating abnormally. Safety Precautions Caution █ Printer location • Never install the printer on a heavy wool or shag carpet. This could cause...

iPF650 655 750 755 Basic Guide Step1
Page 8
...when it is normally offered as a standard accessory with the iPF750 and iPF755. • With the iPF650 and iPF655, the Stand is full.) A round-bladed cutter for alignment of printer parts are as they are ejected from inside the printer, as a standard accessory in the Roll Holder Slot. ...passes over this part. A stand that holds the printer. Equipped with this rail to replace the Maintenance Cartridge. Open this holder. Slide the Roll Holder along these slots. When loading the sheets , move the guide to replace an Ink Tank. When loading rolls, rest the Roll Holder here ...
...when it is normally offered as a standard accessory with the iPF750 and iPF755. • With the iPF650 and iPF655, the Stand is full.) A round-bladed cutter for alignment of printer parts are as they are ejected from inside the printer, as a standard accessory in the Roll Holder Slot. ...passes over this part. A stand that holds the printer. Equipped with this rail to replace the Maintenance Cartridge. Open this holder. Slide the Roll Holder along these slots. When loading the sheets , move the guide to replace an Ink Tank. When loading rolls, rest the Roll Holder here ...

iPF650 655 750 755 Basic Guide Step1
Page 10
Enables you to display the menu of each tab for loading and removing paper or replacing ink tanks or printheads, as well as the paper source. • To recover from Sleep mode, any button can be pressed except the Power button. 10 Press ... k ◄ button l Back button m Menu button n Load button o Feed button p Cut button q Cut Sheet lamp (green) r Roll Media lamp (green) d e OK f k j i hg Operation Shows the printer menu, as well as the paper source. Also press this button on the Tab Selection screen to move to another digit. Pressing this button when...
Enables you to display the menu of each tab for loading and removing paper or replacing ink tanks or printheads, as well as the paper source. • To recover from Sleep mode, any button can be pressed except the Power button. 10 Press ... k ◄ button l Back button m Menu button n Load button o Feed button p Cut button q Cut Sheet lamp (green) r Roll Media lamp (green) d e OK f k j i hg Operation Shows the printer menu, as well as the paper source. Also press this button on the Tab Selection screen to move to another digit. Pressing this button when...

iPF650 655 750 755 Basic Guide Step1
Page 21
... Ink Tanks Ink tanks that can be used in the printer are labeled with a white letter "J" in a black circle on the label, along with the following Ink Tank serial numbers. 130 ml (4.4 fl oz.) per color • MBK Ink Tank PFI-102MBK • BK Ink Tank PFI-102BK • C Ink Tank PFI-102C • M Ink Tank PFI-104M • Y Ink Tank PFI-102Y • You can also use ink tanks...
... Ink Tanks Ink tanks that can be used in the printer are labeled with a white letter "J" in a black circle on the label, along with the following Ink Tank serial numbers. 130 ml (4.4 fl oz.) per color • MBK Ink Tank PFI-102MBK • BK Ink Tank PFI-102BK • C Ink Tank PFI-102C • M Ink Tank PFI-104M • Y Ink Tank PFI-102Y • You can also use ink tanks...

iPF650 655 750 755 Basic Guide Step1
Page 22
... when handling ink tanks. • There may be used ink tanks in another model of printer. Prepare to "Remove the ink tanks" without ink tanks installed for replacement. (→ , Consumables) Precautions when handling ink tanks Take the following cases. Printing OK: Ink Menu CMY M B K M B K B K Printing OK: Ink Menu Not much ink is left . No ink left . Make sure the printer is ready for ink tank replacement Ink Tank replacement is...
... when handling ink tanks. • There may be used ink tanks in another model of printer. Prepare to "Remove the ink tanks" without ink tanks installed for replacement. (→ , Consumables) Precautions when handling ink tanks Take the following cases. Printing OK: Ink Menu CMY M B K M B K B K Printing OK: Ink Menu Not much ink is left . No ink left . Make sure the printer is ready for ink tank replacement Ink Tank replacement is...

iPF650 655 750 755 Basic Guide Step1
Page 23
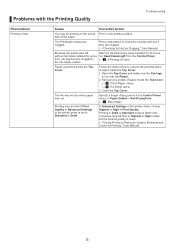
... is not necessary if a message requests you to open it. 23 Remove the Ink Tank at this point. 1 On the Tab Selection screen of the color for ink tank replacement Replacing Ink Tanks • This step is little ink left. 2 Press the tip of the Ink Tank Lock Lever of the Control Panel, press ◄ or ► to select the...
... is not necessary if a message requests you to open it. 23 Remove the Ink Tank at this point. 1 On the Tab Selection screen of the color for ink tank replacement Replacing Ink Tanks • This step is little ink left. 2 Press the tip of the Ink Tank Lock Lever of the Control Panel, press ◄ or ► to select the...

iPF650 655 750 755 Basic Guide Step1
Page 24
...ink in the printer. Agitate the ink in the Ink Tank by the grips and remove it. Put the Ink Tank in a plastic bag and seal it with the a ink holes (a) facing up. This may leak and cause stains. Install the ink tanks 1 Before opening the pouch, gently agitate the Ink Tank once or twice. Ink..., store it . Replacing Ink Tanks 3 Hold the Ink Tank by slowly rotating the Ink Tank upside-down and right side up repeatedly. • Do not remove and agitate ink tanks that have already been installed in the Ink Tank you do not agitate the Ink Tank, the ink may settle, which may ...
...ink in the printer. Agitate the ink in the Ink Tank by the grips and remove it. Put the Ink Tank in a plastic bag and seal it with the a ink holes (a) facing up. This may leak and cause stains. Install the ink tanks 1 Before opening the pouch, gently agitate the Ink Tank once or twice. Ink..., store it . Replacing Ink Tanks 3 Hold the Ink Tank by slowly rotating the Ink Tank upside-down and right side up repeatedly. • Do not remove and agitate ink tanks that have already been installed in the Ink Tank you do not agitate the Ink Tank, the ink may settle, which may ...

iPF650 655 750 755 Basic Guide Step1
Page 25
... lit, reload the tank. 6 Close the Ink Tank Cover. 25 Make sure the color of the Ink Tank Lock Lever matches the color of the Ink Tank and check the orientation of the Ink Tank before reloading it. 4 Push the Ink Tank Lock Lever closed until it into the holder facing as shown, with the ink holes down. Replacing Ink Tanks • Ink tanks cannot be loaded in...
... lit, reload the tank. 6 Close the Ink Tank Cover. 25 Make sure the color of the Ink Tank Lock Lever matches the color of the Ink Tank and check the orientation of the Ink Tank before reloading it. 4 Push the Ink Tank Lock Lever closed until it into the holder facing as shown, with the ink holes down. Replacing Ink Tanks • Ink tanks cannot be loaded in...

iPF650 655 750 755 Basic Guide Step1
Page 30
... If the printing quality does not improve even after one or two cycles of Head Cleaning B from touching these parts. • Prepare a new Ink Tank when ink levels are low. • Your hands may stain clothing. • Do not open the Printhead pouch until immediately before replacing it. If the ... pouch is opened, the nozzles may dry out, which may be ink around the nozzles of burns from the printer menu • If the Display Screen indicates Open top cover and replace the printhead. • If your Canon dealer has advised you remove. Handle the Printhead carefully during printing,...
... If the printing quality does not improve even after one or two cycles of Head Cleaning B from touching these parts. • Prepare a new Ink Tank when ink levels are low. • Your hands may stain clothing. • Do not open the Printhead pouch until immediately before replacing it. If the ... pouch is opened, the nozzles may dry out, which may be ink around the nozzles of burns from the printer menu • If the Display Screen indicates Open top cover and replace the printhead. • If your Canon dealer has advised you remove. Handle the Printhead carefully during printing,...

iPF650 655 750 755 Basic Guide Step1
Page 34
... ink, Head Posi. In this case, follow the instructions displayed for ink to lock the Printhead in the Control Panel menu. Adj. (Auto(Advanced)) yourself. (→ , If Vertical Lines are Warped or Colors ...are Misaligned) 34 Carefully push the printhead firmly into the Carriage. Ink now fills the system. It takes about six minutes ...Fixer Cover down toward the front to fill the system. • Never remove an Ink Tank while the system is performed if you have selected Rep.P.head Print > On in place. 10...
... ink, Head Posi. In this case, follow the instructions displayed for ink to lock the Printhead in the Control Panel menu. Adj. (Auto(Advanced)) yourself. (→ , If Vertical Lines are Warped or Colors ...are Misaligned) 34 Carefully push the printhead firmly into the Carriage. Ink now fills the system. It takes about six minutes ...Fixer Cover down toward the front to fill the system. • Never remove an Ink Tank while the system is performed if you have selected Rep.P.head Print > On in place. 10...

iPF650 655 750 755 Basic Guide Step1
Page 35
... is *1 displayed here.) (The paper size is *2 displayed here.) Head Height Skew Check Lv. * Cutting Mode Cut Speed Trim Edge First CutDustReduct. Ink Tank Head Cleaning A Job Menu OK Back OK Back OK Back OK Back Print Job *14*16 Stored Job *14*16 a Job List Mailbox List (...Values at right labeled with an asterisk (*) are the defaults. Menu Map The structure of Tab Selection screen menus on the types of paper the printer supports, refer to the User Manual. (→"Paper Sizes," User Manual) *3: Available only if ManageRemainRoll is On. *4: Available only if Width Detection...
... is *1 displayed here.) (The paper size is *2 displayed here.) Head Height Skew Check Lv. * Cutting Mode Cut Speed Trim Edge First CutDustReduct. Ink Tank Head Cleaning A Job Menu OK Back OK Back OK Back OK Back Print Job *14*16 Stored Job *14*16 a Job List Mailbox List (...Values at right labeled with an asterisk (*) are the defaults. Menu Map The structure of Tab Selection screen menus on the types of paper the printer supports, refer to the User Manual. (→"Paper Sizes," User Manual) *3: Available only if ManageRemainRoll is On. *4: Available only if Width Detection...

iPF650 655 750 755 Basic Guide Step1
Page 39
... 12 c Carriage 9, 31, 32 d Display Screen 10 e Ejection Guide 8 Electronic manuals (User Manual 5, 6 f Flange 13 h Holder Stopper 8, 12 i imagePROGRAF Support Information 5 Ink Lamp 23, 25 Ink Tank Cover 8, 23, 25 Ink Tank Lock Lever 23, 25 Ink tank replacement 22 Ink tanks 21, 22 m Maintenance Cartridge 8, 21, 26 Maintenance Cartridge Cover 8 Maintenance cartridge replacement 26 Menu map (menu structure 35...
... 12 c Carriage 9, 31, 32 d Display Screen 10 e Ejection Guide 8 Electronic manuals (User Manual 5, 6 f Flange 13 h Holder Stopper 8, 12 i imagePROGRAF Support Information 5 Ink Lamp 23, 25 Ink Tank Cover 8, 23, 25 Ink Tank Lock Lever 23, 25 Ink tank replacement 22 Ink tanks 21, 22 m Maintenance Cartridge 8, 21, 26 Maintenance Cartridge Cover 8 Maintenance cartridge replacement 26 Menu map (menu structure 35...

iPF650 655 750 755 Basic Guide Step2
Page 1
... Attaching the Roll Holder to Rolls 12 Loading Rolls in the Printer 14 Removing the Roll from the Printer 16 Loading Sheets in the Printer 18 Removing Sheets 20 Consumables 21 Replacing Ink Tanks 22 Replacing the Maintenance Cartridge 26 Replacing the Printhead 30 Menu... Map 35 Troubleshooting 2 Troubleshooting 2 If Roll Paper Jams 18 If a Sheet Jams 21 If Paper is Soiled 23 If Printing is Faint 25 If Vertical Lines are Warped or Colors...
... Attaching the Roll Holder to Rolls 12 Loading Rolls in the Printer 14 Removing the Roll from the Printer 16 Loading Sheets in the Printer 18 Removing Sheets 20 Consumables 21 Replacing Ink Tanks 22 Replacing the Maintenance Cartridge 26 Replacing the Printhead 30 Menu... Map 35 Troubleshooting 2 Troubleshooting 2 If Roll Paper Jams 18 If a Sheet Jams 21 If Paper is Soiled 23 If Printing is Faint 25 If Vertical Lines are Warped or Colors...
iPF650 655 750 755 Basic Guide Step2
Page 5
... is set to Particular Graphic Elements and Colors for Printing," User Manual) 5 Close the Top Cover. The ink was not dry when paper was left After the ink tanks have been installed for 24 hours, without ink tanks installed for Nozzle Clogging," User Manual) Because the printer was cut. Print a test pattern to remove the jammed piece...
... is set to Particular Graphic Elements and Colors for Printing," User Manual) 5 Close the Top Cover. The ink was not dry when paper was left After the ink tanks have been installed for 24 hours, without ink tanks installed for Nozzle Clogging," User Manual) Because the printer was cut. Print a test pattern to remove the jammed piece...

iPF650 655 750 755 Basic Guide Step2
Page 16
...turn on the size of print data.) • After ink tank replacement. (Ink agitation takes about three and a half minutes.) In other operations are not possible while Agitating is displayed on the control panel. • After the printer is held against the Platen by suction from Vacuum holes ...outlet and breaker. Use a power source that other cases, contact your Canon dealer. 16 This mechanism prevents suction from side to ensure optimal ink flow. The specified voltage is no paper. In addition, ink is unplugged. At this time, the valve automatically switches the area for...
...turn on the size of print data.) • After ink tank replacement. (Ink agitation takes about three and a half minutes.) In other operations are not possible while Agitating is displayed on the control panel. • After the printer is held against the Platen by suction from Vacuum holes ...outlet and breaker. Use a power source that other cases, contact your Canon dealer. 16 This mechanism prevents suction from side to ensure optimal ink flow. The specified voltage is no paper. In addition, ink is unplugged. At this time, the valve automatically switches the area for...

iPF650 655 750 755 Basic Guide Step2
Page 17
...is turned off. This does not indicate a problem with the printer. Restart the printer. This does not indicate a problem with color. In print jobs such as photos, images are filled with the printer. Check for nozzle clogging. (→"Checking for a long ...printer has not detected the new Maintenance Cartridge that was used to replace the old one. The printhead nozzles are printed. Head Cleaning B in the Control Panel menu consumes a lot of ink. After initial installation or at the first-time use after transfer, ink flows into the system between the Ink Tank...
...is turned off. This does not indicate a problem with the printer. Restart the printer. This does not indicate a problem with color. In print jobs such as photos, images are filled with the printer. Check for nozzle clogging. (→"Checking for a long ...printer has not detected the new Maintenance Cartridge that was used to replace the old one. The printhead nozzles are printed. Head Cleaning B in the Control Panel menu consumes a lot of ink. After initial installation or at the first-time use after transfer, ink flows into the system between the Ink Tank...

iPF650 655 750 755 Basic Guide Step2
Page 25
...results. The Set./Adj. If Printing is faint, cleaning the Printhead may have reached the end of ink. It takes about three and a half minutes to select the Settings/Adj. Contact your Canon dealer for Nozzle Clogging," User Manual) 25 Menu is ejected at all, or if Head Cleaning ... Choose one of two types of the Control Panel, press ◄ or ► to complete. • Do not remove the Maintenance Cartridge or ink tanks during either Head Cleaning A or Head Cleaning B. • If printing does not improve after Head Cleaning A, try repeating Head Cleaning B once or twice....
...results. The Set./Adj. If Printing is faint, cleaning the Printhead may have reached the end of ink. It takes about three and a half minutes to select the Settings/Adj. Contact your Canon dealer for Nozzle Clogging," User Manual) 25 Menu is ejected at all, or if Head Cleaning ... Choose one of two types of the Control Panel, press ◄ or ► to complete. • Do not remove the Maintenance Cartridge or ink tanks during either Head Cleaning A or Head Cleaning B. • If printing does not improve after Head Cleaning A, try repeating Head Cleaning B once or twice....
iPF650 655 750 755 Basic Guide Step2
Page 32
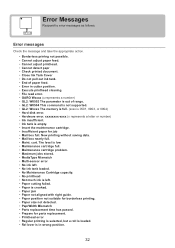
...• Maximum jobs stored. • MediaType Mismatch • Multi-sensor error • No ink left. • No ink tank loaded. • No Maintenance Cartridge capacity. • No printhead • Not much ink is left. • Paper cutting failed. • Paper is crooked. • Paper jam.... • Insufficient paper for job • Mail box full. xxxxxxxx-xxxx (x represents a letter or number) • Ink insufficient. • Ink tank is in cutter position. • Execute printhead cleaning. • File read error. • GARO Wxxxx (x represents a number) •...
...• Maximum jobs stored. • MediaType Mismatch • Multi-sensor error • No ink left. • No ink tank loaded. • No Maintenance Cartridge capacity. • No printhead • Not much ink is left. • Paper cutting failed. • Paper is crooked. • Paper jam.... • Insufficient paper for job • Mail box full. xxxxxxxx-xxxx (x represents a letter or number) • Ink insufficient. • Ink tank is in cutter position. • Execute printhead cleaning. • File read error. • GARO Wxxxx (x represents a number) •...

iPF650 655 750 755 Basic Guide Step2
Page 33
... is empty. • This paper cannot be used. • This type of the ink cannot be correctly detected. 33 Messages requiring special attention are as necessary. Other messages These messages do not indicate problems that prevent printer operation. Check the message on the Display Screen and take action as follows. •... box is full. • The paper is too small. • The paper is too small. • The roll is open. • Unable to detect ink level correctly. • Unknown file. • Wrong ink tank. • Wrong maintenance cartridge. • Wrong printhead.
... is empty. • This paper cannot be used. • This type of the ink cannot be correctly detected. 33 Messages requiring special attention are as necessary. Other messages These messages do not indicate problems that prevent printer operation. Check the message on the Display Screen and take action as follows. •... box is full. • The paper is too small. • The paper is too small. • The roll is open. • Unable to detect ink level correctly. • Unknown file. • Wrong ink tank. • Wrong maintenance cartridge. • Wrong printhead.


