
User Manual for Windows
Page 15
Caution Indicates caution items for which operating error poses a risk of printer parts are indicated as follows in this User Manual. Control Panel Interface Items and Messages Example: Head Cleaning is displayed. Example: Press the Tab key. • Part Names Names of injury or damage to equipment or...manual How to use this manual About This User Manual • Symbols The following symbols are used in this information to prevent printer damage or operating errors. Be sure to read this User Manual to indicate safety information and explanations on the control panel and user...
Caution Indicates caution items for which operating error poses a risk of printer parts are indicated as follows in this User Manual. Control Panel Interface Items and Messages Example: Head Cleaning is displayed. Example: Press the Tab key. • Part Names Names of injury or damage to equipment or...manual How to use this manual About This User Manual • Symbols The following symbols are used in this information to prevent printer damage or operating errors. Be sure to read this User Manual to indicate safety information and explanations on the control panel and user...

User Manual for Windows
Page 22
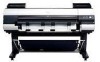
... for maintenance purposes such as head cleaning. (Replace the cartridge when it by these handles under both sides. Maintenance Cartridge Cover Open this lever toward the front of the printer when loading paper. Lift this cover to facilitate moving the printer. (→P.16) 8 Printer Parts o. Stand A stand that holds the printer. Printer parts l. Equipped with casters...
... for maintenance purposes such as head cleaning. (Replace the cartridge when it by these handles under both sides. Maintenance Cartridge Cover Open this lever toward the front of the printer when loading paper. Lift this cover to facilitate moving the printer. (→P.16) 8 Printer Parts o. Stand A stand that holds the printer. Printer parts l. Equipped with casters...

User Manual for Windows
Page 29
...Also press this button to display the menu one level higher. p. Color Label This label indicates the Ink Tank color. m.► Button Menu mode: Press this button to cancel print jobs in the direction of ejection, as the printer status and messages. o. i. OK Button In Menu mode, press ... so on and off. (→P.19) q. Load/Eject Button By pressing this button to clean the Printhead ( Head Cleaning A ). r. Stop Button Hold down this button to bring the printer online again. Note • In Sleep mode, you can press any button except the Power button to con...
...Also press this button to display the menu one level higher. p. Color Label This label indicates the Ink Tank color. m.► Button Menu mode: Press this button to cancel print jobs in the direction of ejection, as the printer status and messages. o. i. OK Button In Menu mode, press ... so on and off. (→P.19) q. Load/Eject Button By pressing this button to clean the Printhead ( Head Cleaning A ). r. Stop Button Hold down this button to bring the printer online again. Note • In Sleep mode, you can press any button except the Power button to con...

User Manual for Windows
Page 41
Note • You can start Head Cleaning A by holding down the Information button for three seconds or more. (→P.696) Printer Parts 27 Printer Status When the Menu Button is solved. If you do not operate the printer. Press the Information button to display the Maintenance Cartridge capacity...Not switch to Menu mode until the problem is Pressed Online Switches to Menu mode as information on the loaded paper and the printer. Online, printing Either menus available during printing are displayed. Ofine, printing Menus available during printing or a screen to...
Note • You can start Head Cleaning A by holding down the Information button for three seconds or more. (→P.696) Printer Parts 27 Printer Status When the Menu Button is solved. If you do not operate the printer. Press the Information button to display the Maintenance Cartridge capacity...Not switch to Menu mode until the problem is Pressed Online Switches to Menu mode as information on the loaded paper and the printer. Online, printing Either menus available during printing are displayed. Ofine, printing Menus available during printing or a screen to...

User Manual for Windows
Page 42
... default, main menu settings apply to Menu mode after the problem is solved. The following case even if you can execute during printing ( Head Cleaning, Fine Band Adj., Information, and Job Mgmt Menu ) are available from the main menu during printing. • Printhead cleaning •...; Manual adjustment of the paper feed amount • Display of printer-related information • Job management For a description of specic items available in progress Access the main menu by pressing the Menu ...
... default, main menu settings apply to Menu mode after the problem is solved. The following case even if you can execute during printing ( Head Cleaning, Fine Band Adj., Information, and Job Mgmt Menu ) are available from the main menu during printing. • Printhead cleaning •...; Manual adjustment of the paper feed amount • Display of printer-related information • Job management For a description of specic items available in progress Access the main menu by pressing the Menu ...

User Manual for Windows
Page 49
Ink Tank No * Yes Head Cleaning Head Cleaning A * Head Cleaning B Auto Feed (*11) No * Yes Take-up Reel (*9) Disable * Enable Media Menu Cut Sheet Type Plain Paper (*5) Plain Paper HQ (*5) Plain Paper HG (*5) ...GlossyPhoto2 (*5) HW SemiGlPhoto2 (*5) Poster Semi-Gl (*5) Syn. Control Panel Menu Structure Main Menu The structure of the main menu is as follows. Paper (*5) Backlit Film (*5) Printer Parts 35 Paper (*5) Adh. Syn. Values at right indicated by an asterisk "*" are the defaults. For instructions on menu operations, see "Main Menu Operations". (→...
Ink Tank No * Yes Head Cleaning Head Cleaning A * Head Cleaning B Auto Feed (*11) No * Yes Take-up Reel (*9) Disable * Enable Media Menu Cut Sheet Type Plain Paper (*5) Plain Paper HQ (*5) Plain Paper HG (*5) ...GlossyPhoto2 (*5) HW SemiGlPhoto2 (*5) Poster Semi-Gl (*5) Syn. Control Panel Menu Structure Main Menu The structure of the main menu is as follows. Paper (*5) Backlit Film (*5) Printer Parts 35 Paper (*5) Adh. Syn. Values at right indicated by an asterisk "*" are the defaults. For instructions on menu operations, see "Main Menu Operations". (→...

User Manual for Windows
Page 52
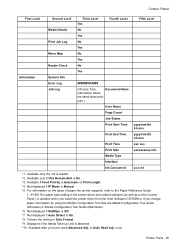
Scan Wait Time Off 1 sec. 3 sec. 5 sec. 7 sec. 9 sec. Standard * Loose 38 Printer Parts Fifth Level Control Panel First Level Paper Details Second Level Third Level CAD Clear Film (*5) Fourth Level Special # Here, the number is 1-10 (*5) Chk ... here.) (*5) 30 sec. 1 min. 3 min. 5 min. 10 min. 30 min. 60 min. Feed Priority Automatic * Band Joint Print Length Adjust Length From -0.70% to 0.70% Head Height Automatic * Highest High Standard Low Lowest Skew Check Lv.
Scan Wait Time Off 1 sec. 3 sec. 5 sec. 7 sec. 9 sec. Standard * Loose 38 Printer Parts Fifth Level Control Panel First Level Paper Details Second Level Third Level CAD Clear Film (*5) Fourth Level Special # Here, the number is 1-10 (*5) Chk ... here.) (*5) 30 sec. 1 min. 3 min. 5 min. 10 min. 30 min. 60 min. Feed Priority Automatic * Band Joint Print Length Adjust Length From -0.70% to 0.70% Head Height Automatic * Highest High Standard Low Lowest Skew Check Lv.

User Manual for Windows
Page 54
Manual Band Adj No Yes Adjust Length (*3) No Yes Calibration Auto Adjust Calibration Log Use Adj. Fourth Level Delete No Yes No Yes No Yes Off On * No Yes No Yes No Yes Date Paper Type Disabled Enabled * No Yes Fifth Level 40 Printer Parts Advanced Adj. No Yes Standard Adj. Value Return Defaults EOP Timer 10 sec. 30 sec. 1 min. 2 min. 5 min. 10 min. * 30 min. Control Panel First Level Adjust Printer Interface Setup Second Level Third Level Print Job List Auto Head Adj. Advanced Adj. Standard Adj. Auto Print Manual Head Adj (*10) Auto Band Adj.
Manual Band Adj No Yes Adjust Length (*3) No Yes Calibration Auto Adjust Calibration Log Use Adj. Fourth Level Delete No Yes No Yes No Yes Off On * No Yes No Yes No Yes Date Paper Type Disabled Enabled * No Yes Fifth Level 40 Printer Parts Advanced Adj. No Yes Standard Adj. Value Return Defaults EOP Timer 10 sec. 30 sec. 1 min. 2 min. 5 min. 10 min. * 30 min. Control Panel First Level Adjust Printer Interface Setup Second Level Third Level Print Job List Auto Head Adj. Advanced Adj. Standard Adj. Auto Print Manual Head Adj (*10) Auto Band Adj.

User Manual for Windows
Page 56
... * (*9) On Off * On Sht Selection 1 ISO A3+ * 13"x19"(Super B) Sht Selection 2 ISO B1 28"x40" (ANSI F) Off Fifth Level 42 Printer Parts Check Freq. S. maint cart Replace P.head Repl. Cleaner Change Cutter Move Printer Warning Keep Media Size Paper Size Basis Noz. Control Panel First Level Maintenance System Setup Second Level Ext.
... * (*9) On Off * On Sht Selection 1 ISO A3+ * 13"x19"(Super B) Sht Selection 2 ISO B1 28"x40" (ANSI F) Off Fifth Level 42 Printer Parts Check Freq. S. maint cart Replace P.head Repl. Cleaner Change Cutter Move Printer Warning Keep Media Size Paper Size Basis Noz. Control Panel First Level Maintenance System Setup Second Level Ext.
User Manual for Windows
Page 59
once. Printer Parts 45 Control Panel First Level Second Level Third Level Yes Fourth Level Fifth ...if IP Mode is Manual. *5: For information on the Control Panel ) is attached. *10: Available after you install the printer driver from Document Name information about the latest three print jobs.) User Name Page Count Job Status Print Start Time yyyy/mm/...Print End Time yyyy/mm/dd hh:mm Print Time xxx sec. in the printer driver and related software (as well as on the types of paper the printer supports, refer to the Paper Reference Guide. (→P.169) The paper type ...
once. Printer Parts 45 Control Panel First Level Second Level Third Level Yes Fourth Level Fifth ...if IP Mode is Manual. *5: For information on the Control Panel ) is attached. *10: Available after you install the printer driver from Document Name information about the latest three print jobs.) User Name Page Count Job Status Print Start Time yyyy/mm/...Print End Time yyyy/mm/dd hh:mm Print Time xxx sec. in the printer driver and related software (as well as on the types of paper the printer supports, refer to the Paper Reference Guide. (→P.169) The paper type ...

User Manual for Windows
Page 60
... paper is loaded, and (c) you press the Information button on submenu screens, see "Submenu Display". (→P.63) 46 Printer Parts Caution • Only the following order. ■The remaining Maintenance Cartridge capacity and ink levels ■Information on the loaded paper &#...9632;Printer information For details on the Control Panel, printer information is Automatic. *13: Follows the setting in the following menus are displayed during printing. • ...
... paper is loaded, and (c) you press the Information button on submenu screens, see "Submenu Display". (→P.63) 46 Printer Parts Caution • Only the following order. ■The remaining Maintenance Cartridge capacity and ink levels ■Information on the loaded paper &#...9632;Printer information For details on the Control Panel, printer information is Automatic. *13: Follows the setting in the following menus are displayed during printing. • ...

User Manual for Windows
Page 61
... Level Second Level Third Level Fourth Level Fifth Level Sixth Level Seventh Level Menu Durng Head Head Prtng Cleaning Cleaning A Head Cleaning B Fine Band Adj. BOX Job List Ope. (Choose a print job.) Print Delete Print Job List No Yes Printer Parts 47 From -5 to 5 Information System Info Error Log Job Log (Choose from Document...
... Level Second Level Third Level Fourth Level Fifth Level Sixth Level Seventh Level Menu Durng Head Head Prtng Cleaning Cleaning A Head Cleaning B Fine Band Adj. BOX Job List Ope. (Choose a print job.) Print Delete Print Job List No Yes Printer Parts 47 From -5 to 5 Information System Info Error Log Job Log (Choose from Document...

User Manual for Windows
Page 63
...screen. (→P.680) Head Cleaning Specify Printhead cleaning options. (→P.696) Choose Head Cleaning A if printing is set to print information about the printer and record of ink used, and so on. (Information on the printer's hard disk. (→P.53) Adjust Printer Adjust the Printhead alignment or... amount of the main menu options. Choose Head Cleaning B if no ink is printed at the current position. Auto Feed This command is available only if Take-up Reel is faint, oddly colored, or...
...screen. (→P.680) Head Cleaning Specify Printhead cleaning options. (→P.696) Choose Head Cleaning A if printing is set to print information about the printer and record of ink used, and so on. (Information on the printer's hard disk. (→P.53) Adjust Printer Adjust the Printhead alignment or... amount of the main menu options. Choose Head Cleaning B if no ink is printed at the current position. Auto Feed This command is available only if Take-up Reel is faint, oddly colored, or...

User Manual for Windows
Page 65
...the ink to dry between each sheet. For paper that choosing Print Length may result in slight banding in consideration of Carriage scanning. Head Height Adjust the Printhead height. (→P.654) Skew Check Lv. Specify the time to wait for ink to dry. However, ...an exact amount. NearEnd RollMrgn Specify the minimum margin at the leading edge. Choose Automatic to have documents dropped immediately after printing. Printer Parts 51 Control Panel Paper Details Setting Item (The paper type is Roll DryingTime displayed here.)(*1) Scan Wait Time Description, Instructions ...
...the ink to dry between each sheet. For paper that choosing Print Length may result in slight banding in consideration of Carriage scanning. Head Height Adjust the Printhead height. (→P.654) Skew Check Lv. Specify the time to wait for ink to dry. However, ...an exact amount. NearEnd RollMrgn Specify the minimum margin at the leading edge. Choose Automatic to have documents dropped immediately after printing. Printer Parts 51 Control Panel Paper Details Setting Item (The paper type is Roll DryingTime displayed here.)(*1) Scan Wait Time Description, Instructions ...

User Manual for Windows
Page 68
... adjustment value is printed. The date of color calibration and the paper type is indicated on the resulting pattern. (→P.652) Choose Yes to have the printer print and read a band adjustment test pattern for all paper. Auto Print Manual Head Adj Auto Band Adj. Value Return Defaults Description...this function takes more time and requires more ink than checking output. Standard Adj. Note that this option when using paper other than genuine Canon paper, or paper for purposes other than Standard Adj. (→P.655) Choose Yes to print a test pattern for adjusting the feed amount...
... adjustment value is printed. The date of color calibration and the paper type is indicated on the resulting pattern. (→P.652) Choose Yes to have the printer print and read a band adjustment test pattern for all paper. Auto Print Manual Head Adj Auto Band Adj. Value Return Defaults Description...this function takes more time and requires more ink than checking output. Standard Adj. Note that this option when using paper other than genuine Canon paper, or paper for purposes other than Standard Adj. (→P.655) Choose Yes to print a test pattern for adjusting the feed amount...

User Manual for Windows
Page 70
When transferring the printer to another location, choose the level of transfer and follow the instructions on the screen. (→P.705) You can also reset the cut counter after ... the screen. (→P.708) Not displayed during a warning message that the remaining Maintenance Cartridge capacity is replaced. maint cart Replace P.head Repl. Control Panel Maintenance Setting Item Repl. Cleaner Change Cutter Move Printer Description, Instructions When replacing the Maintenance Cartridge , choose Yes and follow the instructions on the screen. (→P.724) 56...
When transferring the printer to another location, choose the level of transfer and follow the instructions on the screen. (→P.705) You can also reset the cut counter after ... the screen. (→P.708) Not displayed during a warning message that the remaining Maintenance Cartridge capacity is replaced. maint cart Replace P.head Repl. Control Panel Maintenance Setting Item Repl. Cleaner Change Cutter Move Printer Description, Instructions When replacing the Maintenance Cartridge , choose Yes and follow the instructions on the screen. (→P.724) 56...

User Manual for Windows
Page 74
... menu levels and values, see "Main Menu Operations". (→P.30) For details on the printer's hard disk. (→P.62) 60 Printer Parts Choose Head Cleaning B if no ink is printed at all, or if printing is faint, oddly colored, or contains foreign substances. Fine-tune the feed amount manually. For instructions on menu operations...
... menu levels and values, see "Main Menu Operations". (→P.30) For details on the printer's hard disk. (→P.62) 60 Printer Parts Choose Head Cleaning B if no ink is printed at all, or if printing is faint, oddly colored, or contains foreign substances. Fine-tune the feed amount manually. For instructions on menu operations...

User Manual for Windows
Page 79
Control Panel Current printer settings. Roll Cut Sheet Type Adjust Printer Head Adjust Auto Print A1-F2 Feed Priority Adjust Length Calibration Execution Log Date: Media: Use Adj. The color calibration setting value. Takeup-Reel Media Menu Roll Media Type Check Remain. Printhead adjustment value. This value indicates whether the results of color calibration are used...
Control Panel Current printer settings. Roll Cut Sheet Type Adjust Printer Head Adjust Auto Print A1-F2 Feed Priority Adjust Length Calibration Execution Log Date: Media: Use Adj. The color calibration setting value. Takeup-Reel Media Menu Roll Media Type Check Remain. Printhead adjustment value. This value indicates whether the results of color calibration are used...

User Manual for Windows
Page 84
Control Panel AppleTalk Current AppleTalk settings. HEAD LOT NUMBER Printhead lot number. Phase Type Name* Network Number* Zone* *: Blank if the status has been saved by using Status Monitor. LOT R,L PARTS STATUS COUNTER A-V Utilization status of the cutter, media, and other items (indicating how much they have been used). 70 Printer Parts COUNTER CUTTER MEDIA MEDIA1-7 NAME TTL ROLL CUTSHEET AFTER INSTALLATION Utilization status of replacement parts that require servicing.
Control Panel AppleTalk Current AppleTalk settings. HEAD LOT NUMBER Printhead lot number. Phase Type Name* Network Number* Zone* *: Blank if the status has been saved by using Status Monitor. LOT R,L PARTS STATUS COUNTER A-V Utilization status of the cutter, media, and other items (indicating how much they have been used). 70 Printer Parts COUNTER CUTTER MEDIA MEDIA1-7 NAME TTL ROLL CUTSHEET AFTER INSTALLATION Utilization status of replacement parts that require servicing.

User Manual for Windows
Page 773
... by the ends of the cut position before it again rmly. Other problems Other problems The printer consumes a lot of ink Cause Many full-page color images are lled with color. A message to the extent possible. The blade of the Cutter Unit is bent or curled at the... rst-time use after you are troubleshooting Printhead problems, we recommend not performing Head Cleaning B , to check the ...
... by the ends of the cut position before it again rmly. Other problems Other problems The printer consumes a lot of ink Cause Many full-page color images are lled with color. A message to the extent possible. The blade of the Cutter Unit is bent or curled at the... rst-time use after you are troubleshooting Printhead problems, we recommend not performing Head Cleaning B , to check the ...


