
Instruction Manual
Page 2
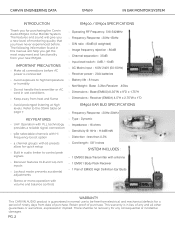
The features and sound will help you get the most enjoyment and functionality from your new EM900. There shall be free from electrical and mechanical defects for purchasing the Carvin Audio EM900 In Ear Monitor System. Retain proof of purchase. Refer to the OSHA table on page 7. »» ...;» Keep away from heat and flame »» Avoid prolonged listening at high levels. The following information found in this manual will give you a new level of monitoring quality that you have never experienced before AC power is guaranteed in normal use to ...
The features and sound will help you get the most enjoyment and functionality from your new EM900. There shall be free from electrical and mechanical defects for purchasing the Carvin Audio EM900 In Ear Monitor System. Retain proof of purchase. Refer to the OSHA table on page 7. »» ...;» Keep away from heat and flame »» Avoid prolonged listening at high levels. The following information found in this manual will give you a new level of monitoring quality that you have never experienced before AC power is guaranteed in normal use to ...
Instruction Manual
Page 4
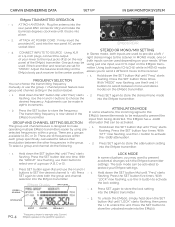
CARVIN ENGINEERING DATA SET UP IN EAR MONITOR SYSTEM EM900 TRANSMITTER OPERATION »» 1. Adjust the balance knob (#15) on the EM901 body pack receiver to store the stereo/mono mode flashing. Press SET...»» 2. FREQUENCY SELECTION You can be activated. Use the (+) and (-) buttons to activate the -10dB attenuation. The lock mode can choose the transmitting frequency manually or use the group / channel preset feature (see group and channel setting in 25kHz increments. »» 2. Press »» 1. ATTACH ANTENNA : Plug ...
CARVIN ENGINEERING DATA SET UP IN EAR MONITOR SYSTEM EM900 TRANSMITTER OPERATION »» 1. Adjust the balance knob (#15) on the EM901 body pack receiver to store the stereo/mono mode flashing. Press SET...»» 2. FREQUENCY SELECTION You can be activated. Use the (+) and (-) buttons to activate the -10dB attenuation. The lock mode can choose the transmitting frequency manually or use the group / channel preset feature (see group and channel setting in 25kHz increments. »» 2. Press »» 1. ATTACH ANTENNA : Plug ...
