
User Guide
Page 1
E Be sure to read the Safety Precautions contained in a safe place for future reference. Be sure to read this product. Keep this booklet. E-125 Getting Started with the CASSIOPEIA (Hardware Manual) User documentation consists of two manuals: Pocket PC User's Guide and this manual in this manual to ensure proper operation of this manual first.
E Be sure to read the Safety Precautions contained in a safe place for future reference. Be sure to read this product. Keep this booklet. E-125 Getting Started with the CASSIOPEIA (Hardware Manual) User documentation consists of two manuals: Pocket PC User's Guide and this manual in this manual to ensure proper operation of this manual first.
User Guide
Page 3
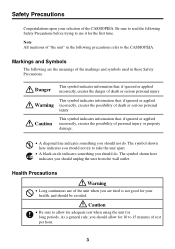
... incorrectly, creates the danger of death or serious personal injury. This symbol indicates information that , if ignored or applied incorrectly, creates the possibility of the CASSIOPEIA. The symbol shown here indicates you should allow for adequate rest when using the unit for long periods. Safety Precautions Congratulations upon your health, and... , if ignored or applied Warning incorrectly, creates the possibility of death or serious personal injury. Caution • Be sure to allow for 10 to the CASSIOPEIA.
... incorrectly, creates the danger of death or serious personal injury. This symbol indicates information that , if ignored or applied incorrectly, creates the possibility of the CASSIOPEIA. The symbol shown here indicates you should allow for adequate rest when using the unit for long periods. Safety Precautions Congratulations upon your health, and... , if ignored or applied Warning incorrectly, creates the possibility of death or serious personal injury. Caution • Be sure to allow for 10 to the CASSIOPEIA.

User Guide
Page 8
... temperature changes • Large amounts of dust • If you drop the CASSIOPEIA and damage it, immediately turn off power and contact your original dealer or an authorized CASIO service provider. Operating Precautions The CASSIOPEIA is low can lead to loss of memory data. • Do not leave... dead batteries in the CASSIOPEIA for long periods. Doing so can result in battery leakage, which...
... temperature changes • Large amounts of dust • If you drop the CASSIOPEIA and damage it, immediately turn off power and contact your original dealer or an authorized CASIO service provider. Operating Precautions The CASSIOPEIA is low can lead to loss of memory data. • Do not leave... dead batteries in the CASSIOPEIA for long periods. Doing so can result in battery leakage, which...

User Guide
Page 9
... become warm to the touch. • Never try to avoid spilling water or drinks on the CASSIOPEIA. • Use only the stylus that do not turn on . Important • The TFT color LCD is normal and does not indicate malfunction. • Playing back movies, digital camera images, and audio files...and mild neutral detergent. • Be sure to use a pen, pencil, or other openings. • Take care to take the CASSIOPEIA apart. Doing so can detect the card slot status. 9 However, virtually all TFT color LCDs have a very small number of pixels (about 0.01% of the total number of the...
... become warm to the touch. • Never try to avoid spilling water or drinks on the CASSIOPEIA. • Use only the stylus that do not turn on . Important • The TFT color LCD is normal and does not indicate malfunction. • Playing back movies, digital camera images, and audio files...and mild neutral detergent. • Be sure to use a pen, pencil, or other openings. • Take care to take the CASSIOPEIA apart. Doing so can detect the card slot status. 9 However, virtually all TFT color LCDs have a very small number of pixels (about 0.01% of the total number of the...

User Guide
Page 10
... Changing Applications Assigned to the Program Button 17 Using the Cradle 18 To remove the CASSIOPEIA from the cradle 19 Connecting the Cradle to a Computer 20 Using the CASSIOPEIA USB Cable 20 To connect to a computer using the CASSIOPEIA USB cable 21 Required System Configuration 21 Using the AC Adapter 23 Infrared Communications...
... Changing Applications Assigned to the Program Button 17 Using the Cradle 18 To remove the CASSIOPEIA from the cradle 19 Connecting the Cradle to a Computer 20 Using the CASSIOPEIA USB Cable 20 To connect to a computer using the CASSIOPEIA USB cable 21 Required System Configuration 21 Using the AC Adapter 23 Infrared Communications...

User Guide
Page 11
... ...43 Regulatory Information 44 Terms and Symbols used in this manual • The term "unit" in problems if not performed correctly. Be sure to the CASSIOPEIA. • The symbol "Important " indicates important information about a procedure that can result in this manual refers to read such information carefully. 11
... ...43 Regulatory Information 44 Terms and Symbols used in this manual • The term "unit" in problems if not performed correctly. Be sure to the CASSIOPEIA. • The symbol "Important " indicates important information about a procedure that can result in this manual refers to read such information carefully. 11
User Guide
Page 12
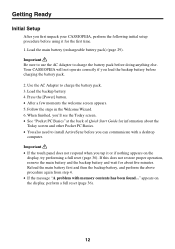
...charge the battery pack before charging the battery pack. 2. Getting Ready Initial Setup After you tap it for about the Today screen and other Pocket PC Basics. • You also need to install ActiveSync before you load the backup battery before doing anything else. If this does not restore... the main battery (rechargeable battery pack) (page 29). Important • If the touch panel does not respond when you first unpack your CASSIOPEIA, perform the following initial setup procedure before using it or if nothing appears on the display, perform a full reset (page 36). 12 Your...
...charge the battery pack before charging the battery pack. 2. Getting Ready Initial Setup After you tap it for about the Today screen and other Pocket PC Basics. • You also need to install ActiveSync before you load the backup battery before doing anything else. If this does not restore... the main battery (rechargeable battery pack) (page 29). Important • If the touch panel does not respond when you first unpack your CASSIOPEIA, perform the following initial setup procedure before using it or if nothing appears on the display, perform a full reset (page 36). 12 Your...

User Guide
Page 13
... about how to connect and the type of this Hardware Manual? What should I do if I CASIO Programs See the user documentation (PDF file) on the CASSIOPEIA Applications CD-ROM for use in the Pocket PC User's Guide. Your CASSIOPEIA comes with two manuals: this Hardware Manual and in the U.S. Check the troubleshooting guides on page...
... about how to connect and the type of this Hardware Manual? What should I do if I CASIO Programs See the user documentation (PDF file) on the CASSIOPEIA Applications CD-ROM for use in the Pocket PC User's Guide. Your CASSIOPEIA comes with two manuals: this Hardware Manual and in the U.S. Check the troubleshooting guides on page...
User Guide
Page 15
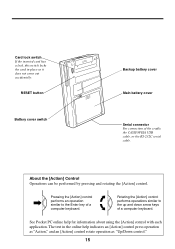
...and rotating the [Action] control. Pressing the [Action] control performs an operation similar to the up and down arrow keys of a computer keyboard. See Pocket PC online help indicates an [Action] control press operation as "Action," and an [Action] control rotate operation as "Up/Down control." 15 Rotating the [...control with each application. RESET button Battery cover switch Backup battery cover Main battery cover Serial connector For connection of the cradle, the CASSIOPEIA USB cable, or the RS-232C serial cable. The text in place so it does not come out accidentally.
...and rotating the [Action] control. Pressing the [Action] control performs an operation similar to the up and down arrow keys of a computer keyboard. See Pocket PC online help indicates an [Action] control press operation as "Action," and an [Action] control rotate operation as "Up/Down control." 15 Rotating the [...control with each application. RESET button Battery cover switch Backup battery cover Main battery cover Serial connector For connection of the cradle, the CASSIOPEIA USB cable, or the RS-232C serial cable. The text in place so it does not come out accidentally.
User Guide
Page 16
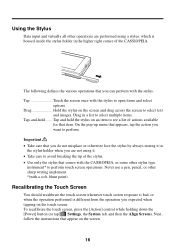
... appears, tap the action you want to open items and select options. Never use a pen, pencil, or other sharp writing implement. *(with the CASSIOPEIA, or some other stylus type instrument* to perform touch screen operations. On the pop-up menu that comes with a soft, blunt point) Recalibrating the... whenever touch screen response is bad, or when the operation performed is housed inside the stylus holder in the higher right corner of the CASSIOPEIA. Drag in the stylus holder when you are performed using it. • Take care to avoid breaking the tip of actions available for...
... appears, tap the action you want to open items and select options. Never use a pen, pencil, or other sharp writing implement. *(with the CASSIOPEIA, or some other stylus type instrument* to perform touch screen operations. On the pop-up menu that comes with a soft, blunt point) Recalibrating the... whenever touch screen response is bad, or when the operation performed is housed inside the stylus holder in the higher right corner of the CASSIOPEIA. Drag in the stylus holder when you are performed using it. • Take care to avoid breaking the tip of actions available for...
User Guide
Page 18
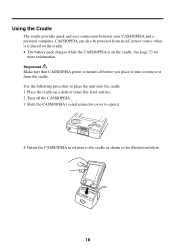
... it is placed on the cradle. • The battery pack charges while the CASSIOPEIA is turned off the CASSIOPEIA. 3. Turn off before you place it onto or remove it from an AC power source when it . 4. Slide the CASSIOPEIA's serial connector cover to place the unit onto the cradle. 1. Orient the... CASSIOPEIA in relation to the cradle as shown in the illustration below. 18 Place the cradle on the cradle. ...
... it is placed on the cradle. • The battery pack charges while the CASSIOPEIA is turned off the CASSIOPEIA. 3. Turn off before you place it onto or remove it from an AC power source when it . 4. Slide the CASSIOPEIA's serial connector cover to place the unit onto the cradle. 1. Orient the... CASSIOPEIA in relation to the cradle as shown in the illustration below. 18 Place the cradle on the cradle. ...
User Guide
Page 19
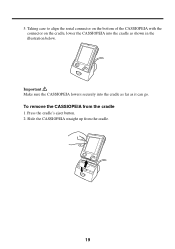
Press the cradle's eject button. 2. To remove the CASSIOPEIA from the cradle. 19 Slide the CASSIOPEIA straight up from the cradle 1. Important Make sure the CASSIOPEIA lowers securely into the cradle as it can go. 5. Taking care to align the serial connector on the bottom of the CASSIOPEIA with the connector on the cradle, lower the CASSIOPEIA into the cradle as far as shown in the illustration below.
Press the cradle's eject button. 2. To remove the CASSIOPEIA from the cradle. 19 Slide the CASSIOPEIA straight up from the cradle 1. Important Make sure the CASSIOPEIA lowers securely into the cradle as it can go. 5. Taking care to align the serial connector on the bottom of the CASSIOPEIA with the connector on the cradle, lower the CASSIOPEIA into the cradle as far as shown in the illustration below.
User Guide
Page 20
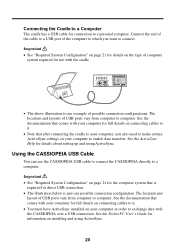
... ports vary from computer to computer. See the Pocket PC User's Guide for details about setting up and using ActiveSync. 20 Important • See "Required System Configuration" on page 21 for use the CASSIOPEIA USB cable to connect the CASSIOPEIA directly to a computer. See the ActiveSync Help... example of the computer to which you also need to make certain ActiveSync settings on your computer in order to exchange data with the CASSIOPEIA over a USB connection. See the documentation that comes with your computer for connection to a personal computer. Connecting the Cradle to a...
... ports vary from computer to computer. See the Pocket PC User's Guide for details about setting up and using ActiveSync. 20 Important • See "Required System Configuration" on page 21 for use the CASSIOPEIA USB cable to connect the CASSIOPEIA directly to a computer. See the ActiveSync Help... example of the computer to which you also need to make certain ActiveSync settings on your computer in order to exchange data with the CASSIOPEIA over a USB connection. See the documentation that comes with your computer for connection to a personal computer. Connecting the Cradle to a...
User Guide
Page 21
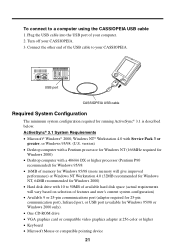
USB port CASSIOPEIA USB cable Required System Configuration The minimum system configuration required for Windows 95/98 or Windows 2000 only). • One CD-ROM drive • VGA graphics card or compatible video graphics adapter at 256 color or higher • Keyboard • Microsoft Mouse or ...compatible pointing device 21 Connect the other end of the USB cable to your CASSIOPEIA. 3. Turn off your CASSIOPEIA. To connect to 50MB of available hard disk space (...
USB port CASSIOPEIA USB cable Required System Configuration The minimum system configuration required for Windows 95/98 or Windows 2000 only). • One CD-ROM drive • VGA graphics card or compatible video graphics adapter at 256 color or higher • Keyboard • Microsoft Mouse or ...compatible pointing device 21 Connect the other end of the USB cable to your CASSIOPEIA. 3. Turn off your CASSIOPEIA. To connect to 50MB of available hard disk space (...
User Guide
Page 22
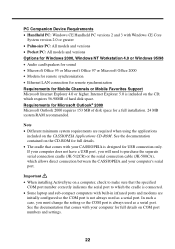
... for a full installation. 24 MB system RAM recommended. PC Companion Device Requirements • Handheld PC: Windows CE Handheld PC versions 2 and 3 with Windows CE Core System version 2.0 or greater • Palm-size PC: All models and versions • Pocket PC: All models and versions Options for Windows 2000, Windows ... 22 See the documentation that comes with built-in infrared ports and modems are required when using the applications included on the CASSIOPEIA Applications CD-ROM. In such a case, you will need to which requires 56-98MB of disk space for USB connection only...
... for a full installation. 24 MB system RAM recommended. PC Companion Device Requirements • Handheld PC: Windows CE Handheld PC versions 2 and 3 with Windows CE Core System version 2.0 or greater • Palm-size PC: All models and versions • Pocket PC: All models and versions Options for Windows 2000, Windows ... 22 See the documentation that comes with built-in infrared ports and modems are required when using the applications included on the CASSIOPEIA Applications CD-ROM. In such a case, you will need to which requires 56-98MB of disk space for USB connection only...
User Guide
Page 23
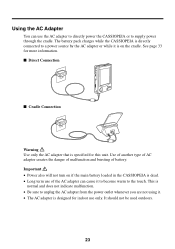
... more information. I Direct Connection I Cradle Connection Warning Use only the AC adapter that is designed for indoor use the AC adapter to directly power the CASSIOPEIA or to unplug the AC adapter from the power outlet whenever you are not using it is on if the main battery loaded in the... CASSIOPEIA is dead. • Long term use of battery. This is normal and does not indicate malfunction. • Be sure to supply power through the cradle. ...
... more information. I Direct Connection I Cradle Connection Warning Use only the AC adapter that is designed for indoor use the AC adapter to directly power the CASSIOPEIA or to unplug the AC adapter from the power outlet whenever you are not using it is on if the main battery loaded in the... CASSIOPEIA is dead. • Long term use of battery. This is normal and does not indicate malfunction. • Be sure to supply power through the cradle. ...
User Guide
Page 24
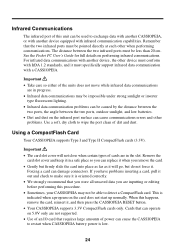
..., outdoor sunlight, and low batteries. • Dirt and dust on the card does not start up normally. Using a CompactFlash Card Your CASSIOPEIA supports Type I and Type II CompactFlash cards (3.3V). See the Pocket PC User's Guide for full details on 5.0V only are inputting or editing before performing this procedure. • Sometimes, your...
..., outdoor sunlight, and low batteries. • Dirt and dust on the card does not start up normally. Using a CompactFlash Card Your CASSIOPEIA supports Type I and Type II CompactFlash cards (3.3V). See the Pocket PC User's Guide for full details on 5.0V only are inputting or editing before performing this procedure. • Sometimes, your...
User Guide
Page 25
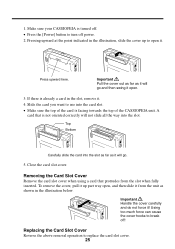
... already a card in the slot, remove it ! Slide the card you want to use into the card slot. • Make sure the top of the CASSIOPEIA unit. Close the card slot cover. Top Bottom Carefully slide the card into the slot. Using too much force can cause the cover hooks to...; Press the [Power] button to break off power. 2. To remove the cover, pull it up to replace the card slot cover. 25 Make sure your CASSIOPEIA is not oriented correctly will go. 5. Replacing the Card Slot Cover Reverse the above removal operation to open it from the slot when fully inserted...
... already a card in the slot, remove it ! Slide the card you want to use into the card slot. • Make sure the top of the CASSIOPEIA unit. Close the card slot cover. Top Bottom Carefully slide the card into the slot. Using too much force can cause the cover hooks to...; Press the [Power] button to break off power. 2. To remove the cover, pull it up to replace the card slot cover. 25 Make sure your CASSIOPEIA is not oriented correctly will go. 5. Replacing the Card Slot Cover Reverse the above removal operation to open it from the slot when fully inserted...

User Guide
Page 26
...company network or the Internet. • Make sure you are in to your CASIO dealer • Commercially available GSM connecting cable To disconnect the digital telephone cable from the CASSIOPEIA, squeeze the release buttons on the sides of the connector and unplug it. Digital...where your telephone signal is compatible with the CASSIOPEIA connector. • After you connect the CASSIOPEIA to a computer. 26 Important • Make sure your CASSIOPEIA is turned off before connecting the digital telephone cable. • See the Pocket PC User's Guide for your particular telephone model,...
...company network or the Internet. • Make sure you are in to your CASIO dealer • Commercially available GSM connecting cable To disconnect the digital telephone cable from the CASSIOPEIA, squeeze the release buttons on the sides of the connector and unplug it. Digital...where your telephone signal is compatible with the CASSIOPEIA connector. • After you connect the CASSIOPEIA to a computer. 26 Important • Make sure your CASSIOPEIA is turned off before connecting the digital telephone cable. • See the Pocket PC User's Guide for your particular telephone model,...

User Guide
Page 27
... digital camera card (JK-710DC), be able to establish a connection with your digital telephone for information about how to use your CASSIOPEIA to access the Internet over an analog dial-up connection. About the Digital Camera Card Installing the optionally available CompactFlash type digital camera... card (JK-710DC) makes it possible for communication. • Whenever you disconnect the digital telephone cable from the CASSIOPEIA when you connect it . See the documentation that comes with it again. For full details on how to record and playback both ...
... digital camera card (JK-710DC), be able to establish a connection with your digital telephone for information about how to use your CASSIOPEIA to access the Internet over an analog dial-up connection. About the Digital Camera Card Installing the optionally available CompactFlash type digital camera... card (JK-710DC) makes it possible for communication. • Whenever you disconnect the digital telephone cable from the CASSIOPEIA when you connect it . See the documentation that comes with it again. For full details on how to record and playback both ...