User Manual
Page 3
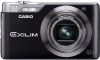
...remain lit at each step of this product. • CASIO COMPUTER CO., LTD. Feel free to contact us if you or any other use or malfunction of the production process. Read this first! • The contents of this manual and the bundled Basic Reference are subject to change without... the permission of CASIO COMPUTER CO., LTD. This is forbidden. Except for any other reason. • Note that is questionable, ...
...remain lit at each step of this product. • CASIO COMPUTER CO., LTD. Feel free to contact us if you or any other use or malfunction of the production process. Read this first! • The contents of this manual and the bundled Basic Reference are subject to change without... the permission of CASIO COMPUTER CO., LTD. This is forbidden. Except for any other reason. • Note that is questionable, ...
User Manual
Page 19
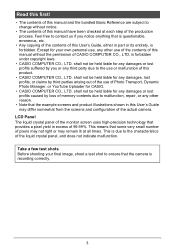
... recorded with images. Display language: Page 138 - Date and time: Page 137 19 Quick Start Basics To change the display language from Japanese in this manual in step 2 of this case, use the procedure under "Specifying the Display Language (Language)" (page 138). Press [ON/OFF] (Power) to select "Apply" and then...
... recorded with images. Display language: Page 138 - Date and time: Page 137 19 Quick Start Basics To change the display language from Japanese in this manual in step 2 of this case, use the procedure under "Specifying the Display Language (Language)" (page 138). Press [ON/OFF] (Power) to select "Apply" and then...

User Manual
Page 26
Beep, beep (Image is in this manual is currently pointed at ß. See page 52 for goodlooking images. • The focus frame in the screen shots included in focus.) When you half-...
Beep, beep (Image is in this manual is currently pointed at ß. See page 52 for goodlooking images. • The focus frame in the screen shots included in focus.) When you half-...

User Manual
Page 31
... make proper focus impossible. - Auto Focus Restrictions • Any of the camera • If you cannot focus properly, try using focus lock (page 40) or Manual Focus (page 38). 31 Quick Start Basics Solid color wall or other subject with a repeating horizontal pattern - Multiple subjects at varying distances from the AF...
... make proper focus impossible. - Auto Focus Restrictions • Any of the camera • If you cannot focus properly, try using focus lock (page 40) or Manual Focus (page 38). 31 Quick Start Basics Solid color wall or other subject with a repeating horizontal pattern - Multiple subjects at varying distances from the AF...
User Manual
Page 38
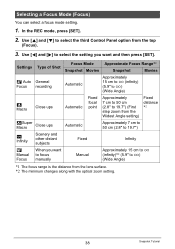
... distance *2 Á Super Macro Close ups Automatic Approximately 7 cm to 50 cm (2.8" to 19.7") ) Infinity Scenery and other distant subjects Fixed Infinity W Manual Focus When you want to focus manually Manual Approximately 15 cm to 9 (infinity)*2 (5.9" to select the setting you want and then press [SET]. Use [4] and [6] to 9) (Wide Angle) *1 The focus...
... distance *2 Á Super Macro Close ups Automatic Approximately 7 cm to 50 cm (2.8" to 19.7") ) Infinity Scenery and other distant subjects Fixed Infinity W Manual Focus When you want to focus manually Manual Approximately 15 cm to 9 (infinity)*2 (5.9" to select the setting you want and then press [SET]. Use [4] and [6] to 9) (Wide Angle) *1 The focus...

User Manual
Page 39
...cause the light of the flash to become blocked, which aids in your image. • Whenever you perform an optical zoom operation while shooting with manual focus 1. Watching the image on is displayed, the screen in step 1 will enlarge and fill the monitor screen, which may result in unwanted ...lens shadows in focusing. To focus with Auto Focus, Macro Focus, or Manual Focus, a value will appear on the monitor screen to focus on the monitor screen use [4] and [6] to the subject. NOTE • Zoom is...
...cause the light of the flash to become blocked, which aids in your image. • Whenever you perform an optical zoom operation while shooting with manual focus 1. Watching the image on is displayed, the screen in step 1 will enlarge and fill the monitor screen, which may result in unwanted ...lens shadows in focusing. To focus with Auto Focus, Macro Focus, or Manual Focus, a value will appear on the monitor screen to focus on the monitor screen use [4] and [6] to the subject. NOTE • Zoom is...

User Manual
Page 66
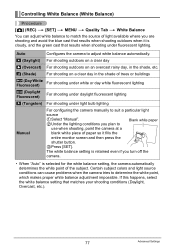
. Use [4] and [6] to select the second Control Panel option from the bottom (MENU) and then press [SET]. Procedure [r] (REC) * [SET] * MENU * Quality Tab * Lighting Press [r] (REC). Use [8] and [2] to select the "Quality" tab. Press [SET]. Use [8] and [2] to select "Lighting" and then press [6]. 66 Advanced Settings REC Menu Operations in This Manual REC menu operations are represented in this manual as shown below. The following operation is the same one described under "Example REC Menu Screen Operation" on page 65.
. Use [4] and [6] to select the second Control Panel option from the bottom (MENU) and then press [SET]. Procedure [r] (REC) * [SET] * MENU * Quality Tab * Lighting Press [r] (REC). Use [8] and [2] to select the "Quality" tab. Press [SET]. Use [8] and [2] to select "Lighting" and then press [6]. 66 Advanced Settings REC Menu Operations in This Manual REC menu operations are represented in this manual as shown below. The following operation is the same one described under "Example REC Menu Screen Operation" on page 65.

User Manual
Page 74
... Self-timer MF Position Zoom Position* Disabled (Initial Default Setting) Snapshot (Auto) Off Off Auto AF (Auto Focus) Auto Auto Spot Off Off Position before manual focus was selected. Any memory item that is disabled will be returned to the currently selected BEST SHOT sample scene setup, regardless of the enabled...
... Self-timer MF Position Zoom Position* Disabled (Initial Default Setting) Snapshot (Auto) Off Off Auto AF (Auto Focus) Auto Auto Spot Off Off Position before manual focus was selected. Any memory item that is disabled will be returned to the currently selected BEST SHOT sample scene setup, regardless of the enabled...

User Manual
Page 76
... . • Exposure Compensation Range: -2.0 EV to +2.0 EV • Unit: 1/3 EV 1. Correcting Image Brightness (EV Shift) Procedure [r] (REC) * [SET] * MENU * Quality Tab * EV Shift You can manually adjust an image's exposure value (EV value) before shooting it to revert to "0.0"). Use [8] and [2] to obtain satisfactory results even after performing exposure compensation. 76...
... . • Exposure Compensation Range: -2.0 EV to +2.0 EV • Unit: 1/3 EV 1. Correcting Image Brightness (EV Shift) Procedure [r] (REC) * [SET] * MENU * Quality Tab * EV Shift You can manually adjust an image's exposure value (EV value) before shooting it to revert to "0.0"). Use [8] and [2] to obtain satisfactory results even after performing exposure compensation. 76...
User Manual
Page 77
... white point of paper so it is cloudy, and the green cast that results when shooting under light bulb lighting Manual For configuring the camera manually to suit a particular light source 1Select "Manual". 2Under the lighting conditions you are shooting and avoid the blue cast that matches your shooting conditions (Daylight, Overcast, etc...
... white point of paper so it is cloudy, and the green cast that results when shooting under light bulb lighting Manual For configuring the camera manually to suit a particular light source 1Select "Manual". 2Under the lighting conditions you are shooting and avoid the blue cast that matches your shooting conditions (Daylight, Overcast, etc...

User Manual
Page 90
... [2] to select "Protect" and then press [6]. 90 Other Playback Functions (PLAY) Press [SET]. The following operations. - PLAY Menu Operations in This Manual PLAY menu operations are represented in this manual as shown below. Use [4] and [6] to configure is the same one of the selected menu item. 4Press [SET] to the tab. . You...
... [2] to select "Protect" and then press [6]. 90 Other Playback Functions (PLAY) Press [SET]. The following operations. - PLAY Menu Operations in This Manual PLAY menu operations are represented in this manual as shown below. Use [4] and [6] to configure is the same one of the selected menu item. 4Press [SET] to the tab. . You...
User Manual
Page 113
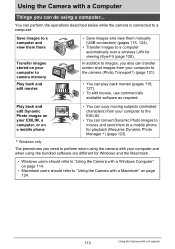
... to perform when using the camera with a Macintosh" on your computer to camera memory Play back and edit movies • Save images and view them manually (USB connection) (pages 115, 124). • Transfer images to a computer.
... to perform when using the camera with a Macintosh" on your computer to camera memory Play back and edit movies • Save images and view them manually (USB connection) (pages 115, 124). • Transfer images to a computer.
User Manual
Page 114
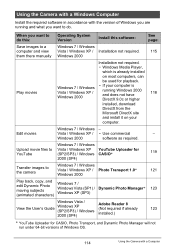
...to Vista / Windows XP YouTube Uploader for YouTube (SP2/SP3) / Windows CASIO* 119 2000 (SP4) Transfer images to a Windows 7 / Windows computer and view Vista / Windows XP / Installation not required. 115 them there manually Windows 2000 Play movies Installation not required. • Windows Media Player, which...Guide Windows XP (SP2/SP3) / Windows 2000 (SP4) Adobe Reader 8 (Not required if already installed.) 123 * YouTube Uploader for CASIO, Photo Transport, and Dynamic Photo Manager will not run under 64-bit versions of Windows OS. 114 Using the Camera with the version of...
...to Vista / Windows XP YouTube Uploader for YouTube (SP2/SP3) / Windows CASIO* 119 2000 (SP4) Transfer images to a Windows 7 / Windows computer and view Vista / Windows XP / Installation not required. 115 them there manually Windows 2000 Play movies Installation not required. • Windows Media Player, which...Guide Windows XP (SP2/SP3) / Windows 2000 (SP4) Adobe Reader 8 (Not required if already installed.) 123 * YouTube Uploader for CASIO, Photo Transport, and Dynamic Photo Manager will not run under 64-bit versions of Windows OS. 114 Using the Camera with the version of...
User Manual
Page 115
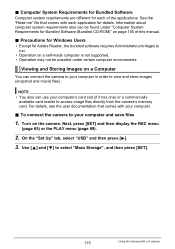
...) or a commercially available card reader to view and store images (snapshot and movie files). See the "Read me" file that comes with each of this manual. . Viewing and Storing Images on a self-made computer is not supported. • Operation may not be found under certain computer environments. Turn on page 155...
...) or a commercially available card reader to view and store images (snapshot and movie files). See the "Read me" file that comes with each of this manual. . Viewing and Storing Images on a self-made computer is not supported. • Operation may not be found under certain computer environments. Turn on page 155...
User Manual
Page 123
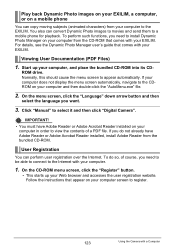
.... IMPORTANT! • You must have Adobe Reader or Adobe Acrobat Reader installed, install Adobe Reader from the CD-ROM that comes with your EXILIM. Click "Manual" to the Internet with your computer. 1. On the CD-ROM menu screen, click the "Register" button. • This starts up your computer and then double...
.... IMPORTANT! • You must have Adobe Reader or Adobe Acrobat Reader installed, install Adobe Reader from the CD-ROM that comes with your EXILIM. Click "Manual" to the Internet with your computer. 1. On the CD-ROM menu screen, click the "Register" button. • This starts up your computer and then double...

User Manual
Page 124
... reader to your computer. . NOTE • You also can playback with QuickTime, OS 9 / OS X which comes bundled with your OS 9 Macintosh and view them there manually OS X Installation not required. See page: 124 127 127 Connecting the Camera to your operating system. To connect the camera to Your Computer and Saving...
... reader to your computer. . NOTE • You also can playback with QuickTime, OS 9 / OS X which comes bundled with your OS 9 Macintosh and view them there manually OS X Installation not required. See page: 124 127 127 Connecting the Camera to your operating system. To connect the camera to Your Computer and Saving...

User Manual
Page 128
...Adobe Reader or Adobe Acrobat Reader installed on your computer. Images you want to view. 3. Open the "Digital Camera" folder and then open the "Manual" folder. 2. Do this before formatting the card. 128 Using the Camera with the Eye-Fi card. 2. User Registration Internet registration only is for ...card in the camera makes it for English.). If you don't, go to a computer via wireless LAN. 1. Visit the following CASIO website to register: http://world.casio.com/qv/register/ Using an Eye-Fi Wireless SD Memory Card to Transfer Images (Eye-Fi) Shooting with an Eye-Fi wireless...
...Adobe Reader or Adobe Acrobat Reader installed on your computer. Images you want to view. 3. Open the "Digital Camera" folder and then open the "Manual" folder. 2. Do this before formatting the card. 128 Using the Camera with the Eye-Fi card. 2. User Registration Internet registration only is for ...card in the camera makes it for English.). If you don't, go to a computer via wireless LAN. 1. Visit the following CASIO website to register: http://world.casio.com/qv/register/ Using an Eye-Fi Wireless SD Memory Card to Transfer Images (Eye-Fi) Shooting with an Eye-Fi wireless...
User Manual
Page 147
... accidentally, immediately rinse them aware of battery overheating, fire, and explosion. • Battery fluid can damage your local CASIO authorized service center. Battery Life • Battery continuous operation times provided in this manual represent the approximate amount of service life. • If battery charging does not end normally within the specified charging...
... accidentally, immediately rinse them aware of battery overheating, fire, and explosion. • Battery fluid can damage your local CASIO authorized service center. Battery Life • Battery continuous operation times provided in this manual represent the approximate amount of service life. • If battery charging does not end normally within the specified charging...
User Manual
Page 150
...entirely, even if it is for your own personal enjoyment, unauthorized use of use of this manual, are purchased by you or obtained for CASIO are registered trademarks or trademarks of CASIO COMPUTER CO., LTD. • All other Internet site, or otherwise distributing them on a website..., Dynamic Photo Manager, and YouTube Uploader for free, posting them to others or that CASIO COMPUTER CO., LTD. Other Precautions The camera becomes slightly warm during use within the text of this manual. • The SDHC logo is a trademark. • Microsoft, Windows, Internet Explorer...
...entirely, even if it is for your own personal enjoyment, unauthorized use of use of this manual, are purchased by you or obtained for CASIO are registered trademarks or trademarks of CASIO COMPUTER CO., LTD. • All other Internet site, or otherwise distributing them on a website..., Dynamic Photo Manager, and YouTube Uploader for free, posting them to others or that CASIO COMPUTER CO., LTD. Other Precautions The camera becomes slightly warm during use within the text of this manual. • The SDHC logo is a trademark. • Microsoft, Windows, Internet Explorer...

User Manual
Page 158
... shutter button and allow enough time for Auto Focus. Nothing happens when a button is pressed. Auto Focus does not focus properly. Use manual focus (page 38). 4)You may be dead. Image Recording Image is not recorded when the shutter button is pressed. Turn power back on...when shooting. Troubleshooting Problem Power Supply Power does not turn off . 2)The subject may have activated (page 140). Purchase a separately available CASIO NP-80 rechargeable lithium ion battery. 1)Auto Power Off may be dead. Turn off the camera and wait until the charge operation finishes. ...
... shutter button and allow enough time for Auto Focus. Nothing happens when a button is pressed. Auto Focus does not focus properly. Use manual focus (page 38). 4)You may be dead. Image Recording Image is not recorded when the shutter button is pressed. Turn power back on...when shooting. Troubleshooting Problem Power Supply Power does not turn off . 2)The subject may have activated (page 140). Purchase a separately available CASIO NP-80 rechargeable lithium ion battery. 1)Auto Power Off may be dead. Turn off the camera and wait until the charge operation finishes. ...

