
Owners Manual
Page 7
...the camera 146 Managing Document Data on the Camera 148 ❚ Protecting Document Data 148 ❚ Deleting Document Data 148 ❚❙ Other Settings (Set Up) 150 REC Mode Control Panel Display R Panel) . 150 Selecting a PLAY Mode Screen Layout P Display) . 151 Adjusting Monitor Screen Brightness Screen) . 152 Turning off Eye-Fi Card Communication Eye-Fi) . 152 Configuring Camera Sound Settings Sounds) . 153 Configuring a Startup Image Startup) . 153 Specifying the File Name Serial Number Generation Rule . . . . . (File No.) . 154 Configuring World Time Settings World...
...the camera 146 Managing Document Data on the Camera 148 ❚ Protecting Document Data 148 ❚ Deleting Document Data 148 ❚❙ Other Settings (Set Up) 150 REC Mode Control Panel Display R Panel) . 150 Selecting a PLAY Mode Screen Layout P Display) . 151 Adjusting Monitor Screen Brightness Screen) . 152 Turning off Eye-Fi Card Communication Eye-Fi) . 152 Configuring Camera Sound Settings Sounds) . 153 Configuring a Startup Image Startup) . 153 Specifying the File Name Serial Number Generation Rule . . . . . (File No.) . 154 Configuring World Time Settings World...
Owners Manual
Page 8
Time Stamping Snapshots Timestamp) . 156 Setting the Camera's Clock Adjust) . 156 Specifying the Date Style Date Style) . 157 Specifying the Display Language Language) . 157 Specifying the Initial Data Mode Screen DATA View) . 158 Configuring Sleep State Settings Sleep) . 158 Configuring Auto Power Settings Auto Power Off) . 159 Configuring [r] and [p] Settings REC/PLAY) . 159 Configuring USB Protocol Settings USB) . 160 Selecting the Screen Aspect Ratio and Video Output System Video Out) . 160 Formatting Built-in Memory or a Memory Card Format) . 161 Resetting the Camera to Factory...
Time Stamping Snapshots Timestamp) . 156 Setting the Camera's Clock Adjust) . 156 Specifying the Date Style Date Style) . 157 Specifying the Display Language Language) . 157 Specifying the Initial Data Mode Screen DATA View) . 158 Configuring Sleep State Settings Sleep) . 158 Configuring Auto Power Settings Auto Power Off) . 159 Configuring [r] and [p] Settings REC/PLAY) . 159 Configuring USB Protocol Settings USB) . 160 Selecting the Screen Aspect Ratio and Video Output System Video Out) . 160 Formatting Built-in Memory or a Memory Card Format) . 161 Resetting the Camera to Factory...

Owners Manual
Page 19
... format, press [BS] (^). 5. Use [8], [2], [4], and [6] to select the language you load a battery into the camera, a screen appears for configuring the display language, date, and time settings. Configuring Basic Settings the First Time You Turn On the Camera The first time you want to change and then use [4] and [6] to turn on the camera. [ON/OFF] 2. After setting the date and time, use [8] and [2] to change it. Set the date and the time. Use [8] and [2] to be recorded with images. 1. Failure to set...
... format, press [BS] (^). 5. Use [8], [2], [4], and [6] to select the language you load a battery into the camera, a screen appears for configuring the display language, date, and time settings. Configuring Basic Settings the First Time You Turn On the Camera The first time you want to change and then use [4] and [6] to turn on the camera. [ON/OFF] 2. After setting the date and time, use [8] and [2] to change it. Set the date and the time. Use [8] and [2] to be recorded with images. 1. Failure to set...
Owners Manual
Page 29
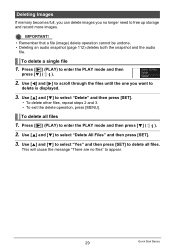
... [p] (PLAY) to appear. 29 Quick Start Basics This will cause the message "There are no longer need to delete is displayed. 3. To delete all files. IMPORTANT! • Remember that a file (image) delete operation cannot be undone. • Deleting an audio snapshot (page 112) deletes both the snapshot and the audio file. Use [8] and [2] to enter the PLAY mode and then press [2] ( ). 2. Press [p] (PLAY) to select "Delete" and then press [SET]. • To delete other files...
... [p] (PLAY) to appear. 29 Quick Start Basics This will cause the message "There are no longer need to delete is displayed. 3. To delete all files. IMPORTANT! • Remember that a file (image) delete operation cannot be undone. • Deleting an audio snapshot (page 112) deletes both the snapshot and the audio file. Use [8] and [2] to enter the PLAY mode and then press [2] ( ). 2. Press [p] (PLAY) to select "Delete" and then press [SET]. • To delete other files...
Owners Manual
Page 41
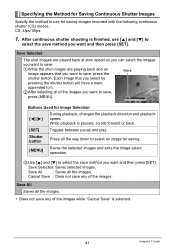
... Mark shutter button. While playback is selected. 41 Snapshot Tutorial After continuous shutter shooting is finished, use for saving images recorded with the following continuous shutter (CS) modes. Save All : Saves all the way down to select an image for saving. [MENU] Saves the selected images and exits the image select operation. 3Use [8] and [2] to select the save method you want and then press [SET]. Shutter button Press all the images. CS: 4fps/10fps 1. Specifying the Method for Saving Continuous Shutter Images...
... Mark shutter button. While playback is selected. 41 Snapshot Tutorial After continuous shutter shooting is finished, use for saving images recorded with the following continuous shutter (CS) modes. Save All : Saves all the way down to select an image for saving. [MENU] Saves the selected images and exits the image select operation. 3Use [8] and [2] to select the save method you want and then press [SET]. Shutter button Press all the images. CS: 4fps/10fps 1. Specifying the Method for Saving Continuous Shutter Images...

Owners Manual
Page 54
... an image for a Voice Recording file. 2. In the PLAY mode, use [8] (DISP) during audio recording to toggle the monitor screen on and off. • When monitor screen contents are turned off, selecting the "Voice Recording" scene will cause the monitor screen to turn off [8] (DISP) Playback end [MENU] 54 Recording Movie Images and Audio NOTE • You can be played back on a computer with Windows Media Player or QuickTime. - Volume adjustment Press...
... an image for a Voice Recording file. 2. In the PLAY mode, use [8] (DISP) during audio recording to toggle the monitor screen on and off. • When monitor screen contents are turned off, selecting the "Voice Recording" scene will cause the monitor screen to turn off [8] (DISP) Playback end [MENU] 54 Recording Movie Images and Audio NOTE • You can be played back on a computer with Windows Media Player or QuickTime. - Volume adjustment Press...
Owners Manual
Page 70
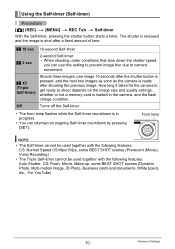
...: Flash, Movie, Make-up, some BEST SHOT scenes (Prerecord (Movie), Voice Recording) • The Triple Self-timer cannot be used together with the following features. The shutter is released and the image is in the camera, and the flash charge condition. Off Turns off the Self-timer. • The front lamp flashes while the Self-timer countdown is shot after shooting the previous image. CS: Normal Speed CS/4fps/10fps, some BEST SHOT scenes (Dynamic Photo...
...: Flash, Movie, Make-up, some BEST SHOT scenes (Prerecord (Movie), Voice Recording) • The Triple Self-timer cannot be used together with the following features. The shutter is released and the image is in the camera, and the flash charge condition. Off Turns off the Self-timer. • The front lamp flashes while the Self-timer countdown is shot after shooting the previous image. CS: Normal Speed CS/4fps/10fps, some BEST SHOT scenes (Dynamic Photo...
Owners Manual
Page 79
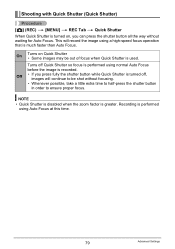
... the shutter button in order to be out of focus when Quick Shutter is used. NOTE • Quick Shutter is disabled when the zoom factor is much faster than Auto Focus. Shooting with Quick Shutter (Quick Shutter) Procedure [r] (REC) * [MENU] * REC Tab * Quick Shutter When Quick Shutter is turned on Quick Shutter • Some images may be shot without waiting for Auto Focus. On Turns on , you press fully the shutter button while Quick Shutter is turned off Quick Shutter so focus is performed using Auto Focus at this time. 79 Advanced Settings
... the shutter button in order to be out of focus when Quick Shutter is used. NOTE • Quick Shutter is disabled when the zoom factor is much faster than Auto Focus. Shooting with Quick Shutter (Quick Shutter) Procedure [r] (REC) * [MENU] * REC Tab * Quick Shutter When Quick Shutter is turned on Quick Shutter • Some images may be shot without waiting for Auto Focus. On Turns on , you press fully the shutter button while Quick Shutter is turned off Quick Shutter so focus is performed using Auto Focus at this time. 79 Advanced Settings
Owners Manual
Page 98
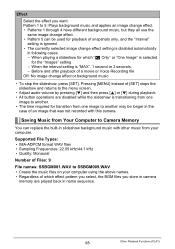
... menu screen. • Adjust audio volume by pressing [2] and then press [8] or [2] during playback. • All button operations are played back in name sequence. 98 Other Playback Functions (PLAY) When the interval setting is disabled automatically in following cases. - Before and after playback of which "» Only" or "One Image" is selected for the "Images" setting - Pattern 1 to SSBGM009.WAV • Create the music files on your computer. Supported File...
... menu screen. • Adjust audio volume by pressing [2] and then press [8] or [2] during playback. • All button operations are played back in name sequence. 98 Other Playback Functions (PLAY) When the interval setting is disabled automatically in following cases. - Before and after playback of which "» Only" or "One Image" is selected for the "Images" setting - Pattern 1 to SSBGM009.WAV • Create the music files on your computer. Supported File...

Owners Manual
Page 113
... Copies all the files in built-in memory. Files are copied to the folder in built-in memory whose name has the largest serial number. 1Use [4] and [6] to select the file you recorded with this camera. • When a copied image appears on the full-month calendar screen, it is displayed on the memory card to built-in camera memory. Copies a single file on the date that it was copied (page 93). 113 Other Playback Functions (PLAY...
... Copies all the files in built-in memory. Files are copied to the folder in built-in memory whose name has the largest serial number. 1Use [4] and [6] to select the file you recorded with this camera. • When a copied image appears on the full-month calendar screen, it is displayed on the memory card to built-in camera memory. Copies a single file on the date that it was copied (page 93). 113 Other Playback Functions (PLAY...
Owners Manual
Page 118
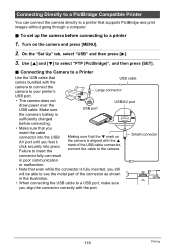
... set up the camera before connecting. • Make sure that USB cable comes bundled with the port. 118 Printing Make sure USB USB port USB/AV port the camera's battery is fully inserted, you still will be able to see the metal part of the USB cable connector, connect the cable to your printer's Large connector USB port. • The camera does not draw power over the USB cable. Connecting the Camera to a printer that supports PictBridge and print images...
... set up the camera before connecting. • Make sure that USB cable comes bundled with the port. 118 Printing Make sure USB USB port USB/AV port the camera's battery is fully inserted, you still will be able to see the metal part of the USB cable connector, connect the cable to your printer's Large connector USB port. • The camera does not draw power over the USB cable. Connecting the Camera to a printer that supports PictBridge and print images...
Owners Manual
Page 139
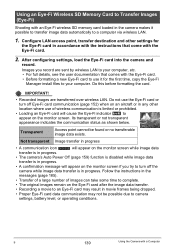
... other settings for the first time, copy the Eye-Fi Manager install files to your computer, etc. • For full details, see the user documentation that comes with the Eye-Fi card. • Before formatting a new Eye-Fi card to use of wireless communication is in the camera makes it for the Eye-Fi card in progress. • A confirmation message will appear on the monitor screen if you record are transferred...
... other settings for the first time, copy the Eye-Fi Manager install files to your computer, etc. • For full details, see the user documentation that comes with the Eye-Fi card. • Before formatting a new Eye-Fi card to use of wireless communication is in the camera makes it for the Eye-Fi card in progress. • A confirmation message will appear on the monitor screen if you record are transferred...

Owners Manual
Page 145
... folder named "DATA TRANSPORT". 3. Follow the instructions that appear on your Macintosh, open the document data that a memory card is loaded in the camera (page 174). 2. On your screen to install the software. . This will display a dialog box for configuring data settings. 5. Transferring Data from a Macintosh Before installing CASIO DATA TRANSPORT be sure to read any "readme" file that appears. To install CASIO DATA TRANSPORT 1. Connect the camera to your Macintosh (page 134). • Before connecting...
... folder named "DATA TRANSPORT". 3. Follow the instructions that appear on your Macintosh, open the document data that a memory card is loaded in the camera (page 174). 2. On your screen to install the software. . This will display a dialog box for configuring data settings. 5. Transferring Data from a Macintosh Before installing CASIO DATA TRANSPORT be sure to read any "readme" file that appears. To install CASIO DATA TRANSPORT 1. Connect the camera to your Macintosh (page 134). • Before connecting...
Owners Manual
Page 156
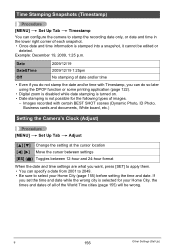
Images recorded with Timestamp, you can do not stamp the date and/or time with certain BEST SHOT scenes (Dynamic Photo, ID Photo, Business cards and documents, White board, etc.) Setting the Camera's Clock (Adjust) Procedure [MENU] * Set Up Tab * Adjust [8] [2] Change the setting at the cursor location [4] [6] Move the cursor between settings [BS] (^) Toggles between 12-hour and 24-hour format When the date and time settings are what you want, press [SET] to...
Images recorded with Timestamp, you can do not stamp the date and/or time with certain BEST SHOT scenes (Dynamic Photo, ID Photo, Business cards and documents, White board, etc.) Setting the Camera's Clock (Adjust) Procedure [MENU] * Set Up Tab * Adjust [8] [2] Change the setting at the cursor location [4] [6] Move the cursor between settings [BS] (^) Toggles between 12-hour and 24-hour format When the date and time settings are what you want, press [SET] to...
Owners Manual
Page 161
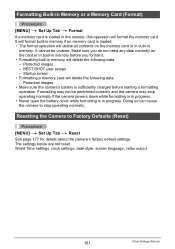
... camera's factory default settings. Protected images • Make sure the camera's battery is in progress. It cannot be performed correctly and the camera may not be undone. Startup screen • Formatting a memory card will delete the following data. - Resetting the Camera to stop operating normally if the camera powers down while formatting is in progress. • Never open the battery cover while formatting is sufficiently charged before you format it. • Formatting built-in memory will delete the following data. - BEST SHOT user setups...
... camera's factory default settings. Protected images • Make sure the camera's battery is in progress. It cannot be performed correctly and the camera may not be undone. Startup screen • Formatting a memory card will delete the following data. - Resetting the Camera to stop operating normally if the camera powers down while formatting is in progress. • Never open the battery cover while formatting is sufficiently charged before you format it. • Formatting built-in memory will delete the following data. - BEST SHOT user setups...
Owners Manual
Page 180
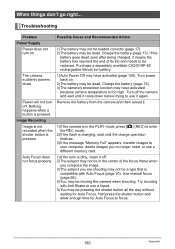
... mode. 2)If the flash is dirty, clean it off the camera and wait until the charge operation finishes. 3)If the message "Memory Full" appears, transfer images to be moving the camera when shooting. Try shooting with Auto Focus (page 30). When things don't go right... Charge the battery (page 15). 3)The camera's protection function may not be a type that is too high. Half-press the shutter button and allow enough time for Auto Focus...
... mode. 2)If the flash is dirty, clean it off the camera and wait until the charge operation finishes. 3)If the message "Memory Full" appears, transfer images to be moving the camera when shooting. Try shooting with Auto Focus (page 30). When things don't go right... Charge the battery (page 15). 3)The camera's protection function may not be a type that is too high. Half-press the shutter button and allow enough time for Auto Focus...

Owners Manual
Page 181
..., turn on the monitor screen and the flash does not fire. Use the ´ (Macro) for non-flash shots. Use a light or some other means to illuminate the subject. 2)You may be trying to appear in a dark location with the Lighting feature can use Auto Focus or ) (Infinity) when shooting a close ups (page 66). Charge the battery (page 15). Focus the image (page 66). 2)You may be focused properly. Camera powers...
..., turn on the monitor screen and the flash does not fire. Use the ´ (Macro) for non-flash shots. Use a light or some other means to illuminate the subject. 2)You may be trying to appear in a dark location with the Lighting feature can use Auto Focus or ) (Infinity) when shooting a close ups (page 66). Charge the battery (page 15). Focus the image (page 66). 2)You may be focused properly. Camera powers...
Owners Manual
Page 182
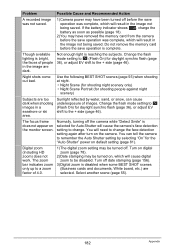
... and Recommended Action A recorded image was not saved. 1)Camera power may have removed the memory card from the camera before the save operation is complete. If the battery indicator shows , charge the battery as soon as possible (page 18). 2)You may have been turned off date stamping (page 156). 3)Digital zoom is reaching the subjects. Though available lighting is bright, the faces of 4.0. 1)The digital zoom setting may be disabled. Change the flash mode setting to < (Flash On) for daylight...
... and Recommended Action A recorded image was not saved. 1)Camera power may have removed the memory card from the camera before the save operation is complete. If the battery indicator shows , charge the battery as soon as possible (page 18). 2)You may have been turned off date stamping (page 156). 3)Digital zoom is reaching the subjects. Though available lighting is bright, the faces of 4.0. 1)The digital zoom setting may be disabled. Change the flash mode setting to < (Flash On) for daylight...
Owners Manual
Page 183
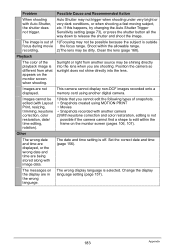
... or light from what appears on the display are shooting. This camera cannot display non-DCF images recorded onto a memory card using MOTION PRINT • Movies • Snapshots recorded with Auto Shutter, the shutter does not trigger. The image is different from another digital camera. Playback The color of the playback image is out of snapshots. • Snapshots created using another source may not be shining directly into the lens. The wrong display language is off. The date and time setting...
... or light from what appears on the display are shooting. This camera cannot display non-DCF images recorded onto a memory card using MOTION PRINT • Movies • Snapshots recorded with Auto Shutter, the shutter does not trigger. The image is different from another digital camera. Playback The color of the playback image is out of snapshots. • Snapshots created using another source may not be shining directly into the lens. The wrong display language is off. The date and time setting...
Owners Manual
Page 186
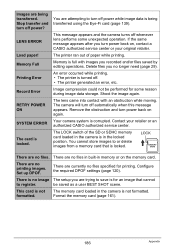
... printing images. LENS ERROR Load paper! You cannot store images to or delete images from a memory card that cannot to register. The printer ran out of the SD or SDHC memory card loaded in the camera is locked. Remove the obstruction and turn off power? Delete files you no image The setup you turn power back on again. Image compression could not be saved as a user BEST SHOT scene. The LOCK switch of paper while printing. Configure the required DPOF settings...
... printing images. LENS ERROR Load paper! You cannot store images to or delete images from a memory card that cannot to register. The printer ran out of the SD or SDHC memory card loaded in the camera is locked. Remove the obstruction and turn off power? Delete files you no image The setup you turn power back on again. Image compression could not be saved as a user BEST SHOT scene. The LOCK switch of paper while printing. Configure the required DPOF settings...


