

Owners Manual
Page 5
... the [4] and [6] Keys L/R Key) . . . 78 ❚ Shooting with Quick Shutter Quick Shutter) . . . 79 ❚ Displaying the On-screen Grid Grid) . . . 80 ❚ Turning on Image Review Review) . . . 80 ❚ Using Icon Help Icon Help) . . . 80 ❚ Configuring Power On Default Settings Memory) . . . 81 Image Quality Settings Quality) . . 82 ❚ Specifying Snapshot Size...
... the [4] and [6] Keys L/R Key) . . . 78 ❚ Shooting with Quick Shutter Quick Shutter) . . . 79 ❚ Displaying the On-screen Grid Grid) . . . 80 ❚ Turning on Image Review Review) . . . 80 ❚ Using Icon Help Icon Help) . . . 80 ❚ Configuring Power On Default Settings Memory) . . . 81 Image Quality Settings Quality) . . 82 ❚ Specifying Snapshot Size...

Owners Manual
Page 80
... on, the camera will appear on the display for about one second immediately after you switch between REC functions. Turning on Image Review (Review) Procedure [r] (REC) * [MENU] * REC Tab * Review While Review is turned on the REC mode monitor screen for easy vertical and horizontal alignment when composing images. Displaying the On-screen Grid...
... on, the camera will appear on the display for about one second immediately after you switch between REC functions. Turning on Image Review (Review) Procedure [r] (REC) * [MENU] * REC Tab * Review While Review is turned on the REC mode monitor screen for easy vertical and horizontal alignment when composing images. Displaying the On-screen Grid...

Owners Manual
Page 177
... Detection Off Anti Shake Off AF Area U Spot AF Assist Light On Focus Frame ß Digital Zoom On L/R Key Make-up Quick Shutter On Grid Review Icon Help Memory Off On On b BEST SHOT: Off / Auto Shutter: Off / Flash: On / Focus: Off / White Balance: Off / ISO: Off / AF Area: On / Metering...
... Detection Off Anti Shake Off AF Area U Spot AF Assist Light On Focus Frame ß Digital Zoom On L/R Key Make-up Quick Shutter On Grid Review Icon Help Memory Off On On b BEST SHOT: Off / Auto Shutter: Off / Flash: On / Focus: Off / White Balance: Off / ISO: Off / AF Area: On / Metering...
Owners Manual
Page 208
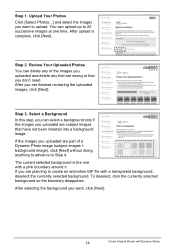
...is complete, click [Next]. To deselect, click the currently selected background so the boundary disappears. You can upload up to Step 4. Review Your Uploaded Photos You can select a background only if the images you don't need. If the images you uploaded are part of ... transparent background, deselect the currently selected background. Step 3. Select a Background In this step, you can delete any that you uploaded are finished reviewing the uploaded images, click [Next]. If you are wrong or that are planning to upload. After selecting the background you want , click [Next...
...is complete, click [Next]. To deselect, click the currently selected background so the boundary disappears. You can upload up to Step 4. Review Your Uploaded Photos You can select a background only if the images you don't need. If the images you uploaded are part of ... transparent background, deselect the currently selected background. Step 3. Select a Background In this step, you can delete any that you uploaded are finished reviewing the uploaded images, click [Next]. If you are wrong or that are planning to upload. After selecting the background you want , click [Next...

Owners Manual
Page 209
Create Your Movie Configure the settings required for conversion also depends on Dynamic Server traffic at the time. After all the settings are finished reviewing the images and background, click [Next]. The actual amount of time required for movie conversion. Step 5. Your computer will change the settings automatically to the ...
Create Your Movie Configure the settings required for conversion also depends on Dynamic Server traffic at the time. After all the settings are finished reviewing the images and background, click [Next]. The actual amount of time required for movie conversion. Step 5. Your computer will change the settings automatically to the ...
