User Manual
Page 7
... and Saving Files 125 ❚ Transferring Images Automatically and Managing Them on Your Macintosh. . 128 ❚ Playing a Movie 128 ❚ Viewing User Documentation PDF Files) . . 129 ❚ User Registration 129 Using an Eye-Fi Wireless SD Memory Card to Transfer Images . (Eye-Fi) . 129 Files and Folders 131 Memory Card Data 132 ❚❙ Other Settings (Set Up) 134 Adjusting Monitor Screen Brightness Screen) . 134 Turning off Eye-Fi Card Communication Eye-Fi) . 134 Configuring Camera Sound Settings Sounds) . 135 Enabling Shutter Button Power On Quick Mode) . 135...
... and Saving Files 125 ❚ Transferring Images Automatically and Managing Them on Your Macintosh. . 128 ❚ Playing a Movie 128 ❚ Viewing User Documentation PDF Files) . . 129 ❚ User Registration 129 Using an Eye-Fi Wireless SD Memory Card to Transfer Images . (Eye-Fi) . 129 Files and Folders 131 Memory Card Data 132 ❚❙ Other Settings (Set Up) 134 Adjusting Monitor Screen Brightness Screen) . 134 Turning off Eye-Fi Card Communication Eye-Fi) . 134 Configuring Camera Sound Settings Sounds) . 135 Enabling Shutter Button Power On Quick Mode) . 135...
User Manual
Page 19
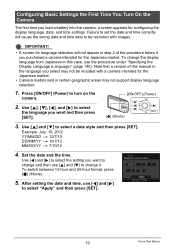
...] (Power) 2. To change it. Use [8], [2], [4], and [6] to be included with a camera intended for the Japanese market. • Camera models sold in this manual in the language you load a battery into the camera, a screen appears for the Japanese market. Note that a version of the procedure below if you purchased a camera intended for configuring the display language, date, and time settings. To switch between 12-hour and 24-hour format, press [0] (Movie). 5. IMPORTANT...
...] (Power) 2. To change it. Use [8], [2], [4], and [6] to be included with a camera intended for the Japanese market. • Camera models sold in this manual in the language you load a battery into the camera, a screen appears for the Japanese market. Note that a version of the procedure below if you purchased a camera intended for configuring the display language, date, and time settings. To switch between 12-hour and 24-hour format, press [0] (Movie). 5. IMPORTANT...

User Manual
Page 30
Deleting Snapshots and Movies If memory becomes full, you can delete files only while "Off" is selected for the camera's "Ü Disabled" setting (page 142). Use [4] and [6] to scroll through the files until the one you press [2] ( ) while "On" is displayed. 3. Press [p] (PLAY) to free up storage and record more images. To delete a single file 1. Use [8] and [2] to delete is selected for "Ü Disabled". IMPORTANT! • Remember that a file (image) delete operation cannot be undone. [2] ( ) •...
Deleting Snapshots and Movies If memory becomes full, you can delete files only while "Off" is selected for the camera's "Ü Disabled" setting (page 142). Use [4] and [6] to scroll through the files until the one you press [2] ( ) while "On" is displayed. 3. Press [p] (PLAY) to free up storage and record more images. To delete a single file 1. Use [8] and [2] to delete is selected for "Ü Disabled". IMPORTANT! • Remember that a file (image) delete operation cannot be undone. [2] ( ) •...

User Manual
Page 47
.... Press the shutter button to zoom. IMPORTANT! • Digital zoom, HD zoom, and Single SR zoom are disabled while date stamping (page 138) is turned on the image size setting. In the REC mode, slide the zoom controller to shoot the image. You can adjust the optical zoom setting before you press [0] (Movie) to avoid deterioration of zoom: optical zoom, HD Zoom, Single SR Zoom, and digital zoom. Single SR Zoom Applies super resolution technology to start movie recording. The maximum zoom factor depends on...
.... Press the shutter button to zoom. IMPORTANT! • Digital zoom, HD zoom, and Single SR zoom are disabled while date stamping (page 138) is turned on the image size setting. In the REC mode, slide the zoom controller to shoot the image. You can adjust the optical zoom setting before you press [0] (Movie) to avoid deterioration of zoom: optical zoom, HD Zoom, Single SR Zoom, and digital zoom. Single SR Zoom Applies super resolution technology to start movie recording. The maximum zoom factor depends on...
User Manual
Page 54
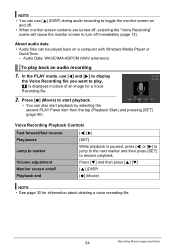
... turned off Playback end [4] [6] [SET] While playback is displayed in place of an image for information about deleting a voice recording file. 54 Recording Movie Images and Audio Press [2] and then press [8] [2] [8] (DISP) [0] (Movie) NOTE • See page 30 for a Voice Recording file. 2. Voice Recording Playback Controls Fast forward/fast reverse Play/pause Jump to marker Volume adjustment Monitor screen on a computer with Windows Media Player or QuickTime. - About audio data • Audio files can also start playback...
... turned off Playback end [4] [6] [SET] While playback is displayed in place of an image for information about deleting a voice recording file. 54 Recording Movie Images and Audio Press [2] and then press [8] [2] [8] (DISP) [0] (Movie) NOTE • See page 30 for a Voice Recording file. 2. Voice Recording Playback Controls Fast forward/fast reverse Play/pause Jump to marker Volume adjustment Monitor screen on a computer with Windows Media Player or QuickTime. - About audio data • Audio files can also start playback...
User Manual
Page 58
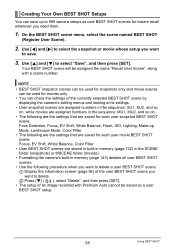
... or movie whose setup you need them. 1. Face Detection, Focus, EV Shift, White Balance, Flash, ISO, Lighting, Make-up to 999 camera setups as a user BEST SHOT setup. 58 Using BEST SHOT Your BEST SHOT scene will be saved as user BEST SHOT scenes for each user snapshot BEST SHOT scene. Focus, EV Shift, White Balance, Color Filter • User BEST SHOT scenes are stored in built-in memory (page 132) in the SCENE folder (snapshots) or MSCENE folder (movies). • Formatting the camera's built...
... or movie whose setup you need them. 1. Face Detection, Focus, EV Shift, White Balance, Flash, ISO, Lighting, Make-up to 999 camera setups as a user BEST SHOT setup. 58 Using BEST SHOT Your BEST SHOT scene will be saved as user BEST SHOT scenes for each user snapshot BEST SHOT scene. Focus, EV Shift, White Balance, Color Filter • User BEST SHOT scenes are stored in built-in memory (page 132) in the SCENE folder (snapshots) or MSCENE folder (movies). • Formatting the camera's built...

User Manual
Page 93
.... • The currently selected image change effect. • Pattern 5 can replace the built-in name sequence. 93 Other Playback Functions (PLAY) When the interval setting is transitioning from one image to the menu screen. • Adjust audio volume by pressing [2] and then press [8] or [2] during playback. • All button operations are played back in slideshow background music with this camera. Supported File Types: • PCM format (16-bit, monaural) WAV...
.... • The currently selected image change effect. • Pattern 5 can replace the built-in name sequence. 93 Other Playback Functions (PLAY) When the interval setting is transitioning from one image to the menu screen. • Adjust audio volume by pressing [2] and then press [8] or [2] during playback. • All button operations are played back in slideshow background music with this camera. Supported File Types: • PCM format (16-bit, monaural) WAV...

User Manual
Page 97
... or Movie Screen * [SET] * MENU * PLAY Tab * Rotation 1. Use [8] and [2] to 2049. NOTE • Note that has been protected or zoomed cannot be displayed on the camera's monitor screen. • An image that this procedure does not actually change the image data. Editing the Date and Time of [SET] will be rotated. • The original (unrotated) version of an image that is displayed on the image menu screen and the calendar screen. 97 Other Playback Functions (PLAY)
... or Movie Screen * [SET] * MENU * PLAY Tab * Rotation 1. Use [8] and [2] to 2049. NOTE • Note that has been protected or zoomed cannot be displayed on the camera's monitor screen. • An image that this procedure does not actually change the image data. Editing the Date and Time of [SET] will be rotated. • The original (unrotated) version of an image that is displayed on the image menu screen and the calendar screen. 97 Other Playback Functions (PLAY)
User Manual
Page 100
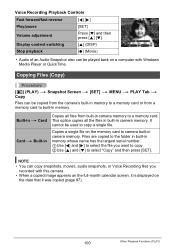
... date that it is displayed on a computer with this camera. • When a copied image appears on the full-month calendar screen, it was copied (page 87). 100 Other Playback Functions (PLAY) Voice Recording Playback Controls Fast forward/fast reverse [4] [6] Play/pause [SET] Volume adjustment Press [2] and then press [8] [2]. It cannot be copied from the camera's built-in memory to a memory card or from built-in camera memory to camera built-in camera memory. Copies a single file on the memory card to a memory card...
... date that it is displayed on a computer with this camera. • When a copied image appears on the full-month calendar screen, it was copied (page 87). 100 Other Playback Functions (PLAY) Voice Recording Playback Controls Fast forward/fast reverse [4] [6] Play/pause [SET] Volume adjustment Press [2] and then press [8] [2]. It cannot be copied from the camera's built-in memory to a memory card or from built-in camera memory to camera built-in camera memory. Copies a single file on the memory card to a memory card...
User Manual
Page 109
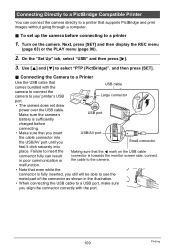
... charged before connecting to a printer 1. Connecting Directly to a PictBridge Compatible Printer You can result connector is towards the monitor screen side, connect in the illustration. • When connecting the USB cable to a USB port, make sure you align the connector correctly with the USB cable camera to connect the camera to a Printer Use the USB cable that comes bundled with the port. 109 Printing Next, press [SET] and then display the REC menu (page 63) or the PLAY menu...
... charged before connecting to a printer 1. Connecting Directly to a PictBridge Compatible Printer You can result connector is towards the monitor screen side, connect in the illustration. • When connecting the USB cable to a USB port, make sure you align the connector correctly with the USB cable camera to connect the camera to a Printer Use the USB cable that comes bundled with the port. 109 Printing Next, press [SET] and then display the REC menu (page 63) or the PLAY menu...
User Manual
Page 113
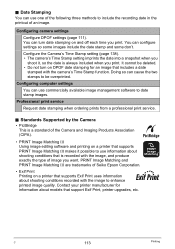
... stamps to date stamp images. Configuring camera settings Configure DPOF settings (page 111). Configure the Camera's Time Stamp setting (page 138). • The camera's Time Stamp setting imprints the date into a snapshot when you shoot it possible to use commercially available image management software to be deleted. • Do not turn date stamping on a printer that is always included when you print. Doing so can turn on a printer that supports PRINT Image Matching III makes it , so the date is recorded with the camera's Time Stamp function. C 113 Printing...
... stamps to date stamp images. Configuring camera settings Configure DPOF settings (page 111). Configure the Camera's Time Stamp setting (page 138). • The camera's Time Stamp setting imprints the date into a snapshot when you shoot it possible to use commercially available image management software to be deleted. • Do not turn date stamping on a printer that is always included when you print. Doing so can turn on a printer that supports PRINT Image Matching III makes it , so the date is recorded with the camera's Time Stamp function. C 113 Printing...
User Manual
Page 141
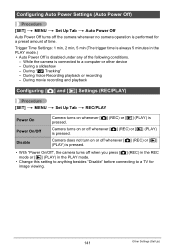
... the camera whenever no camera operation is performed for image viewing. 141 Other Settings (Set Up) While the camera is connected to a TV for a preset amount of the following conditions. - During Voice Recording playback or recording - Configuring Auto Power Settings (Auto Power Off) Procedure [SET] * MENU * Set Up Tab * Auto Power Off Auto Power Off turns off whenever [r] (REC) or [p] (PLAY) is pressed. Trigger Time Settings: 1 min, 2 min, 5 min (The trigger time is always 5 minutes in the PLAY mode.) • Auto Power Off...
... the camera whenever no camera operation is performed for image viewing. 141 Other Settings (Set Up) While the camera is connected to a TV for a preset amount of the following conditions. - During Voice Recording playback or recording - Configuring Auto Power Settings (Auto Power Off) Procedure [SET] * MENU * Set Up Tab * Auto Power Off Auto Power Off turns off whenever [r] (REC) or [p] (PLAY) is pressed. Trigger Time Settings: 1 min, 2 min, 5 min (The trigger time is always 5 minutes in the PLAY mode.) • Auto Power Off...
User Manual
Page 144
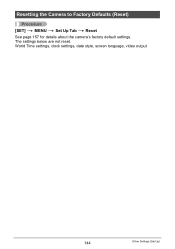
The settings below are not reset. World Time settings, clock settings, date style, screen language, video output 144 Other Settings (Set Up) Resetting the Camera to Factory Defaults (Reset) Procedure [SET] * MENU * Set Up Tab * Reset See page 157 for details about the camera's factory default settings.
The settings below are not reset. World Time settings, clock settings, date style, screen language, video output 144 Other Settings (Set Up) Resetting the Camera to Factory Defaults (Reset) Procedure [SET] * MENU * Set Up Tab * Reset See page 157 for details about the camera's factory default settings.
User Manual
Page 155
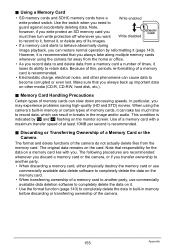
... a Memory Card or the Camera The format and delete functions of the camera do not actually delete files from a memory card a number of times, it . • Use the format function (page 143) to guard against accidentally deleting data. The original data remains on it loses its images. • If a memory card starts to behave abnormally during image playback, you want Write disabled to record to and delete data from the memory card. Make sure that responsibility for the data on a memory card lies with a maximum transfer speed of...
... a Memory Card or the Camera The format and delete functions of the camera do not actually delete files from a memory card a number of times, it . • Use the format function (page 143) to guard against accidentally deleting data. The original data remains on it loses its images. • If a memory card starts to behave abnormally during image playback, you want Write disabled to record to and delete data from the memory card. Make sure that responsibility for the data on a memory card lies with a maximum transfer speed of...
User Manual
Page 159
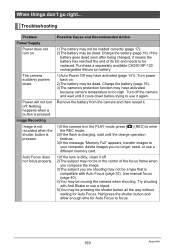
... the charge operation finishes. 3)If the message "Memory Full" appears, transfer images to your computer, delete images you are shooting may be a type that is compatible with Anti Shake or use a different memory card. 1)If the lens is in the center of its life and needs to focus. 159 Appendix Use manual focus (page 40). 4)You may be moving the camera when shooting. Half-press the shutter button and allow enough time for Auto Focus. Possible...
... the charge operation finishes. 3)If the message "Memory Full" appears, transfer images to your computer, delete images you are shooting may be a type that is compatible with Anti Shake or use a different memory card. 1)If the lens is in the center of its life and needs to focus. 159 Appendix Use manual focus (page 40). 4)You may be moving the camera when shooting. Half-press the shutter button and allow enough time for Auto Focus. Possible...

User Manual
Page 160
The image may be malfunctioning. The flash unit may not be using ´ (Macro) for close -up shot. Use Auto Focus for scenery and portrait shots (page 40). 3)You may be focused properly. There is digital noise in the monitor screen image. When composing the image, make images appear coarse. Contact a CASIO authorized service center or your original retailer. Charge the battery (page 16). Use the ´ (Macro) for scenery or portraits. Shooting a very...
The image may be malfunctioning. The flash unit may not be using ´ (Macro) for close -up shot. Use Auto Focus for scenery and portrait shots (page 40). 3)You may be focused properly. There is digital noise in the monitor screen image. When composing the image, make images appear coarse. Contact a CASIO authorized service center or your original retailer. Charge the battery (page 16). Use the ´ (Macro) for scenery or portraits. Shooting a very...
User Manual
Page 161
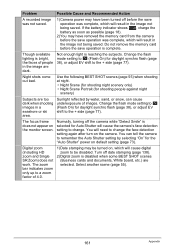
... Auto Shutter will cause the camera's face detection setting to be turned on the monitor screen. If the battery indicator shows , charge the battery as soon as possible (page 18). 2)You may have been turned off date stamping (page 138). 2)Digital zoom is complete. Turn off before the save operation was complete, which will result in the image not being saved. Problem Possible Cause and Recommended Action A recorded image was not saved. 1)Camera power may have removed...
... Auto Shutter will cause the camera's face detection setting to be turned on the monitor screen. If the battery indicator shows , charge the battery as soon as possible (page 18). 2)You may have been turned off date stamping (page 138). 2)Digital zoom is complete. Turn off before the save operation was complete, which will result in the image not being saved. Problem Possible Cause and Recommended Action A recorded image was not saved. 1)Camera power may have removed...
User Manual
Page 162
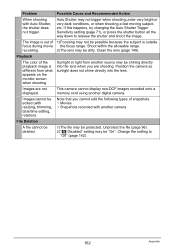
... press the shutter button all the way down to "Off" (page 142). 162 Appendix Change the setting to release the shutter and shoot the image. Shoot within the allowable range. Images cannot be edited (with another digital camera. Problem Possible Cause and Recommended Action When shooting with Auto Shutter, the shutter does not trigger. This camera cannot display non-DCF images recorded onto a memory card using another camera File Deletion A file cannot be protected. Clean the lens (page 149...
... press the shutter button all the way down to "Off" (page 142). 162 Appendix Change the setting to release the shutter and shoot the image. Shoot within the allowable range. Images cannot be edited (with another digital camera. Problem Possible Cause and Recommended Action When shooting with Auto Shutter, the shutter does not trigger. This camera cannot display non-DCF images recorded onto a memory card using another camera File Deletion A file cannot be protected. Clean the lens (page 149...

User Manual
Page 163
... device you turn power back on the display are in accordance with a dead battery. Set the correct date and time (page 139). Always connect directly to recognize the camera if you turn it on , it means that , configure each setting. If this is selected. The wrong display language is the case, perform the reset operation to initialize the camera's setup (page 144). Images cannot be transferred over a USB connection. 1)The USB cable may not...
... device you turn power back on the display are in accordance with a dead battery. Set the correct date and time (page 139). Always connect directly to recognize the camera if you turn it on , it means that , configure each setting. If this is selected. The wrong display language is the case, perform the reset operation to initialize the camera's setup (page 144). Images cannot be transferred over a USB connection. 1)The USB cable may not...

User Manual
Page 165
... transferred using the Eye-Fi card (page 129). The Camera Shake unit may be created. An error occurred while printing. • The printer is no longer need (page 30). If the same message appears after you turn off whenever lens performs some reason during image data storage. Memory Full No subjects in the 999th folder. Folder cannot be malfunctioning. Images are attempting to a printer while the camera's USB settings are already 9999 files...
... transferred using the Eye-Fi card (page 129). The Camera Shake unit may be created. An error occurred while printing. • The printer is no longer need (page 30). If the same message appears after you turn off whenever lens performs some reason during image data storage. Memory Full No subjects in the 999th folder. Folder cannot be malfunctioning. Images are attempting to a printer while the camera's USB settings are already 9999 files...


