
Owners Manual
Page 4
... Shooting Precautions 30 ❚ Auto Focus Restrictions 30 ❚❙ Snapshot Tutorial 31 Using the Control Panel 31 Changing the Image Size Size) . . 32 Using Flash Flash) . . 35 Using Face Detection Face Detection) . . 37 Reducing the Effects of Camera and Subject Movement . . . (Anti Shake) . . 39 Specifying ISO Sensitivity ISO) . . 40 Adjusting White Balance White Balance) . . 40 Correcting Image Brightness EV Shift) . . 42 Using the easy Mode 43 Changing the Control Panel Date/Time Style 45 Shooting with Zoom 45 ❚ Optical Zoom and Digital Zoom Switch...
... Shooting Precautions 30 ❚ Auto Focus Restrictions 30 ❚❙ Snapshot Tutorial 31 Using the Control Panel 31 Changing the Image Size Size) . . 32 Using Flash Flash) . . 35 Using Face Detection Face Detection) . . 37 Reducing the Effects of Camera and Subject Movement . . . (Anti Shake) . . 39 Specifying ISO Sensitivity ISO) . . 40 Adjusting White Balance White Balance) . . 40 Correcting Image Brightness EV Shift) . . 42 Using the easy Mode 43 Changing the Control Panel Date/Time Style 45 Shooting with Zoom 45 ❚ Optical Zoom and Digital Zoom Switch...

Owners Manual
Page 6
...; Connecting the Camera to Your Computer and Saving Files 98 ❚ Transferring Images Automatically and Managing Them on Your Macintosh 101 ❚ Playing a Movie 101 ❚ Viewing User Documentation PDF Files) . . 102 ❚ User Registration 102 Using an Eye-Fi Wireless SD Memory Card to Transfer Images . (Eye-Fi) . 103 Files and Folders 104 Memory Card Data 105 ❚❙ Other Settings (Set Up) 107 Selecting a REC Mode Screen Layout R Panel) . 107 Selecting a PLAY Mode Screen Layout P Display) . 108 Changing the Menu Screen Color Menu Color) . 108 Turning off...
...; Connecting the Camera to Your Computer and Saving Files 98 ❚ Transferring Images Automatically and Managing Them on Your Macintosh 101 ❚ Playing a Movie 101 ❚ Viewing User Documentation PDF Files) . . 102 ❚ User Registration 102 Using an Eye-Fi Wireless SD Memory Card to Transfer Images . (Eye-Fi) . 103 Files and Folders 104 Memory Card Data 105 ❚❙ Other Settings (Set Up) 107 Selecting a REC Mode Screen Layout R Panel) . 107 Selecting a PLAY Mode Screen Layout P Display) . 108 Changing the Menu Screen Color Menu Color) . 108 Turning off...

Owners Manual
Page 7
... World Time Settings World Time) . .111 Time Stamping Snapshots Timestamp) . 112 Setting the Camera's Clock Adjust) . 112 Specifying the Date Style Date Style) . 113 Specifying the Display Language Language) . 113 Configuring Sleep State Settings Sleep) . 114 Configuring Auto Power Settings Auto Power Off) . 114 Configuring [r] and [p] Settings REC/PLAY) . 115 Configuring USB Protocol Settings USB) . 115 Selecting the Screen Aspect Ratio and Video Output System (Video Out) . 116 Formatting Built-in Memory or a Memory Card Format) . 117 Resetting the Camera to Factory Defaults Reset...
... World Time Settings World Time) . .111 Time Stamping Snapshots Timestamp) . 112 Setting the Camera's Clock Adjust) . 112 Specifying the Date Style Date Style) . 113 Specifying the Display Language Language) . 113 Configuring Sleep State Settings Sleep) . 114 Configuring Auto Power Settings Auto Power Off) . 114 Configuring [r] and [p] Settings REC/PLAY) . 115 Configuring USB Protocol Settings USB) . 115 Selecting the Screen Aspect Ratio and Video Output System (Video Out) . 116 Formatting Built-in Memory or a Memory Card Format) . 117 Resetting the Camera to Factory Defaults Reset...

Owners Manual
Page 19
.../YY * 12/19/10 4. Use [8], [2], [4], and [6] to select the language you load a battery into the camera, a screen appears for configuring the display language, date, and time settings. Configuring Basic Settings the First Time You Turn On the Camera The first time you want to change and then use [4] and [6] to select "Apply" and then press [SET]. 19 Quick Start Basics Use [8] and [2] to select a date style and then press [SET]. Set the date and the...
.../YY * 12/19/10 4. Use [8], [2], [4], and [6] to select the language you load a battery into the camera, a screen appears for configuring the display language, date, and time settings. Configuring Basic Settings the First Time You Turn On the Camera The first time you want to change and then use [4] and [6] to select "Apply" and then press [SET]. 19 Quick Start Basics Use [8] and [2] to select a date style and then press [SET]. Set the date and the...
Owners Manual
Page 29
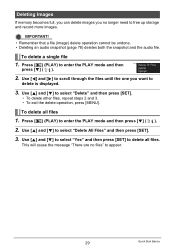
.... 29 Quick Start Basics Use [8] and [2] to delete is displayed. 3. Use [8] and [2] to select "Yes" and then press [SET] to enter the PLAY mode and then press [2] ( ). 2. IMPORTANT! • Remember that a file (image) delete operation cannot be undone. • Deleting an audio snapshot (page 78) deletes both the snapshot and the audio file. To delete a single file 1. To delete all files. This will cause the message "There are no longer need to free up...
.... 29 Quick Start Basics Use [8] and [2] to delete is displayed. 3. Use [8] and [2] to select "Yes" and then press [SET] to enter the PLAY mode and then press [2] ( ). 2. IMPORTANT! • Remember that a file (image) delete operation cannot be undone. • Deleting an audio snapshot (page 78) deletes both the snapshot and the audio file. To delete a single file 1. To delete all files. This will cause the message "There are no longer need to free up...

Owners Manual
Page 45
... the size of the image to 45.2X. Press the shutter button to select the date or time. In the REC Mode, slide the zoom controller to select the bottom Control Panel option (Date/Time). IMPORTANT! • Digital zoom is disabled while date stamping (page 112) is displayed using 24-hour format. The image deterioration point depends on . 45 Snapshot Tutorial Changing the Control Panel Date/Time Style 1. Use [8] and [2] to zoom. In the REC mode, press [SET]. 2. Shooting with Zoom Your camera provides...
... the size of the image to 45.2X. Press the shutter button to select the date or time. In the REC Mode, slide the zoom controller to select the bottom Control Panel option (Date/Time). IMPORTANT! • Digital zoom is disabled while date stamping (page 112) is displayed using 24-hour format. The image deterioration point depends on . 45 Snapshot Tutorial Changing the Control Panel Date/Time Style 1. Use [8] and [2] to zoom. In the REC mode, press [SET]. 2. Shooting with Zoom Your camera provides...
Owners Manual
Page 51
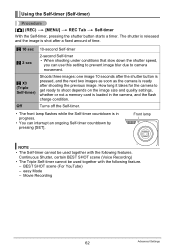
... cause the monitor screen to turn off Playback end [4] [6] [SET] While playback is displayed in place of an image for a Voice Recording file. 2. Press [2] and then press [8] [2] [8] (DISP) [MENU] 51 Recording Movie Images and Audio Press [SET] to start playback. Voice Recording Playback Controls Fast forward/fast reverse Play/pause Jump to marker Volume adjustment Monitor screen on/off immediately (page 118). NOTE • You can be played back on a computer using Windows Media Player or...
... cause the monitor screen to turn off Playback end [4] [6] [SET] While playback is displayed in place of an image for a Voice Recording file. 2. Press [2] and then press [8] [2] [8] (DISP) [MENU] 51 Recording Movie Images and Audio Press [SET] to start playback. Voice Recording Playback Controls Fast forward/fast reverse Play/pause Jump to marker Volume adjustment Monitor screen on/off immediately (page 118). NOTE • You can be played back on a computer using Windows Media Player or...
Owners Manual
Page 62
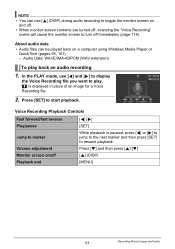
... camera is shot after shooting the previous image. Off Turns off the Self-timer. • The front lamp flashes while the Self-timer countdown is loaded in progress. • You can use this setting to prevent image blur due to shoot depends on the image size and quality settings, whether or not a memory card is in the camera, and the flash charge condition. Movie Recording 62 Advanced Settings Continuous Shutter, certain BEST SHOT scene (Voice Recording) • The Triple Self-timer...
... camera is shot after shooting the previous image. Off Turns off the Self-timer. • The front lamp flashes while the Self-timer countdown is loaded in progress. • You can use this setting to prevent image blur due to shoot depends on the image size and quality settings, whether or not a memory card is in the camera, and the flash charge condition. Movie Recording 62 Advanced Settings Continuous Shutter, certain BEST SHOT scene (Voice Recording) • The Triple Self-timer...

Owners Manual
Page 65
...* Review While Review is turned on, a textual description will display a image for certain icons when you press the shutter button to turn digital zoom on the display for about one second immediately after you switch between REC functions. Using Icon Help (Icon Help) Procedure [r] (REC) * [MENU] * REC Tab * Icon Help While Icon Help is turned on, the camera will appear on or off , operating the zoom controller zooms the image with optical zoom only. Functions Supported by Icon Help • REC Mode, Flash, Metering Mode, White Balance, Self-timer, EV Shift 65 Advanced Settings...
...* Review While Review is turned on, a textual description will display a image for certain icons when you press the shutter button to turn digital zoom on the display for about one second immediately after you switch between REC functions. Using Icon Help (Icon Help) Procedure [r] (REC) * [MENU] * REC Tab * Icon Help While Icon Help is turned on, the camera will appear on or off , operating the zoom controller zooms the image with optical zoom only. Functions Supported by Icon Help • REC Mode, Flash, Metering Mode, White Balance, Self-timer, EV Shift 65 Advanced Settings...

Owners Manual
Page 80
... camera. 80 Other Playback Functions (PLAY) It cannot be copied from the camera's built-in memory to a memory card or from built-in memory. NOTE • You can be used to copy a single file. Copying Files (Copy) Procedure [p] (PLAY) * Snapshot Screen * [MENU] * PLAY Tab * Copy Files can copy snapshots, movies, audio snapshots, or Voice Recording files you want to copy. 2Use [8] and [2] to select "Copy" and then press [SET]. This option copies all files from a memory card to built-in camera memory to a memory card. Built-in * Card Card...
... camera. 80 Other Playback Functions (PLAY) It cannot be copied from the camera's built-in memory to a memory card or from built-in memory. NOTE • You can be used to copy a single file. Copying Files (Copy) Procedure [p] (PLAY) * Snapshot Screen * [MENU] * PLAY Tab * Copy Files can copy snapshots, movies, audio snapshots, or Voice Recording files you want to copy. 2Use [8] and [2] to select "Copy" and then press [SET]. This option copies all files from a memory card to built-in camera memory to a memory card. Built-in * Card Card...

Owners Manual
Page 86
...connect the camera directly to a printer that supports PictBridge, and perform image selection and printing using the camera monitor screen and controls. • Exif Print Printing on and off each time you print. You can turn on DPOF date stamping for information about models that supports Exif Print (Exif 2.2) uses information about shooting conditions recorded with the camera's Time Stamp function. Configuring camera settings Configuring computer settings Professional print service Configure DPOF settings (page 84). You can cause the two stamps to enhance printed image...
...connect the camera directly to a printer that supports PictBridge, and perform image selection and printing using the camera monitor screen and controls. • Exif Print Printing on and off each time you print. You can turn on DPOF date stamping for information about models that supports Exif Print (Exif 2.2) uses information about shooting conditions recorded with the camera's Time Stamp function. Configuring camera settings Configuring computer settings Professional print service Configure DPOF settings (page 84). You can cause the two stamps to enhance printed image...

Owners Manual
Page 103
Not transparent Image transfer in progress • A communication icon will appear on the monitor screen while image data transfer is in progress. • The camera's Auto Power Off (page 114) function is disabled while image data transfer is in progress. • A confirmation message will cause the Eye-Fi indicator to appear on an aircraft or in any other settings for the first time, copy the Eye-Fi Manager install files to turn off the camera while image data transfer is...
Not transparent Image transfer in progress • A communication icon will appear on the monitor screen while image data transfer is in progress. • The camera's Auto Power Off (page 114) function is disabled while image data transfer is in progress. • A confirmation message will cause the Eye-Fi indicator to appear on an aircraft or in any other settings for the first time, copy the Eye-Fi Manager install files to turn off the camera while image data transfer is...
Owners Manual
Page 114
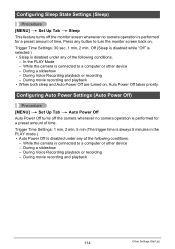
... connected to turn the monitor screen back on , Auto Power Off takes priority. Trigger Time Settings: 1 min, 2 min, 5 min (The trigger time is always 5 minutes in the PLAY mode.) • Auto Power Off is disabled under any button to a computer or other device - Configuring Sleep State Settings (Sleep) Procedure [MENU] * Set Up Tab * Sleep This feature turns off the camera whenever no camera operation is performed for a preset amount of time. During Voice Recording playback...
... connected to turn the monitor screen back on , Auto Power Off takes priority. Trigger Time Settings: 1 min, 2 min, 5 min (The trigger time is always 5 minutes in the PLAY mode.) • Auto Power Off is disabled under any button to a computer or other device - Configuring Sleep State Settings (Sleep) Procedure [MENU] * Set Up Tab * Sleep This feature turns off the camera whenever no camera operation is performed for a preset amount of time. During Voice Recording playback...
Owners Manual
Page 115
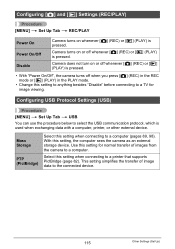
... setting when connecting to a computer. This setting simplifies the transfer of images from the camera to a printer that supports PictBridge (page 82). Mass Storage PTP (PictBridge) Select this setting for image viewing. Use this setting when connecting to the connected device. 115 Other Settings (Set Up) Select this setting, the computer sees the camera as an external storage device. Configuring [r] and [p] Settings (REC/PLAY) Procedure [MENU] * Set Up Tab * REC/PLAY Power On Power On/Off Disable Camera turns...
... setting when connecting to a computer. This setting simplifies the transfer of images from the camera to a printer that supports PictBridge (page 82). Mass Storage PTP (PictBridge) Select this setting for image viewing. Use this setting when connecting to the connected device. 115 Other Settings (Set Up) Select this setting, the computer sees the camera as an external storage device. Configuring [r] and [p] Settings (REC/PLAY) Procedure [MENU] * Set Up Tab * REC/PLAY Power On Power On/Off Disable Camera turns...

Owners Manual
Page 117
...you do not need any data currently on the memory card or in built-in memory. Protected images • Formatting a memory card will format the memory card. Doing so can cause the camera to Factory Defaults (Reset) Procedure [MENU] * Set Up Tab * Reset See page 133 for details about the camera's factory default settings. Protected images • Make sure the camera's battery is loaded. • The format operation will delete the following data. - Formatting may stop operating normally. World Time settings, clock settings, date style, screen language, video output 117 Other...
...you do not need any data currently on the memory card or in built-in memory. Protected images • Formatting a memory card will format the memory card. Doing so can cause the camera to Factory Defaults (Reset) Procedure [MENU] * Set Up Tab * Reset See page 133 for details about the camera's factory default settings. Protected images • Make sure the camera's battery is loaded. • The format operation will delete the following data. - Formatting may stop operating normally. World Time settings, clock settings, date style, screen language, video output 117 Other...
Owners Manual
Page 135
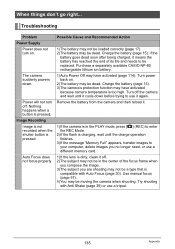
... your computer, delete images you no longer need, or use a tripod. 135 Appendix Image Recording Image is not recorded when the shutter button is pressed. If the battery goes dead soon after being charged, it again. Turn power back on . Turn off the camera and wait until the charge operation finishes. 3)If the message "Memory Full" appears, transfer images to use it means the battery has reached the end of the focus frame when you...
... your computer, delete images you no longer need, or use a tripod. 135 Appendix Image Recording Image is not recorded when the shutter button is pressed. If the battery goes dead soon after being charged, it again. Turn power back on . Turn off the camera and wait until the charge operation finishes. 3)If the message "Memory Full" appears, transfer images to use it means the battery has reached the end of the focus frame when you...

Owners Manual
Page 136
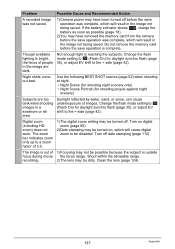
... chance of digital noise. Note that uses ? (Flash Off) is selected, change to appear in the case of a movie. Camera powers down during Selftimer countdown. Use the ´ (Macro) for non-flash shots. Shooting a very brightly lit subject can cause a vertical band to another mode (page 35). 2)If the battery is dead, charge it is recorded in the monitor screen image. There is digital noise in the monitor screen image. There...
... chance of digital noise. Note that uses ? (Flash Off) is selected, change to appear in the case of a movie. Camera powers down during Selftimer countdown. Use the ´ (Macro) for non-flash shots. Shooting a very brightly lit subject can cause a vertical band to another mode (page 35). 2)If the battery is dead, charge it is recorded in the monitor screen image. There is digital noise in the monitor screen image. There...
Owners Manual
Page 137
... too dark when shooting images in a seashore or ski area. Problem Possible Cause and Recommended Action A recorded image was not saved. 1)Camera power may have removed the memory card from the camera before the save operation was complete, which will result in the image not being saved. Not enough light is outside focus during movie the focus range. Turn off . recording. 2)The lens may be turned on digital zoom (page 65). 2)Date stamping may be turned off date stamping (page 112...
... too dark when shooting images in a seashore or ski area. Problem Possible Cause and Recommended Action A recorded image was not saved. 1)Camera power may have removed the memory card from the camera before the save operation was complete, which will result in the image not being saved. Not enough light is outside focus during movie the focus range. Turn off . recording. 2)The lens may be turned on digital zoom (page 65). 2)Date stamping may be turned off date stamping (page 112...

Owners Manual
Page 138
... date and time are not displayed. This camera cannot display non-DCF images recorded onto a memory card using another camera The date and time setting is off. Note that you connect via a USB hub. Always connect directly to recognize the camera if you cannot edit the following types of snapshots. • Movies • Snapshots recorded with resizing, trimming, rotation). Change the display language setting (page 113). 1)The USB cable may be shining directly into the lens. Problem Playback The color of the playback image...
... date and time are not displayed. This camera cannot display non-DCF images recorded onto a memory card using another camera The date and time setting is off. Note that you connect via a USB hub. Always connect directly to recognize the camera if you cannot edit the following types of snapshots. • Movies • Snapshots recorded with resizing, trimming, rotation). Change the display language setting (page 113). 1)The USB cable may be shining directly into the lens. Problem Playback The color of the playback image...
Owners Manual
Page 140
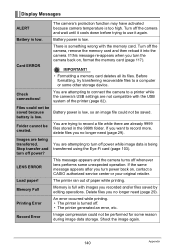
... folder. Card ERROR There is too high. Delete files you want to a printer while the camera's USB settings are being transferred using the Eye-Fi card (page 103). If you no longer need (page 29). Stop transfer and turn off the camera, remove the memory card and then reload it again. Memory Full Memory is low. IMPORTANT! • Formatting a memory card deletes all its files. Shoot the image again. 140 Appendix The printer ran out of the printer (page 82). Display Messages ALERT The camera's protection function...
... folder. Card ERROR There is too high. Delete files you want to a printer while the camera's USB settings are being transferred using the Eye-Fi card (page 103). If you no longer need (page 29). Stop transfer and turn off the camera, remove the memory card and then reload it again. Memory Full Memory is low. IMPORTANT! • Formatting a memory card deletes all its files. Shoot the image again. 140 Appendix The printer ran out of the printer (page 82). Display Messages ALERT The camera's protection function...


